
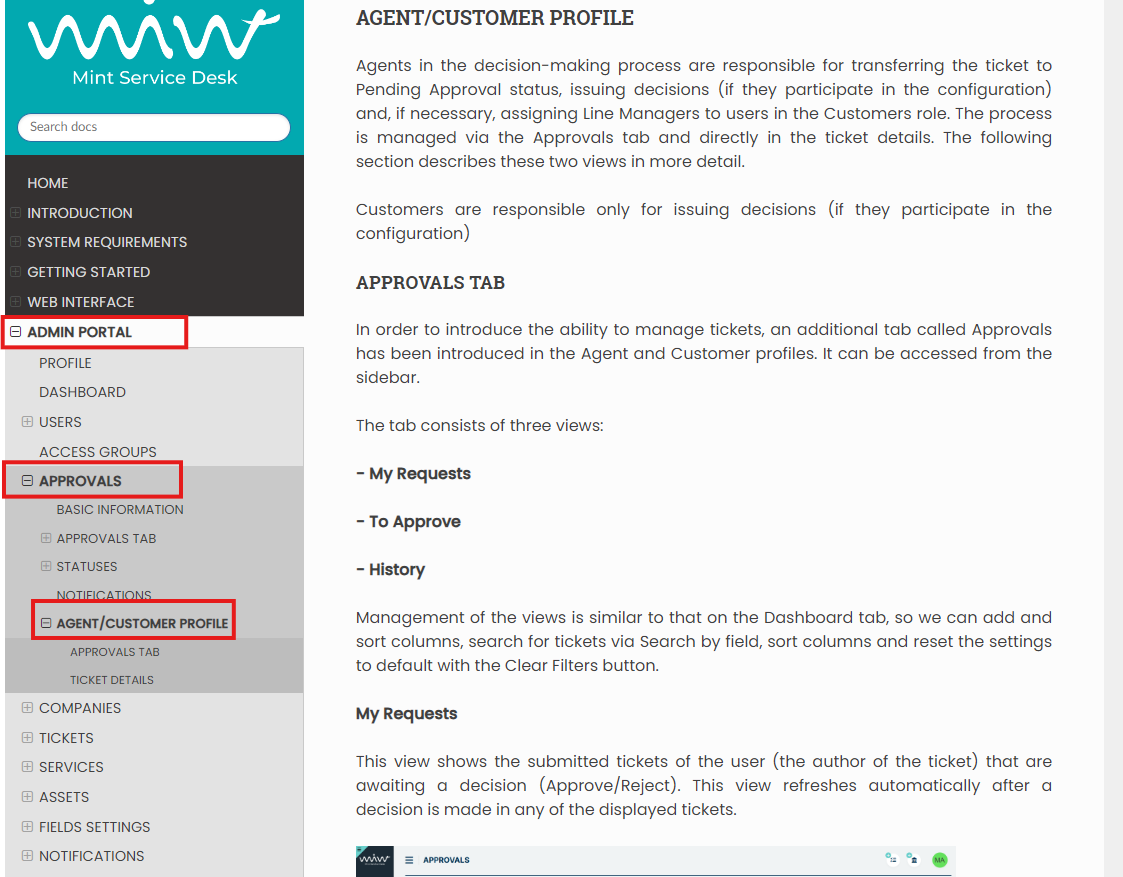
WEB INTERFACE
LOGIN PORTAL
The Mint Web Client URL leads you to the login portal, to ease the user management, all the users can log in in the same page and the system will open the proper session based on the assigned role.
Mint Service Desk works with three different user profiles:
Customer
Agent
Admin
SIGN IN
It is the main displayed screen. If you already have an account, just
type your username and your password in the corresponding fields and
click on  . If you want, you can check the option “Remember My
Login”.
. If you want, you can check the option “Remember My
Login”.
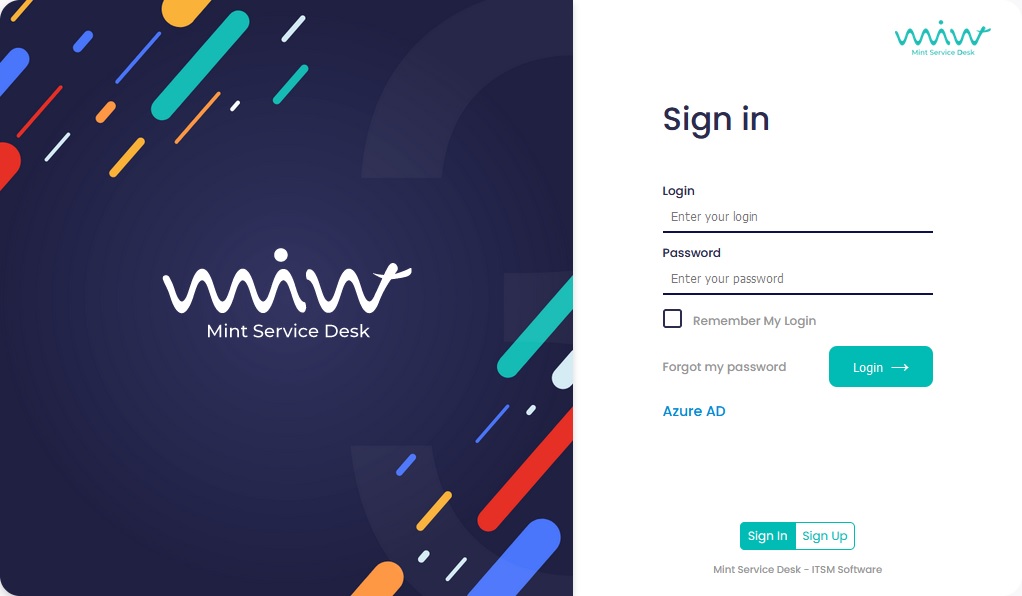
FORGOT MY PASSWORD
If you forgot your password you just need to click on the  link
that will forward you to a new screen where you need to type your email
address in order to receive a new temporary password. Don’t forget to
change it to something you will remember easily but remember that
password should also be safe and hard to crack.
link
that will forward you to a new screen where you need to type your email
address in order to receive a new temporary password. Don’t forget to
change it to something you will remember easily but remember that
password should also be safe and hard to crack.

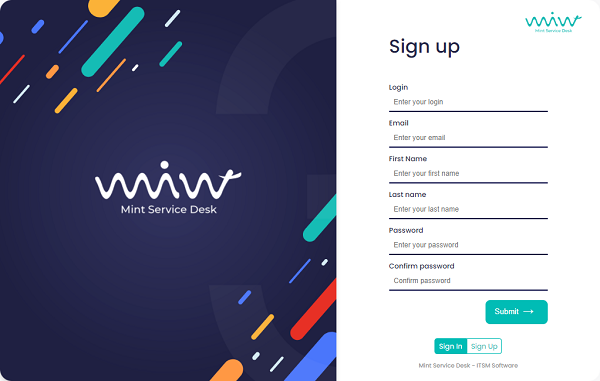
SIGN UP
If you don’t have an account, the  button (on the right upper
corner) will take you to a predefined form, where you have to type your
personal information: “LOGIN”, “EMAIL”, “FIRST NAME”, “LAST NAME” and
“PASSWORD”, in order to create your account. The MINT Service Desk
admin will receive your request, activate your account and assign you a
correct Role - so you would be able to log in.
button (on the right upper
corner) will take you to a predefined form, where you have to type your
personal information: “LOGIN”, “EMAIL”, “FIRST NAME”, “LAST NAME” and
“PASSWORD”, in order to create your account. The MINT Service Desk
admin will receive your request, activate your account and assign you a
correct Role - so you would be able to log in.
BASICS
All users have the same section to change their profile settings, after
a successful login. You will find an action bar on the top, including
the  button to hide/show the menu sidebar on the left, the new
ticket
button to hide/show the menu sidebar on the left, the new
ticket  action button (Client and Agent account) and the
profile
action button (Client and Agent account) and the
profile  . Agent user will also have one additional button available
used for creating a new asset.
. Agent user will also have one additional button available
used for creating a new asset.
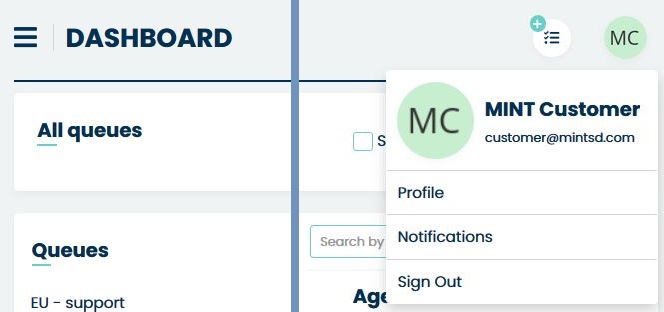
On the top right corner, you will see a picture or first letters (name,
surname) from your profile. In order to edit your profile or logout, you
need to click on the circle .
It will display a menu with three options: “Profile”, “Notifications” and “Log out”.
PROFILE
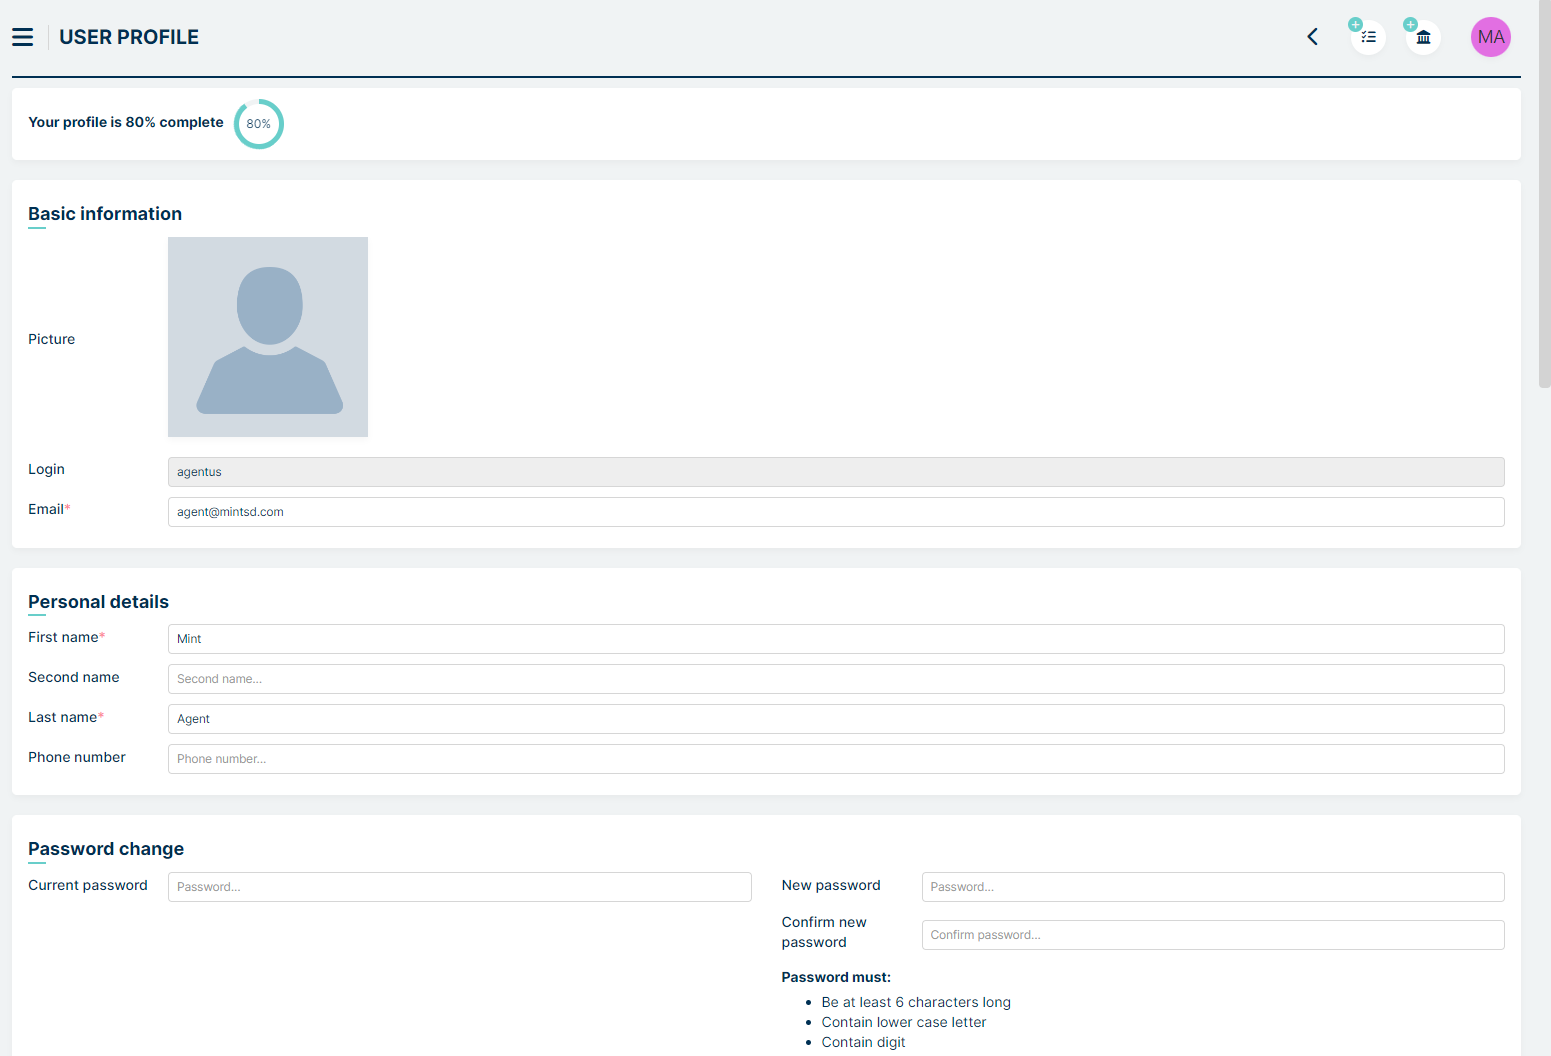
If you click on “Profile” it will lead you to the section where you can personalize various settings, such as personal information, contact details, appearance configuration, ticket view, signatures, and many other options. This functionality will be described using the agent profile as an example.
We distinguish the following sections
Basic information
This section contains:
Picture - Here we can set our own profile picture.
Login - The user’s individual login (editable only by the admin).
Email - Contact email address.
Personal details
Here you can change your personal data, like Language, Theme, First Name, Second Name, Surname.
Password change
As the name suggests, you can change the password here by entering information in the fields: Current password, New password, Repeat new password.
Moving further down, we have additional available options.
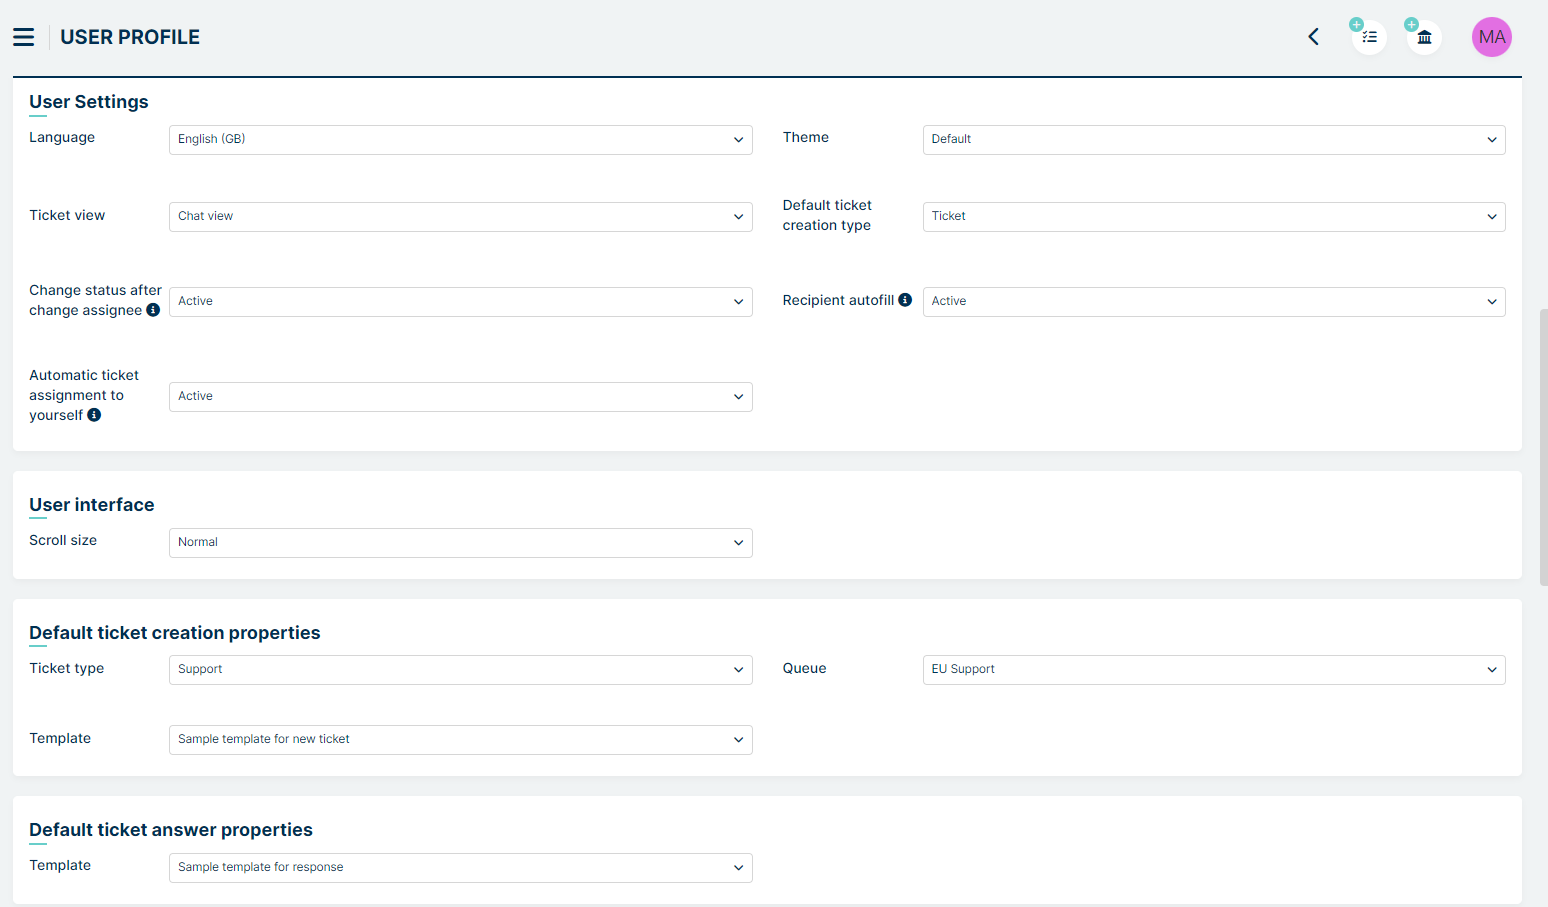
User settings
This section consists of the following settings:
Language - you can choose from several available languages
Line manager - you can set your supervisor here (agent or customer) - setting used in Approvals (see Approvals tab in Admin profile)
Theme - you can choose from: Default (light theme), Gray, Dark
Ticket view - Controls the default panel settings when viewing ticket details. You can choose Chat view or Table view
Default ticket creation type (available only for Agent) - here, you can choose the default tab that will be set when entering the screen for creating a new ticket. Available options are: Ticket, Email Ticket and Customer Portal Case displayed as a tab (functionality described in the Customer Portal section in the Admin profile). This setting can be enabled or disabled in Admin profile in Settings > General > Tickets
Change status after assignee (available only for Agent) - Assigning an agent to a ticket with the “Open” status results in an automatic status change. This setting applies to the profile from which the assignment action is performed
Recipient autofill (available only for Agent) - If enabled, when replying to a ticket via email, the system automatically fills in the sender’s email address
Automatic ticket assignment to yourself (available only for Agent) - When enabled, any ticket created by an agent is automatically assigned to that agent. However, if the queue assigned to the ticket has a default agent with the “Assign when creating the ticket” option enabled, the default agent takes precedence
User interface
Here, at this moment, the available setting is Scroll size where you can manage the width of the sliders in Mint. You can choose between the standard size (Normal) and the reduced size (Small).
Default ticket creation properties (available for Agent and Customer)
This setting can be enabled or disabled in Admin profile in Settings > General > Tickets. Here you can customize the ticket creation panel according to your needs.
Ticket type - Choose from a dropdown list; the selected type will be set by default when creating a ticket.
Queue - Similar to the above, this applies to the Queue field.
Template - Here we set the template that will appear in the first lines of the Description field in the ticket creation view.
Default ticket answer properties (available for Agent and Customer)
This setting can be enabled or disabled in Admin profile in Settings > General > Tickets. This section pertains to the ticket details panel and currently contains Template setting - here you set the template that will appear in the first lines of the Description field after clicking on it in Ticket Details
Custom fields
Above the section Signature settings field you will find section with additional information that can be created and managed in Admin > Agents > User fields – it will be explained later in this guide. By default there is nothing here, but once the Admin creates some fields, you (and all of the users) will see them here. They might look like the one in the following screen (‘Contact’, ‘Location’, ‘Additional info’ parts):

Next you have:
Signature settings (available for Agent and Customer)
In this section, you can flexibly configure our signature. By clicking the Pick custom signature button, you can use pre-configured templates set by the Admin in the Tickets > Signatures section. Any content, even that selected from a template, can be freely modified using the Edit signature button. In the signature content, you can use so-called snippets, which are references to values in the system, such as the ticket number, ticket creation date, or even values from the user’s custom fields. Snippets are available under the scissors icon below the field containing signature content.
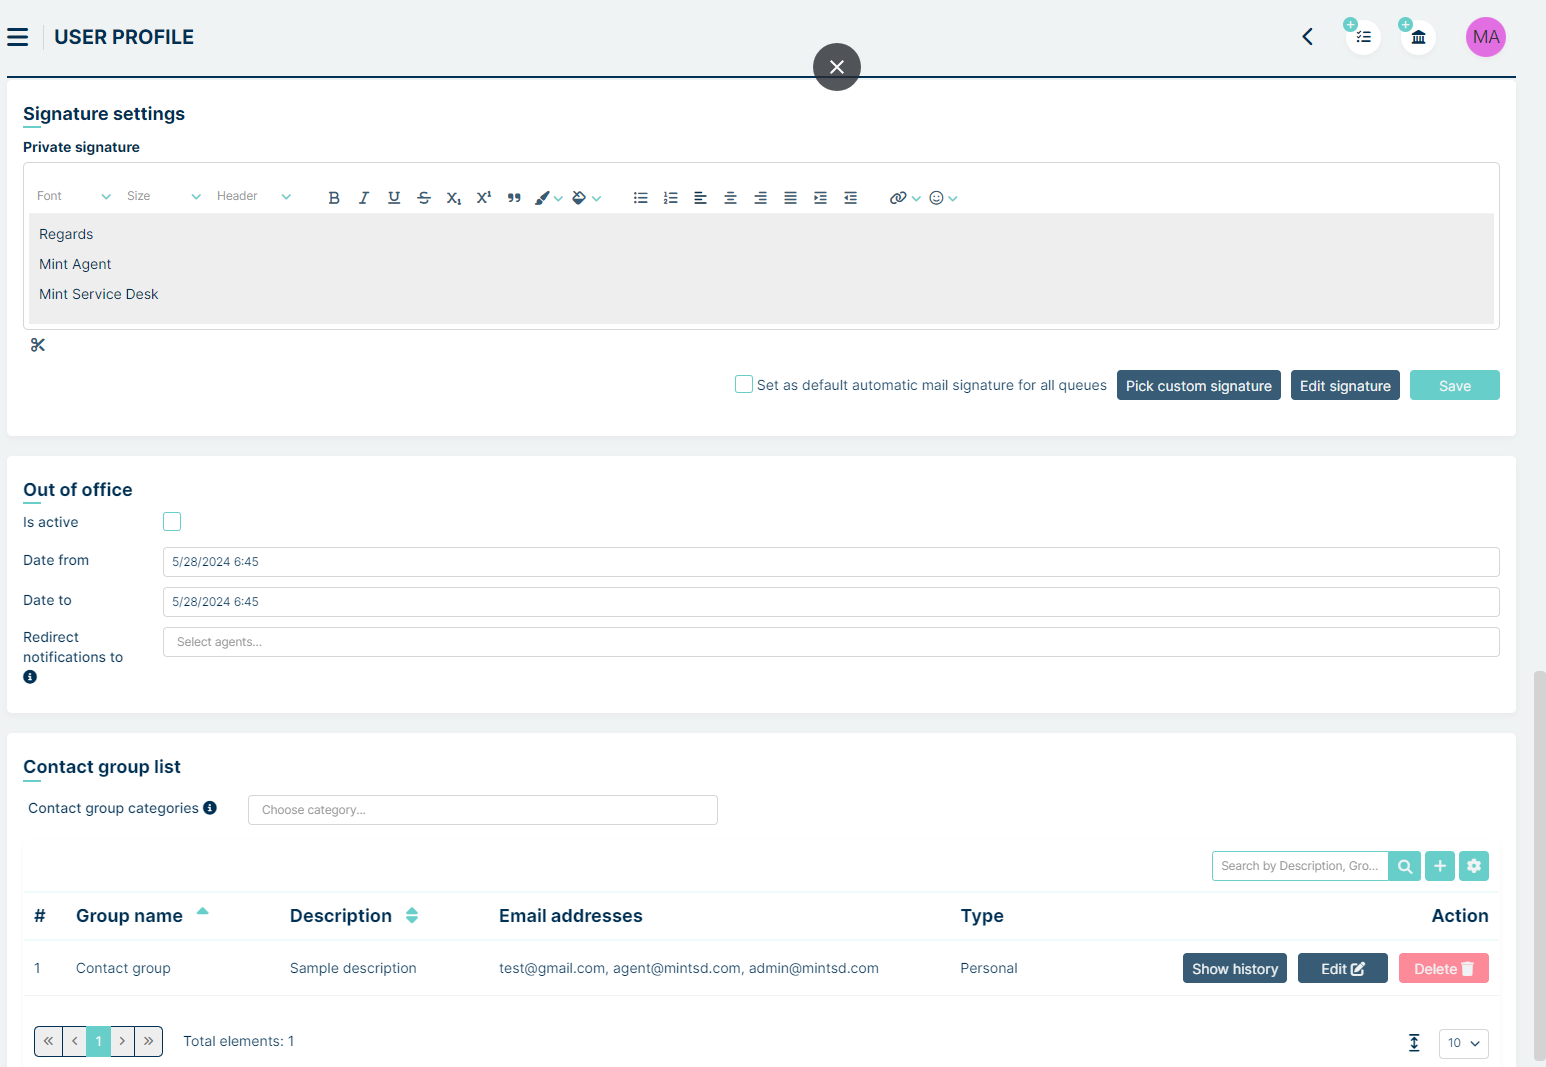
Out of office (available for Agent and Customer)
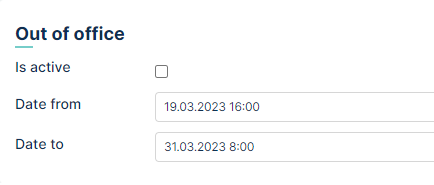
When you want to mark a period in which you will be unavailable, you can do so in the ‘Out of office’ section. All you need to do is to choose the start and end date of your absence and check the checkbox with the activation of this period.
If you would like to redirect notifications from tickets that you are assigned to another agent or agents during your absence, you can use the “Redirect notifications to” field. Clicking on this field will display a list of available agents.
NOTE: Redirect works only with ‘tickets.assignee’ option set in ‘Receivers’ section in notification configuration (see Admin portal -> Notifications).

After selecting specific individuals and checking the “Is active” option, notifications from the tickets you are assigned to will be sent to the chosen agents. Remember that notifications will be redirected even if the selected target agent does not have permission for the ticket. In such a case, the agent will receive a message that they do not have permission for the ticket when they click on the notification.

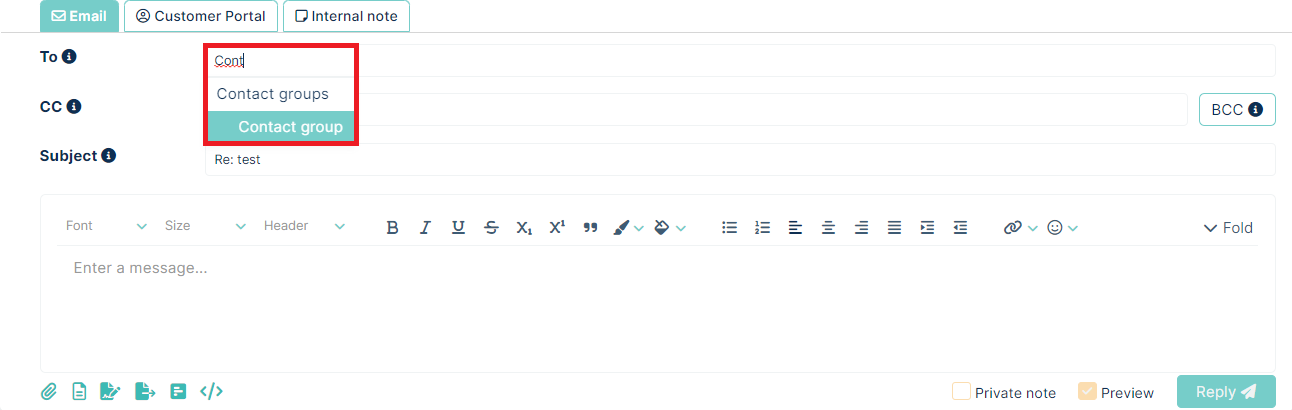
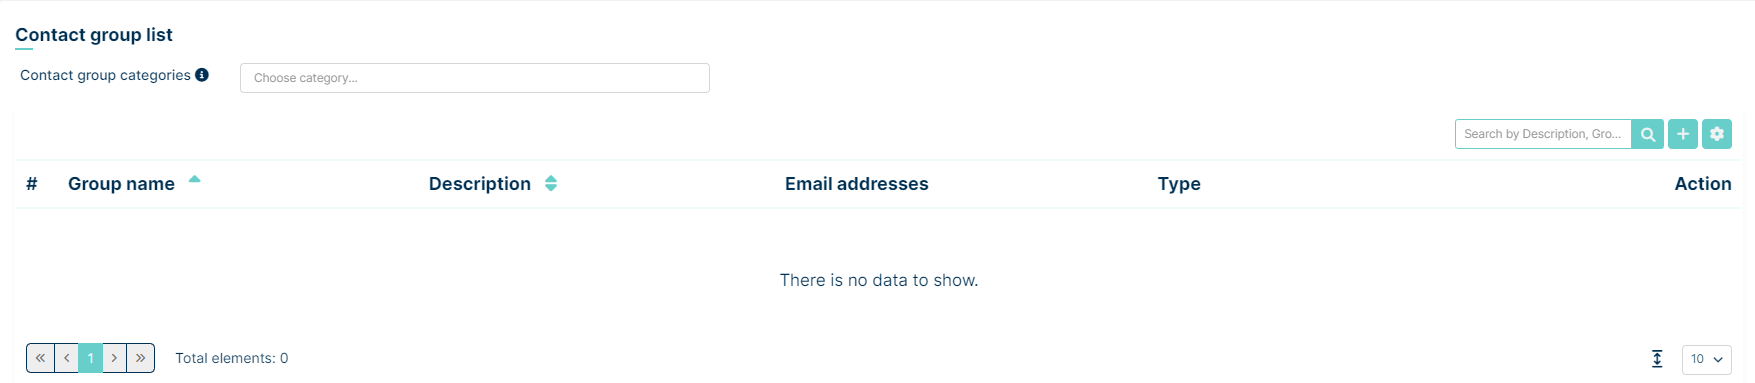
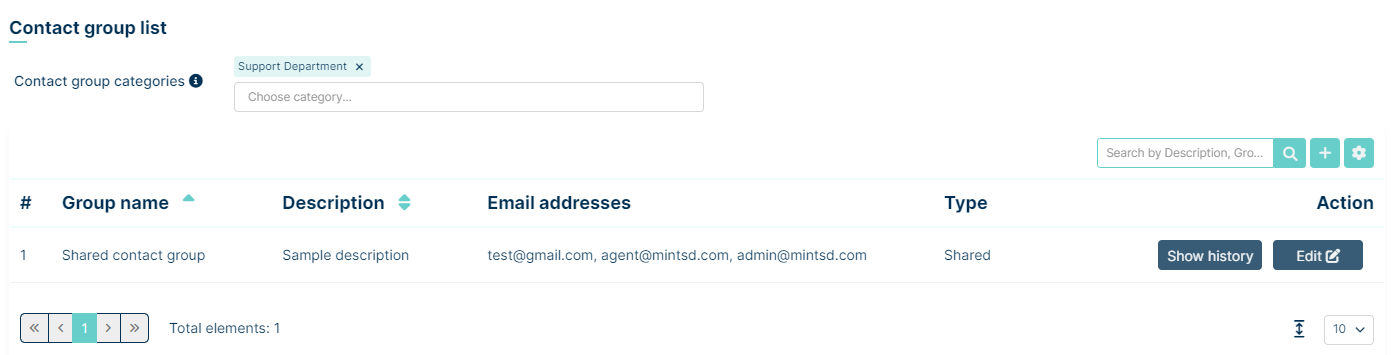
Contact group list
In the ‘Contact group list’ section, you can create contact groups to use them in email section in ticket. The contact groups you create can be visible only to you or they can be shared with other agents.
Note: The contact group option is only available to agents.
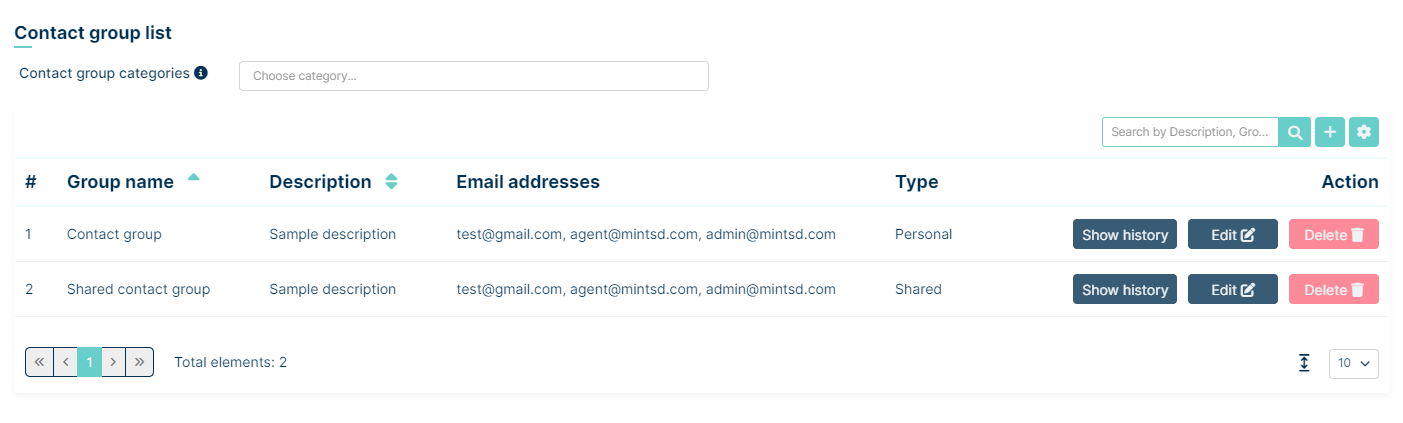
Below you have example view of Contact group list:
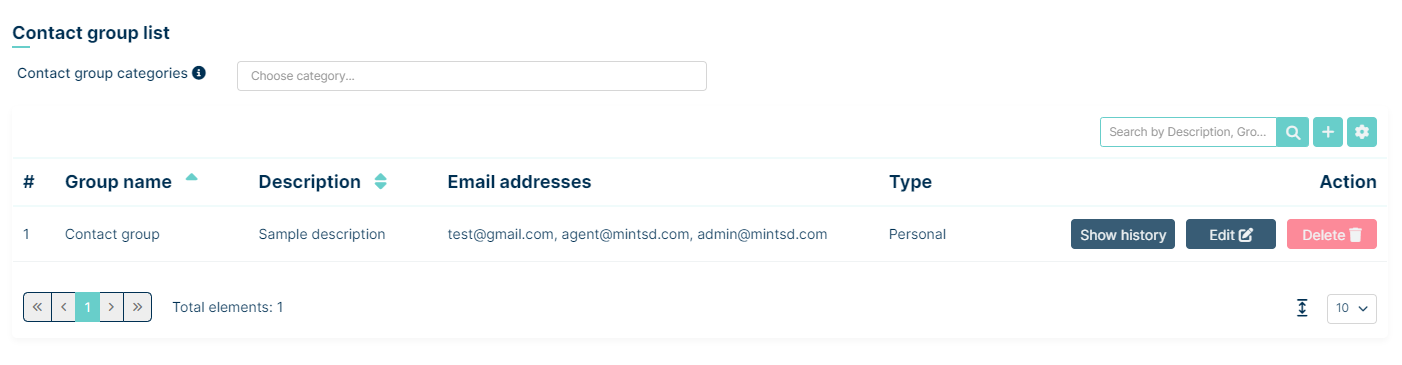
At the top left there is Contact group categories field

Selecting specific categories will cause related contact groups created by other agents to appear (go to ‘Admin’ => ‘Tickets’ => ‘Contact Group Categories’ to see how to create categories.)
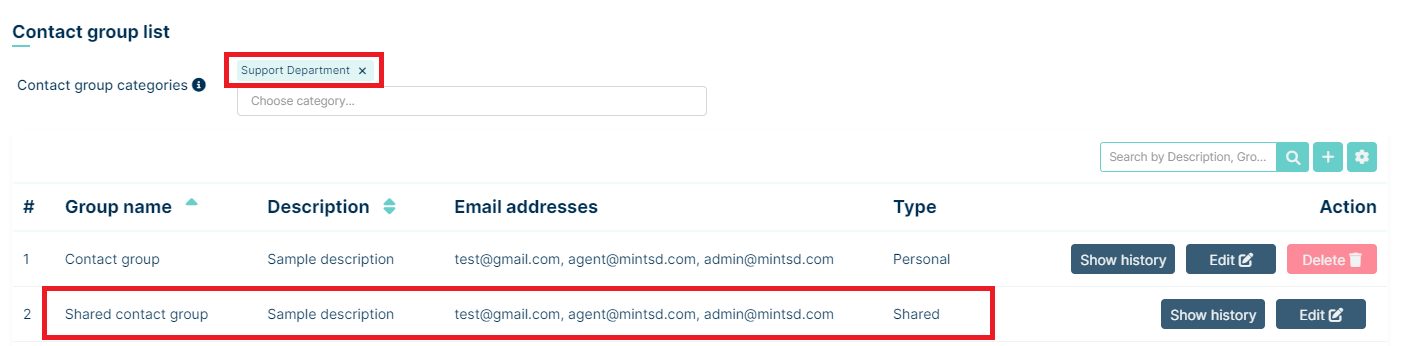
In the right part there is a panel with Search by field, Add new group button and Set column properties button where we can configure column visibility and search field.

The main part of this section is a table with a list of contact groups.

Here we have columns like Group name, Description, Email adresses in each contact group. There is also Type column where we can see which group is personal (visible only by us) or shared (visible by all agents). Last column is named Action – here we can see History of each group, we can Edit them and also Delete. Remember that you can only delete the groups you have created - you cannot delete a group created by another agent.
To start configuring groups, press the  button. When it is pressed, the configuration modal will be displayed.
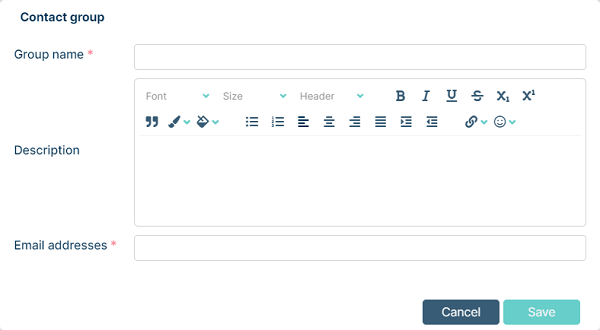
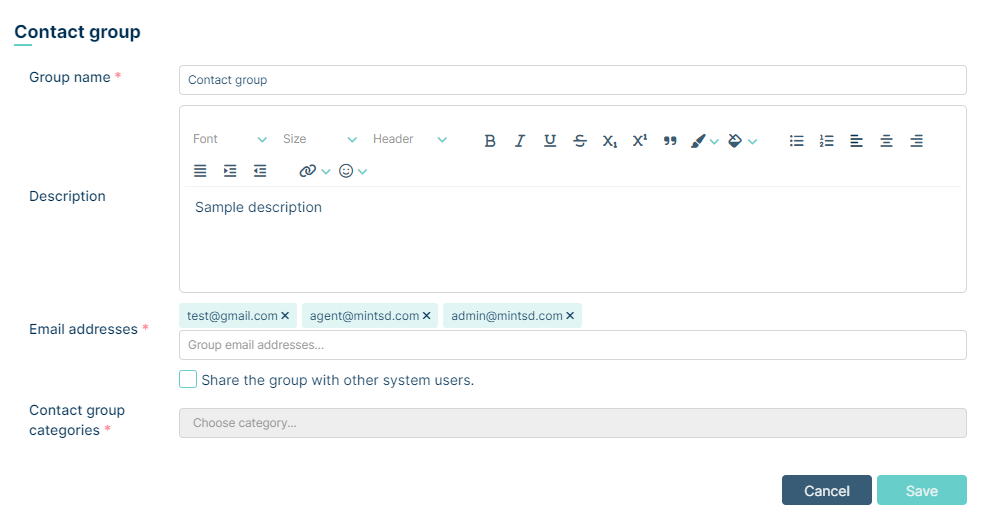
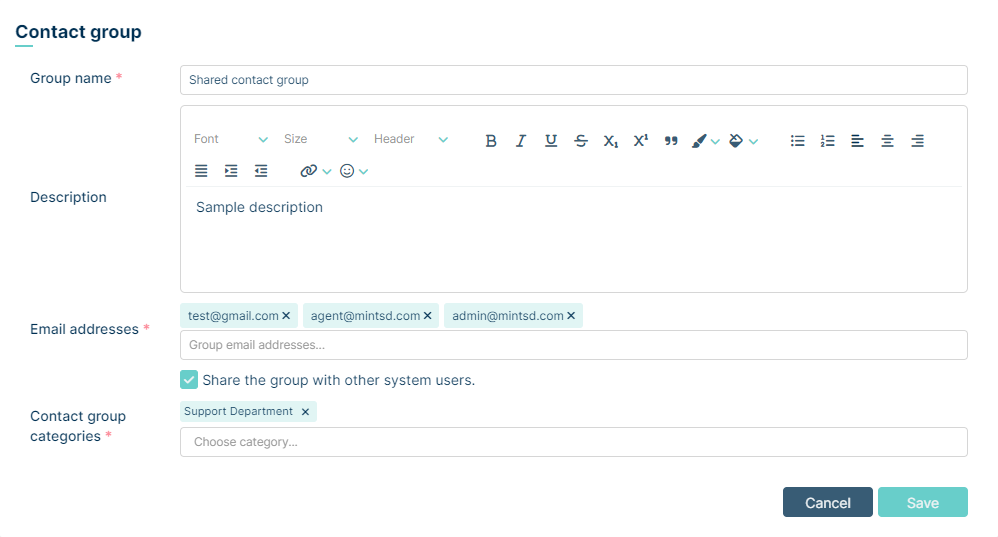
In the Group name field, you give the name that this group will have.
In the Description field, you set the description for this group.
In the Email addresses field, you enter the email accounts that will be part of this contact group.
In the Share the group with other system users checkbox, you choose if your new group should be visible for all agents (checked) or only for you (unchecked).
In the Contact group categories, if you previously checked „Share” checkbox above, you can choose which category from the list your new group will be assigned to. You can assing your group to one or more categories. Categories must be predefined by the Admin in the Tickets > Contact group categories section
Lets try to add sample personal contact group. Fill fields like on screen below and press Save button.
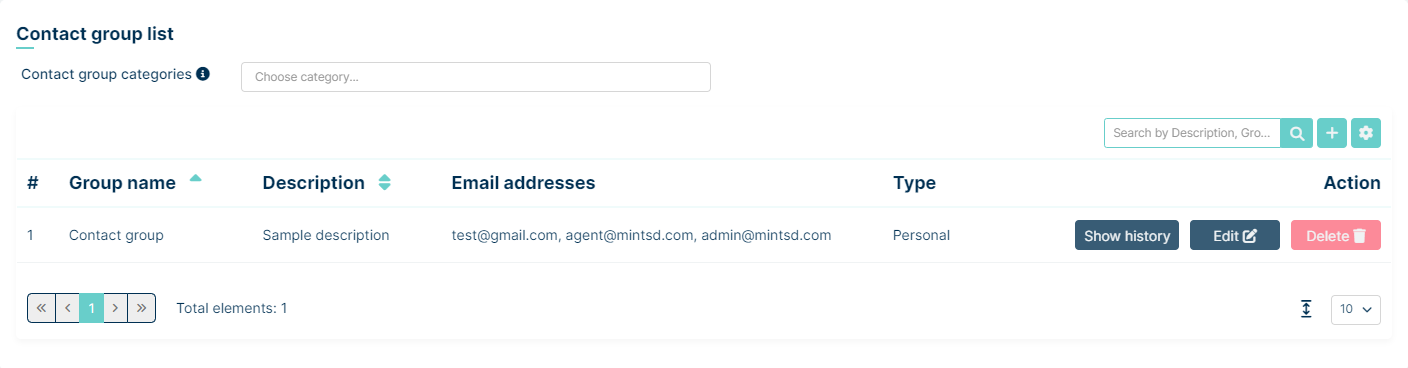
Your new group will appear on the list.
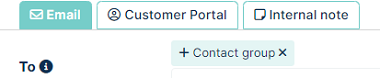
Now going to the email section, you can select the contact group.
When you add a contact group, it is displayed in the TO field.
By clicking the x button, the group will be removed from the TO field. By clicking the + button instead of displaying the group, each single email will be added separately.
The effect of clicking +:

Now lets try create Shared contact group. Fill all fields like on screen below and press Save button
Your new group will appear on the list.
Your new shared group can be visible to all agents. Below is the view of another agent’s contact group section:
In anoher agent would like to use our created shared contact group, he needs to choose category from the list that our group is assigned to:

After that, our group will appear and will also be visible in the email section of the tickets
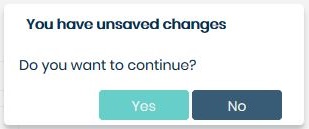
Always remember that after making any changes in your profile you have to click
one the  button to store your changes. If you forget to do it, the
moment you try to leave this part of the system you will see the following
message.
button to store your changes. If you forget to do it, the
moment you try to leave this part of the system you will see the following
message.
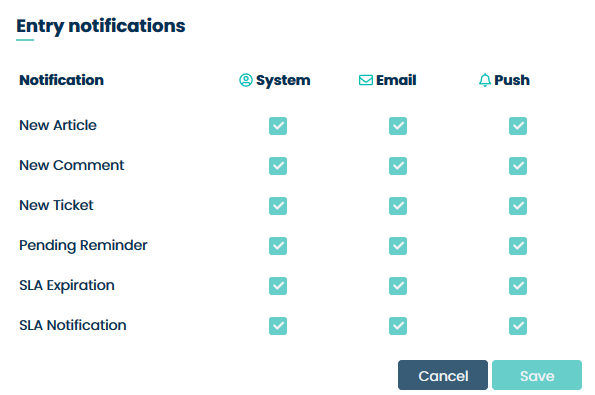
NOTIFICATIONS
Below ‘Profile’ button you will find another position: ‘Notifications’. Right here you the notifications which were allowed for you to receive (admin user can change that). If you don’t want to receive any of them simply unmark the correct position.
SIGN OUT
If you want to log out and close your session on MINT Service Desk, just click on “Sign out” and the system will close your session and lead you to the main login screen.

CLIENT PORTAL
The client portal is a user-friendly interface where clients can see their tickets, create new tickets, and check the list of available assets.
CUSTOMER PORTAL
The Customer Portal is a module that enables customers to efficiently create requests using templates predefined by the Administrator. The module’s visibility is determined by the settings in the Administrator’s profile.
The module consists of:
Cases: These are templates created by the Administrator.
Containers: Here, you can assign and group the cases mentioned above.
Customers have the ability to create tickets through the Customer Portal, even if they don’t have permissions for queues or ticket types.
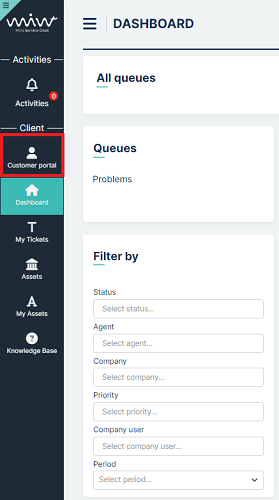
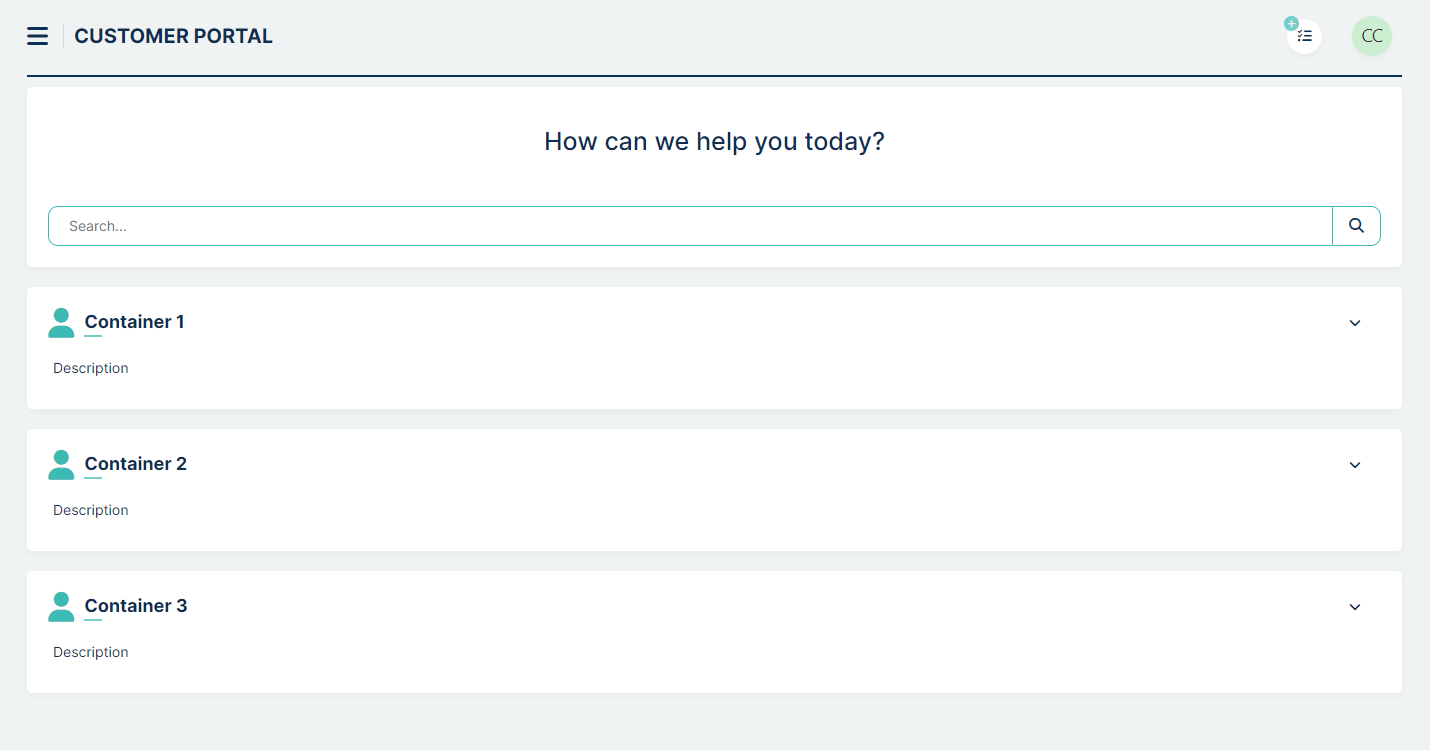
To begin using the module, simply click on the Customer Portal button located in the left sidebar.
In the Admin profile we can set the Customer Portal to appear by default as the first screen after Customer logs in
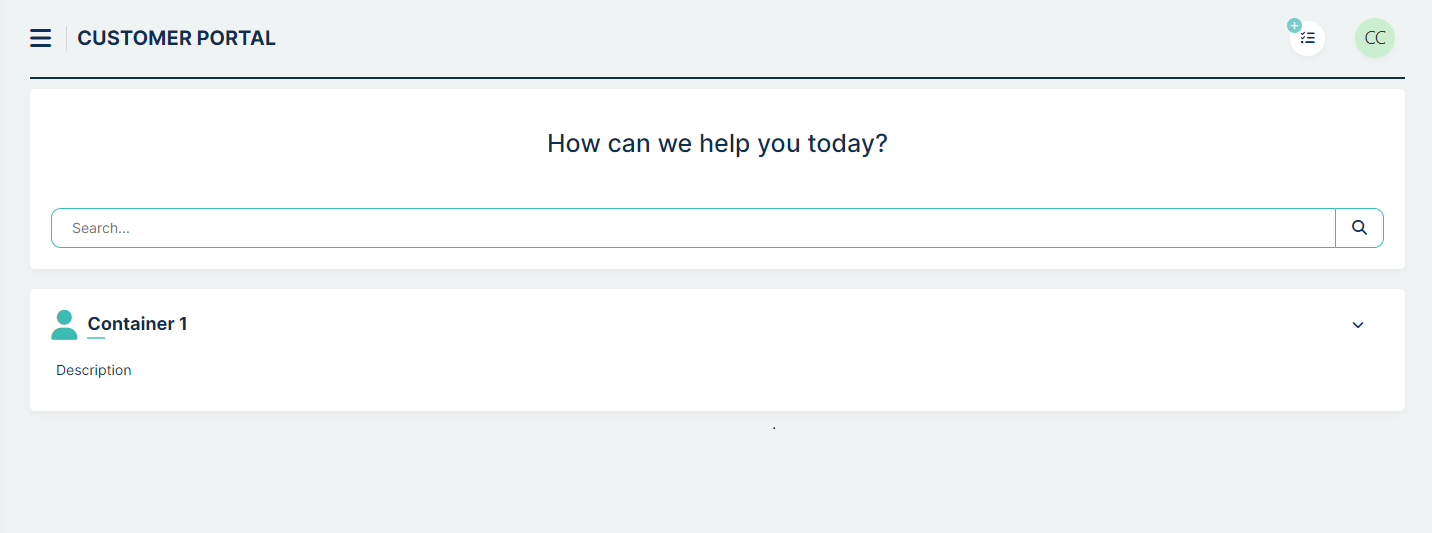
At the top, you’ll find a ‘Search’ field that allows you to quickly locate any case. You can search by:
Container name
Container description
Case name
Case short and long descriptions
Below the search field, you’ll find the container view. Each container includes a name, a short description, and an image or icon assigned by the Administrator. On the right side of the container, there is a button that expands the list of issues.

Clicking on this button reveals the case name, a brief case description, and the associated picture or photo assigned to the case
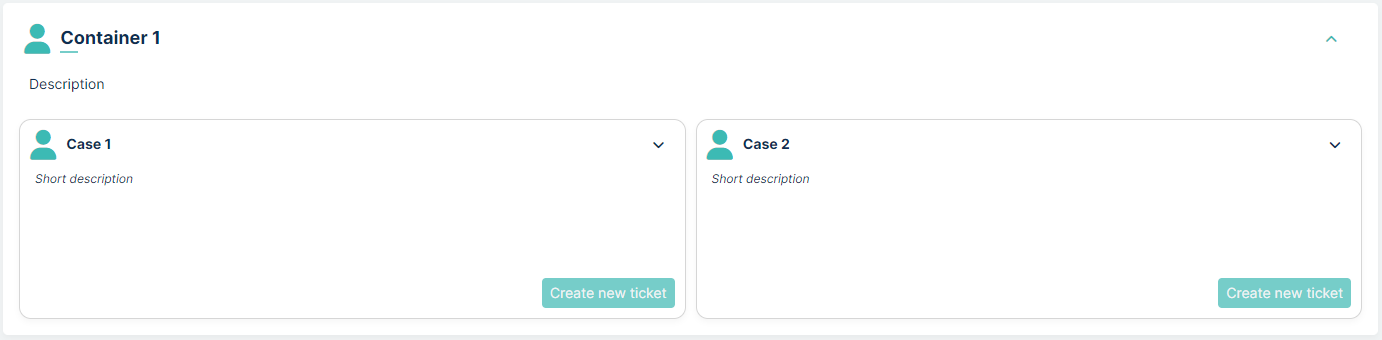
At the bottom right of the case, you’ll find the  button and the expand list button. Clicking the
expand list button reveals the long case description text.
button and the expand list button. Clicking the
expand list button reveals the long case description text.
In the Customer Portal module, you can easily add a variety of containers and cases. An illustrative view of the containers list is provided below:
and with expanded containers:
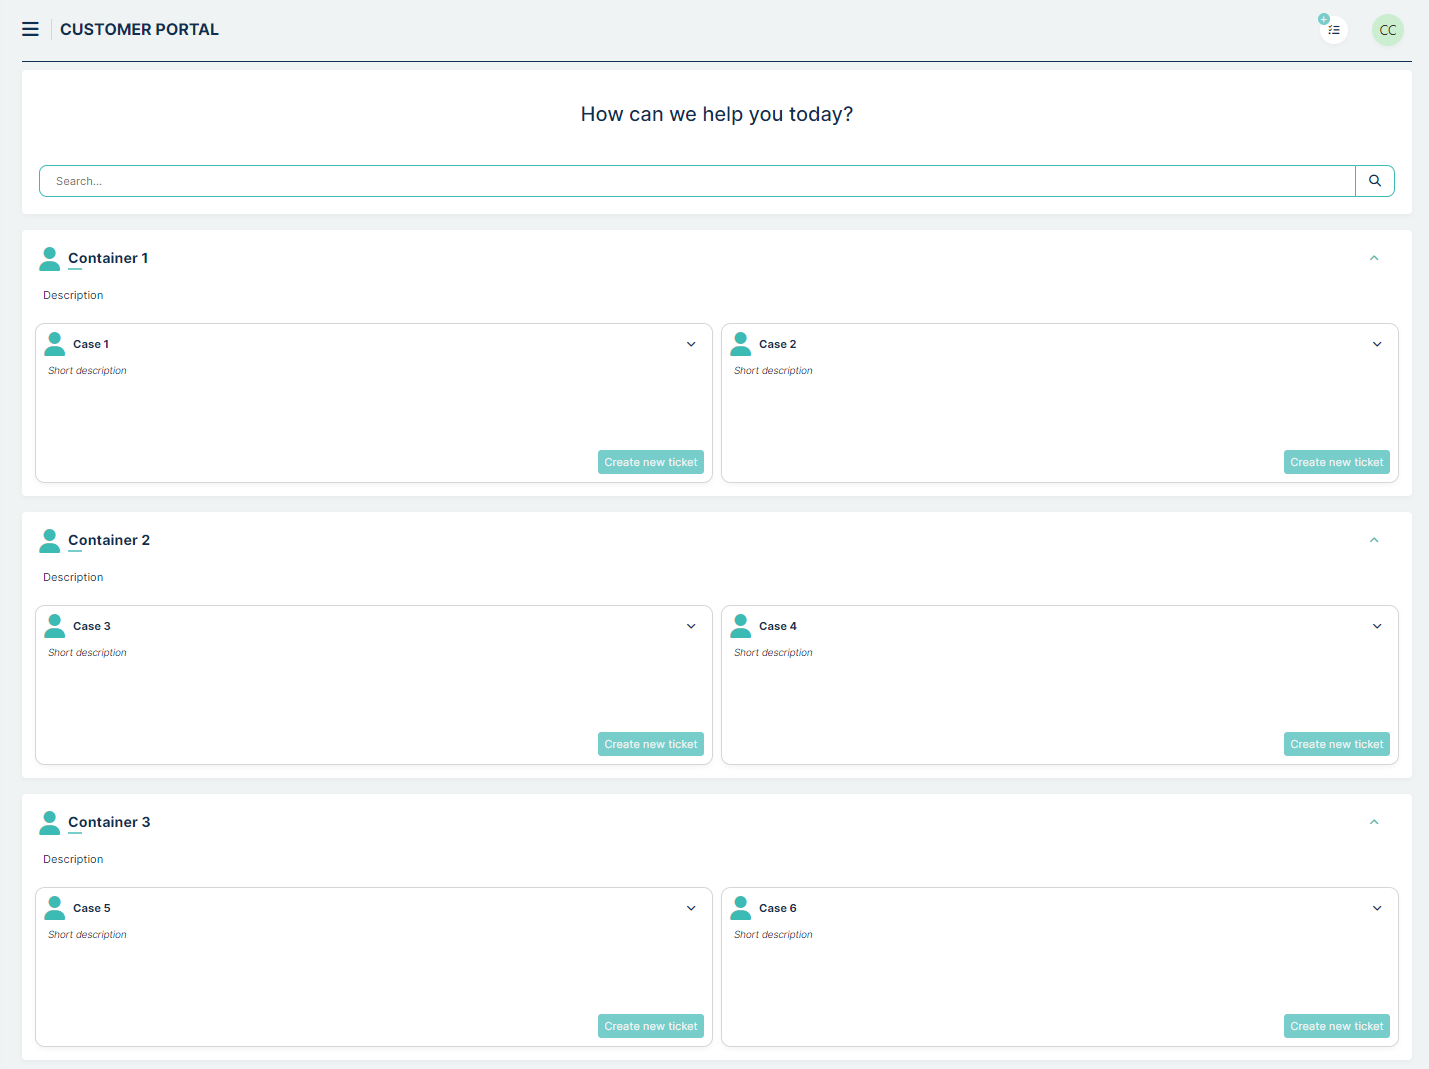
In the Admin profile, we have the option to set the default collapse or expand view for each container and case.
Now, creating a ticket is straightforward. Simply select a case and click on . A new window will appear.
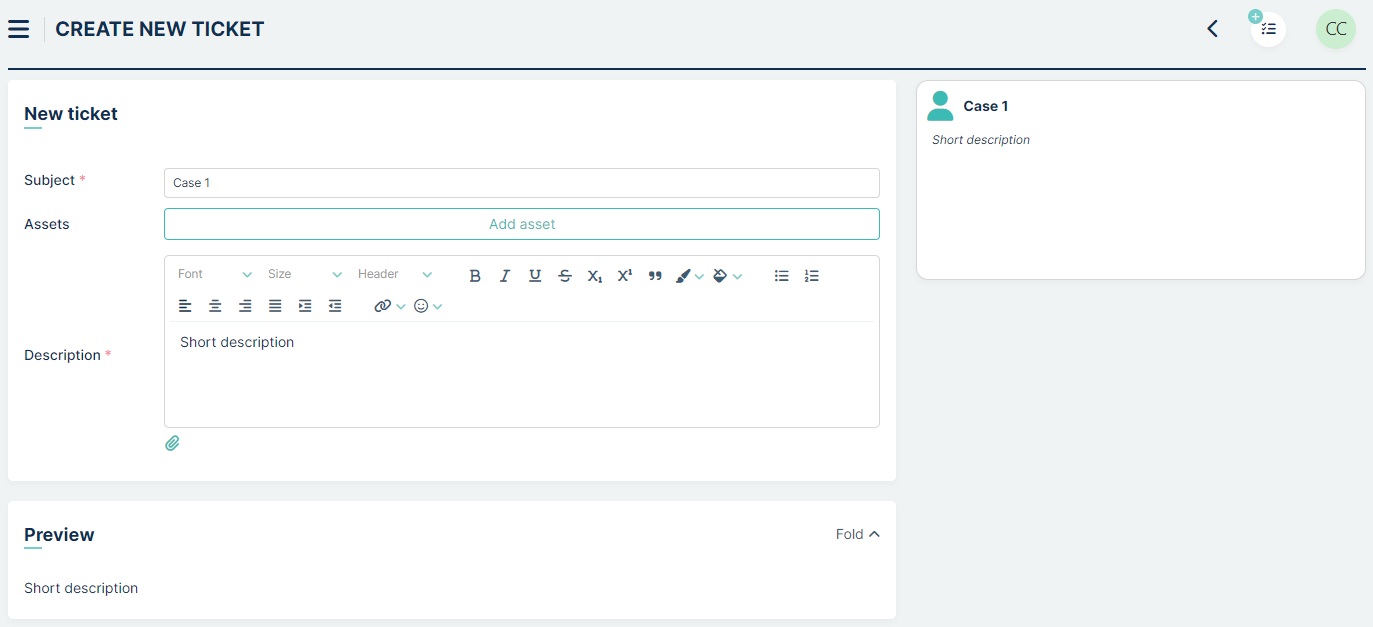
The “Subject” field is automatically filled with the case name, and the description contains a brief description of the case. Both of these fields are editable. Additionally, you have the option to add attachments and assets.
In the top right corner, there is a tile displaying a preview of our case template.
The process of creating a ticket is concluded by clicking the  button in the lower right corner. After
clicking this button, you have two options:
button in the lower right corner. After
clicking this button, you have two options:
– You can view the details of your ticket if you have the necessary permissions set by the Administrator for the ticket type and queue.
– you can see the info that our case will be proceeded by agents

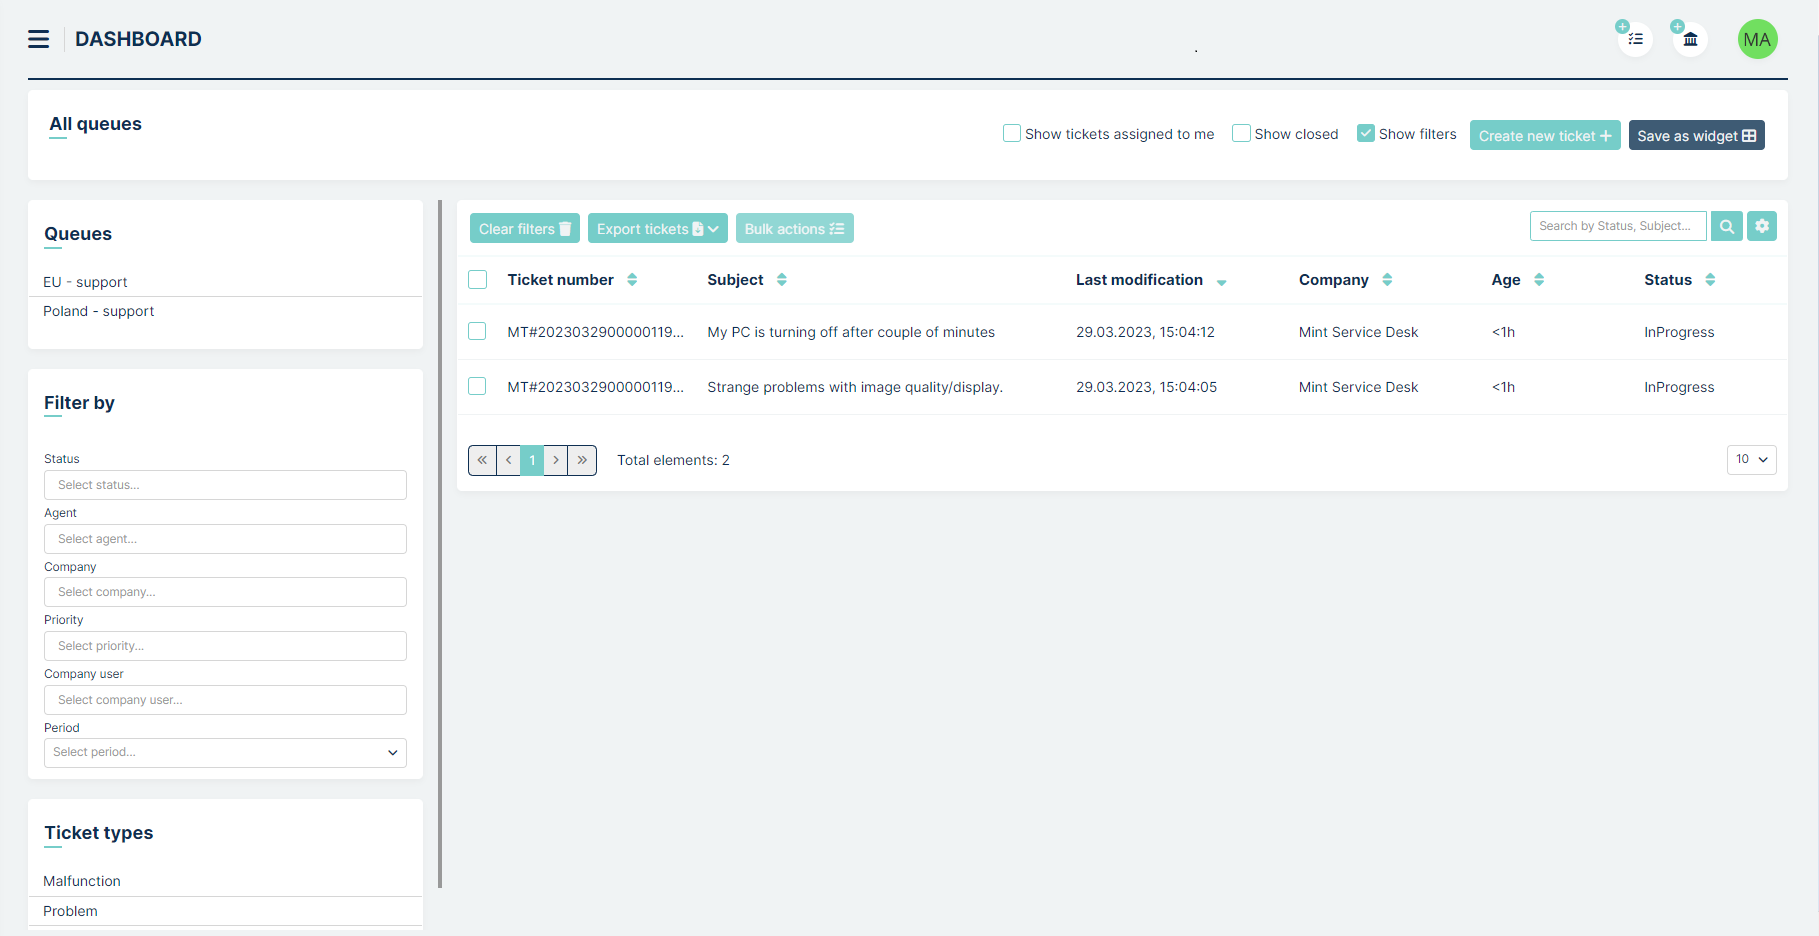
DASHBOARD
The first view after login is called “Dashboard”. It displays the tickets that the client is able to see, those can be “My tickets” or tickets from the same company created by another colleague.
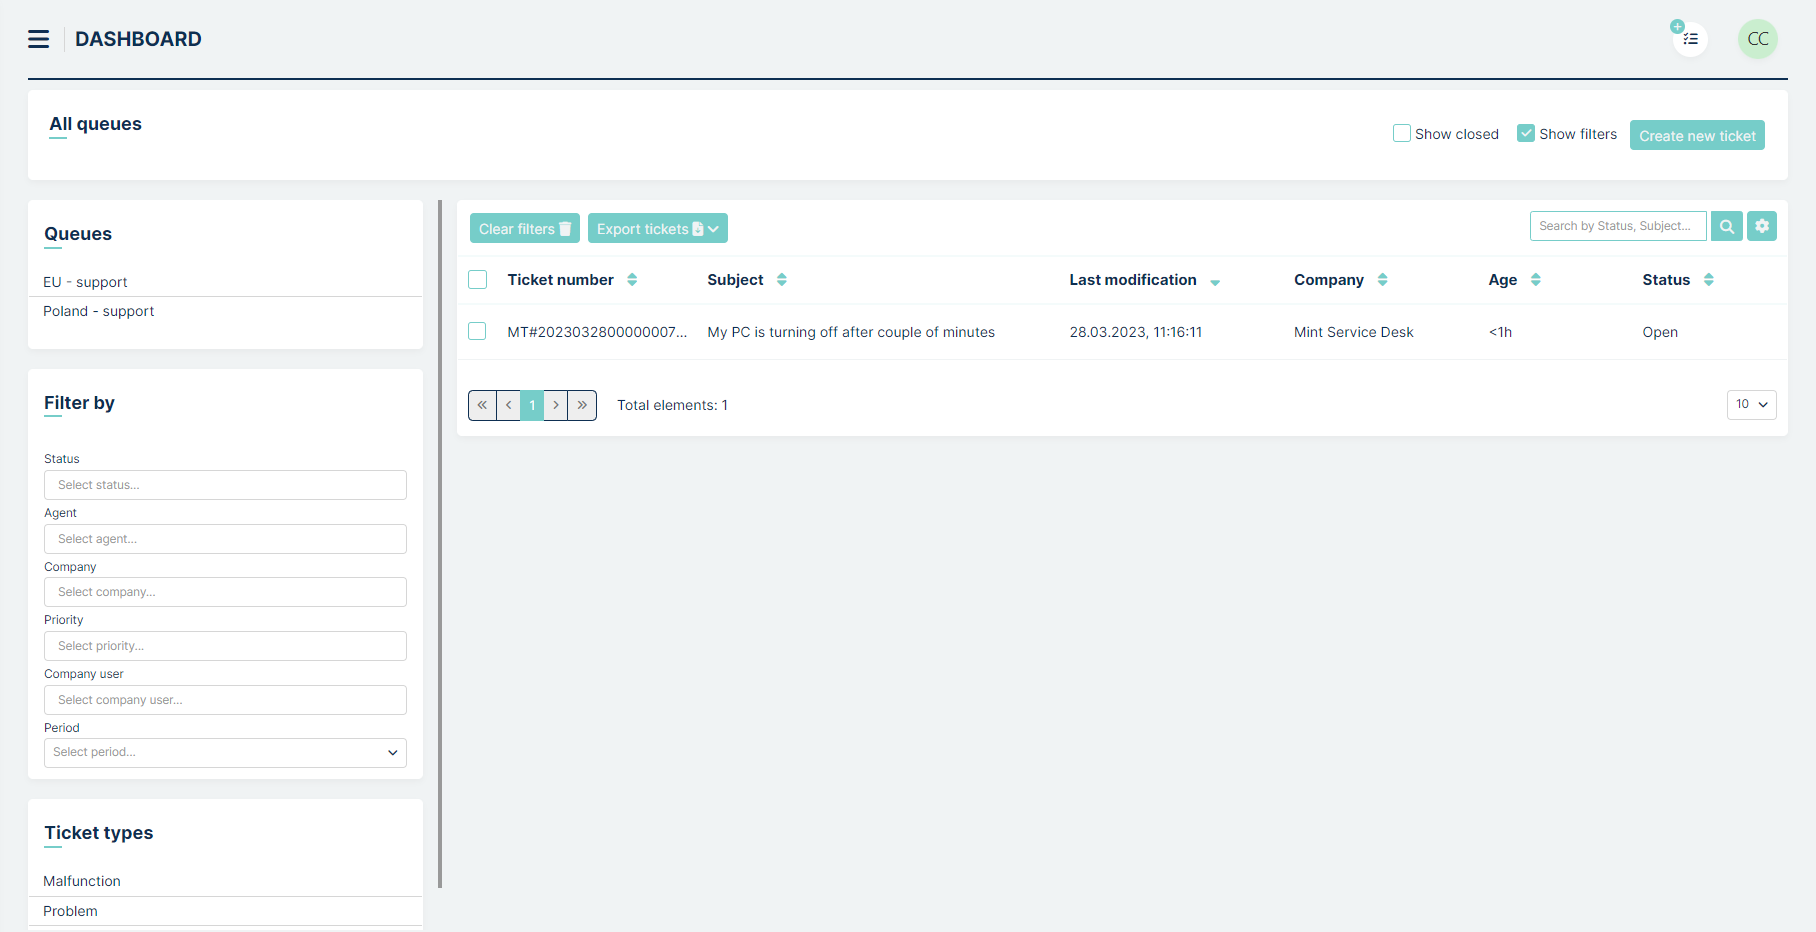
You can filter the tickets listed by ‘Queues’, ‘Ticket type’, ‘Status’
and ‘Period’, or choose to sort tickets by different attributes like
“Ticket Number”, “Subject”, “Creation date” and more. To do so just
click on the column name. You will notice that each time you do that a
small icon next to the column’s name will change:
 ->
->
 ->
->

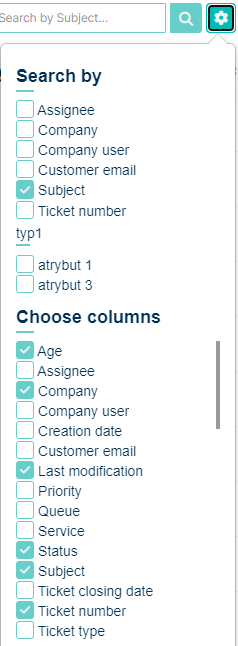
The attribute columns you see can be added or removed in the section
“Set column properties” on the right side by clicking on the  button. Once you do that you will see a small window, where you can
select the desired information you want to see on the tickets list.
Making any changes in ‘Set column properties’ is automatically saved, so
you won’t lose anything once you go to any other part of the system.
button. Once you do that you will see a small window, where you can
select the desired information you want to see on the tickets list.
Making any changes in ‘Set column properties’ is automatically saved, so
you won’t lose anything once you go to any other part of the system.
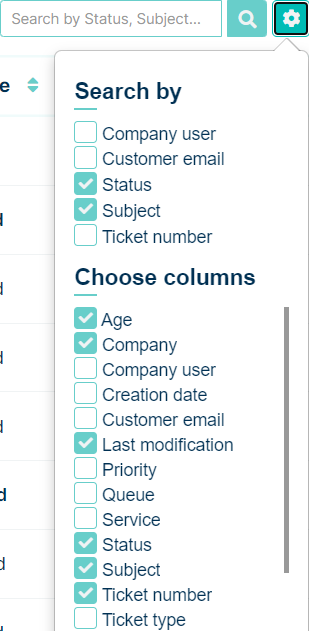
Also, you can look for specific tickets using the section “Search” field. Whatever you type here will be searched for, depending on the things you marked in the ‘Search by’ section of the ‘Set column properties’ window.

In the upper part, above the tickets list, you will see a  button, which will allow you to reset the view and remove all of the
active filters.
button, which will allow you to reset the view and remove all of the
active filters.

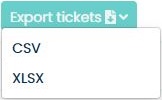
If you want, you can export the list of your tickets and save in one of
two file formats: .CVS or .XLSX. To do that, just click on the  button and select one of the 2 available file formats.
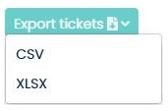
Now, in the new window click ‘Save’ to save the file in your browser’s default download catalog.
Once you open the file it will contain tickets information such as: ‘Ticket number’, ‘Id’, Subject’, Creation date’, ‘Last modification’, ‘Company’, ‘Status’, Customer’, ‘Queue’, and ‘Assignee’.
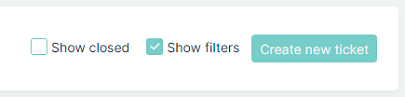
If you like to see or hide tickets that have already been solved and
closed, you can always mark/unmark the option  . The same
situation is for filters located on the left - you can always hide
and unhide them by
. The same
situation is for filters located on the left - you can always hide
and unhide them by  button. Both of these checkboxes are
located on the right side of the Dashboard screen.
button. Both of these checkboxes are
located on the right side of the Dashboard screen.
When you have plenty of Tickets on the list, you will have to use some additional navigation options, located below the list of Tickets, for moving between pages or for changing the number of Tickets that can be displayed on one page.

On the left side, you have the navigation buttons, while on the right side you can change the number of tickets per page (5/10/15/20/25/50 or even 100, by default you will have 10 Tickets per page). Those options are available in many places in Mint Service Desk.
One more important thing is that you can click on any attribute of the listed tickets on your dashboard and that will take you to the “Ticket Details” of the selected ticket.
Last, but not least, if you ever see the following message, while trying to access any Ticket or Asset, it means that the Admin user has changes your access rights and you need to contact him and ask for help.

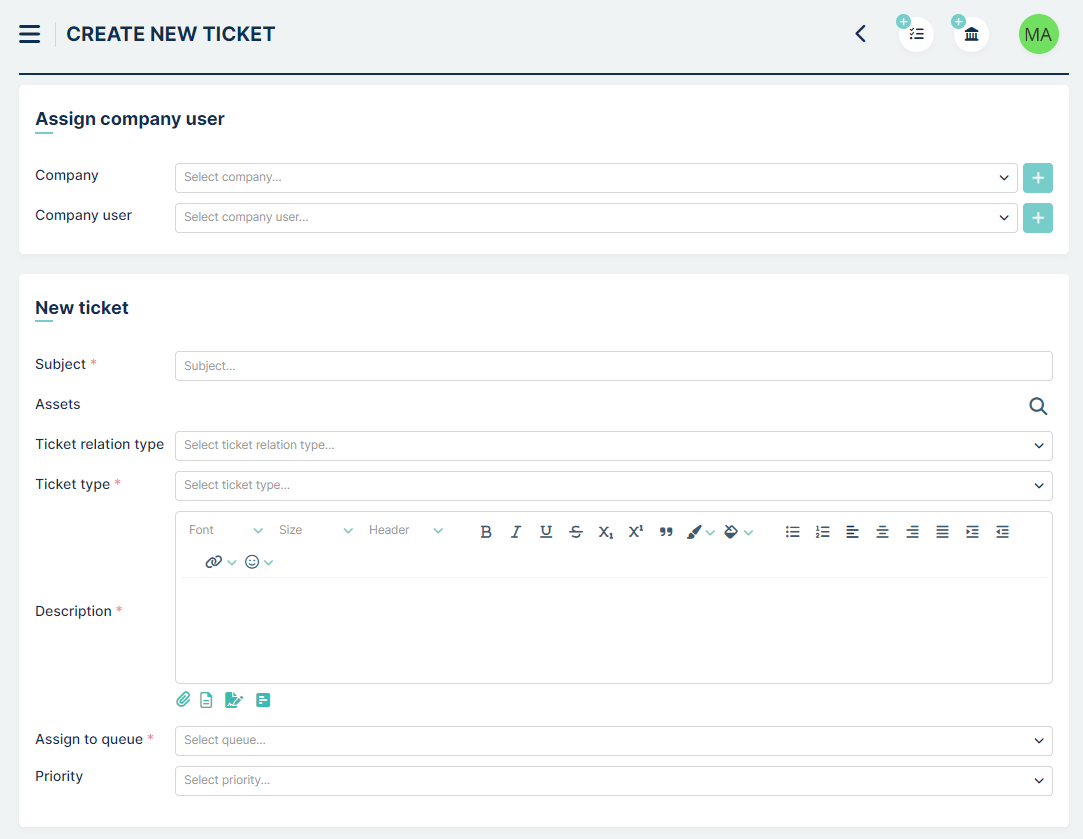
NEW TICKET
On the top right side of the Dashboard screen, you will find two
shortcut icons: and .
Click on one of them and the new ‘Create new ticket” screen will be displayed.
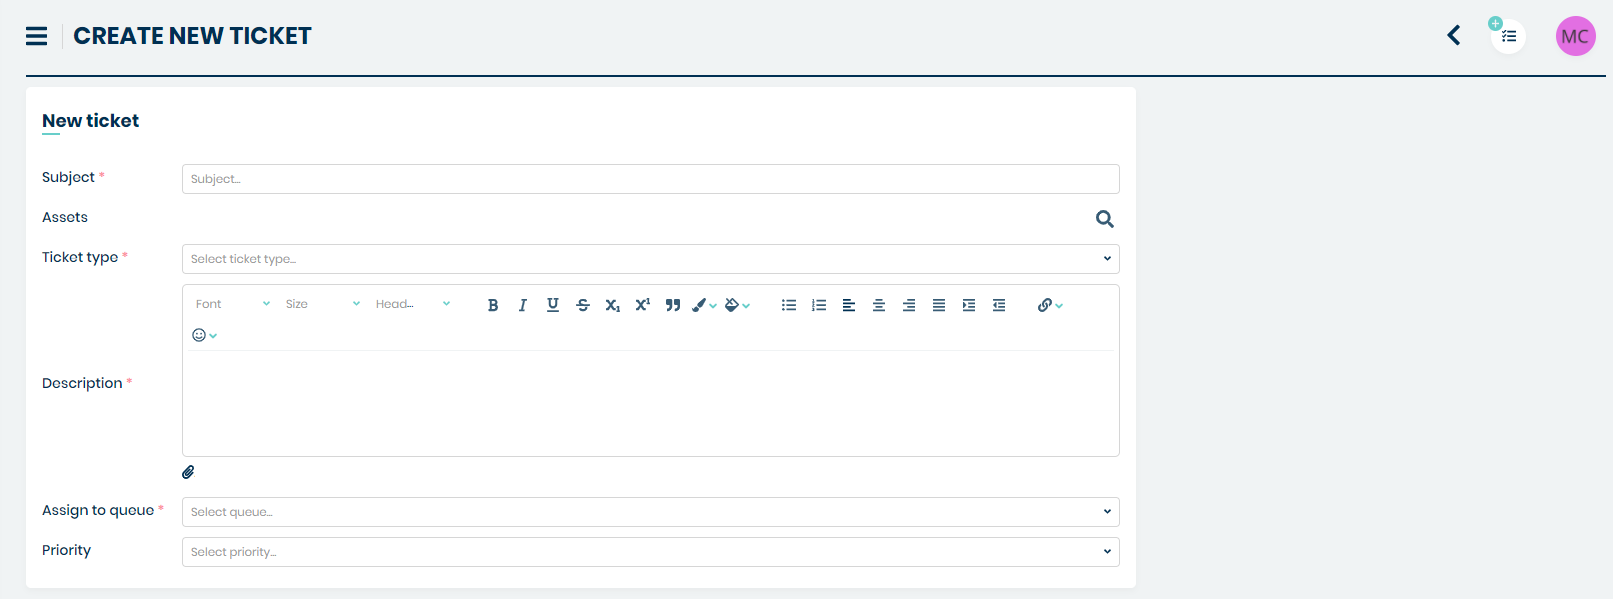
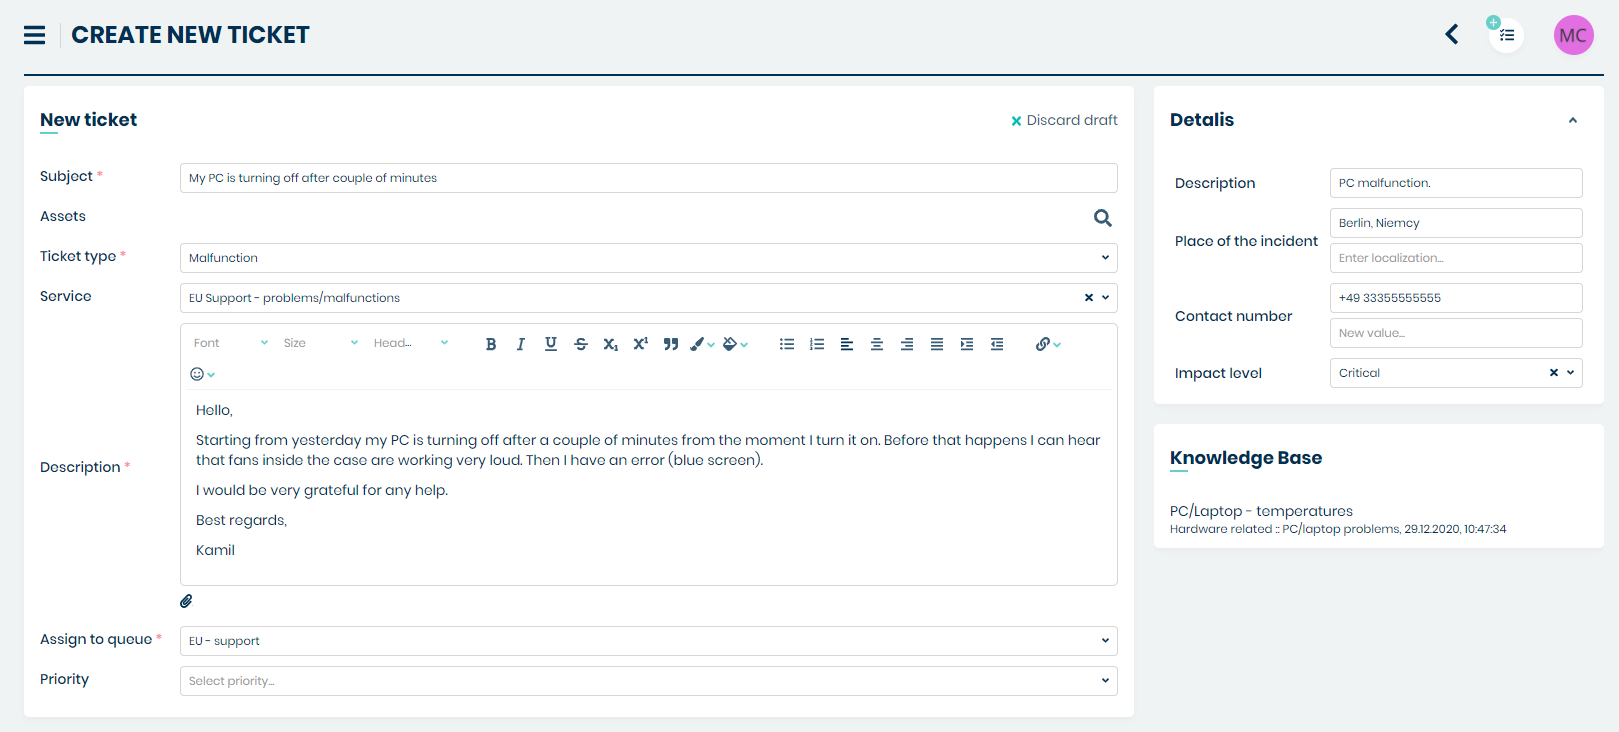
Right here, you will need to fill up some required (marked with a *) information such as:
“Subject” (a short description of your incident or request)
“Description” (detailed information about the problem, your need, etc.)
choose a right ‘Ticket type’
assign the ticket to a right queue by selecting one on the ‘Assign to queue’ list.
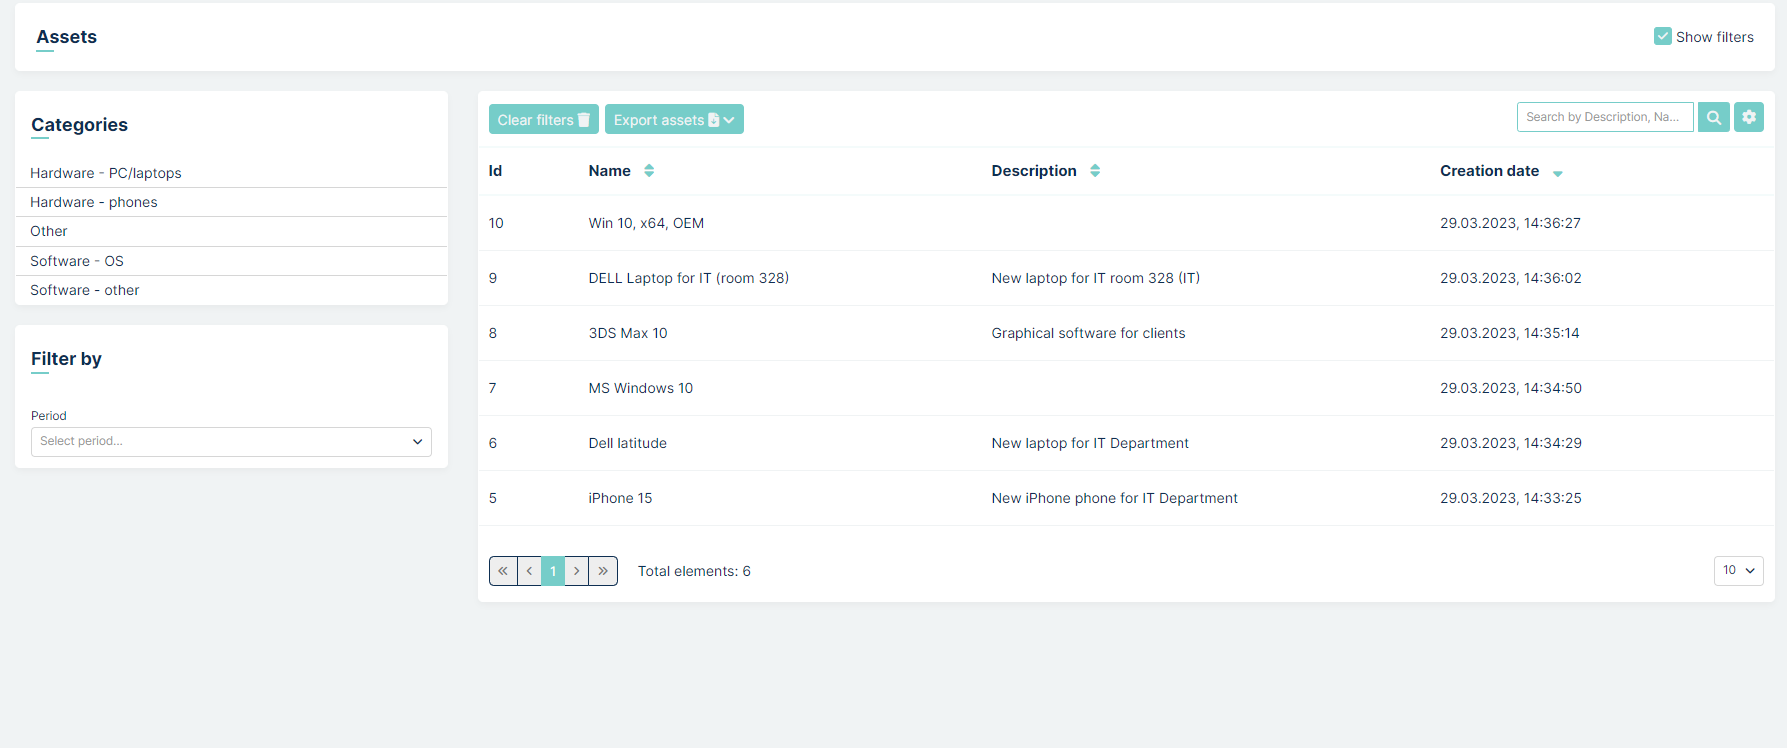
In this place, you can also add the Asset (from those which are available for you) if the problem is happening strictly on a specific device. Once you click on the magnifier icon you will open a new window where you can search and select assets you want to assign to your ticket.
Apart from the above you can also choose a ‘Service’ (along with SLA/parameters/priorities which are specified individually for each service), add some attachments (pictures, screenshots, .zip files, docs, etc.), and select a ‘Priority’ of your ticket.
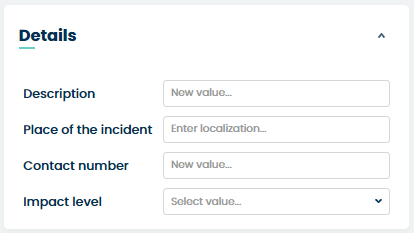
If you chose a ‘Ticket type’ which includes some additional attributes, you will see, that on the right side of a view a new block has appeared, containing some fields and other options, where you can add even more information.

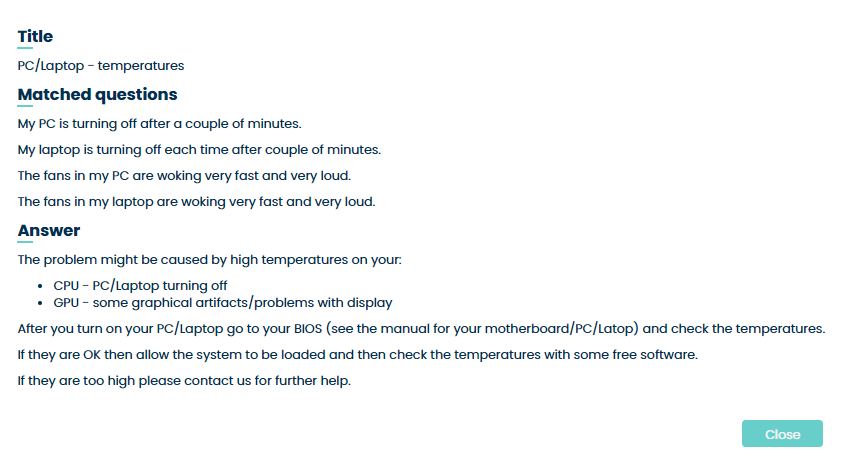
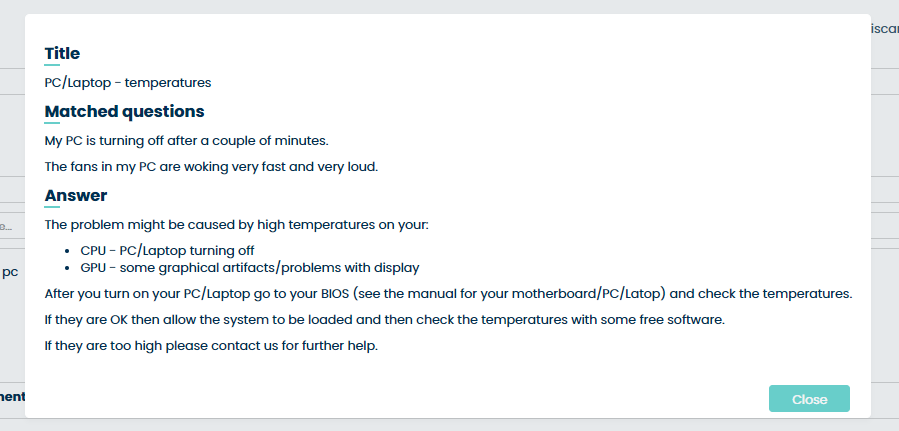
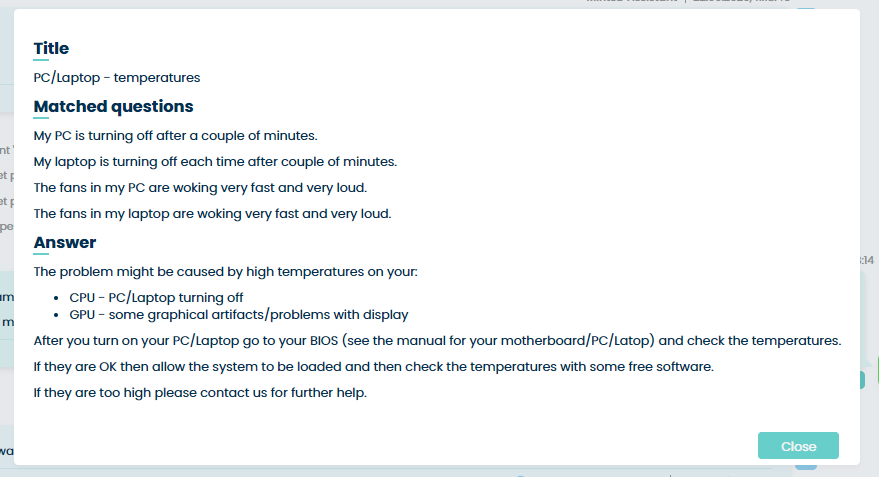
Take notice that once you start typing the text in the ‘Description’ field you might see a new block ‘Knowledge Base’ on the right side. There is a chance that your question/problem has already been described or solved in the Knowledge Base section so if the system finds the right topics (based on the words you type) it will display them immediately for you.

To see details just click on any of the topics and you will see detailed information.
Once you finished with adding information the view should look like in the following screenshot.
If, for any reason, you decide that you entered the wrong text inside
‘Subject’ and ‘Description’ fields you can delete their content very
easily. Just click 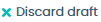 located in the upper part of the “New
ticket’ section.
located in the upper part of the “New
ticket’ section.

Once you do that, the ‘Subject’ and ‘Description’ fields will be cleared.
Before you create a new Ticket there is one more thing you need to know. Mint automatically remembers the content of the two abovementioned fields. When you accidentally leave the “Create new ticket’ view you’re not losing the content of those two fields. Once you go back to ‘Create new ticket’ view you will notice that ‘Subject’ and ‘Description’ are filled with the same text you entered.
When you’re creating a new ticket, you can see how it’s gonna look like by simply scrolling the view down..
Now, once you’re done with everything, just click on the button
(right bottom corner) to create your new ticket and wait for Agent’s response.
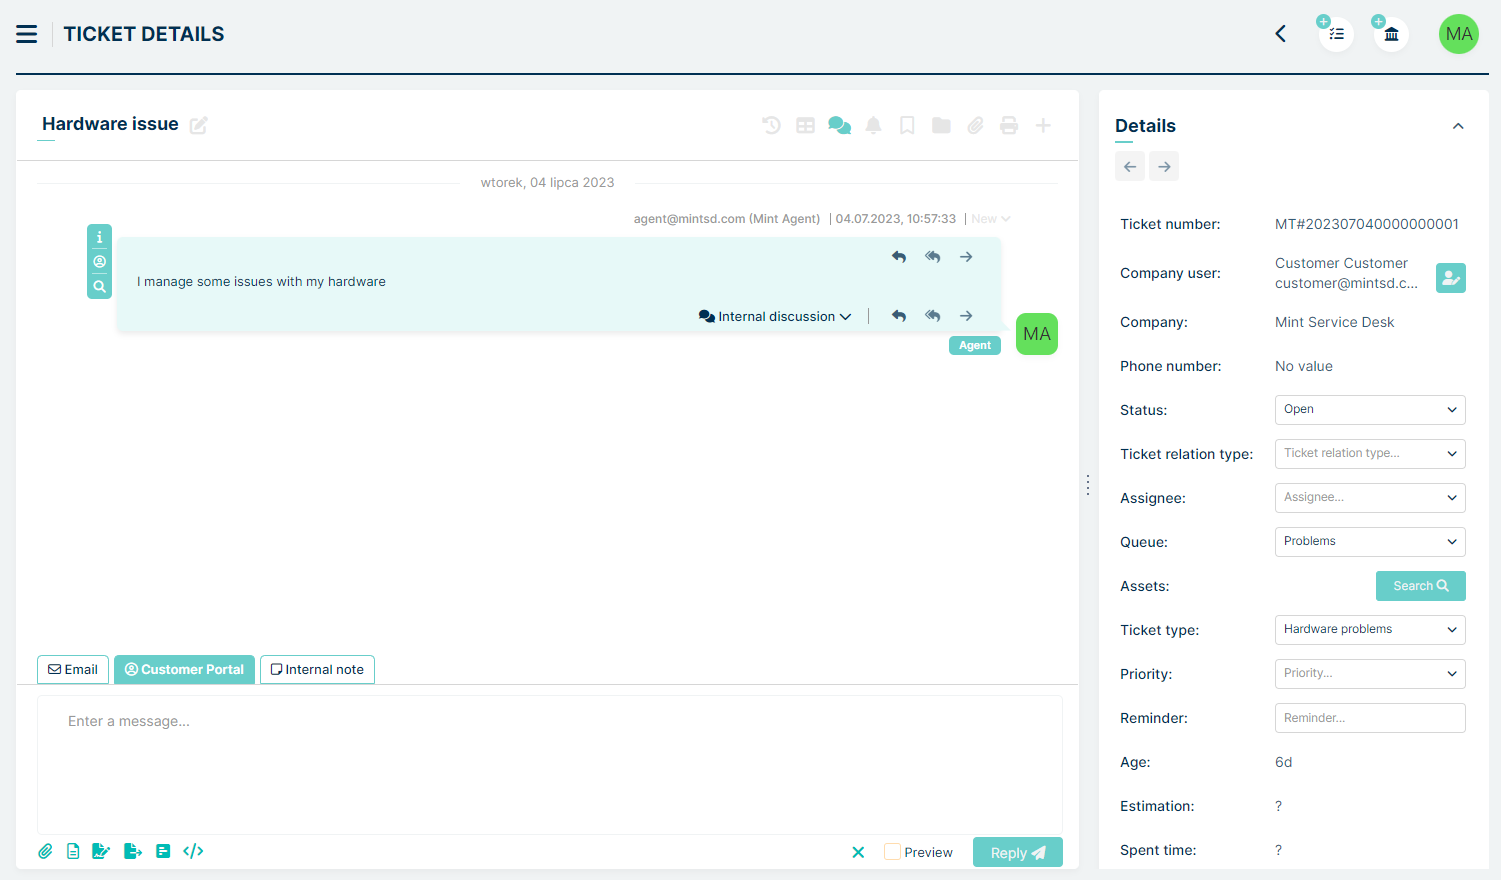
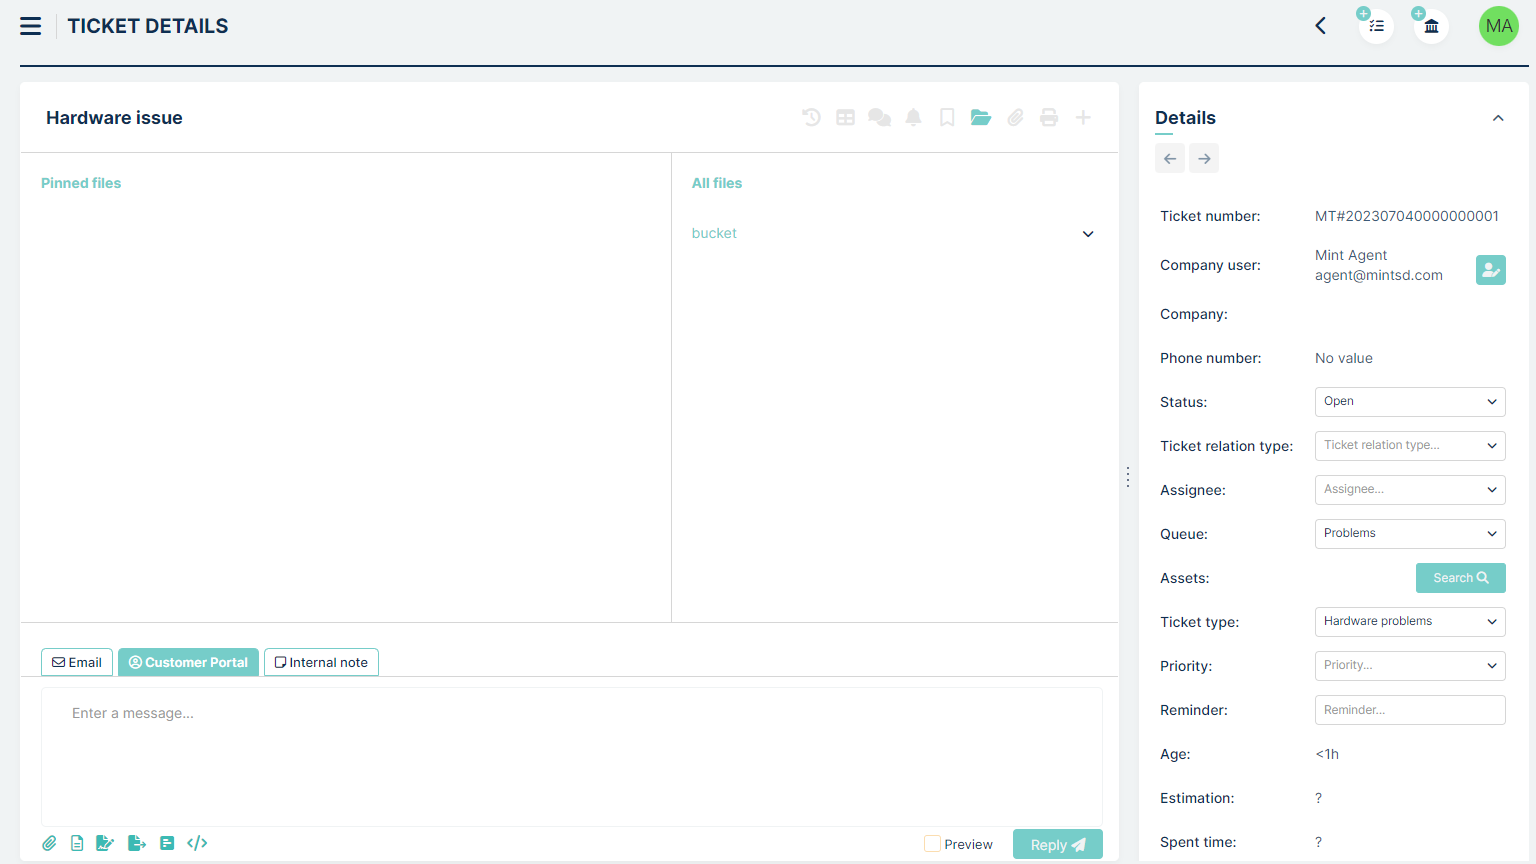
TICKET DETAILS
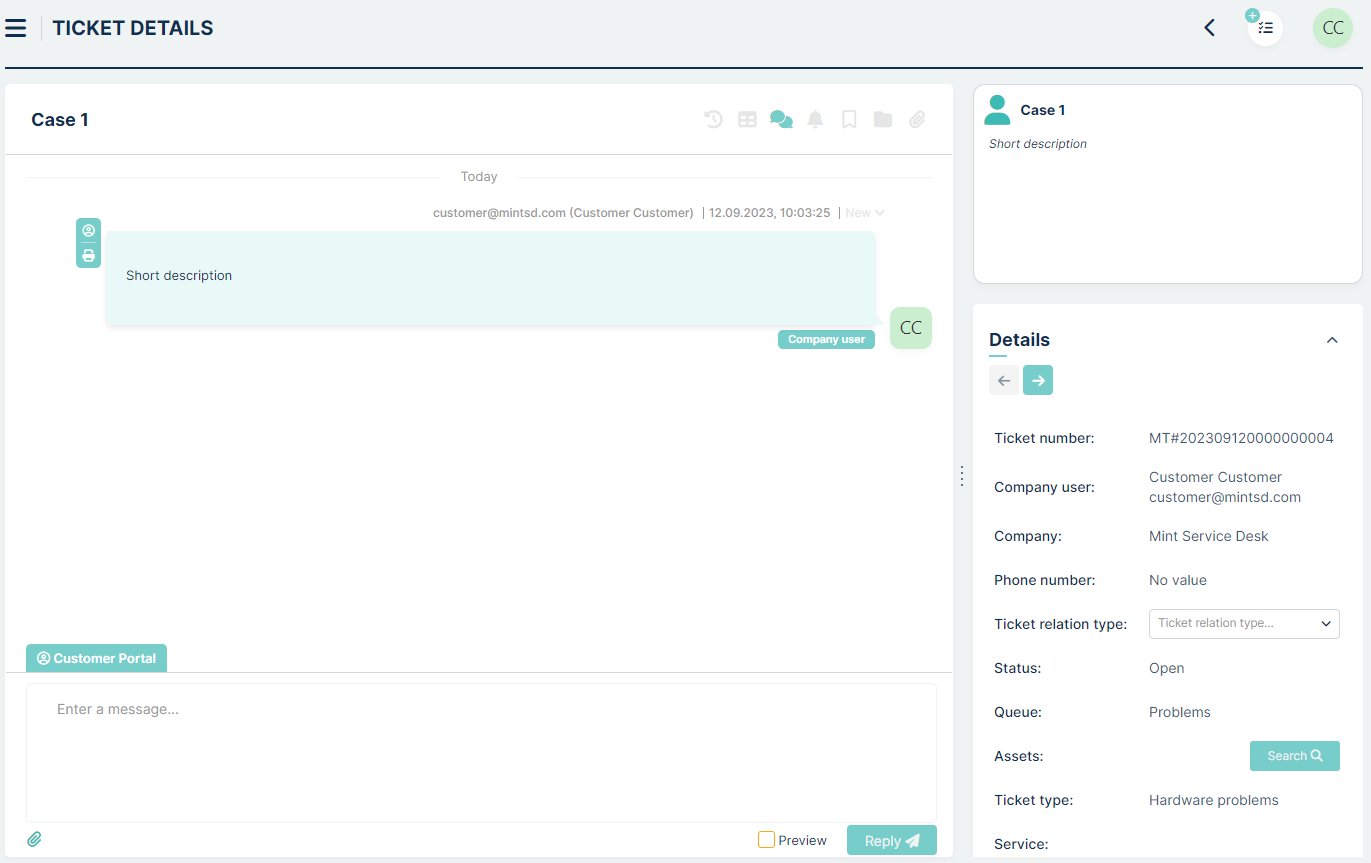
The moment you create new ticket you will be automatically moved to ‘Ticket details’ view where you will find the whole communication and all additional information regarding this ticket in one place.
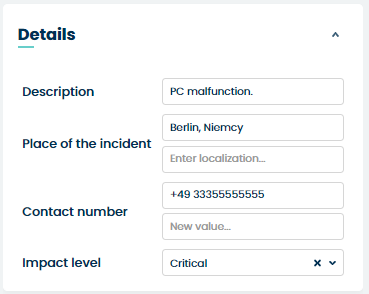
All of the information about “Ticket number”, “Company user”, “Company”, “Status”, “Queue”, “Assets”,” Ticket type”, “Priority”, “Service”, “Age” are located on the right side in ‘Details’ section.
To close the ticket, click the  button in the top right corner.
Next to it there are two buttons
button in the top right corner.
Next to it there are two buttons  which are used to switch between tickets.
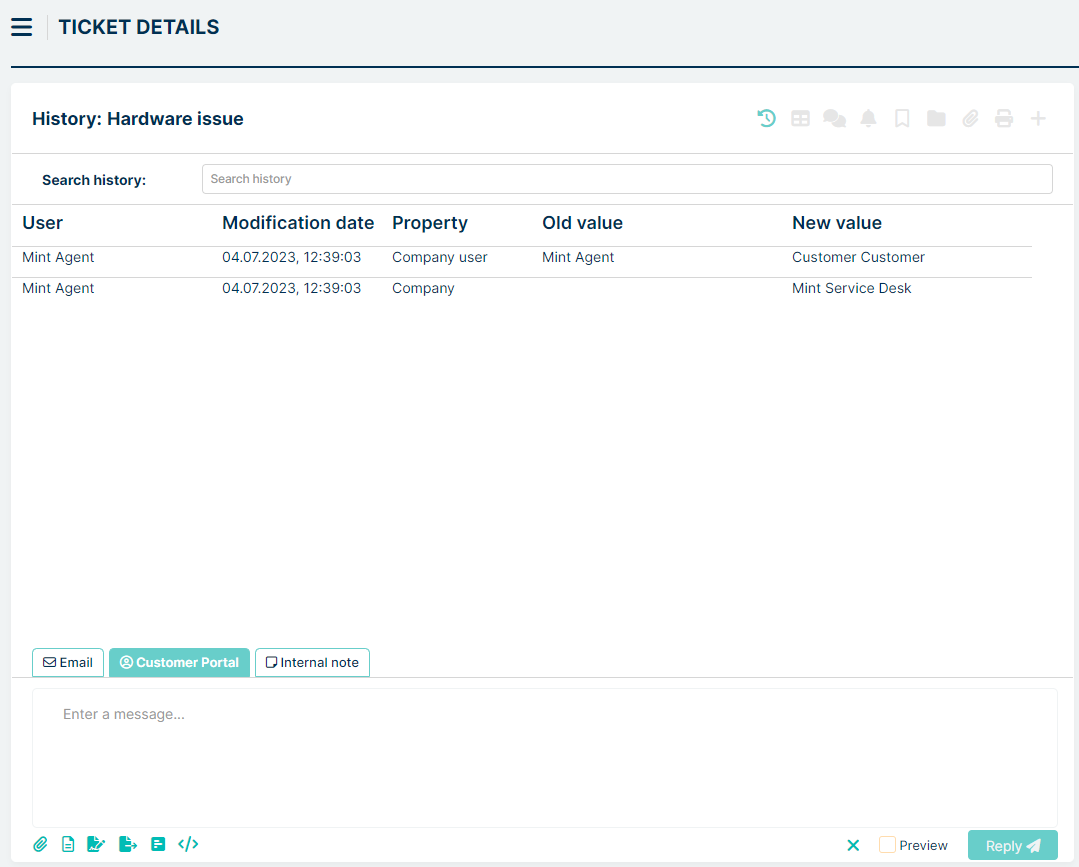
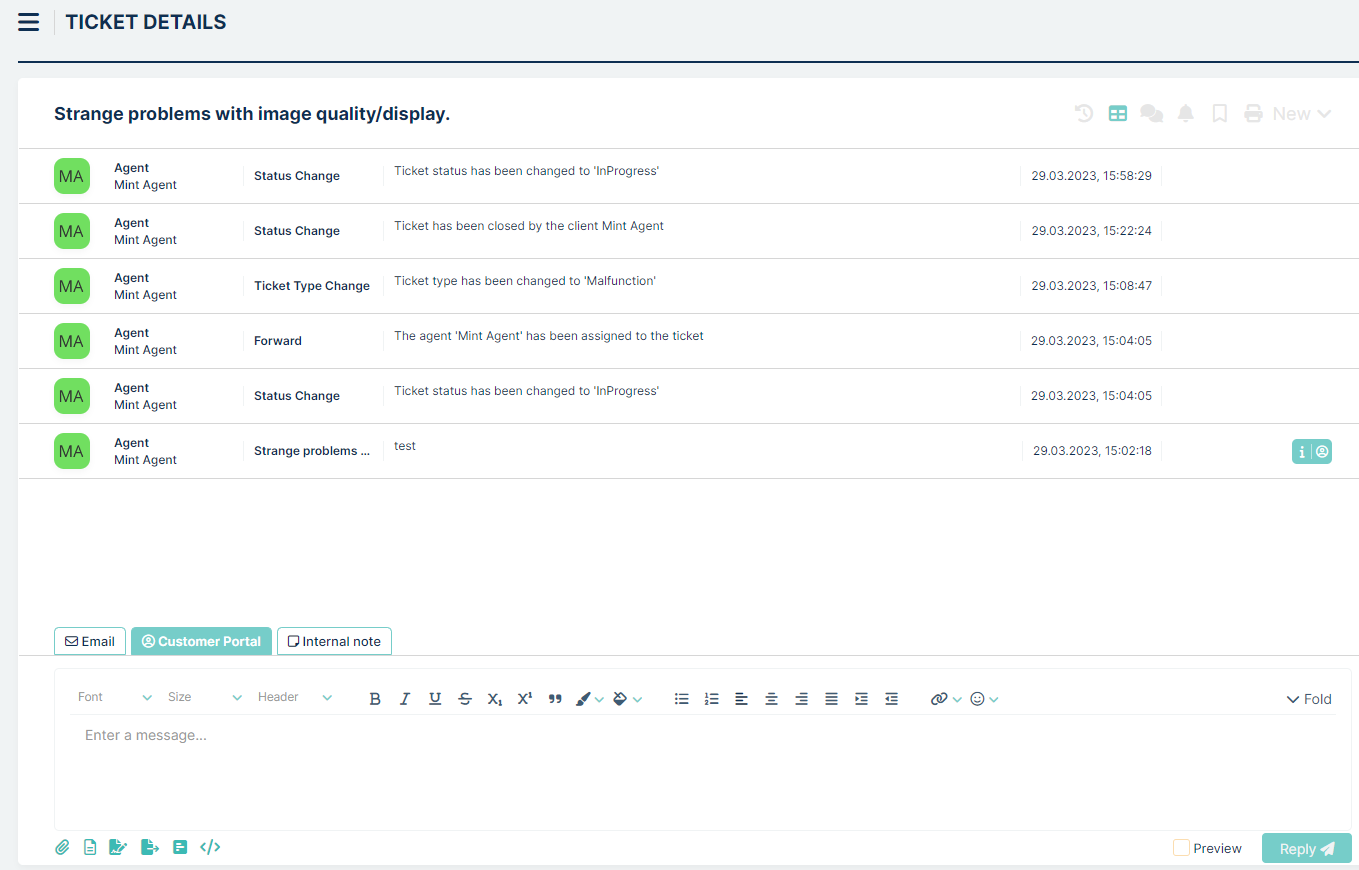
To view the ticket history, press  the button. A window will appear where you can see its history. Ticket type, service, queue, etc. changes will be shown here
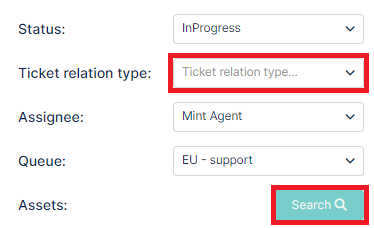
Take notice that the attribute “Assets” also includes a search option that you can use to look for a specific asset very quickly and link it with the ticket.
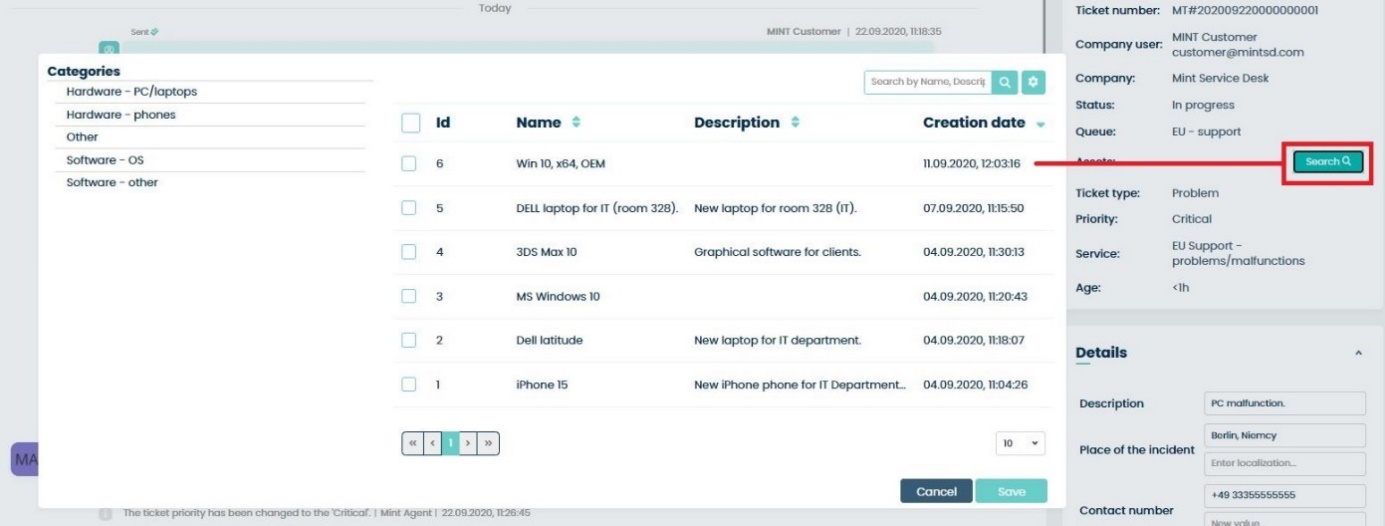
Once you choose one (or more) and click Save those assets will be visible in the ‘Assets’ part of the ‘Details’ section.

If you click on any of them it will open a new window where you will see
details of this chosen Asset. If from this place you click the  button inside you will go to the ‘Edit asset’ view where you can change
the assets details (if you have the required rights).
button inside you will go to the ‘Edit asset’ view where you can change
the assets details (if you have the required rights).

Below the ‘Details’ section, you might find some additional attributes/information related with the “Ticket type”. They can be created and managed by the Admin user in Admin > Tickets > Types section – it will be all explained later in this guide.
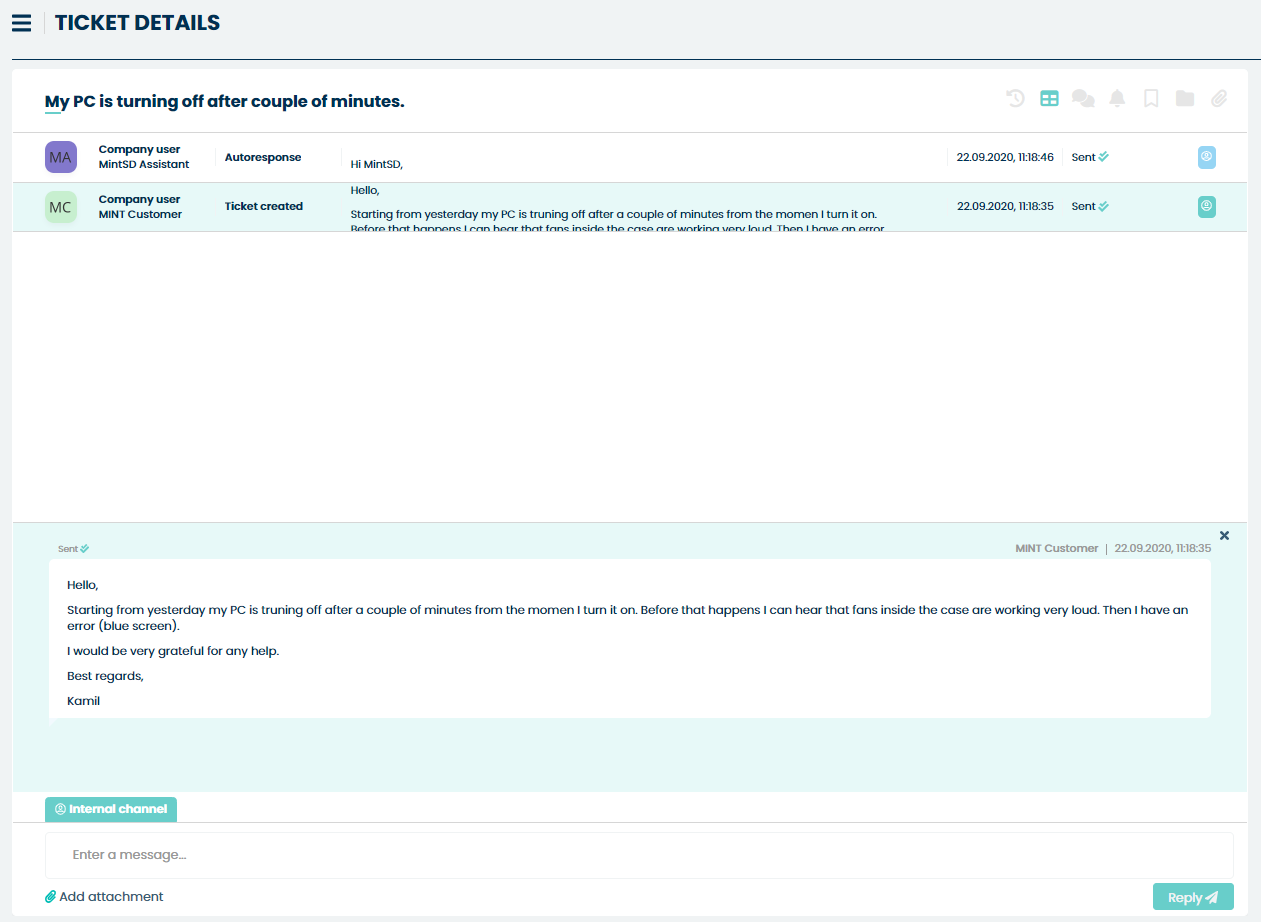
The messages and details of the communication takes the most space in the
‘Ticket details’ view. Messages can be displayed in a framed or chat view by
selecting one of them  .
.
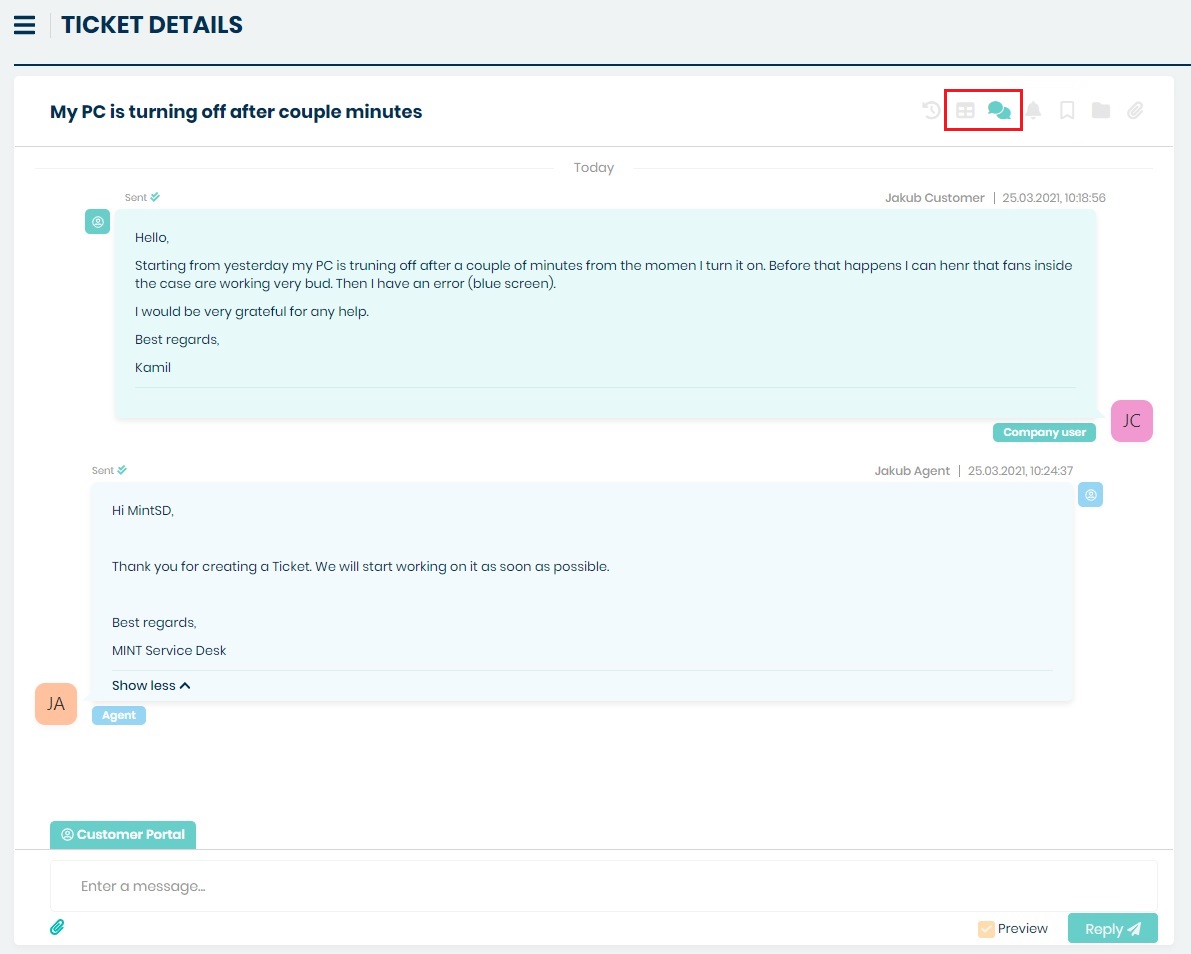
If you switch to a framed view  (chat is set
as a default view) you will see the list of messages. To see details of
one of them just click on it (screen below).
(chat is set
as a default view) you will see the list of messages. To see details of
one of them just click on it (screen below).
The other two buttons next to chat/framed view  are used for
the ‘Notifications timeline’ and Subscribing/Unsubscribing the ticket.
are used for
the ‘Notifications timeline’ and Subscribing/Unsubscribing the ticket.

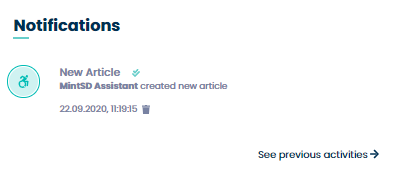
If you click first of them ( ) you will see a small window
containing the history of notifications created for this one particular
ticket. If you want to see previous activities just click
the
) you will see a small window
containing the history of notifications created for this one particular
ticket. If you want to see previous activities just click
the button.
The second one, once activated ( ) will send notifications each time something new happens within the ticket.
The behaviour of the button when clicked depends on the option selected under ‘Subscription management strategy’ in ‘Admin’ > ‘Settings’ > ‘General’ > ‘Tickets’
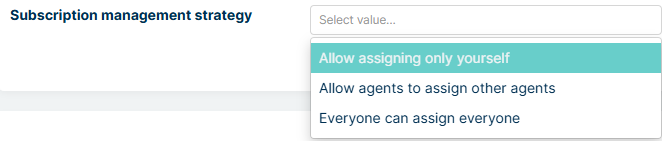
With the ‘Allow assigning only yourself’ option selected, You subscribe only yourself to the ticket by selecting the button.
With the ‘Allow agents to assign other agents’ option selected, if you are an Agent, you can additionally select the option to subscribe another Agents to the ticket.
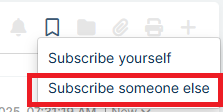
By clicking option ‘Subscribe someone else’ a new modal will appear
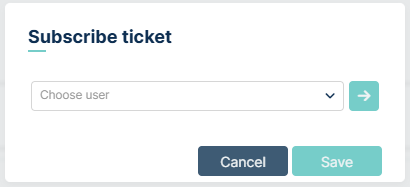
You can choose users from the list
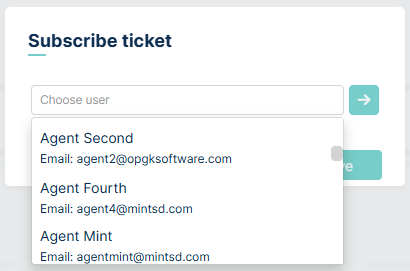
and add them by pressing the arrow button. Agent will appear below
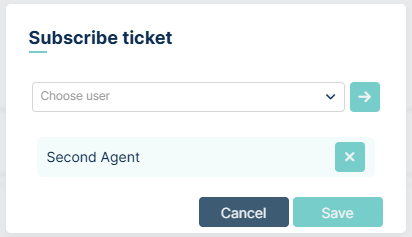
If You subscribed also Yourself, You will be on the list too
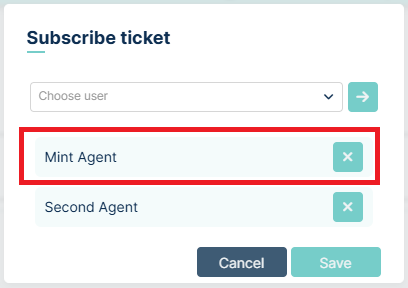
You can easily unsubscribe other users by clicking the
With the ‘Everyone can assign everyone’ option selected, You have the possibility to subscribe yourself and another users (Agents and Customers) to the ticket by selecting the button. Please rememeber that with this option set, Customers can see a list of all Agents in the system.
Subscribing users is similar to subscribing in the “Allow agents to assign other agents” option (above).
Next button is the File Repository

File Repository is a place for the orderly storage of “MINT” application documents. Each user level has different options for dealing with files from the repository. The customer can download files if they are assigned to a given ticket.
Let’s check File Repository as Customer. First step is to enter to the ticket details. Here we can see an icon like below
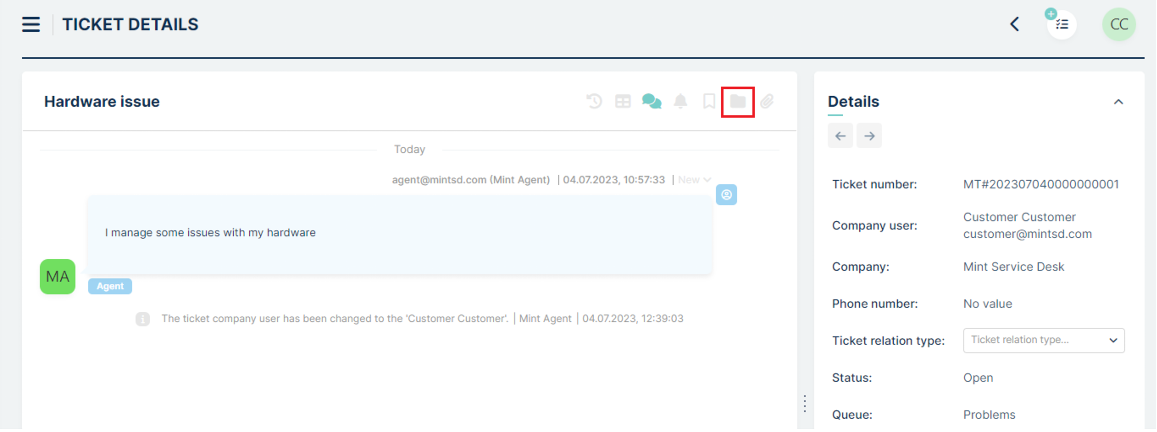
We can click on it and enter to File Repository tab. Here we can see files pinned by Agent.
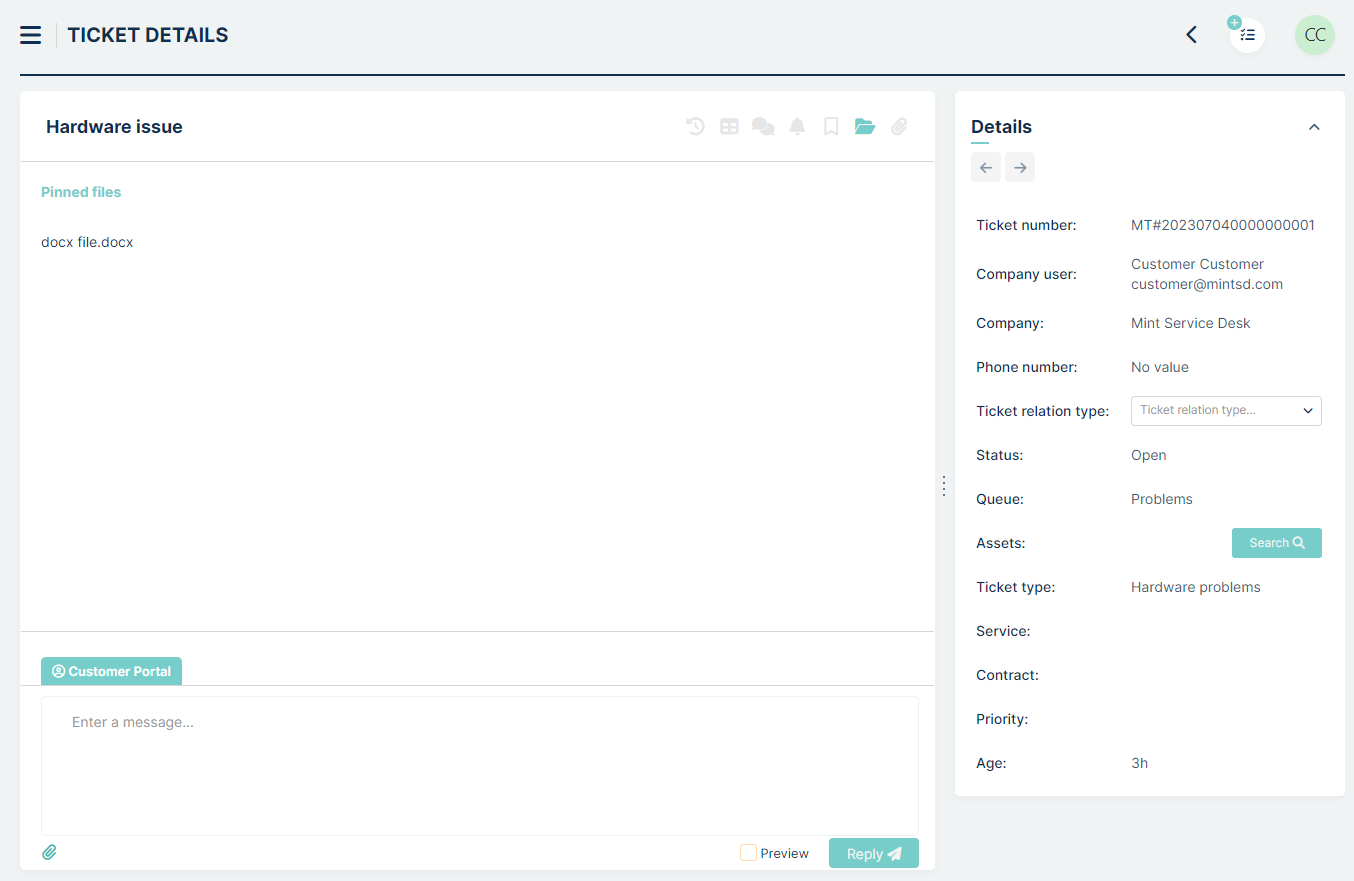
To download file we just need to click on pinned file. Whole downloading process is similar as in Agent’s profile and is described there.
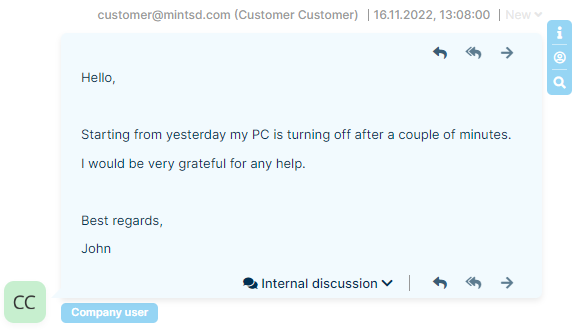
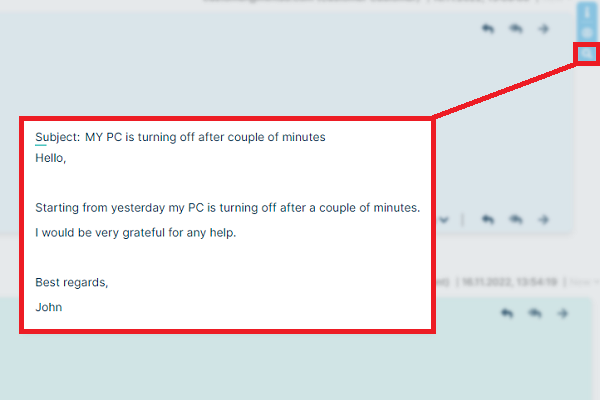
Let’s take a look to chat section. If the message inside the chat contains a lot of
text it will we shortened – in order to see the whole text you need to click  .
.

Except for the messages, in the chat section, you will see some additional information e.g. when an Agent decides to change the ticket Status or its Priority.

Now, if you want to type and send a message, just use the ‘Enter a message…’ field below the Chat section.

Type the message, add some attachments (‘Add attachment’) if you want,
and click  button.
You can also format your message by using the text editor, which will be displayed the moment you click on the ‘Enter the message…’ field.

When you’re ready just click the button and the message will be sent.
You will immediately see in on the chat.

Each article you can easily export to pdf file using ( ) button located next to every article.
Basically, the whole ‘Ticket Details’ section is where you will see all of the interactions between customers and agents happening in order to solve the ticket.
MY TICKETS
This function can be enabled or disabled in admin profile in Settings => General => Tickets
The “My Tickets” feature is an additional dashboard with a list of tickets that we are the authors of (that we have created - both as tickets and as email requests) and applies to both the agent and the customer.
This functionality allows us to follow the life cycle of a ticket even if we do not have access to it due to permissions. This allows the user to view basic information such as the queue, type of submission, assigned person. Entering the details of the requests depends on the agent’s permissions to the queue and the request type.
The “My Tickets” view consists of a panel containing tables with requests, a side panel containing basic filters, and a top panel containing “Show Closed” and “Show Filters” checkboxes. The table has basic columns with information such as status, queue, agent, for example.
Navigating “My Tickets” is the same as the dashboard and is described in the “Dashboard” section
APPROVALS
To see the description of the Approvals tab, please visit Admin portal -> Approvals -> Agent/Customer profile
ASSETS
As a client, you will also see the “Assets” section, where you will find the assets available from the company or provider. This means that the MINT Service Desk administrator added some assets that are not assigned to you, but they are available or connected because maybe you can relate your requests with them or you can ask for new services knowing that the asset is available in the company.
As an example, it is very helpful for software assets because you will know if your company already has a particular software or license you may need, and you don’t need to pay twice.
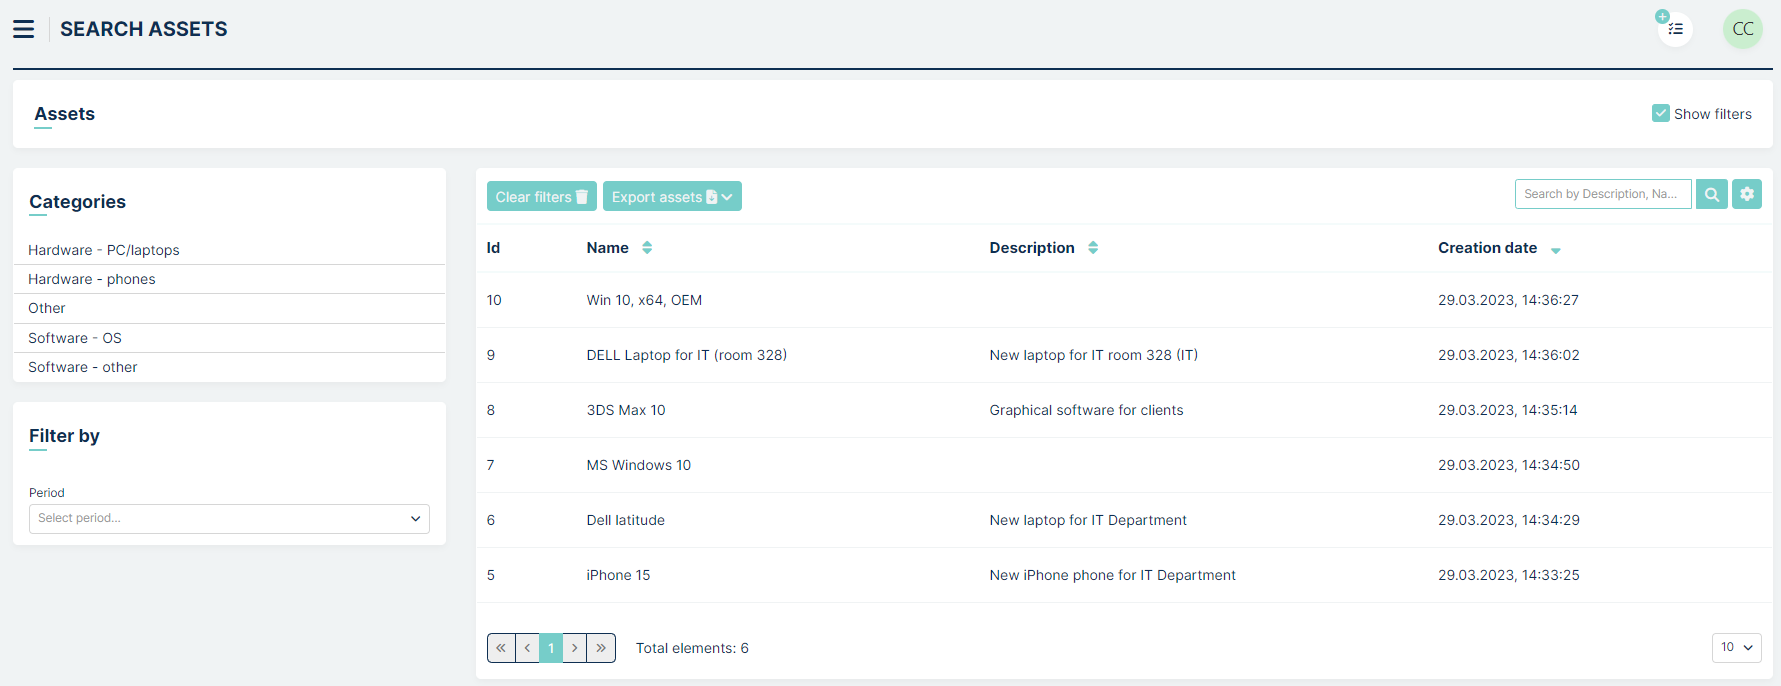
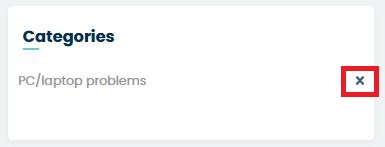
Right here you can filter those assets by ‘Categories’ or by ‘Period’.
If you want to reset active filters, just click on the button.
You can also remove any selections (Categories, Filters) by click on
 or
or  button right next to each position.

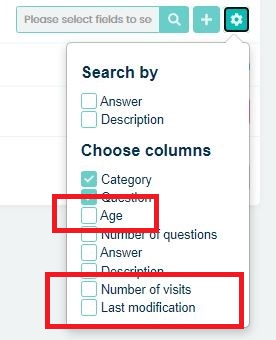
The attribute columns can be added or removed in the section “Set column
properties” on the right side by clicking on the button. Once
you do that you will see a small window, where you can select the
desired information you want to see on the assets list. Making any
changes in ‘Set column properties’ is automatically saved, so you won’t
lose anything once you go to any other part of the system.
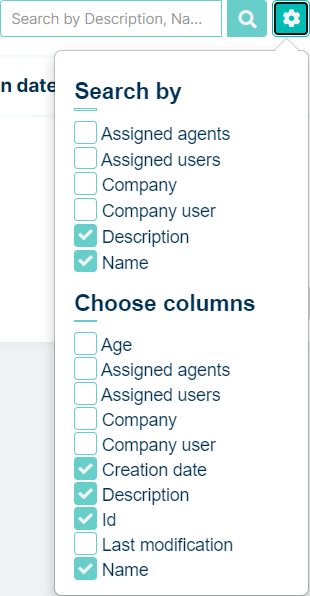
Also, you can look for specific assets by using the section “Search” field. Whatever you type here will be searched for, depending on the things you marked in the ‘Search by’ section of the ‘Set column properties’ window.

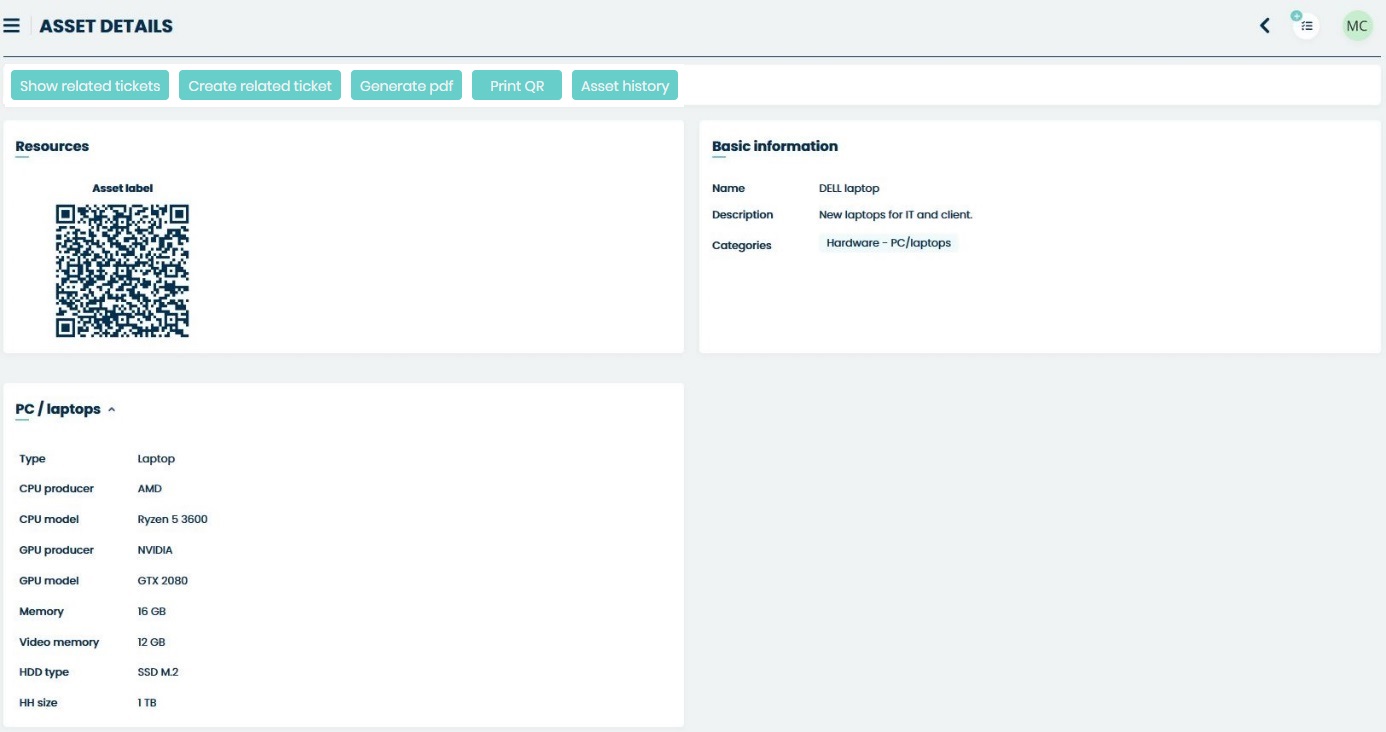
If you want to see the details of any asset, just click on one of them.

If, on the other hand, you want only to see details of any asset (without changing anything in it) you can click on any asset on the list and you will be moved to the ‘Asset details’ view.
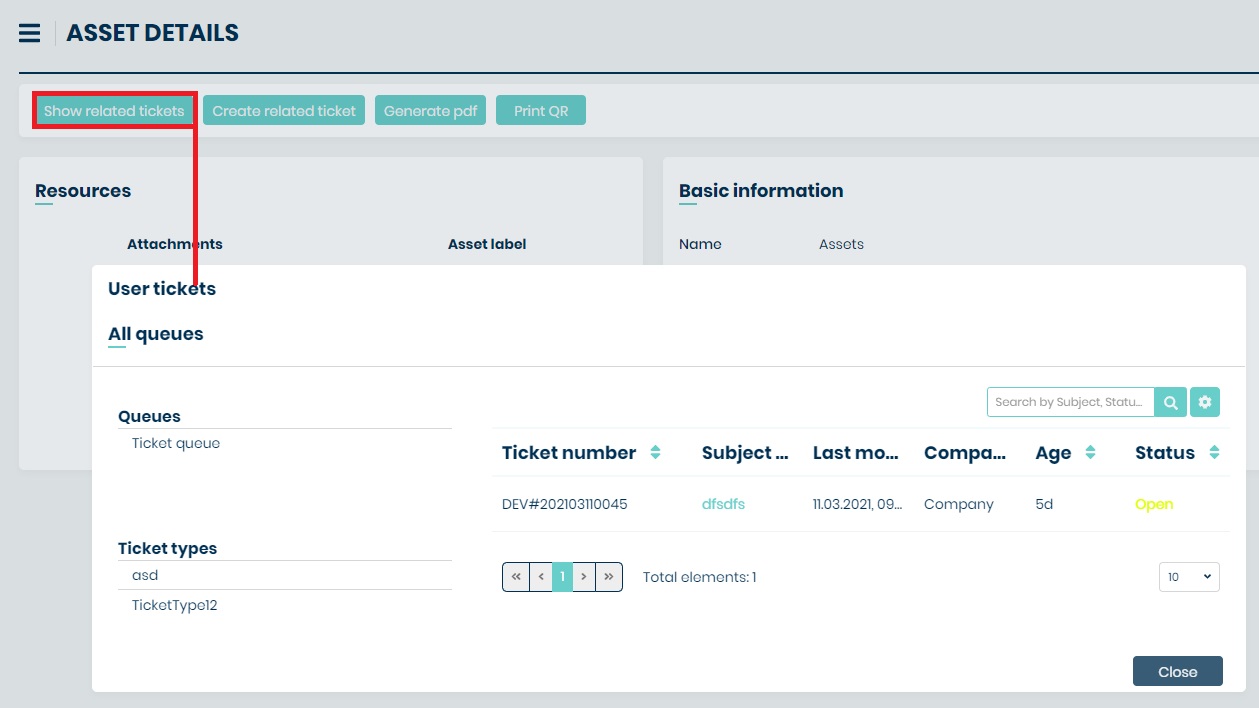
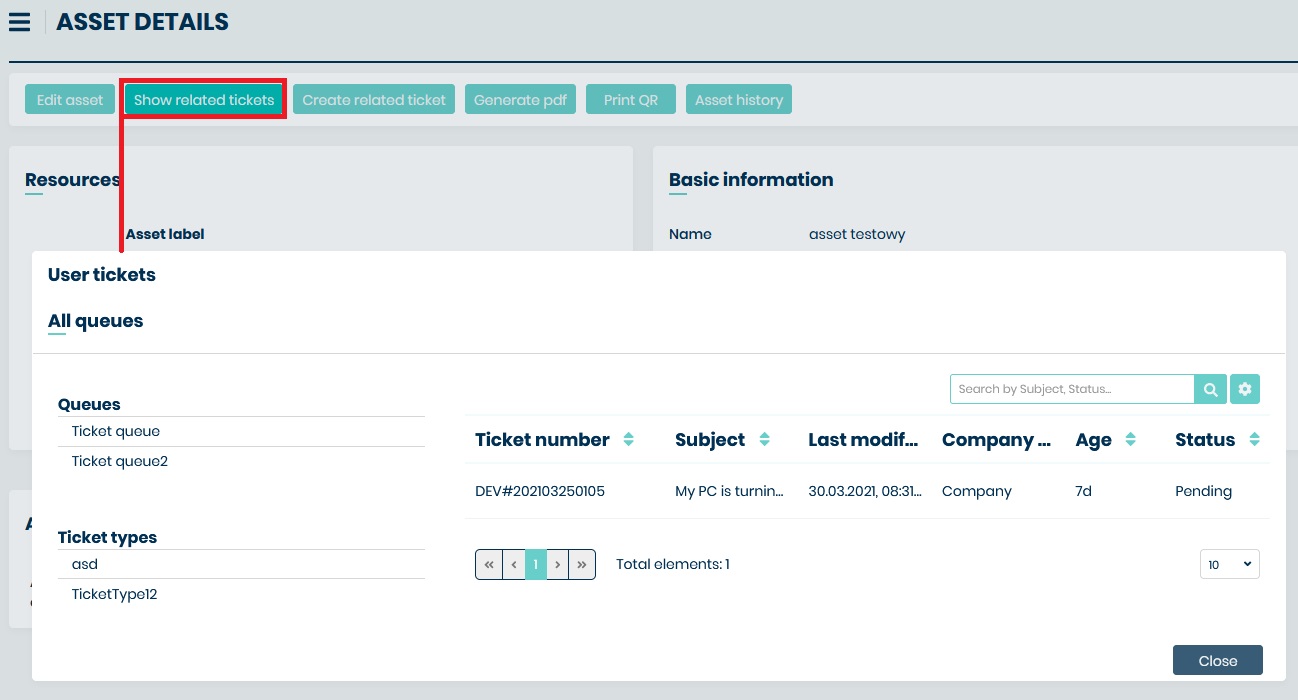
If the asset is related to any of your Tickets
(an Agent is able to do it) you will find it on the list once you click
the  button.
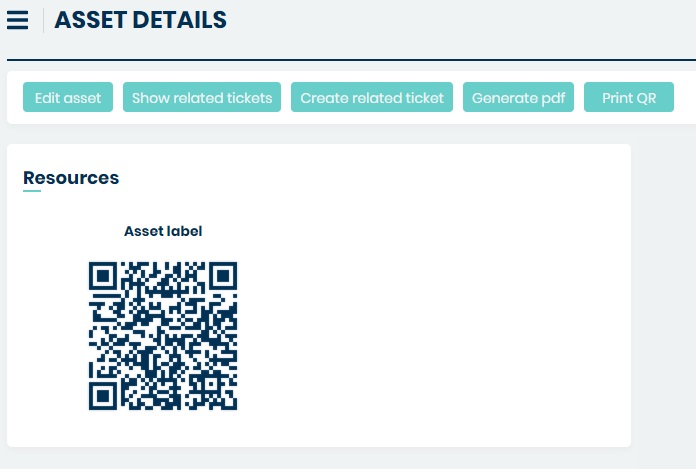
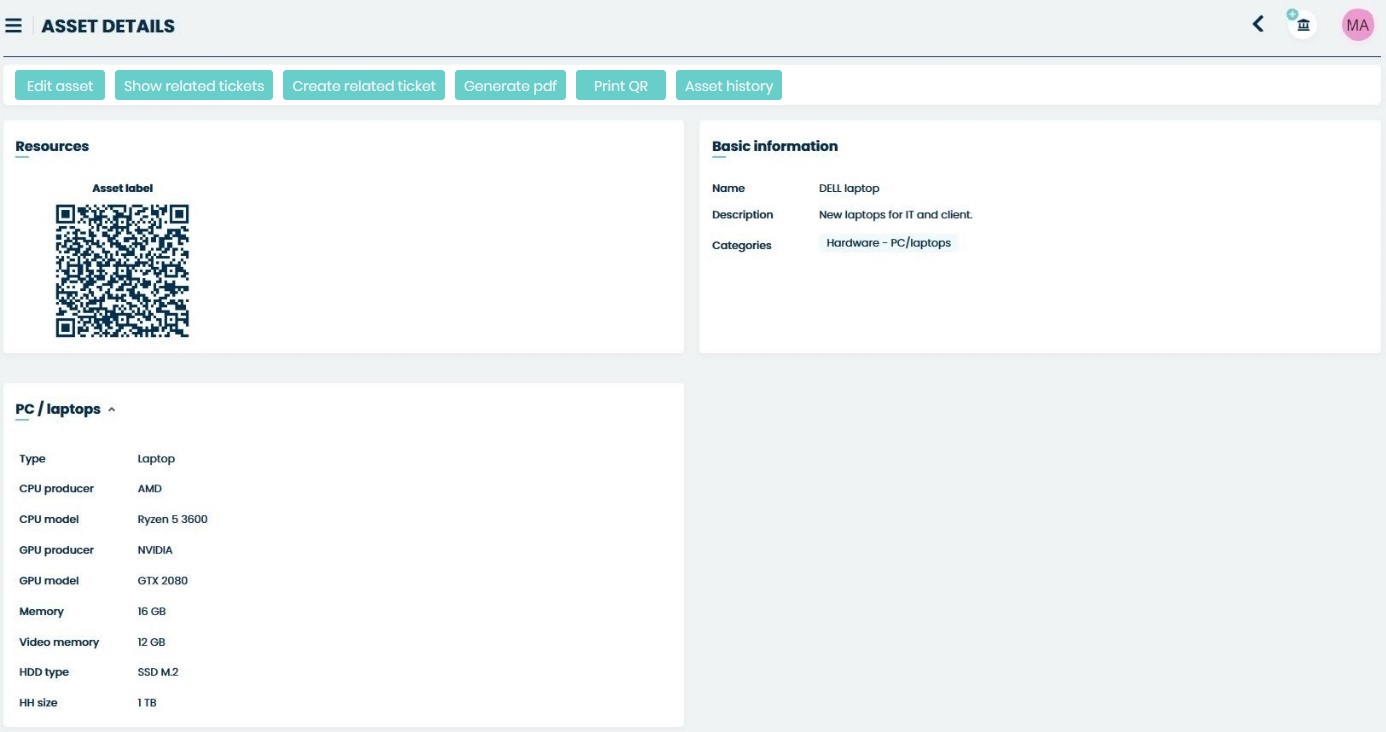
If you want to export asset information into a pdf file simply press ‘Generate pdf’ button.
If you want to print the QR code on your printer simply press ‘Print QR’ button.
There is QR code which you can scan and you will be moved to the Asset Details of this particular Asset.
MY ASSETS
The only difference between this part and ‘Assets’ is that here you will only see the Assets that are only assigned to you. The rest (asset list, editing, preview, etc.) stays the same as it was for ‘Assets’.
KNOWLEDGE BASE
In this section, as a Client you can see the whole list of Knowledge Base topics with questions assigned to them and their answers. You can browse the list of already existing topics and search for the answers that might help you with your problem. Also, as it was described in ‘Ticket details’ part, you can get some help when you’re creating a Ticket, while typing the Ticket’s content.

The default view shows the list of all available topics. On the left side, you can see available categories.

You can select one category, or even a sub-category inside to find the topic that fits your need. If you do so you can easily go back to any level above in the category structure by clicking on the category path in the upper side of the view.
You can also click on the ‘X’ button located on the right side of the currently selected category/sub-category.
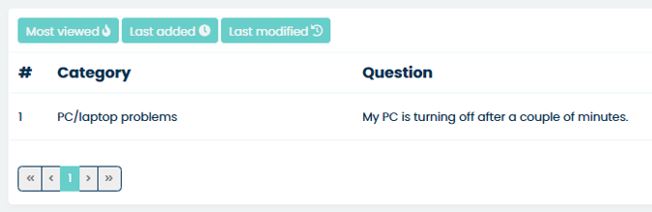
By default, in the main view of the Knowledge Base section, you will see the list
topics with the following attribute columns: Category, Question, Action.
In order to see more information, you need to click the
button.

Once you do that you will see a small window, where you can select the desired information you want to see on the Knowledge Base list. Making any changes in ‘Set column properties’ is automatically saved, so you won’t lose anything once you go to any other part of the system.
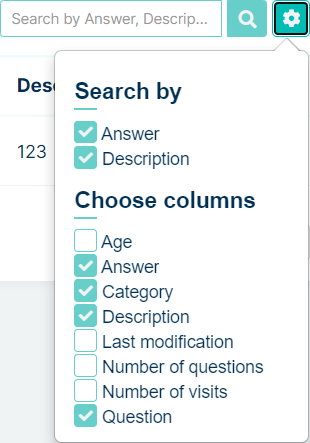
Also, you can look for a specific topic by using the section “Search” field. Whatever you type here will be searched for, depending on the things you marked in the ‘Search by’ section of the ‘Set column properties’ window.

In the upper part, above the topics list, you will see a couple of buttons:
‘Most viewed’
‘Last added’
‘Last modified’
They are used for sorting the list by:
Most viewed - from most viewed to the least viewed (column ‘Number of visits’)
Last added – from most recently added topic to the oldest one (column ‘Age’)
Last modified – from the most recently modified = most up to date (column ‘Last modification’)
Remember that in order to see any changes on the list while selecting the options above you need to have the right abovementioned attribute columns selected.
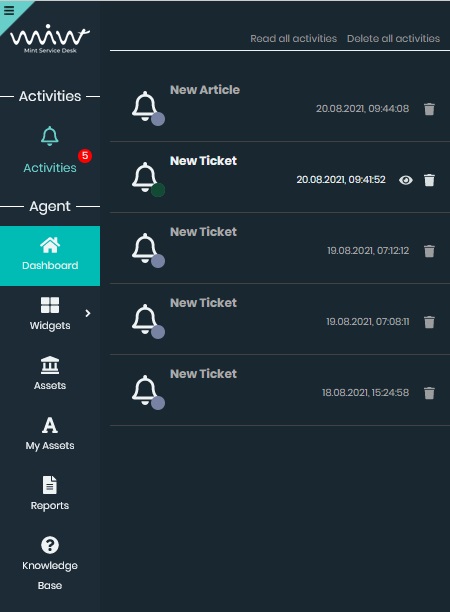
ACTIVITIES
On the left side, in the lower part of the menu, you will find the Activities section.
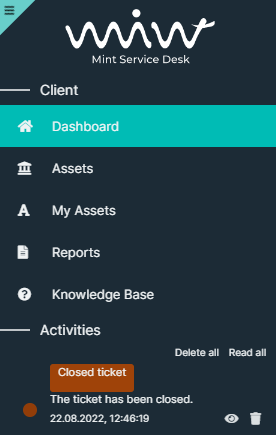
It will display the tickets with any new activity, so you could easily see what is new and go directly to the action. You will see a blinking position on the list each time a new change, like a new message (Article) from the Agent, has been made. The notifications are customizable (color, title, content, etc.), but only an Admin user is allowed to do that.
You can delete any position from the Activities list, by clicking the
 button.
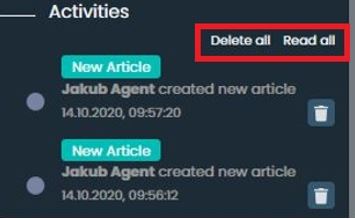
If you have more than one activity on the list you can either ‘Delete all’ of them (they will disappear) or mark all of them as already read (‘Read all’).
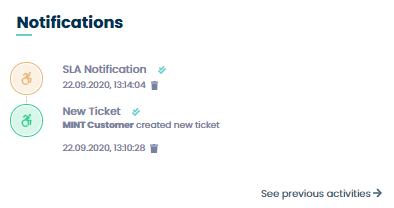
Also if you have a couple of unchecked notifications within one ticket, for example, a couple of unread messages from the Agent, you will notice a number presented on the right side inside the notification.
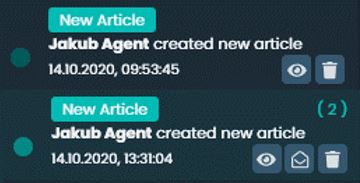
Now you can click on the notification and be moved to the Ticket Details screen where you can check the messages you missed.
You can also click on the  “Read’ icon to mark the
notification as already Read (it will be grayed out) or even click on
the
“Read’ icon to mark the
notification as already Read (it will be grayed out) or even click on
the  ‘Read all’ icon to mark all of the notifications
(described with a number) as already read.
‘Read all’ icon to mark all of the notifications
(described with a number) as already read.
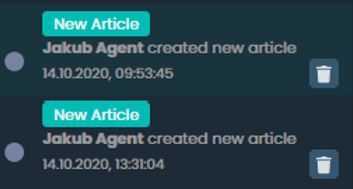
Once you use those options the notifications would now look like in the following screen.
If you have plenty of positions available on the Activities list, you will see only part of them. To see more click on the button ‘See more activities’ and more of them will be loaded.

Each time you click on the notification in the ‘Activities’ section you will be moved to the Ticket Details screen where you can continue communicating with an Agent.
If you want to change the look of the sidebar to a new one, just press the button  in the upper left corner.

When the activity button is pressed, the activity box will slide out.
To hide the activity sections, press the Activities button again.
Last, but now least, if you ever see the following message, while trying to access any Ticket or Asset, it means that the Admin user has changed your access rights and you need to contact him and ask for help.

AGENT PORTAL
Once you login to your Agent account you will see a Dashboard view.
DASHBOARD
Dashboard will display the tickets that you are able to see based on the agent rights.
You can sort them by different attributes (by clicking on the column name -
you will notice that each time you do that a small icon next to column’s name
will change //)
On the left side of the Dashboard you can filter your tickets by “Queue”, “Ticket Type” or you can use the “Filter by” option that helps you to filter them by “Status”, “Agent”, “Company” and “Period”.
The ticket which is new will be Bold until you click on it and go to its details.
New ticket:

The ticket you already opened:

The attribute columns can be added or removed in the section “Set column
properties” on the right side by clicking on the button. Once
you do that you will see a small window, where you can select the
desired information you want to see on the tickets list. Making any
changes in ‘Set column properties’ is automatically saved, so you won’t
lose anything once you go to any other part of the system.
Also, you can look for specific tickets using the section “Search” field. Whatever you type here will be searched for, depending on the things you marked in the ‘Search by’ section of the ‘Set column properties’ window.
In the upper part, above the tickets list, you will see a
button, which will allow you to reset the view and remove all of the
active filters.

If you want, you can export the list of your tickets and save it in one
of two file formats: .CVS or .XLSX. To do that, just click on the
button and select one of the 2 available file formats.
Now, in your Operational System’s file explorer click ‘Save’ to save the file on your hard drive.
Once you open the file it will contain tickets information such as: ‘Ticket number’, ‘Id’, Subject’, Creation date’, ‘Last modification’, ‘Company’, ‘Status’, Customer’, ‘Queue’, and ‘Assignee’.
If you like to see or hide tickets that have already been solved and
closed, you can always mark/unmark the option located on the
right side of the Dashboard screen.

When you have plenty of Tickets on the list, you will have to use some additional navigation options, located below the list of Tickets, for moving between pages or for changing the number of Tickets that can be displayed on one page.

On the left side, you have the navigation buttons, while on the right side you can change the number of Tickets per page. Those options are available in many places in the Mint Service Desk.
One more important thing is that you can click on any position of the listed tickets on your dashboard and that will take you to the “Ticket Details” of the selected ticket.
To close several tickets, use the  button.
As you can see, this button is blocked by default. To activate it, simply select
some tickets by clicking on the checkbox next to them.
button.
As you can see, this button is blocked by default. To activate it, simply select
some tickets by clicking on the checkbox next to them.
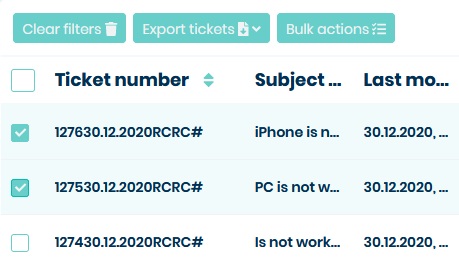
Now use the button. A modal will show up. From the list select
the “Close” option and confirm the operation with the “Apply” or
“Apply without notification” button. If you want to close related ticket, select
“close with related” checkbox.
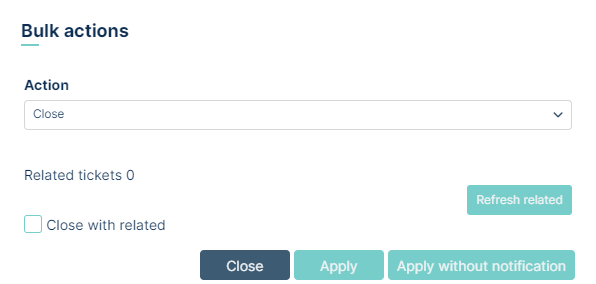
Apply - Close multiple tickets with notifications in “Activities” section
Apply without notification – Close multiple tickets without notifications in “Activities” section
When you click one of these buttons, the modal will be updated.
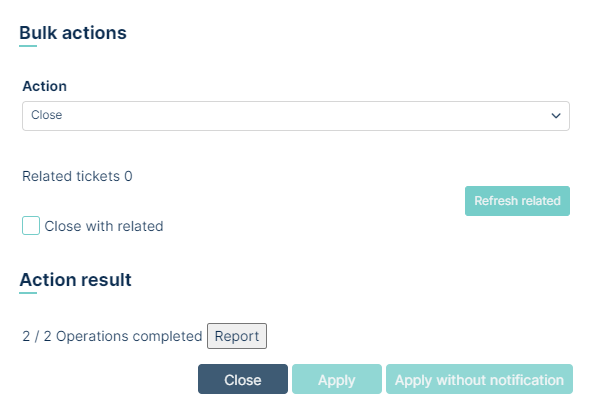
To download the report of closed tickets, click on the  button.
Click outside the modal to complete the multiple ticket closing process.
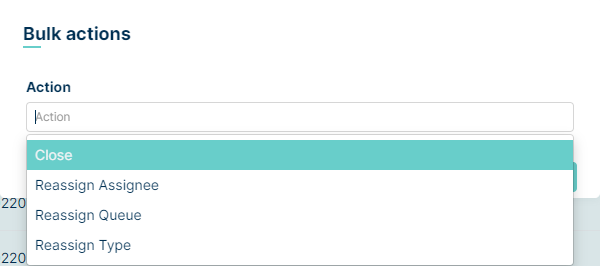
There are currently six bulk actions in the system:
Close Allows you to close multiple tickets.
Reassign Assignee Allows you to reassign multiple tickets.
Reassign Queue Allows you to change the queue assignment of multiple tickets.
Reassign Type Allows you to change the type assignment of multiple tickets.
Set custom field value Allows you bulk filling of custom fields within the same ticket type in multiple tickets
Reassign status Allows you to chane the status of multiple tickets
FULL TEXT SEARCH
OVERVIEW
The ticket search in Mint Service Desk system has been enhanced with a new full text search engine powered by SOLR. This makes finding tickets faster, more accurate, and more powerful.
The system now indexes and analyzes all ticket-related information, including:
Ticket messages and comments
Full content of attached documents (PDF, Word, Excel, etc.)
Attachment file names
Text in images and screenshots using OCR (Optical Character Recognition)
Thanks to this, you can locate a ticket even if your search phrase only appears inside a document or on an image.
REQUIREMENTS
To use the full text search functionality:
The feature must be enabled in the system
The agent’s role must have permission to use the search engine. These permissions can be configured by an administrator in Users → Roles → Edit role
To search within article content, the Article search permission is required
To search within attachment content and attachment names, the Attachment search permission is required
DASHBOARD ENHANCEMENTS
The ticket dashboard for Agents has been updated to provide more flexibility. New columns that can now be displayed in your ticket list include:
Attachment Name
Article Content
Attachment Content
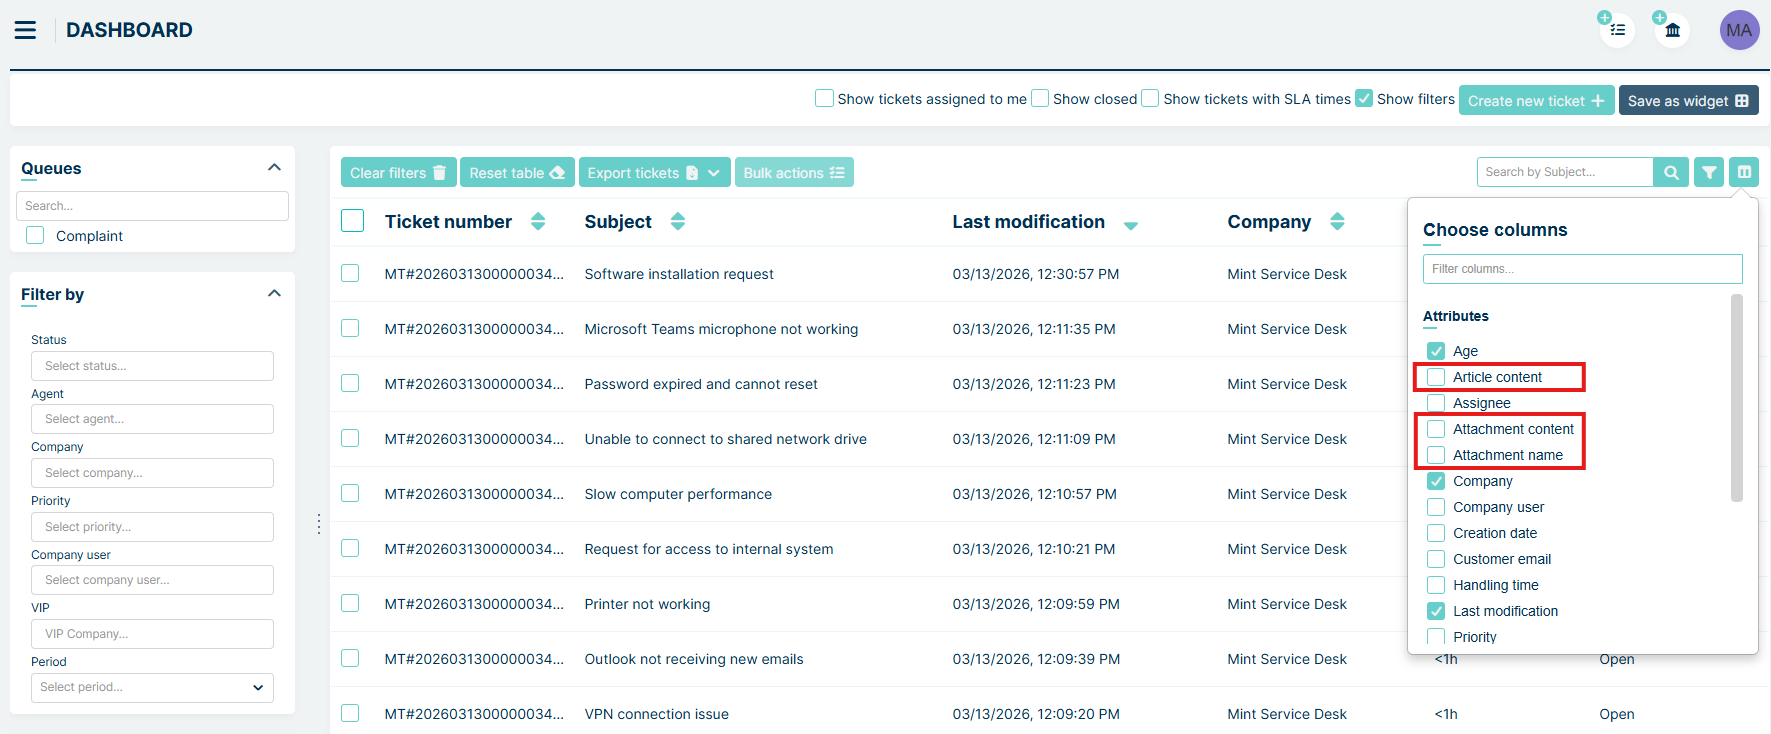
Similarly, the Search by option now allows searching by:
Attachment Name
Article Content
Attachment Content

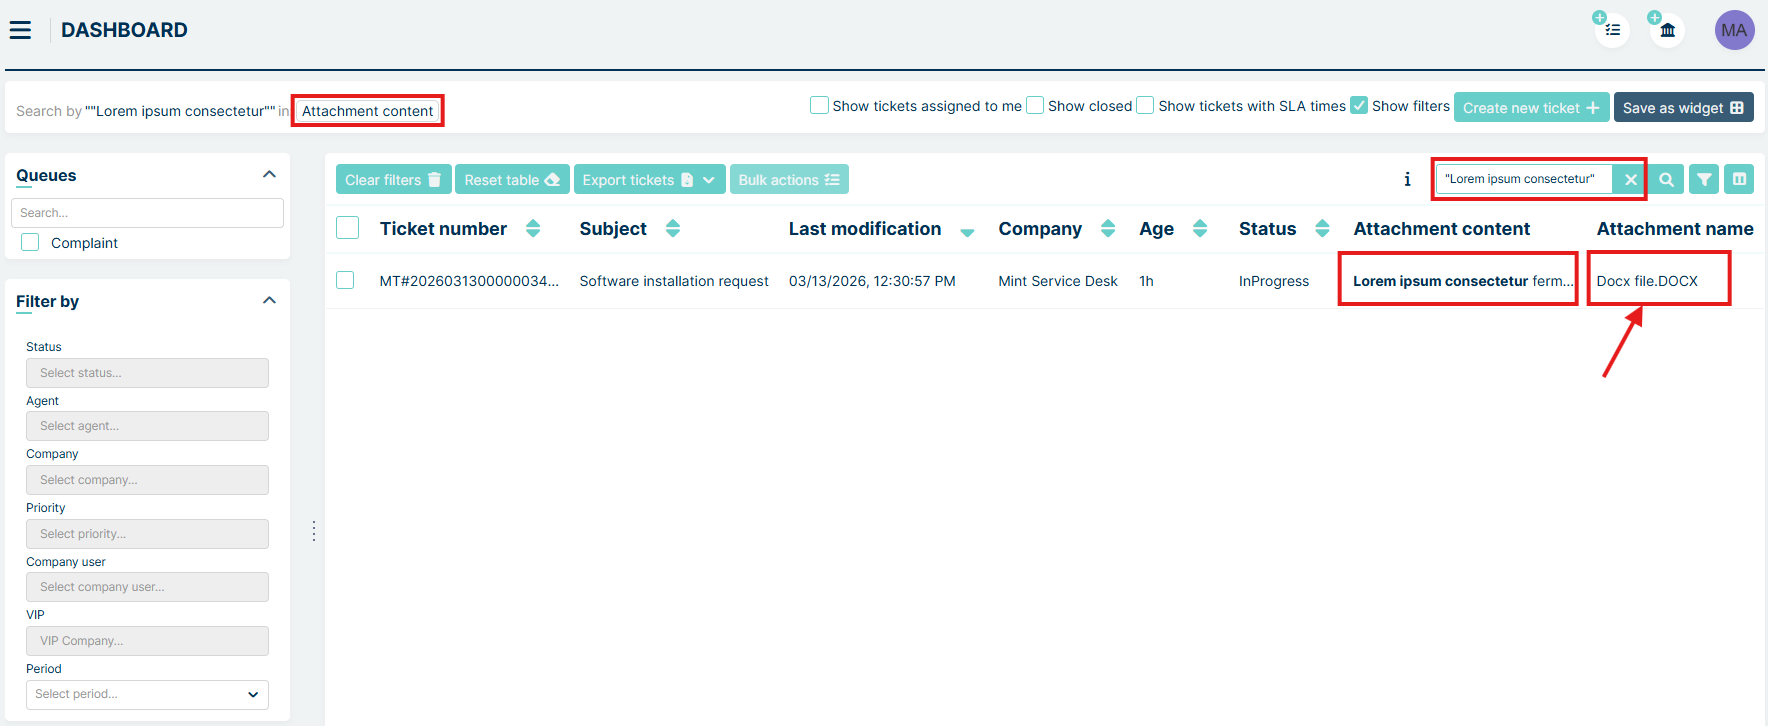
USING THE FULL TEXT SEARCH
To search for tickets, first choose which column you want to search by: Attachment Name, Article Content, or Attachment Content. This activates the full text search engine
Important: Once these colums are chosen by user, the filters in the Filter by section are temporarily disabled.
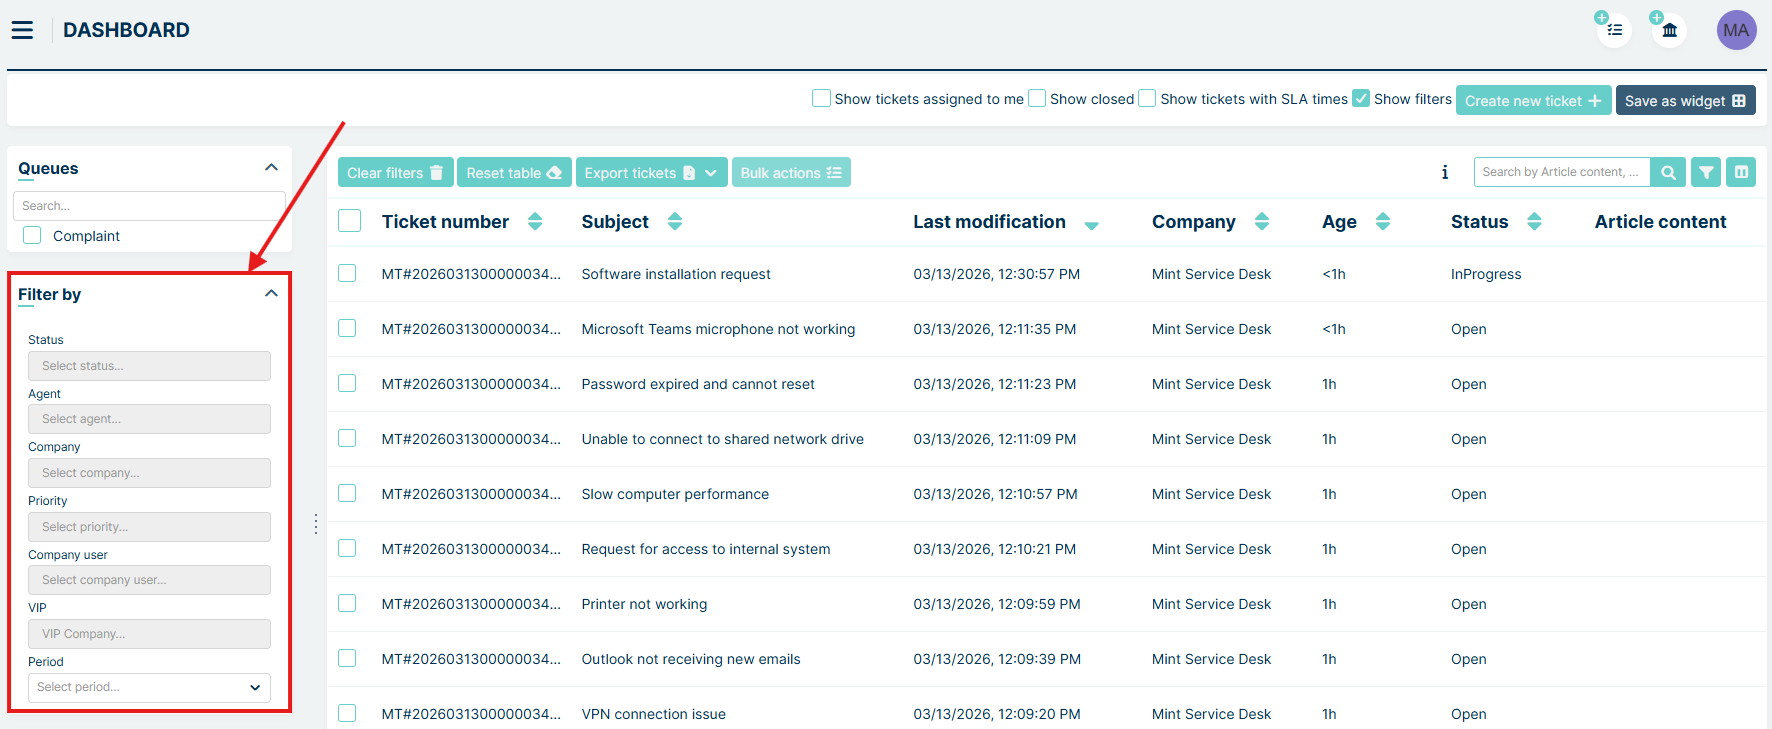
This means you cannot apply filters while performing full text search. If you need to filter the ticket list first, do it before selecting these columns.
To start searching, type your phrase in the Search by field. The system will show all tickets where your phrase appears in the selected type of data. For convenience, you can also display the column you are searching by to quickly see where matches were found.
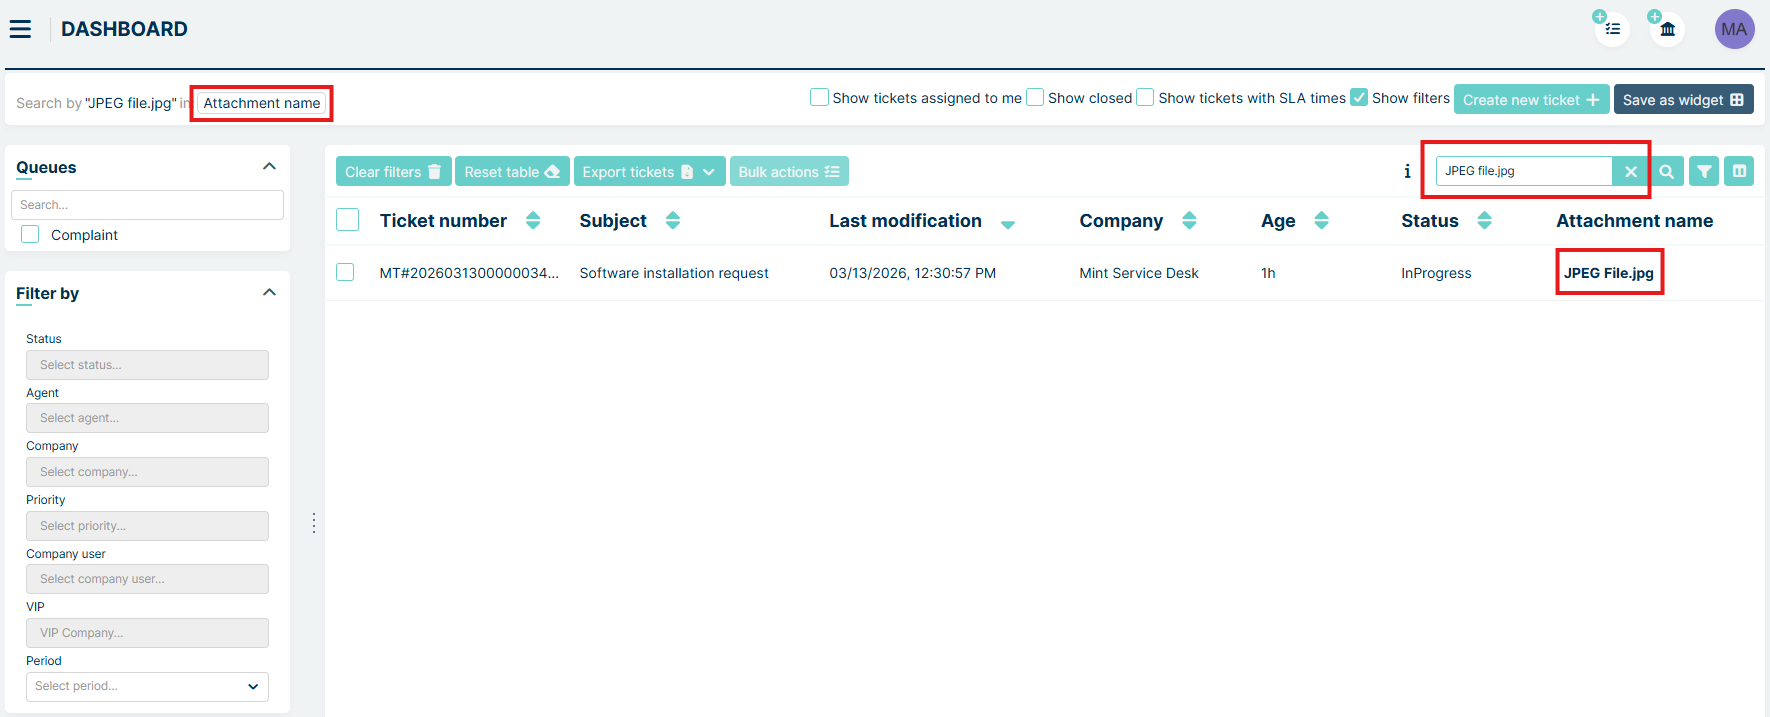
When searching by Attachment Name, the column displays the first matching file name from each ticket.
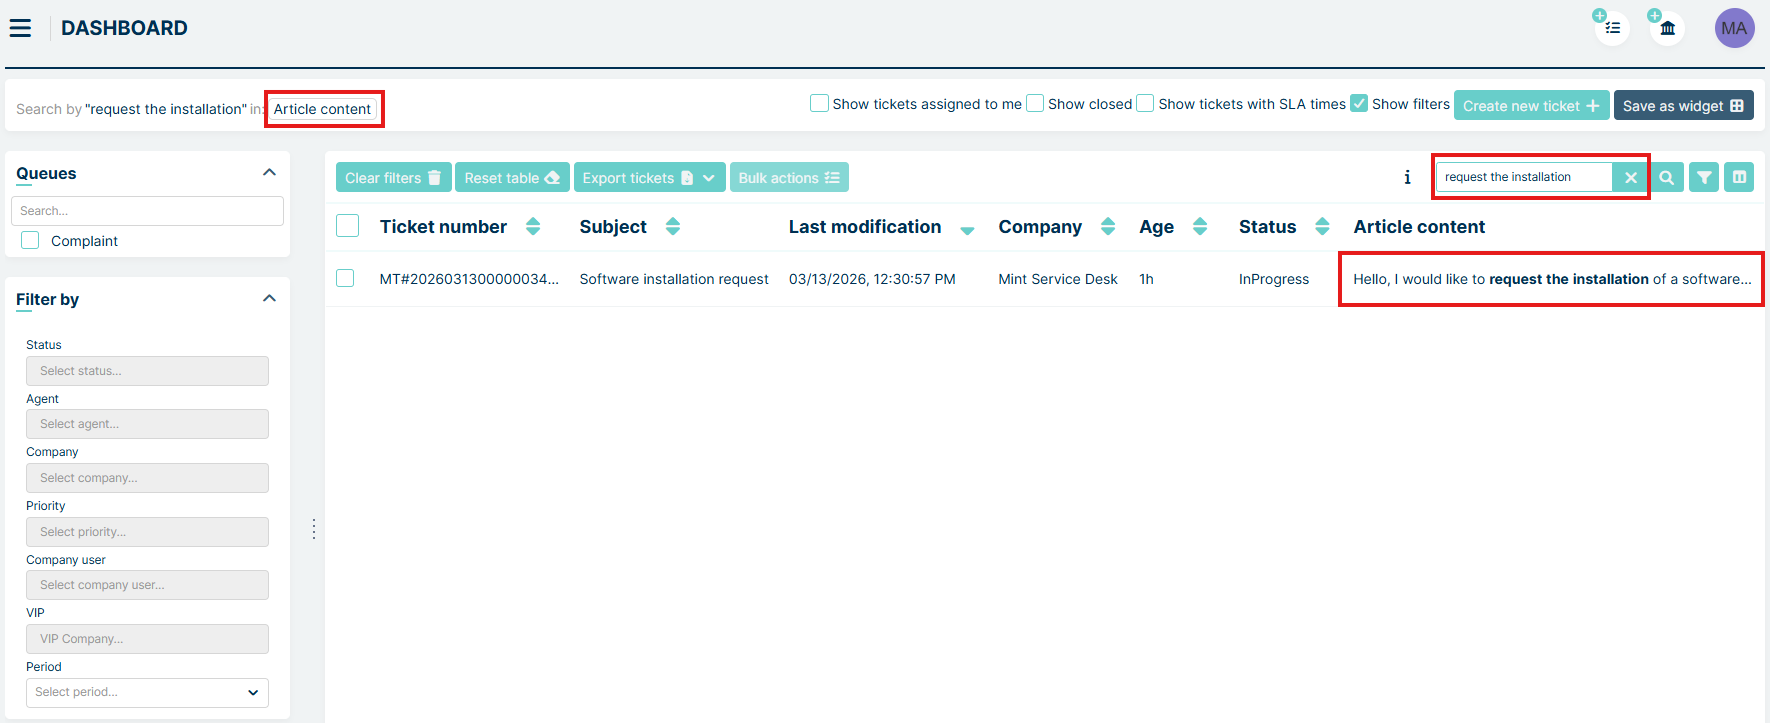
When searching by Article Content, the column shows a larger fragment of the article text where the search phrase was found.
When searching by Attachment Content, the column shows a larger fragment of text extracted from the attachment containing the search phrase.
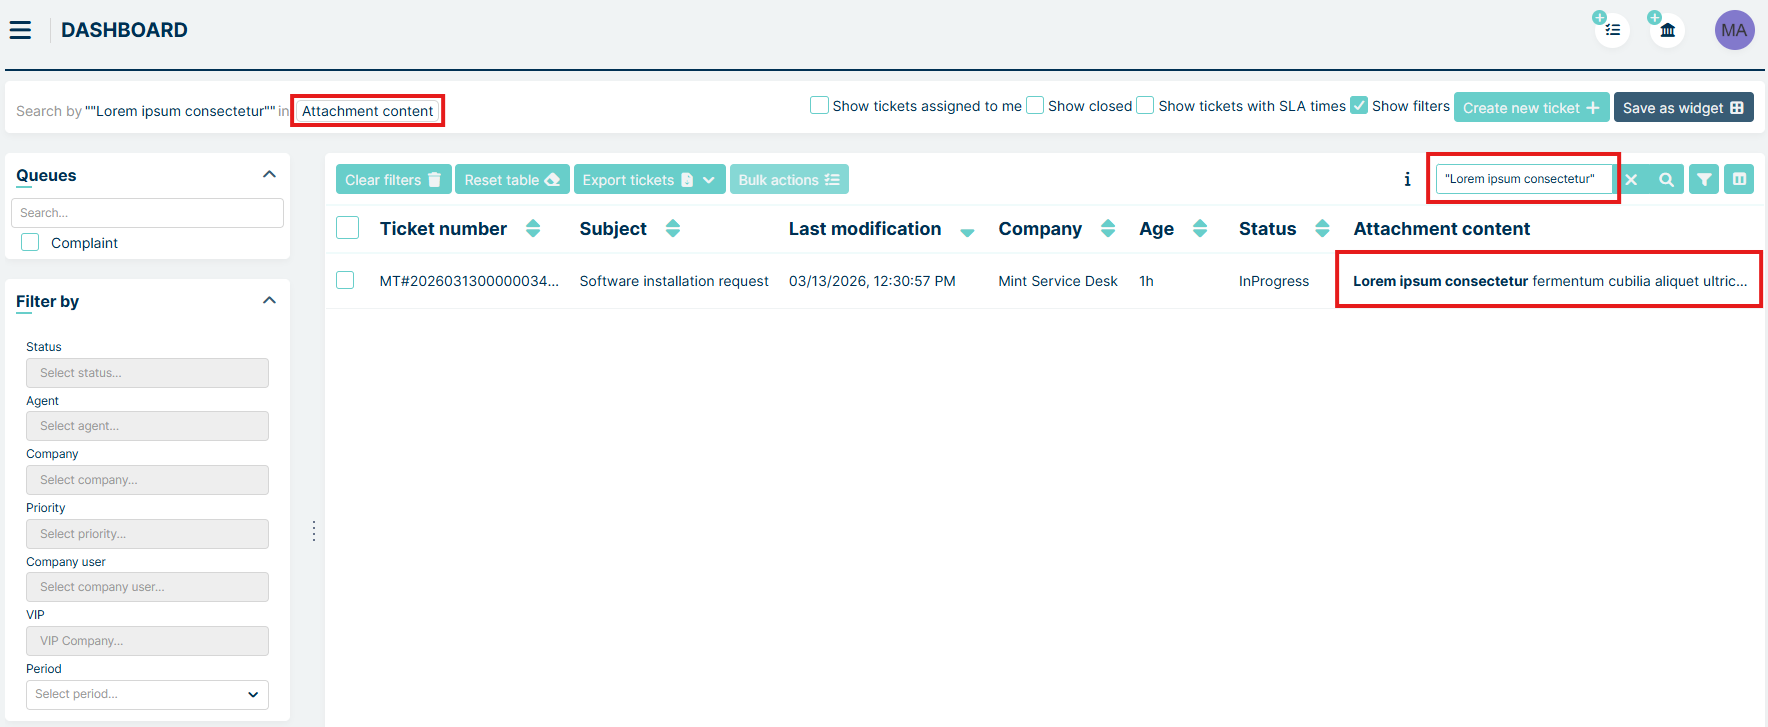
If you are searching only by Attachment Content and the Attachment Name column is also visible, the system shows which file contains the matching phrase.
USING LOGICAL OPERATORS
The search supports logical operators to refine results:
AND – finds tickets containing all the words you enter (this is the default)
OR – finds tickets containing at least one of the words
NOT – excludes tickets containing a specific word
You can also search for exact phrases by enclosing them in quotation marks:
"technical documentation"
Wildcards make searches even more flexible:
* – matches any number of characters
Use case: we want to find file named example.txt. Searching for example* will find any attachment whose name starts with example.
? – matches exactly one character
Use case: we want to find file, but we are not sure, if the file was named example1.txt or example2.txt. We can use ? wildcard and type example?.txt in search field to find the file.
SEARCHING ATTACHMENT NAMES
When searching by Attachment Name, you must either enter the full file name including the extension or use wildcards/operators. Partial words alone will not return results.
Examples - we are triyng to find file example file.txt:
Search Example |
Result |
|---|---|
example file |
Not found |
example file.txt |
Found |
example* |
Found |
*file.txt |
Found |
ex?mple file.txt |
Found |
“example file.txt” |
Found |
For Article Content and Attachment Content, you can freely combine phrases, logical operators, and wildcards to refine your search.
TIPS FOR USERS
Always choose the correct column before searching to get accurate results.
Use quotation marks to find exact phrases.
Use wildcards to handle variations in spelling or file names.
If results seem too broad, combine terms with AND or refine the column or content type.
You can select one or more full-text search columns to search across multiple data sources at once.
You can combine standard columns with full-text search columns to include all selected fields in a single search.
NEW TICKET
If you receive a phone call from a customer or if you want to create an internal
ticket, then you need to create a new ticket. In all cases, all you need to do is
to click on one of two buttons: : or , located on the top
right side of the Agent Portal.
A new ‘Create new ticket’ screen will be displayed.
When you receive, for example, information that some of your Customers have a problem/need help but did not or (by any means) cannot create a Ticket, as an Agent you can, while creating a ticket, assign ‘Company’ and a ‘Company user’ to the ticket.

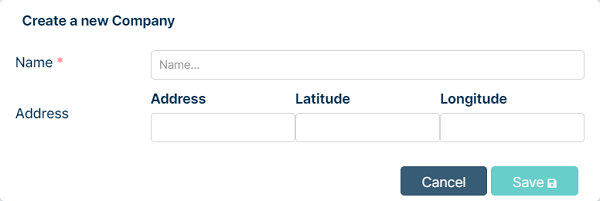
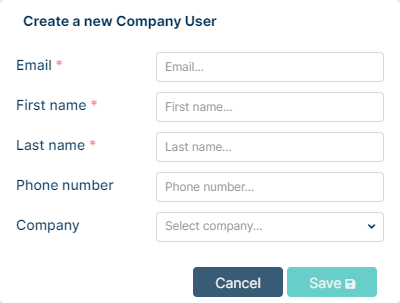
In this place, you can can also quickly add a totally new Company and Company
user by clicking on the button (Admin can hide these buttons for Agents by
checking ‘Hide the ability to create a client and company’ in Users -> Roles ->
specific agent role). Depending on the choice you will see one of two following windows.
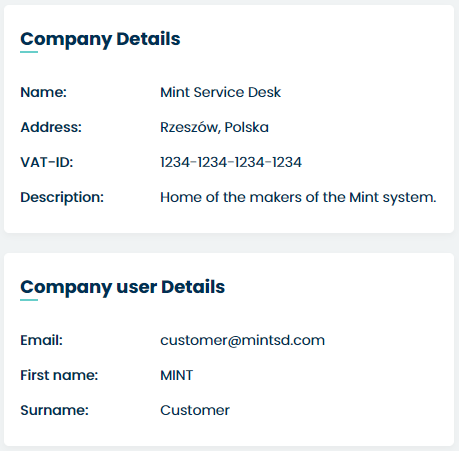
Once you select a Company/Company user or add totally new one additional information will appear on the right side.
Now, you need to add some required (marked with a *) information such as “Subject” (a very short description of the incident, request, etc.), “Description” (detailed information about the problem, your need, etc.) and also choose a right ‘Ticket type’ and assign the ticket to a right queue by selecting one on the ‘Assign to queue’ list.
You can also add the asset (from those which are available for you) if Client’s problem/inquiry etc. is related to any specific device/asset.

Apart from the above you can also choose a ‘Service’ (along with SLA/parameters/priorities which are specified individually for each service).
If you want you can add some attachments (pictures, screenshots, etc.) and even select a ‘Priority’ of this ticket.
If you choose a ‘Ticket type’ which includes some additional attributes, you will see, that on the right side of a screen a new block has appeared (located below the ‘Company Details’ and ‘Company user Details’ parts), containing some fields and other options, where you can add even more information to his ticket. The information you might see here depends on the Administrator user. He is the only person that can create and manage those attributes.
Like it was previously described in the Customer part, when you’re typing the description in the ‘Description’ field, MINT Service Desk will search the Knowledge Base database for the topics which might include some useful information or even a solution to the problem. If the system finds the right topic (by analyzing the words you used in ‘Description’) it will display it on the right side.

To see the details just click on the topic and a new window will appear.
Now, once you completed filling up the information, you need to click on
the button (right bottom corner) to create this new ticket. Once you
do that you will be automatically moved to the ‘Ticket Details’ section.
TICKET DETAILS
As mentioned before, from the ‘Dashboard’ view, as an Agent you can click on any of the tickets on the list in order to move to the ‘Ticket Details’ part of the system. It’s also a place where you will be moved once you create a new ticket.
Right here, all of the Ticket Details will be presented on the right
side. Those are: “Ticket number”, “Company user” (by clicking the
 icon you will be able to change/add a Company or Customer),
“Company”, “Phone number”, “Status”, “Ticket relation type”, “Assignee”, “Queue”, “Assets”,
”Ticket type”, “Service”, “Priority”, “Reminder”, “Age”, “Estimation” and “Spent time”.
icon you will be able to change/add a Company or Customer),
“Company”, “Phone number”, “Status”, “Ticket relation type”, “Assignee”, “Queue”, “Assets”,
”Ticket type”, “Service”, “Priority”, “Reminder”, “Age”, “Estimation” and “Spent time”.
At the very top there is a  button, it is used to delete tickets.
Next to it there are two buttons which are used to switch between tickets.
button, it is used to delete tickets.
Next to it there are two buttons which are used to switch between tickets.
Merge tickets
This function can be enabled or disabled in admin profile in Settings => General => Tickets
Merge ticket is a function that merges two tickets into one. All articles and files are transferred to the ticket selected by us, while the merged ticket has only its history. Merge ticket can only be made by the agent, the customer can only view its details. It is not possible to merge an already merged ticket.
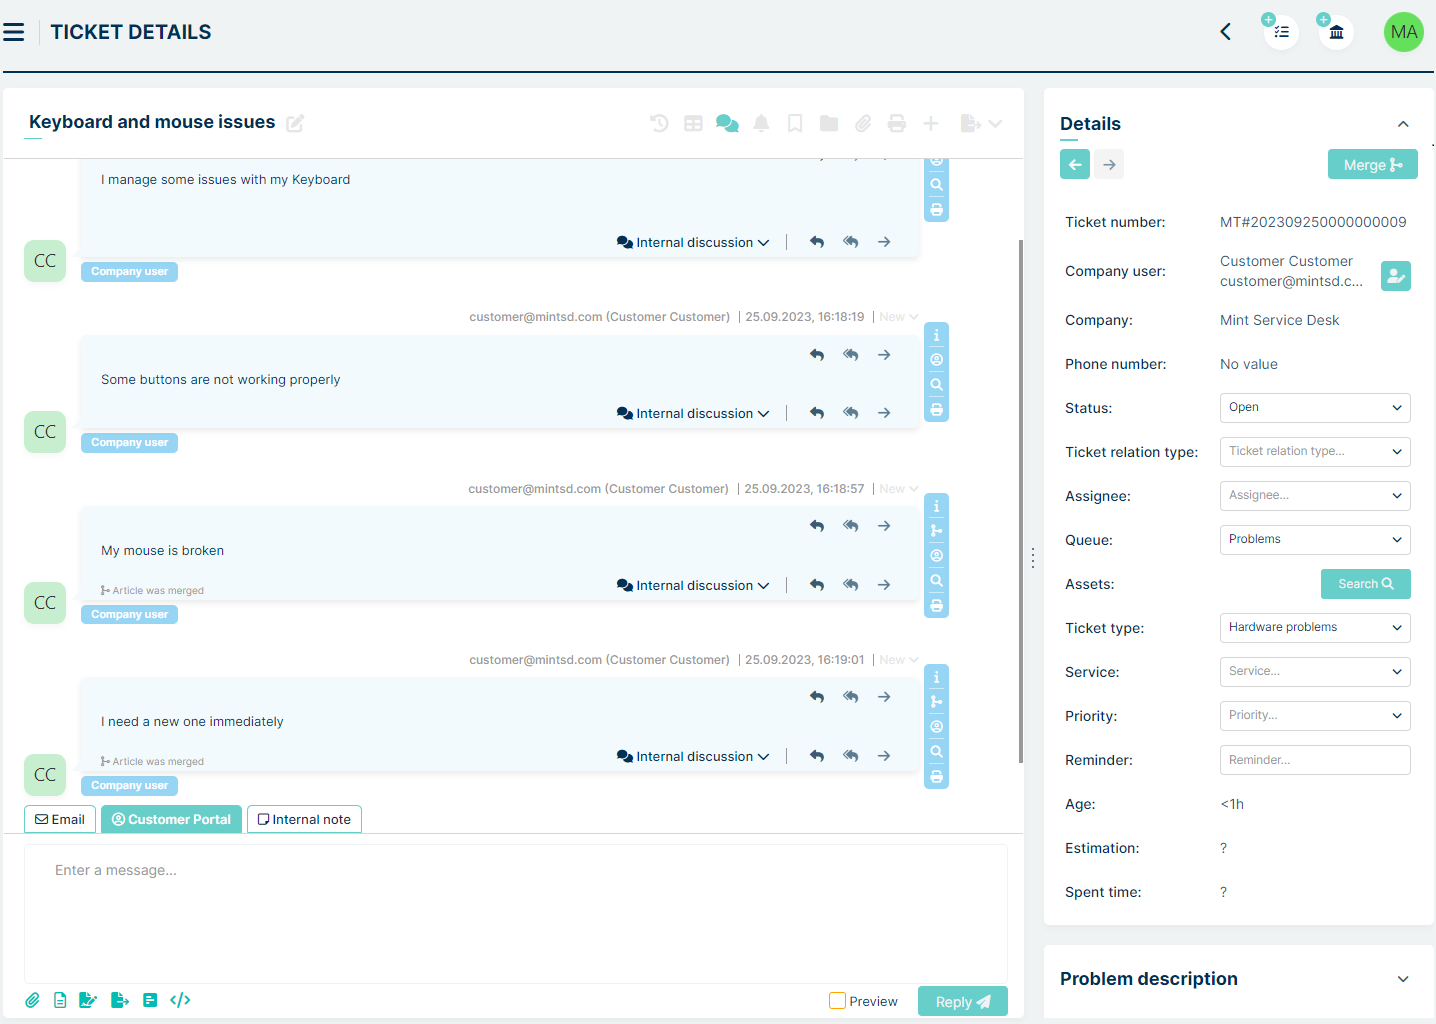
Let’s try to perform the Merge Ticket action in sample case.
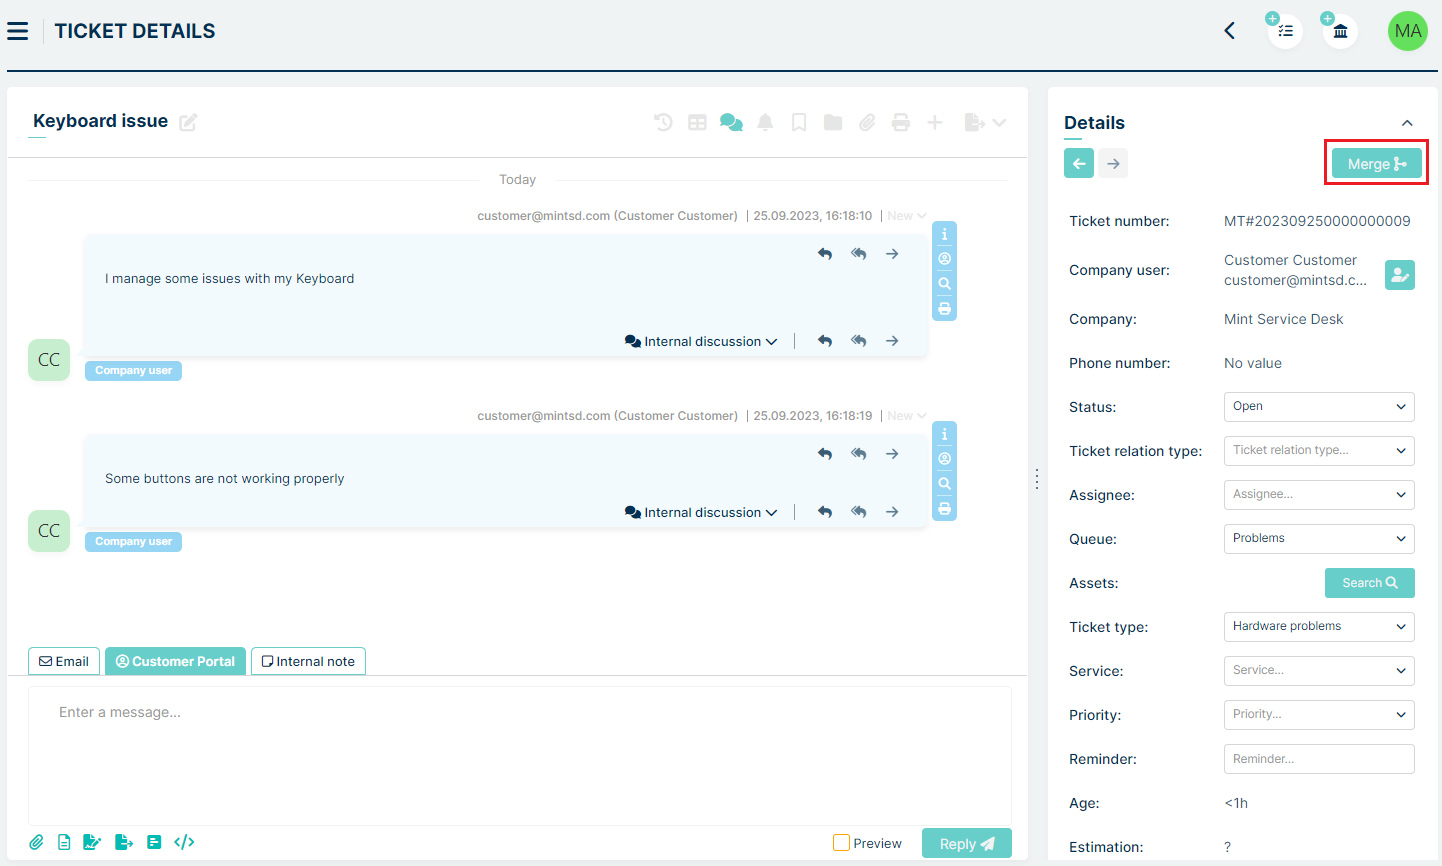
A customer is having problems with his keyboard and has sent in a ticket
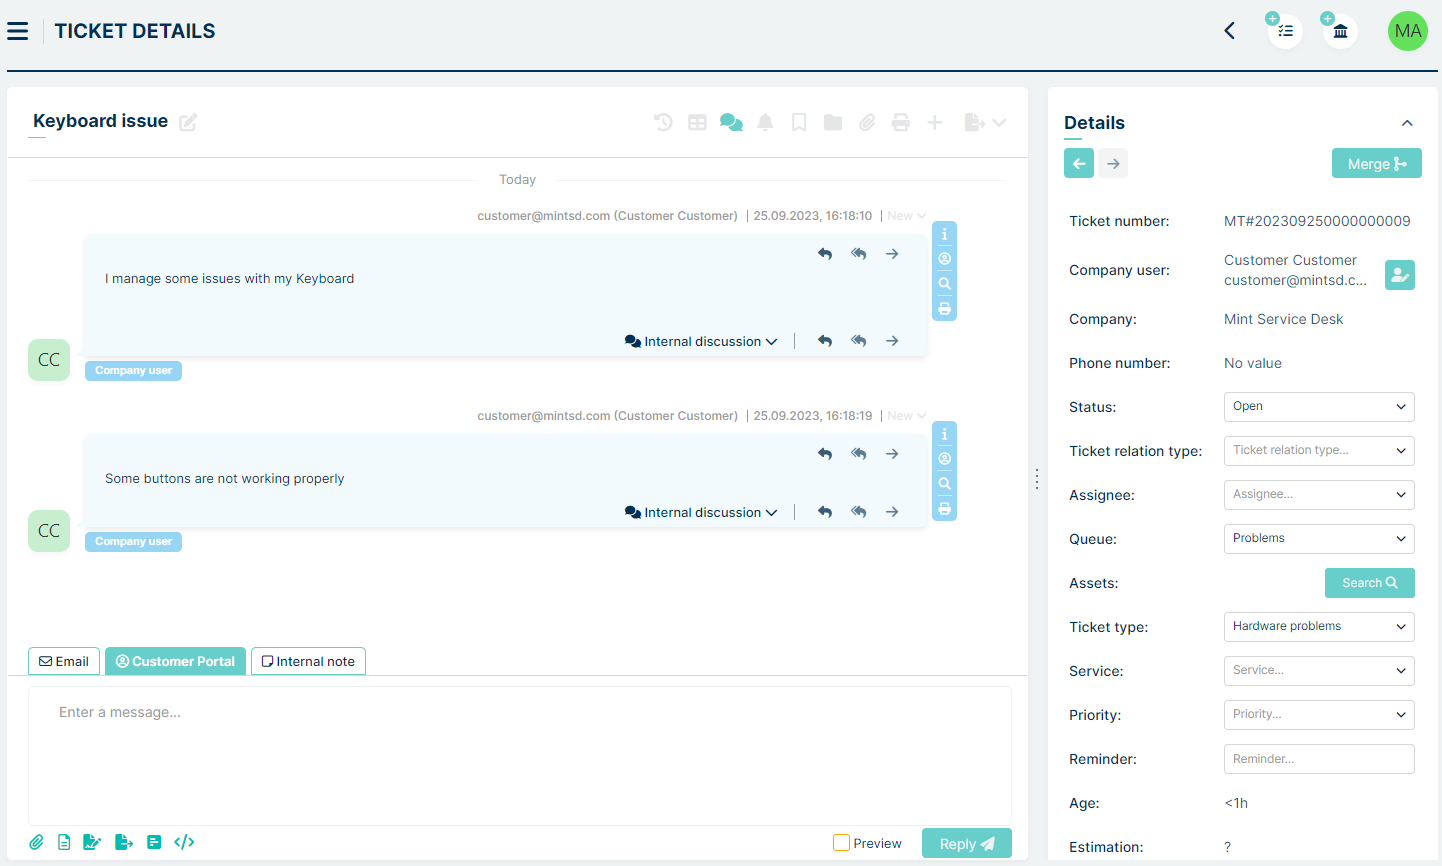
Moments later, he sent a similar request regarding mouse problems.
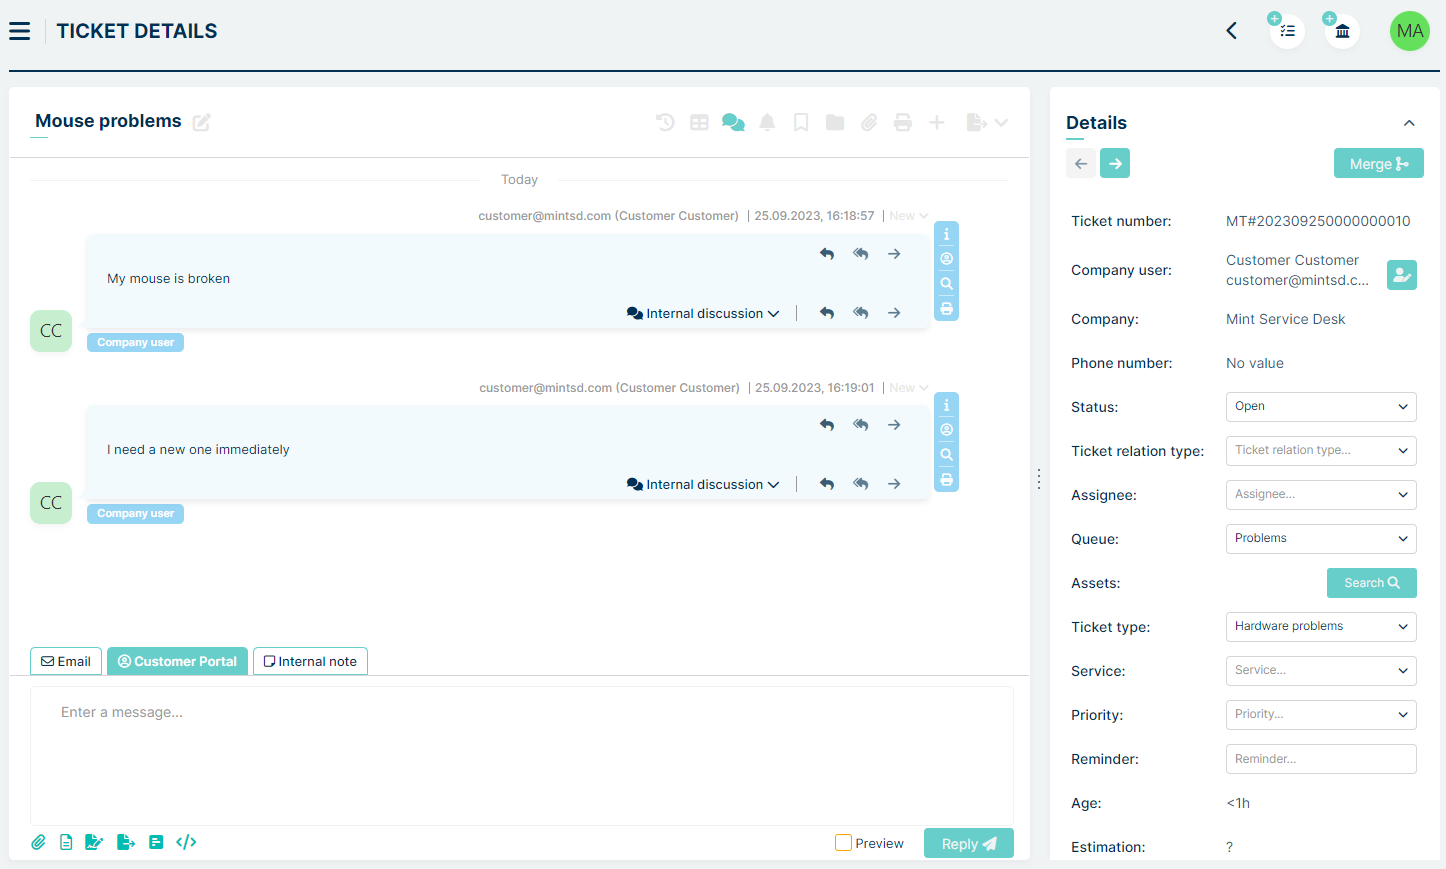
Now, there are two tickets in the system regarding a similar issue.
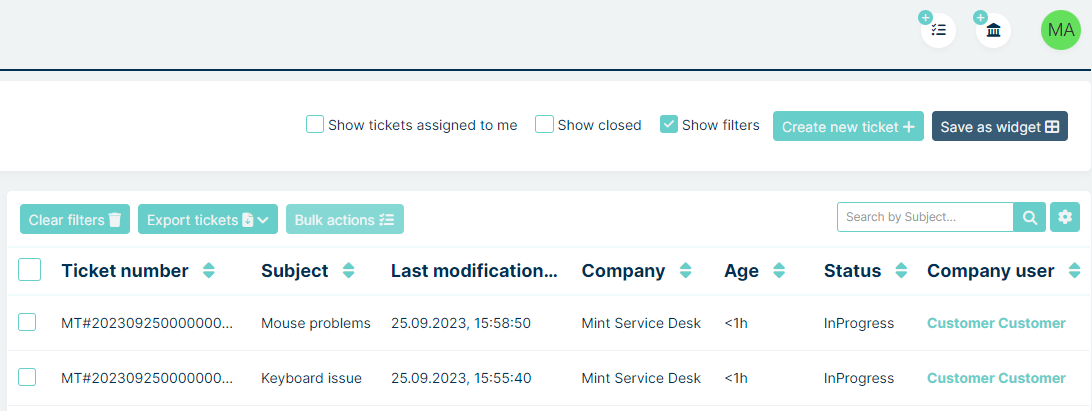
You can merge them to one case.
First we need to enter the ticket that we would like to merge. This ticket will lose all its articles
and attachments. The  button is visible in upper right in the “Details” section
After clicking the Merge button, a modal with Tickets should appear.
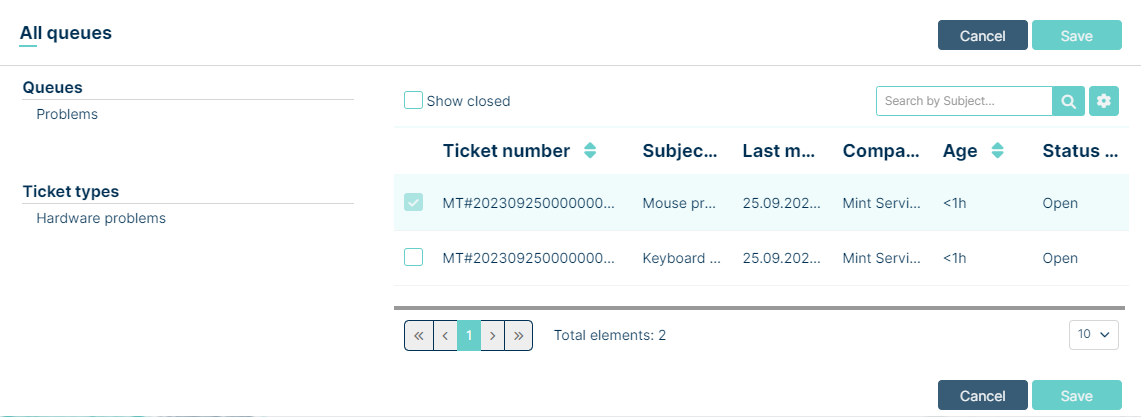
We can filter the queues and ticket type we are interested, as well as adjust the columns and even search through the search field. Next we select the chosen ticket by checking the checkbox. The ticket to be merged must be selected in the modal table. This modal should allow us to select only one ticket to which the data from the merged ticket is to be transferred. After click Save button at bottom of modal, the information appear:
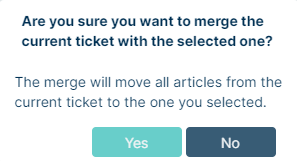
After pressing the “Yes” button, the ticket merging process starts. Choosing “No” rejects the query and takes us back to the modal. After merging, the ticket we choose in the modal opens. all our articles from the merged ticket should be arranged according to the creation date. All the attachments should appear both in the articles and in the Attachments view (the paperclip icon).
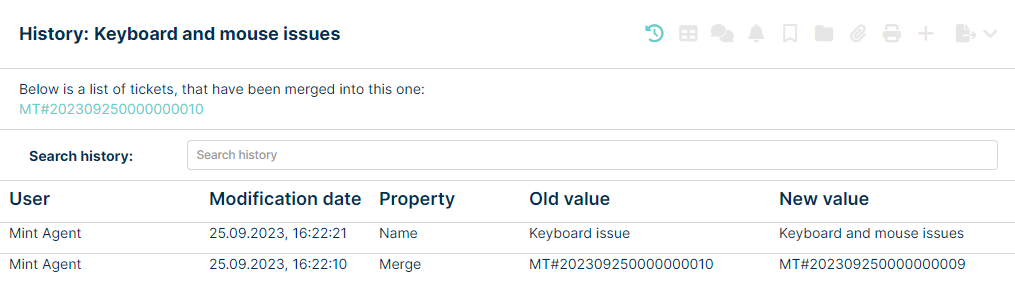
When we enter the ticket history, we have the ticket number that has been merged and an entry in the history about the merge.
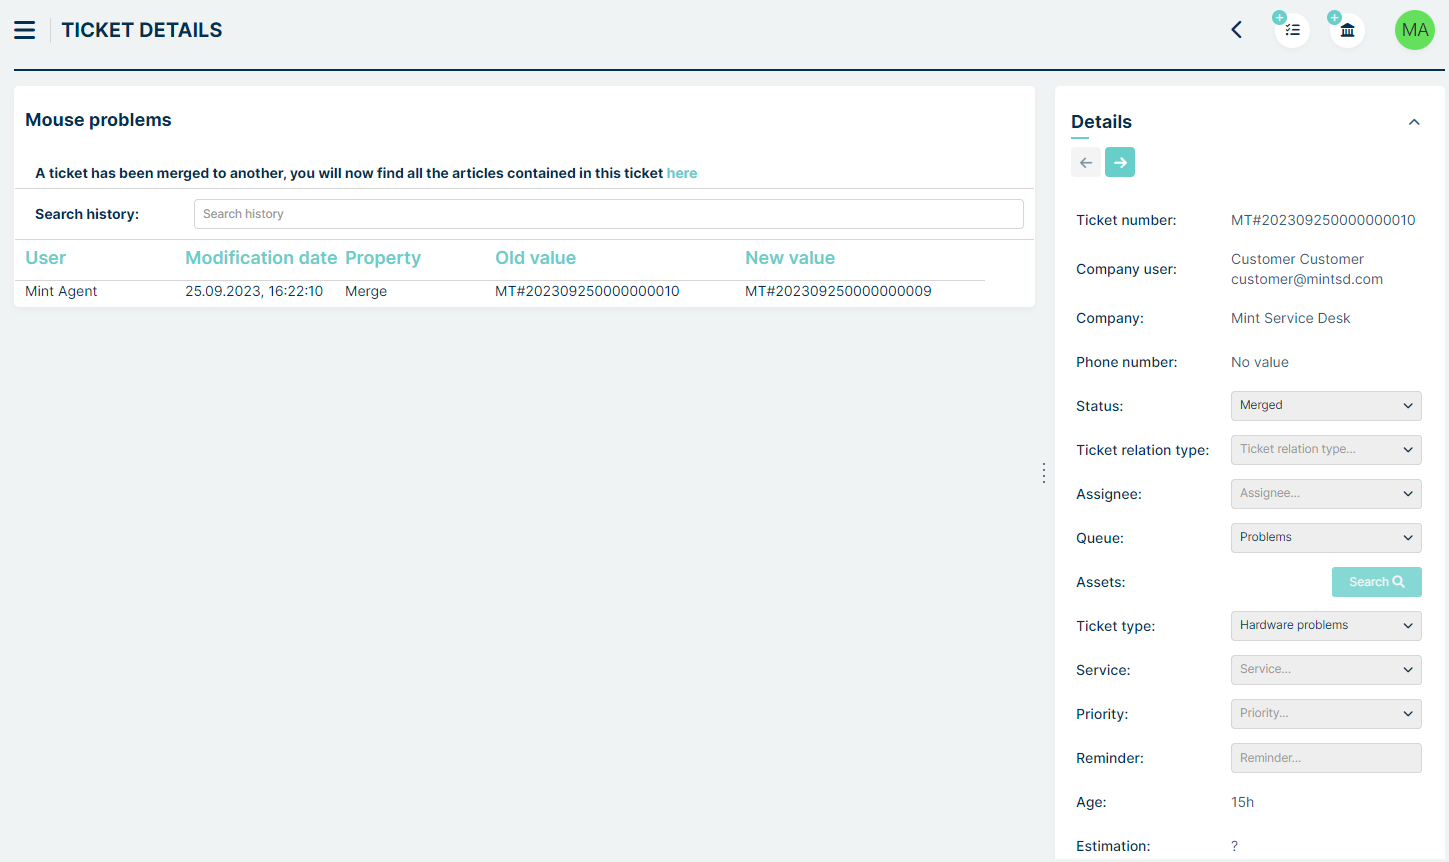
When we enter a merged ticket, we have blocked all fields with the data like Status, Queue, Ticket type etc. We have access to ticket history, where there is information about where the ticket was merged.
Upper sidebar
To view the ticket history, press the button. A window will appear where you can see its
history. Ticket type, service, queue, etc. changes will be shown here
Take notice, that as an Agent you are able (unlike the Customer) to change most of the details. You can add specific assets to the ticket, but also relate this ticket with any other, if the problem/request/inquiry etc. is similar to some other one.
If you click on of those two positions, you will see a new window, where you can either search for an asset or a ticket you want to add (asset) or relate (ticket) with your problem. Below you can see the look of the window, where you can search for an asset to add to your ticket.
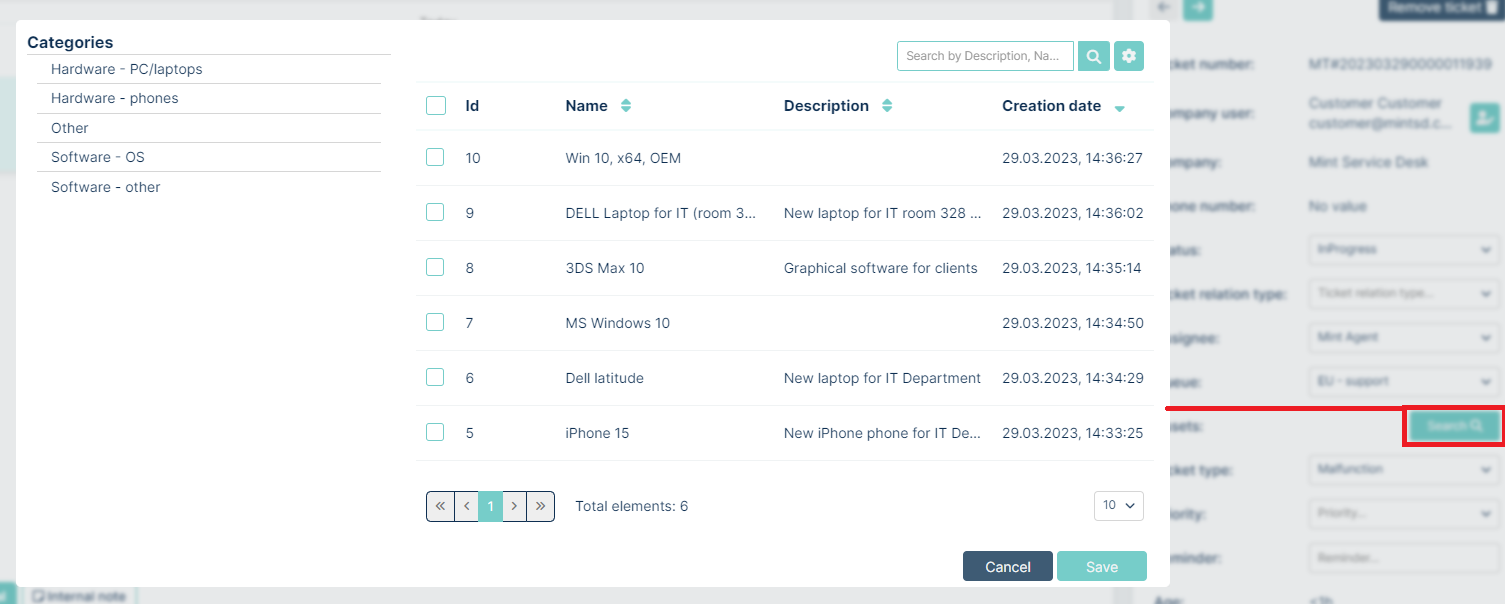
The process of searching for a ticket, you want to relate to yours, looks very similar. The only difference is that you can filter them by Queue or Ticket Type (while for the assets you use Categories).
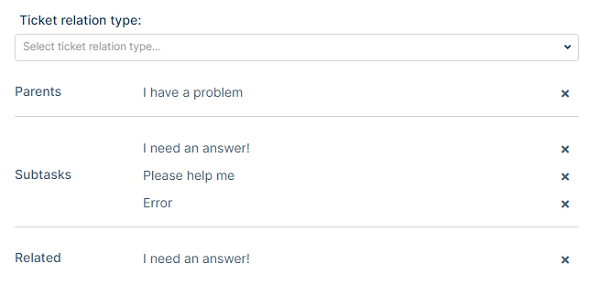
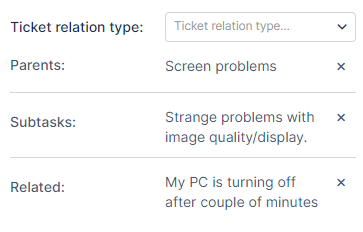
If any two requests are related then the agent can set this in the Ticket relation type field. The agent will have three choices after pressing this button:
Related
Parents
Subtasks
After selecting which option you want to link, you need to select the ticket you want to relate.
The effect of linking several tickets:
An Agent can also set a “Reminder”, which means that he can select a specific day and time when he will receive a notification (in the MINT system and on agent’s email).

While creating a reminder agent can also write o note describing, for example, the next action to be made.

It is also possible to estimate the time in which the deadline for closing the ticket is expected.
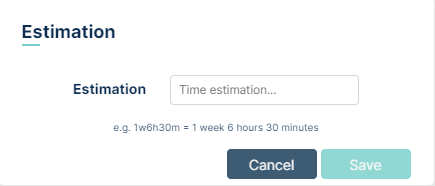
To estimate the time, enter appropriate values in the “Time estimation ..”
field and press the button
An agent can report how much time he spent on resolving a ticket.
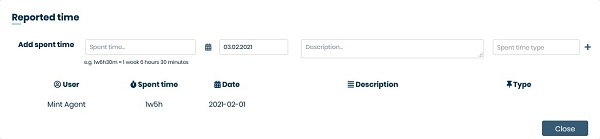
In the Spent time… field, the agent enters how much time he spent on
resolving the request. In the next column, a day is selected from the calendar.
If you want to add a description, you can do it in the Description… field.
The last thing you can add is Spent time type which is set in the admin panel.
To add the time spent, click on the  button.
Remember that when entering values in the fields Estimation time… and Spent time… after entering the number, you must use one of these letters:
w: weeks
d: days
h: hours
m: minutes
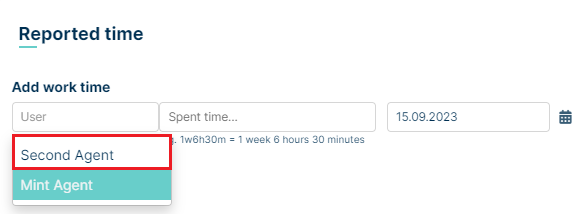
If agent has permission “Work time coordinator” in his Role, he can report another agent’s work time in ticket.
Below the ‘Details’ section, you will find the ‘SLA timeline’ section showing interactive counters (with progression bars) with time left for e.g. responding to the client or for resolution of a problem. Those timers are refreshed each second and progression bars are filling up. Once any of them is full (or close), the right person (depending on Admin choices made in the Services section) will receive a notification. It can be you or any other agent.
The moment Client creates a Ticket (if he’s using Mint) or a new ticket is created from email message, that new ticket will be waiting for an Agent to be assigned to it.
When you, as an Agent enter the Ticket Details of such Ticket you will notice three timers (or less/more if Admin user decides so).
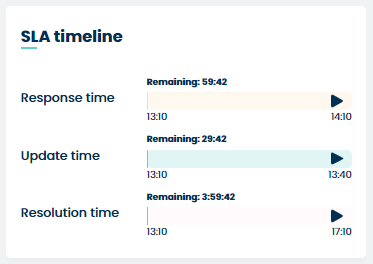
When you assign yourself to a Ticket those timers will not change or stop. However, when you write any message to the Customer, even a simple ‘Hi’, two of those timers will disappear (‘Response time’ and ‘Update time’).
The only timer that stays until the problem is fixed and the ticket is closed is ‘Resolution time’ which shows the time limit before SLA conditions will be broken.
If the Ticket state will be changed to the one which has also a ‘Stop SLA’ option activated (see ‘Admin>Tickets>Statuses) the SLA timer will be stopped.
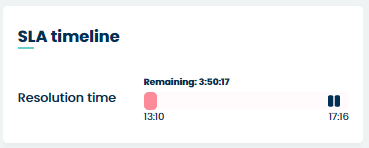
Once the ticket Status is set back to one that has no ‘Stops SLA’ option enabled, the timer will be running again and counting ‘Remaining’ time down.
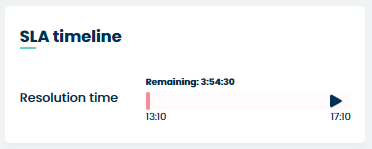
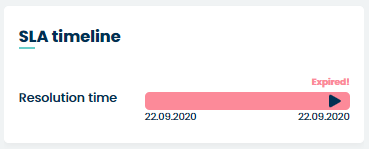
If you forget about the ticket and the timer runs out you will not only receive a notification about it (if it was configured by the admin) but also you will see the timer just like on the following screen.
Below the ‘SLA timeline’ section you will find some additional attributes/information (depending on the Ticket Type you choose earlier). They can be created and managed by the Admin user in Admin > Tickets > Custom fields > Tickets structure – it will be all explained later in this guide.
Below the Details, unlike the Customer user, an Agent is able to see the Knowledge Base topics that have been found and might include some useful information or even a solution to the Client’s problem. If you don’t see any Knowledge Base information here it means that the system has not found any topics in the Knowledge Base database, based on the Ticket’s description.
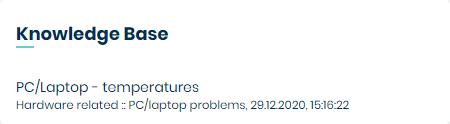
Right here you can also click on the displayed Knowledge Base topic in order to see its details.
Now let’s go back to the main section of the Ticket Details view. The messages and details of the communication are the main part and take the most space.
Messages can be displayed in a framed or chat view by selecting one of
them . The button responsible for that is located at the top
part of the view.

If you switch to a framed view (chat is set as a default
view) you will see the list of messages. To see details of each of them
just click on it (screen below).
The next two buttons next to chat/framed view: are used for
‘Notifications timeline’ and ‘Subscribing/Unsubscribing’ the ticket.
If you click first of them ()you will see a small window
containing the history of notifications created for this one particular
ticket. If you want to see previous activities just click
thebutton.
The second one, once activated () will send notifications each time something new happens within the ticket.
The behaviour of the button when clicked depends on the option selected under ‘Subscription management strategy’ in ‘Admin’ > ‘Settings’ > ‘General’ > ‘Tickets’
With the ‘Allow assigning only yourself’ option selected, You subscribe only yourself to the ticket by selecting the button.
With the ‘Allow agents to assign other agents’ option selected, if you are an Agent, you can additionally select the option to subscribe another Agents to the ticket.
By clicking option ‘Subscribe someone else’ a new modal will appear
You can choose users from the list
and add them by pressing the arrow button. Agent will appear below
If You subscribed also Yourself, You will be on the list too
You can easily unsubscribe other users by clicking the
With the ‘Everyone can assign everyone’ option selected, You have the possibility to subscribe yourself and another users (Agents and Customers) to the ticket by selecting the button. Please rememeber that with this option set, Customers can see a list of all Agents in the system.
Subscribing users is similar to subscribing in the “Allow agents to assign other agents” option (above).
There are also three more buttons we need to describe.

This button ( ) is a File Repository. We will explain it more here.
The file repository is a place for the orderly storage of “MINT” application documents. Each user level has different options for dealing with files from the repository. Agent can pin files from “Buckets” to selected tickets in ticket details and also download files.
After click on () button, we can see tab with Pinned files on the left
and All files on the right.
All files section contains buckets and files uploaded by Admin. Pinned files section contains files pinned to ticket from All files section by Agent
Let’s try to pin file to ticket. First we need to click on specific bucket and expand it
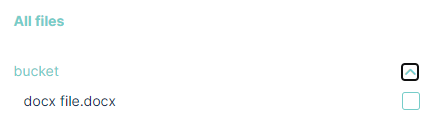
Then we need to select checkbox related to file we want to pin. The  button appear.
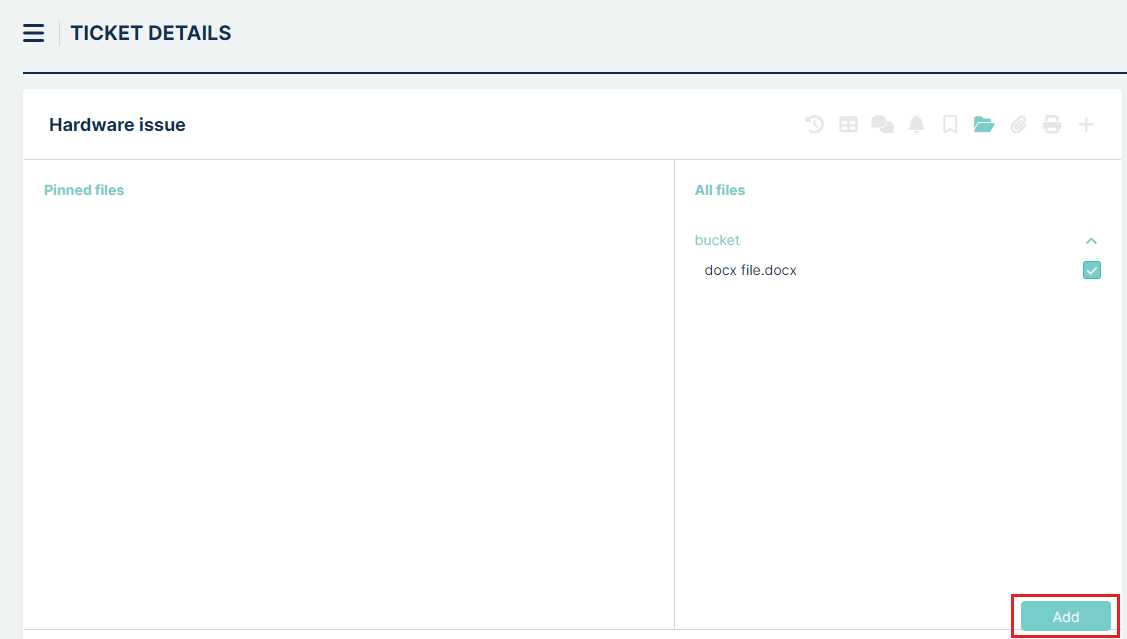
Clicking button makes selected files pinned to ticket in Pinned files section.
These files will be visible for Customer assigned to ticket.

If you want to unpin file, you just simply click ( ) button. After this, you will
see the modal to confirm operation:
) button. After this, you will
see the modal to confirm operation:

Downloading files
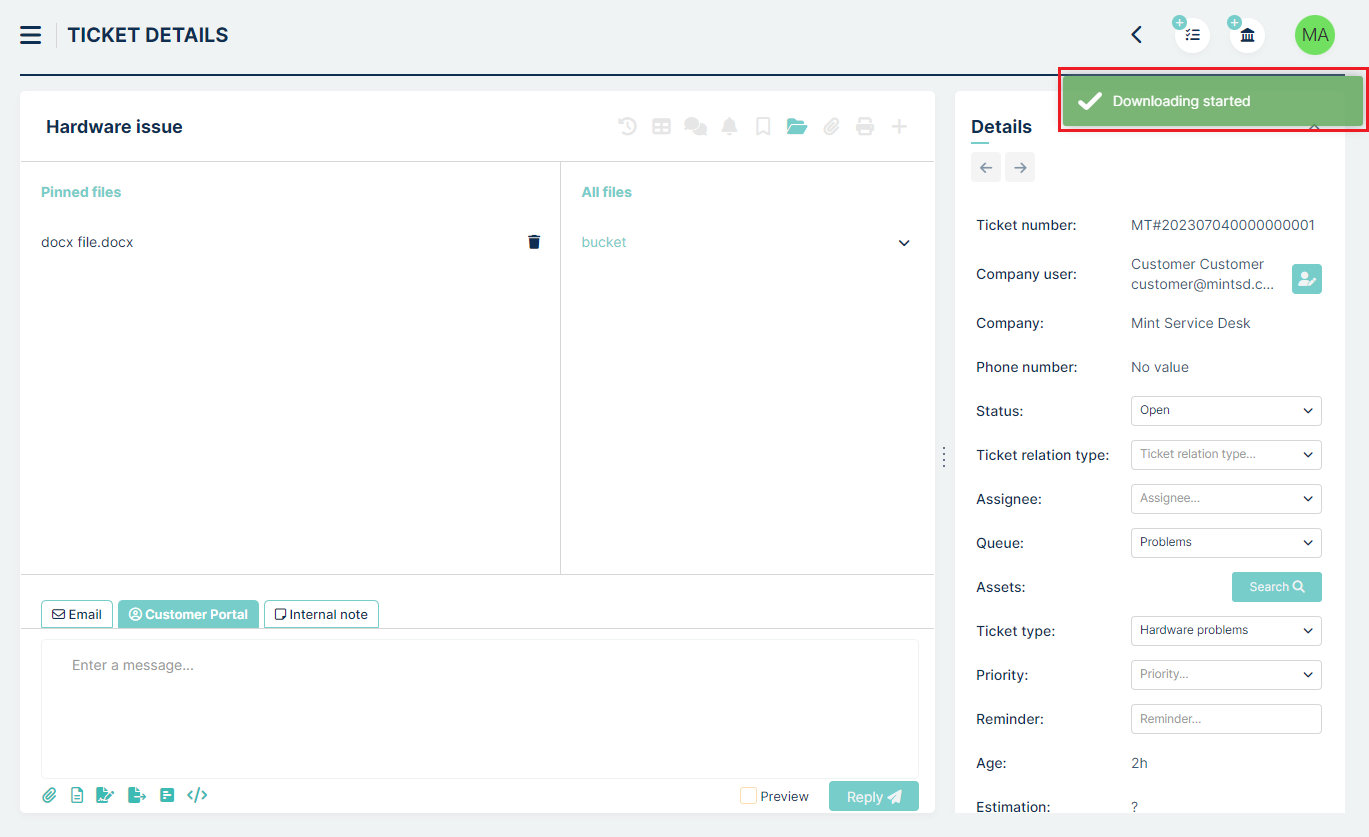
Let’s try to download file. To do this, we just need to click on pinned file. If file has less than 20 mb, the toast “Downloading started” will appear.
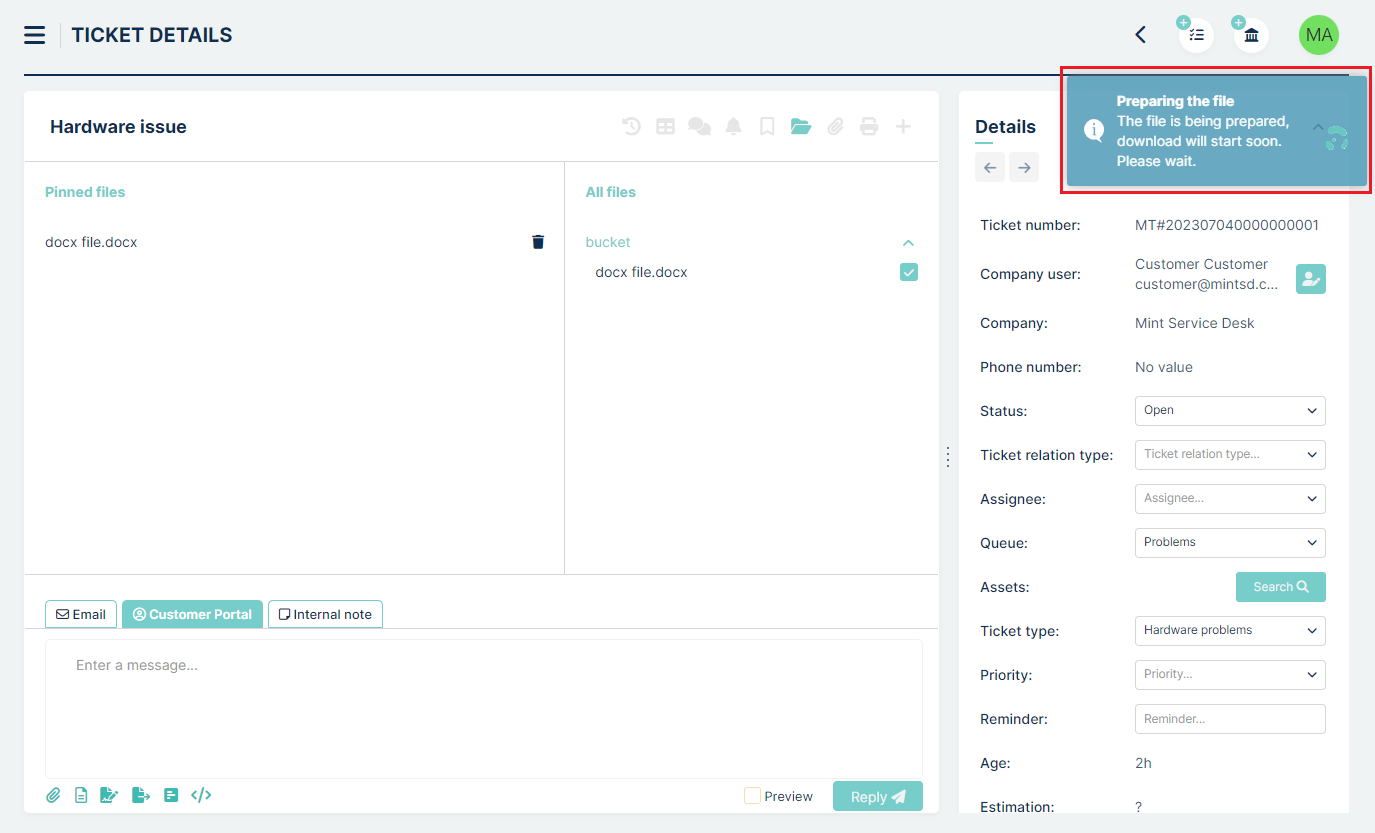
If file has more than 20 mb and less than 1 gb, we have additional toast before above, named “Preparing the file”:
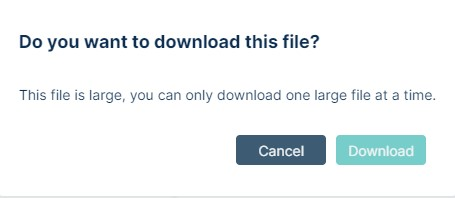
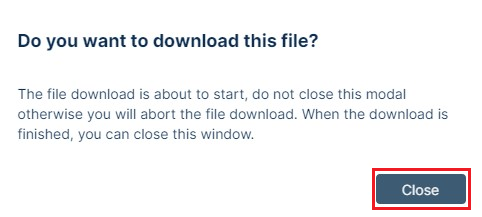
Finally, when file has more than 1gb and we click to download it, we will see information modal:
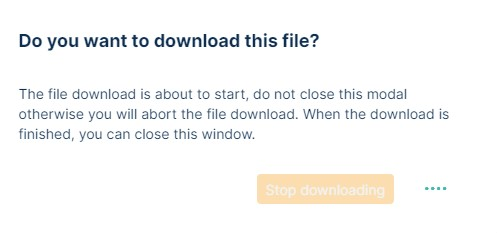
Clicking on “Download” button causes next modal to appear:
When download is finished, the Close button appear:
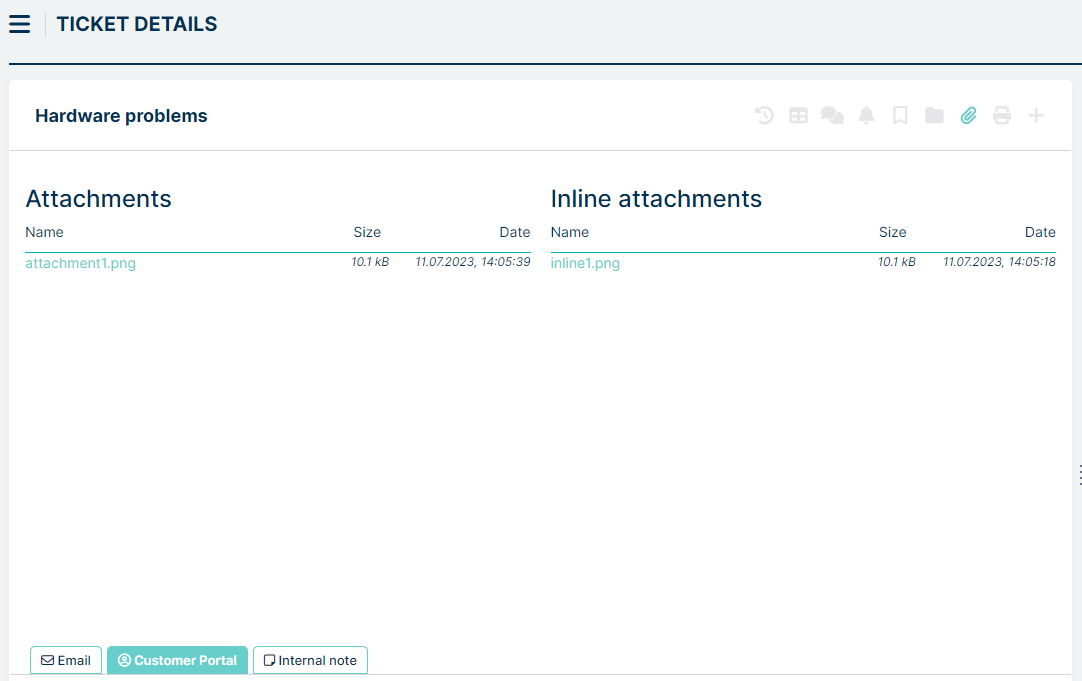
Next button ( ) directs us to Attachment View.

Here we are able to see all files connected to ticket. Left side contains standard attachments, while the right side contains inline attachments. We can easily download them from here just clicking on each file.
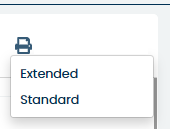
The printer icon () is used for Exporting the ticket content to .pdf
file.

Click on this button and you will see a small list with two options: Extended and Standard.
If you click on any of those positions a new file explorer window of your Operational System will be opened. Select the location where you want the .pdf file to be saved and click Save to save the file on your hard drive. Now go to that place and open the file.
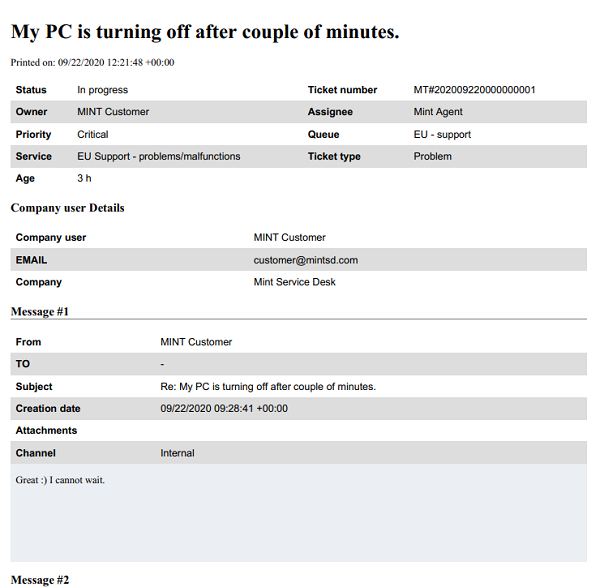
The .pdf contains the whole communication between agent and client as well as some crucial information e.g. Ticket owner, Current Ticket Status, Assigned Agent as well.
The difference between the ‘Standard’ and ‘Extended’ version of the saved .pdf file is that the ‘Extended’ version also includes system messages such as information about ‘Priority’ being changed or the Agent being assigned to the ticket.
Another button ( ) can be used by the Agent for creating a
new Ticket during a conversation with the Customer.
) can be used by the Agent for creating a
new Ticket during a conversation with the Customer.

For example, when you’re trying to find a solution for a Client’s problem and another one emerges, you can create a New Ticket which will be automatically related to already processed Ticket.
To do so click on the () button and select ‘Empty’ or ‘Inherit values’
from the menu.
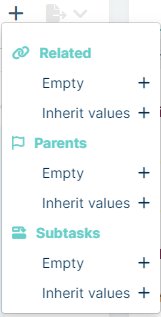
If you choose for example ‘Empty’ field from Related, you will be moved to the standard ‘Create new ticket’ view. Like it was described before, fill up all necessary information and create the ticket. After that ticket will be visible in ‘Related to:’ part of the Ticket details section. If you choose the second option, the only thing that will change is that some fields will already be filled (“Company”, “Company user”, “Subject”, “Ticket type”, “Service”, “Assign to queue”).
You can also create new ticket as Parent od Subtask to current, making similar step as with Related ticket.
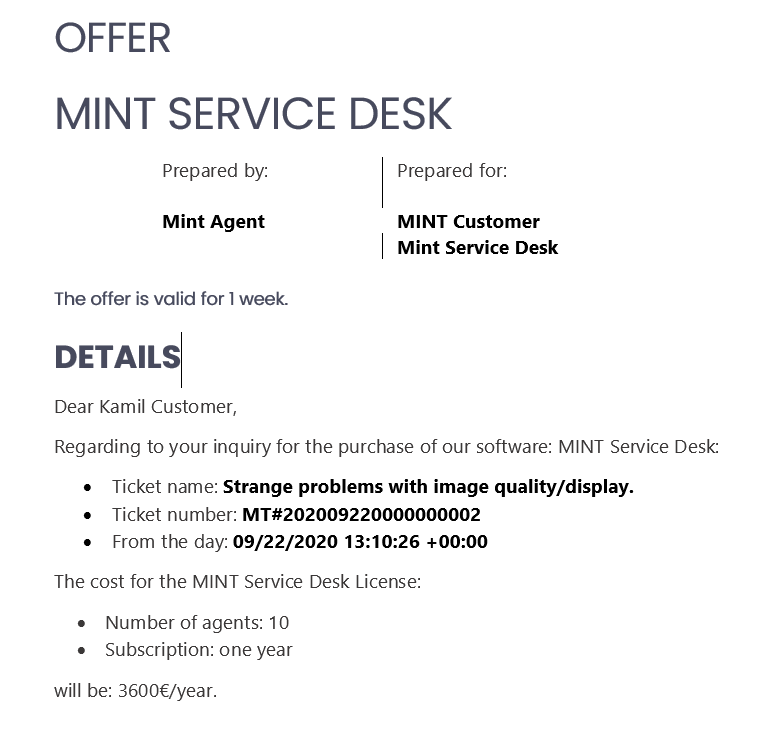
The last button ( ) is used for generating a document.

It uses ‘Document templates’ added by Admin to the system and replaces the ‘placeholders’ from the template with real data. Thanks to that you can quickly generate e.g. an offer document when the client asks for that.
To generate a document you need to click the button and from
the dropdown menu select the document template you want to use. If you don’t see
any positions here it means that the Admin user has not created any document
templates.

Once you select any of the templates you will have to select a place on your Hard Drive and Save the file. Once you open it the document will have ‘Placeholders’ replaced with the data taken from the MINT Service Desk.
For better differentiation placeholders that were replaced with real data are bold.
Now let’s see how the offer document template looks like before ‘Placeholders’ were replaced with data.
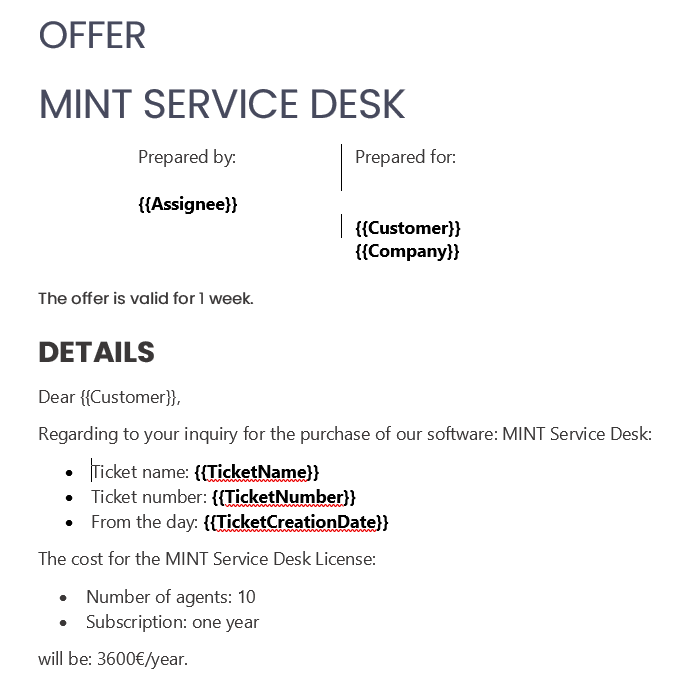
The whole process of creating Document templates and using Placeholders is described in the Admin > Tickets > Document templates part of this guide.
As you can see ‘Placeholders’ were replaced with real data. If you need to have some specific document template available you need to contact your Mint SD admin user and ask him to add it to the system.
Now, when you have a document filled with data you can print it or e.g. send it to the customer as an attachment.
Let’s go back to the communication (chat) part of the ‘Ticket details’ view’.
If the message inside the chat contains a lot of text it will we
shortened – in order to see the whole text you need to click  .
.

Now, if you want to write a message you can type it in the text box and
send it by clicking on button.

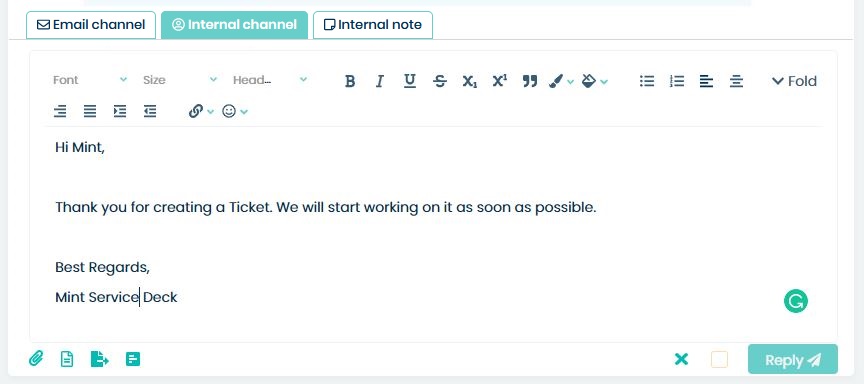
As an Agent, you can send messages in three ways.
The first one, “Email channel” is used for communication with a client who’s using his email account (and not MINT Service Desk system). If you want, you can also add someone in CC to receive a copy of your message.
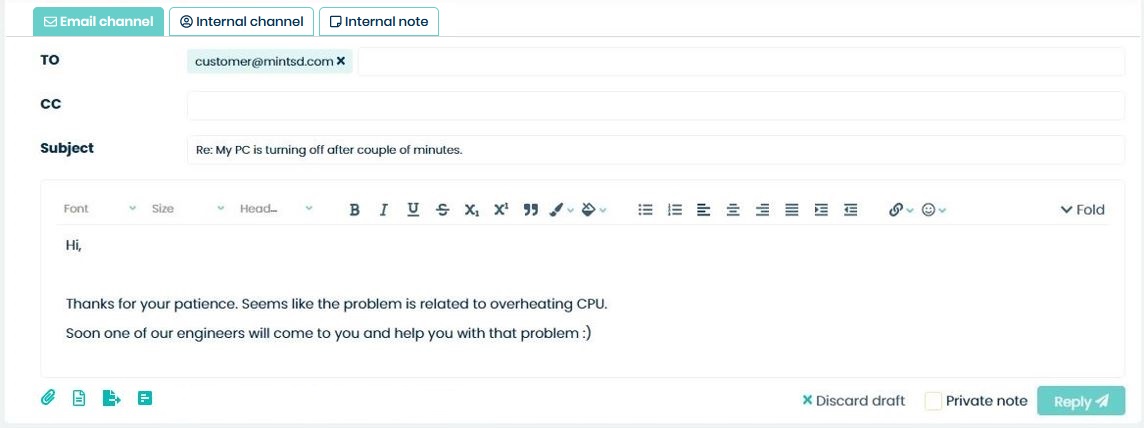
Second one, “Customer portal” is used for communication with a client who is a registered user and has an account/is using the MINT Service Desk system.
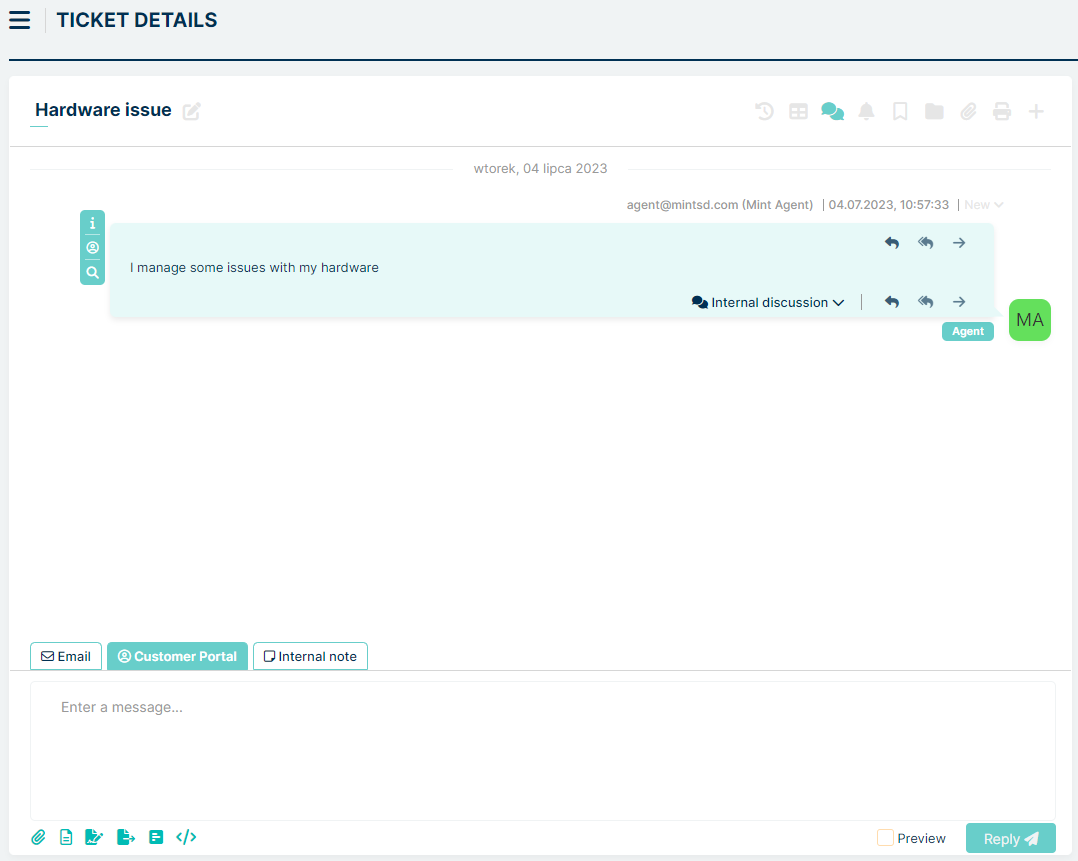
Third one, “Internal note”, is used for creating notes about ticket etc. What you write in this section will not be seen by the client.
In all cases, you can format your message by using the text editor, which will be displayed once you click on the ‘Enter the message…’ field.
Once you click the button, a message will be sent and you
will see in on the chat.
Always remember that the communication within tickets is very important. The cool thing is that as an Agent you can check the “Private note” option (located at the bottom) in order to send internal messages which will be visible only for Agents and not for the Customers.
Another very important thing is that if you want to send messages to the customer you need to uncheck this option, otherwise the customer won’t be able to see them.
Apart from attaching some files (pictures etc.) to your message, you can also select custom-made answer template instead of typing each time the same message to each of your customers.

Click ‘Custom template’ and in the ‘Choose template response’ select one from the list. Remember that in order to see any of them on the list they need to be first created by the Admin and marked as Custom templates (not system ones) and with the right queue attached. See the ‘Admin>Tickets>Templates part of this guide for more details.
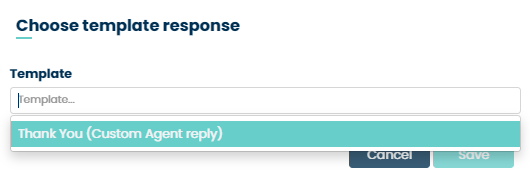
Once you selected the template its content will be loaded right below your selection.
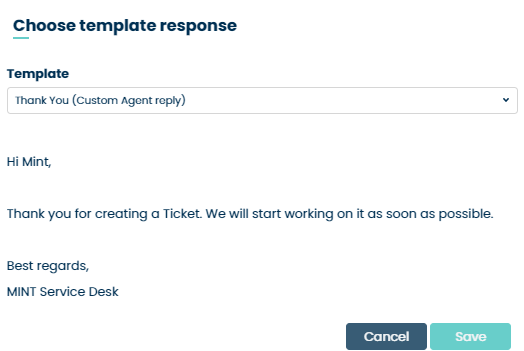
Click Save and the text will be moved to a Rich Text editor where you can change the message before sending.
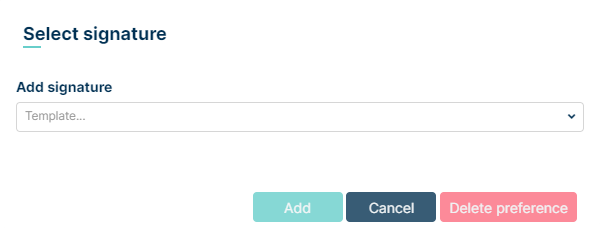
The next thing you can do before sending the message is that you can attach your signature. To do that you need to use the ‘Add signature’ option.

After pressing this button, the agent will be taken to the signature selection.
After selecting a signature, a preview of this option will be displayed.
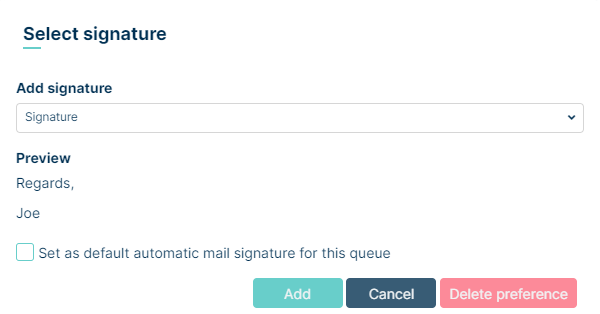
Under the preview it says ‘Set as default automatic mail signature for this queue’ checking this option means that this signature will be automatically included in emails.
To add the selected signature to the application, press the button.
To cancel adding a signature press  button.
To remove the signature preference, press  button.
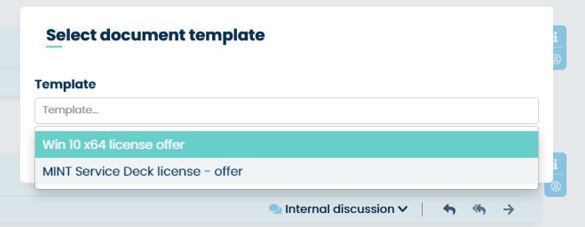
The next thing you can do before sending the message is that you can attach a document based on a template (Admin > Tickets > Document Templates). To do that you need to use the ‘Attach document’ option.

Click on the ‘Attach document’ located at the bottom of the communication section inside the ‘Ticket details’ view.
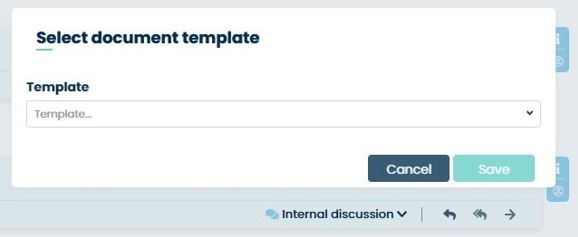
Inside the ‘select document template’ window select the document template you want to use and click Save.
The document template will be filled with data (on ‘Placeholders’ place) and automatically attached to the message (but not sent). Now, you can type some message and send it, along with the document, to the customer.
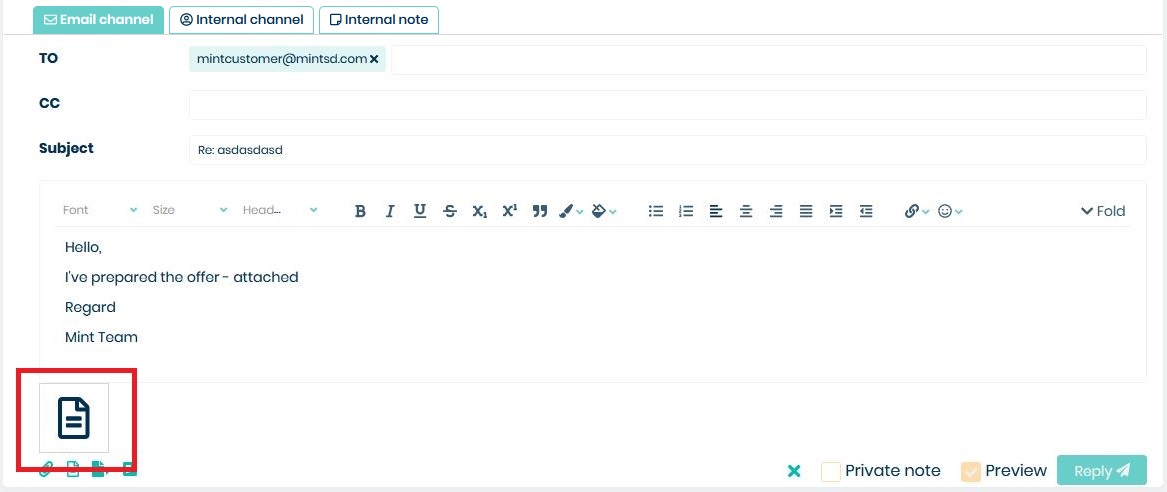
If you want, you can check if the document is correct before you send it. Just click on the attachment miniature, save the file on your hard drive, open it, and check for any mistakes.
The next thing you can do before sending the message is that you can attach a survey. To do that you need to use the ‘Select survey’ option.

Click on the ‘Select survey’ located at the bottom of the communication section inside the ‘Ticket details’ view.
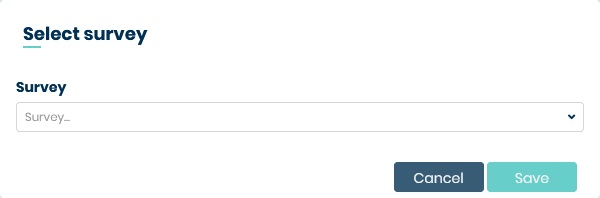
Choose which survey you want to select and click the button. For more information
about the survey check Admin Portal - > Surveys in this documentation.
The last thing is that you can also leave such documents for you for later to see. For example, if you switch the message tab to “Internal note”, and attach/send document here, the client will not see it, but you will.

Click ‘Reply’ and you will see a new internal message.

Now, whenever you want to check what kind of offer you sent to the customer you can download it from here.
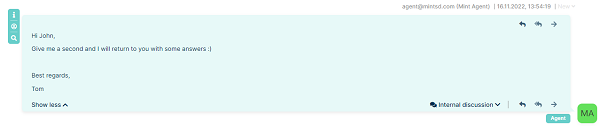
The other important thing within communication is that you can add some internal comments next to any internal message and by that to start an “Internal discussion” with other agents in order to discuss the problem. Just click on ‘internal discussion’ in any of the messages and type a message in ‘Talk to another agent’ field.
Thanks to that you can keep track of the answers in one place rather than adding new ‘private messages’ in the main chat. You won’t have to scroll down the whole communication and look for the answers.
When you reload the view or come back to the ticket after some time, you
will notice that internal discussions are hidden. In order to see them,
you need to click on the  link.
link.
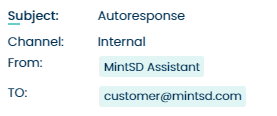
The next thing, as you probably already noticed, is that there are some small icons on the side of each article/message.
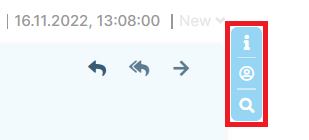
The upper one contains some basic information like a channel of
communication, message’s author, etc.. To see this information you need
to click the  icon. The second one means that the message was
send by system user.
icon. The second one means that the message was
send by system user.
Pressing the third button  will display a preview of the article.
The last button () works similarly to the same button in the top right
corner of the ticket screen, but it exports the selected article instead of
whole ticket. It is also saved in PDF format.
When there is a new message or system information waiting for you within the Ticket Details, apart from receiving notifications on the sidebar, the moment you enter the Ticket Details view you will see, on the bottom part of the Chat section, the following message.

You can either click ‘See’ to see those new messages or click mark them as already read.
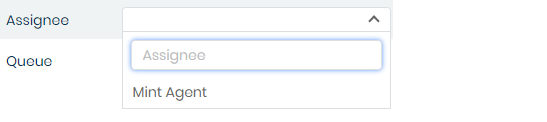
Last, but not least, always remember that New Ticket will always wait for someone to be assigned to it. If you write (as an Agent) a message inside the Ticket chat, you will be automatically assigned to the ticket. The other way to do it is to click on the “Assignee” part of the “Details” section and choose yourself from the list.
In both cases, a new internal message will be displayed for you in the communication part of the “Ticket Details’ view.

MY TICKETS
This function can be enabled or disabled in admin profile in Settings => General => Tickets
The “My Tickets” feature is an additional dashboard with a list of tickets that we are the authors of (that we have created - both as tickets and as email requests) and applies to both the agent and the customer.
This functionality allows us to follow the life cycle of a ticket even if we do not have access to it due to permissions. This allows the user to view basic information such as the queue, type of submission, assigned person. Entering the details of the requests depends on the agent’s permissions to the queue and the request type.
The “My Tickets” view consists of a panel containing tables with requests, a side panel containing basic filters, and a top panel containing “Show Closed” and “Show Filters” checkboxes. The table has basic columns with information such as status, queue, agent, for example.
Navigating “My Tickets” is the same as the dashboard and is described in the “Dashboard” section
WIDGETS
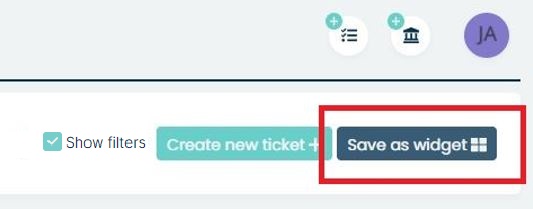
The cool thing when working as an Agent is that you can create your own
custom ‘Widgets’. For example, if you want to have a quick way to see
only new tickets from one particular queue you can use filters, and then
when you see what you want you just click on the button  .
.
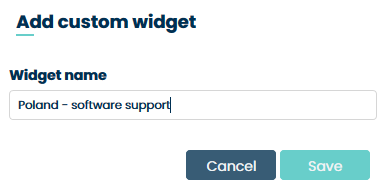
A new window will appear, where you need to type the name for your
widget and click on the button.
After you do that, on the left side menu, in the ‘Widgets’ section, you will see a newly created widget. Remember that you must have at least one widget saved for the ‘Widgets’ section of the left side menu to be visible
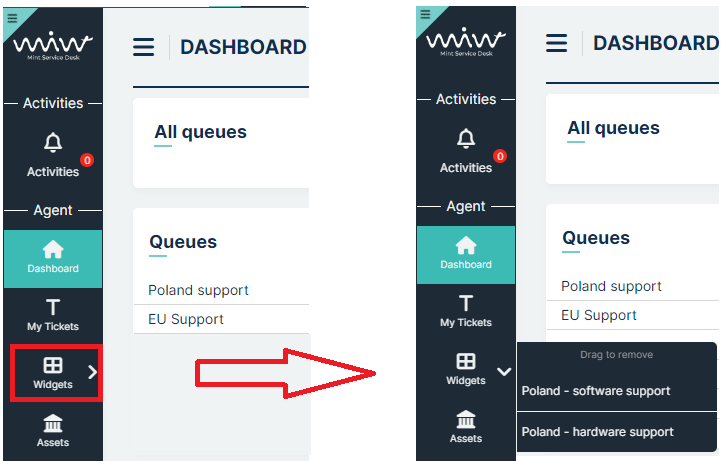
Now, you can click on in at any time and you will see custom information based on the previously saved filters.
If you want to delete the widget just click on in with your Left Mouse Button and while holding it drag the widget up over the Trash Can icon (it will be invisible until you move the widget up).
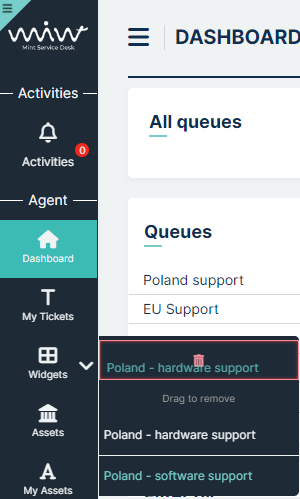
Now release Left Mouse Button and the widget will be removed.
The widget view is similar to the desktop view - we can filter and search for tickets. When you are in the view of a particular widget, its saved name is displayed at the top of the page.
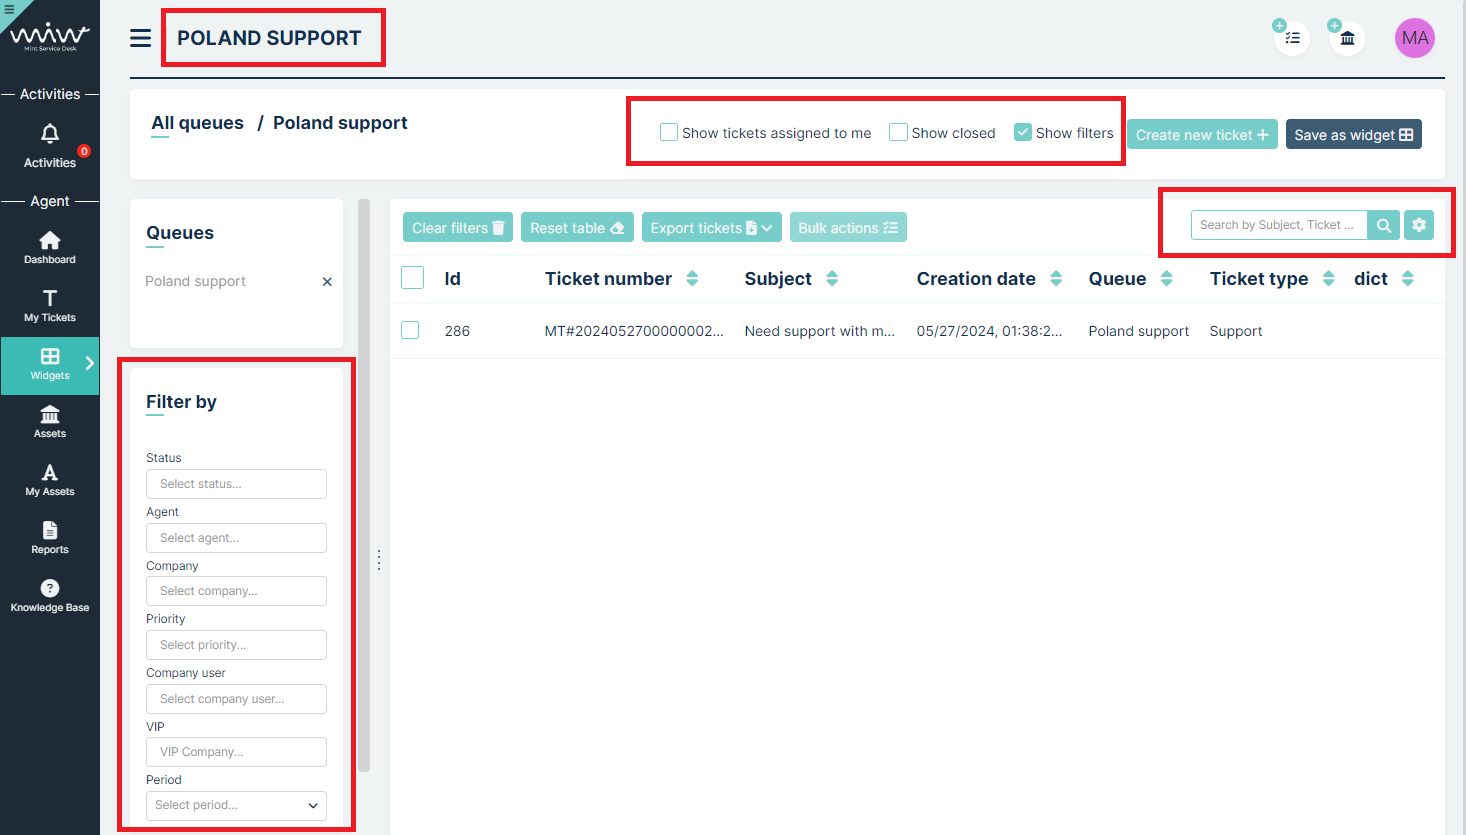
Remember that upon re-entering the widget, the filter settings will revert to the originally saved ones.
APPROVALS
To see the description of the Approvals tab, please visit Admin portal -> Appvovals -> Agent/Customer profile
NEW ASSET
On the top right side of the agent portal, the bar menu also displays the button of the feature “New asset” that allows agents to create new assets.
Once you click on this button, a new asset creation form will be displayed. Right here, an Agent can create a new asset.
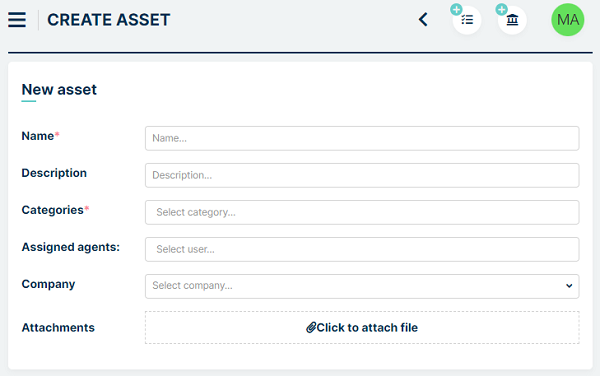
Now, an Agent needs do put in the required information (marked with *): “Name” and select the right “Category”. He can also add a detailed “Description” or some attachments.
The available categories are related to the configuration of user rights.
Also, an agent can attach some particular user to this newly created asset by using the ‘Assigned users’ option and selecting one (or more) user from the list.
Once all of the information is ready, click on the button.
The screen will be reloaded and you will see that some additional fields have been created on the right side. Those are additional attributes available for the particular Category of Assets. They can be created and managed by the Admin user.
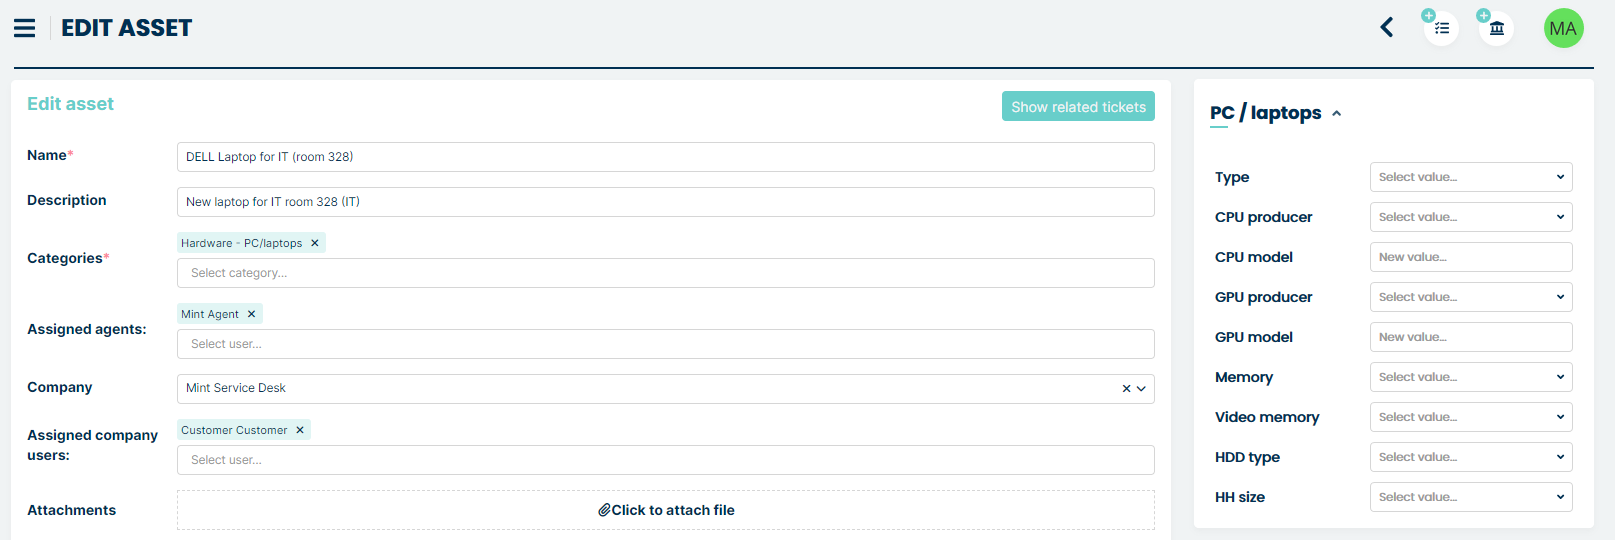
Once you add that additional information, you can update the asset by
clicking on button.
ASSETS
The default view in this section shows the list of available assets, along with some filtering options.
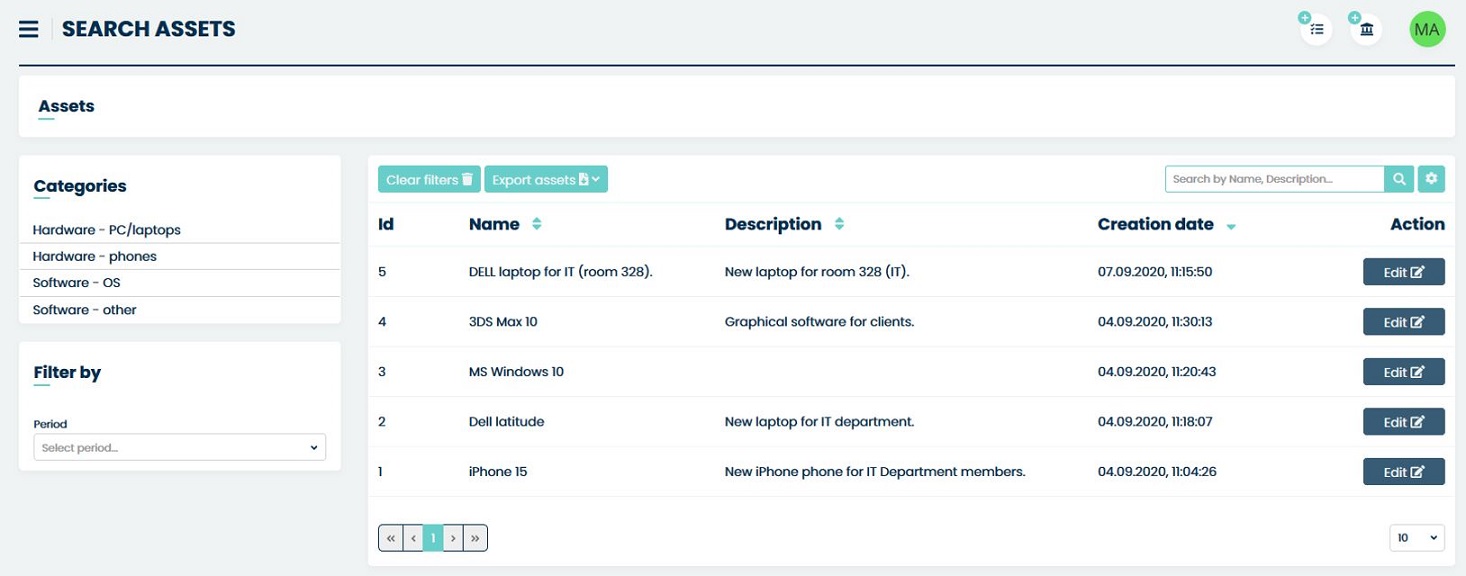
Right here you can filter assets by ‘Categories’ or by ‘Period’. If you
want to reset active filters, just click on the button. You
can also remove any selections (Categories, Filters) by clicking on
or button right next to each position.
The attribute columns can be added or removed in the section “Set column
properties” on the right side by clicking on the button. Once
you do that you will see a small window, where you can select the
desired information you want to see on the assets list. Making any
changes in ‘Set column properties’ is automatically saved, so you won’t
lose anything once you go to any other part of the system.
Also, you can look for specific assets by using the section “Search” field. Whatever you type here will be searched for, depending on the things you marked in the ‘Search by’ section of the ‘Set column properties’ window.
If you want to see the details of any asset, just click on it. It will open the Asset details view.
If the asset is related to any of the Tickets you will find it on the
list once you click the button.
Also, as you already noticed, inside the ‘Edit asset’ view there is a section which contains Asset’s ‘label’ – a QR code which you can scan and you will be moved to the Asset Details of this particular Asset.
If on the other hand, you would like to make some changes in the already existing assets you can use the Edit button available in this place.

You can also use the  button available on the right side of
the Asset list on the main view.
button available on the right side of
the Asset list on the main view.
In both cases system will move you to an ‘Edit Asset” screen which displays information and Asset’s attributes.

As an Agent you can edit asset’s information. However, the displayed assets and their attributes are related to the configuration and rights that administrator assigned to you.
Remember, that there might be more attributes for that asset in the system, but you will be able to see only those which Admin user wants to display. Additionally, Agent (just like the Admin) can change the list of assigned users by removing and old one or adding a totally new one (as shown for Mint Agent in the picture below). You can also assign Company as well as Company User.
The “Create related ticket” button allows you to create a ticket related to an asset. After pressing this button user will be redirected to create new ticket form.
The “Generate QR” button is used to generate a QR code and then download to disk.
The “Print QR” button is used to print the QR code. When this button is pressed, the printer panel will be activated for printing.
MY ASSETS
The only difference between this part and ‘Assets’ is that here you will only see the Assets that are only assigned to you. The rest (asset list, editing, preview, etc.) stays the same.
COMPANIES
At this point in the system, an agent can edit Companies just like an admin. For, this to be possible the agent role must have this option checked:

The capabilities of this site are outlined in the admin documentation.
USERS
At this point in the system, an agent can edit Company Users just like an admin. For, this to be possible the agent role must have this option checked:
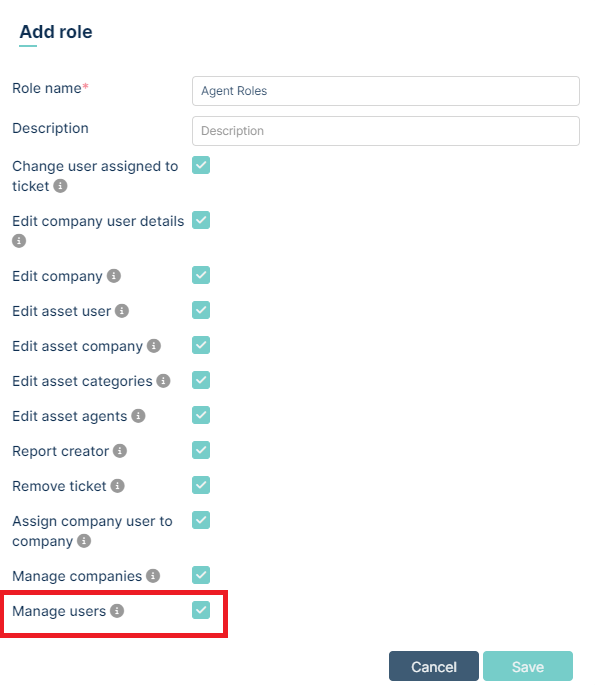

The capabilities of this site are outlined in the admin documentation.
ACCESS GROUPS
This part has been described in admin documentation. To have acces to this module, Agent must have the “Manage users” role assigned by admin in agent roles (like in “Users” part above). An agent can manage Access Groups or only have view access to those assigned by the admin. This is determined by another role called “Manage Access Groups” in Users -> Roles. If this role is active, the agent has management rights equal to those of the admin.
REPORTS
BASICS
In this part of the MINT Service Desk system, Agent can create, download and email reports containing information about Tickets, Assets, Users, Contracts and SQL queries to the database. Agent can also share reports with other users (except Admin).
IMPORTANT!
Saved reports take into account the permissions (context) of the user who created them. If an Agent shares a report with a person who does not have access to specific queues or ticket types, when generating the report, that person will see all tickets visible to the report author in the list. The author’s permissions are checked each time a new report is generated.
The process of creating and managing reports in the Mint Service Desk system includes the following steps:
1) Report configuration - Agent can define the conditions of the report, such as filters, data range, users who have access to the report and the format for saving the file (CSV, XLSX). Agent can also define the list of email recipients for the report. As soon as all the parameters are set, the report is saved in the system by Save button.
2) Report generation - Once the report configuration has been saved, Agent can generate the report. The status of the report is recorded in the system along with the date it was generated, allowing the user to track the history of the report.
3) View, download and send - Once successfully generated, the report is available for viewing in the system, for downloading in the selected file format and for sending to specified email recipients.
4) Setting the report schedule - Agent can configure a schedule for generating reports. Reports can be generated periodically according to specified dates or intervals (e.g. daily, weekly, monthly). It is also possible to automatically send generated reports to selected recipients.
The general description of the tabs can be found in the Tab Description section, while detailed information on creating a report is available in the Creating Report section. To learn more about creating schedules, visit the Creating Schedule section.
TAB DESCRIPTION
The main report screen is divided into three tabs:
Reports (default screen) - Here we have a list of all saved and shared reports.
Report generation history - Here we have a full history of how the reports were generated and whether they were generated successfully or with errors.
Report schedule - Here we can create schedules for running selected reports and sending them to specified recipients.
REPORTS
The main screen displays a list of created reports. By default, the table displays columns such as Name, Type, Creation date, Last generated. There are also columns with action buttons: Send, Generate, Download (in CSV or XLSX format) and Actions (Edit and Delete).

Let’s briefly describe the buttons listed:
Send - allows you to send the last generated report to the recipients defined in the report in the Recipients section (button is hidden if no email recipients are defined in the report configuration)
Generate - used to generate a report based on the data contained in the configuration. Each click generates a new report and saves it in the history in the preview window.
CSV/XLSX - buttons for downloading the report in the appropriate format (visibility of these buttons depends on the options selected in the Exports section of the report configuration)
Edit - allows you to access the saved report configuration and make changes
Delete - allows to delete the report configuration including all its history
You can search for a specific topic by using the section “Search” field. Whatever you type here will be searched for, depending on the things you marked in the ‘Search by’ section of the ‘Set column properties’ window.

If you decide that you don’t need some of the attribute columns you can remove
them from the view. To do that simply click on the button.

Once you do that you will see a small window, where you can select (or unselect) the desired information you want to see on the Reports list. Making any changes in ‘Set column properties’ is automatically saved, so you won’t lose anything once you go to any other part of the system.
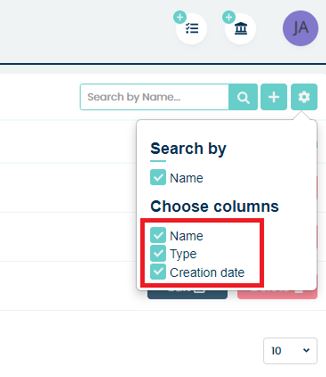
One last this is that you can sort the list of available Reports by the
date they were created. Just click on the ‘Creation Date’ column’s name.
You will notice a small icon next to it. It represents whether the list
is sorted by date: ascending ( )or descending(
 ).
).
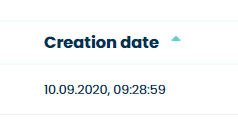
REPORT GENERATION HISTORY
This tab allows you to track the generation history of each report. Reports that have started to be generated are placed in the generation queue. If many reports are being generated at the same time, some of them may enter a ‘Waiting’ status, waiting for the earlier ones to finish.
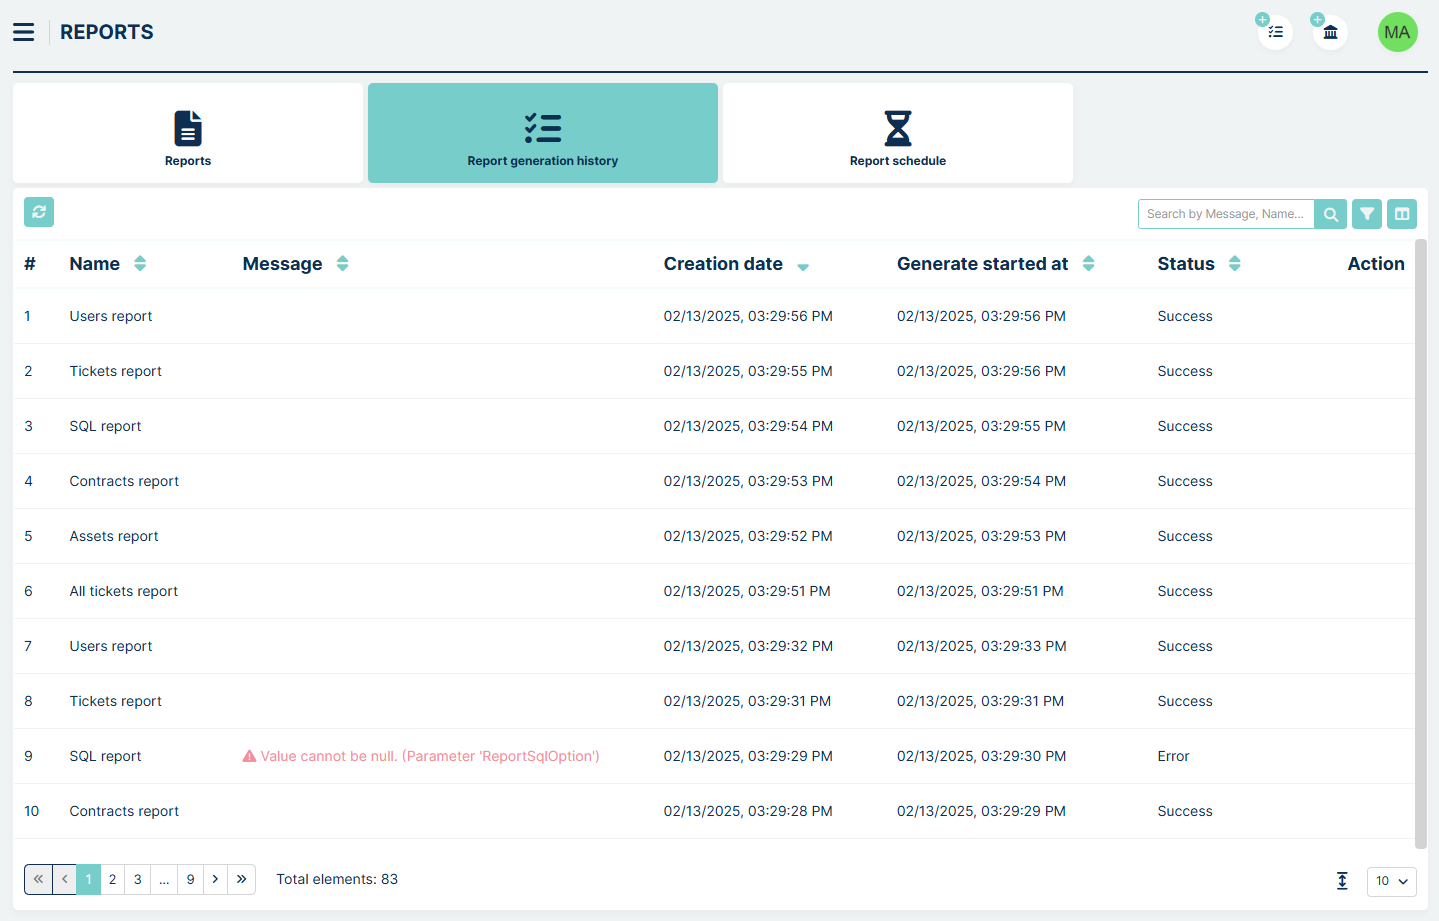
The table contains the following columns
Name - the name of the generated report
Messages - the column that indicates the contents of the error if the report generation failed
Creation Date - the date and time when a particular report was added to the generation queue
Generate started at - the date and time the report generation started
Status - the current status
Waiting - generation waiting in queue (when multiple reports are generated at the same time)
Success - generation was successful
Progress - generation is still in progress
Cancelled - the report was in the process of being generated, but the user aborted the action with the Cancel button
Error - an error occurred and the report could not be generated
Action - the column that displays the Cancel button when the report is being generated. Clicking it will cancel the task
The tab does not refresh automatically - to do it, use the refresh button at the top left of the table.
As in Reports tab, there is the section “Search”
field”. How to use this section is described in the Reports tab.
REPORT SCHEDULE
This section allows you to create a schedule for the automatic generation of saved report configurations. You can also configure the system to send the report as an attachment to specified email addresses after it is generated, with a corresponding title and message body. The history of each email delivery is saved in each schedule. You can download historical reports or resend them manually.
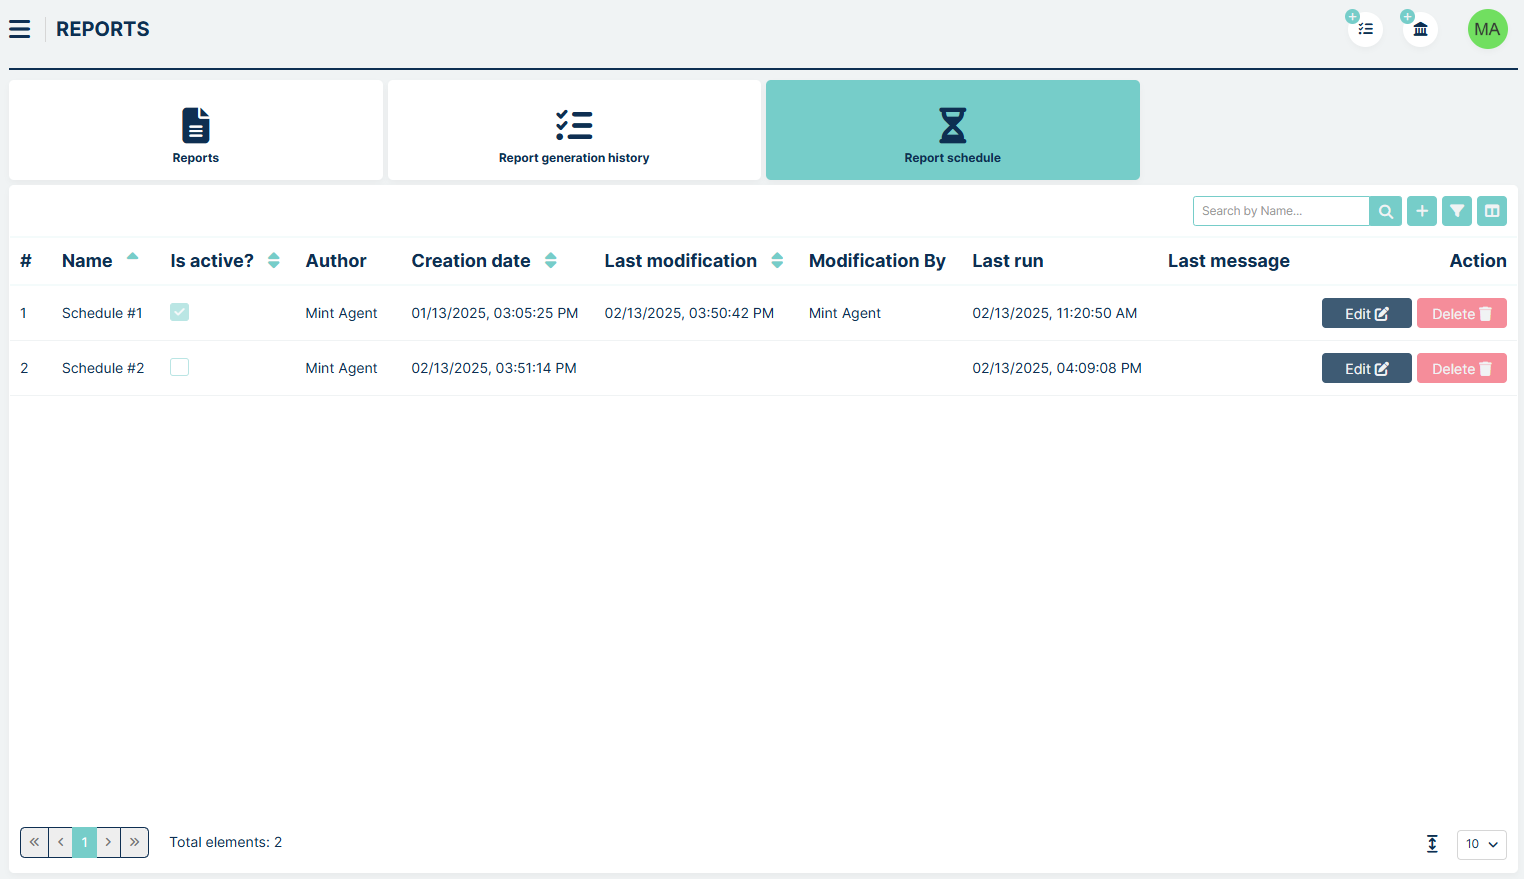
The main view is a table with the following columns:
Name - The name given to the schedule.
Is active? - Indicates whether the schedule is currently active. You can change this setting in the schedule’s edit view.
Author - The creator of the schedule.
Creation date - The date when the schedule was created.
Last modification - The date of the last change to the schedule.
Modification by - The author of the last modification.
Last run - The date when the report was last generated.
Last message - The last error message related to sending or generating the report (if an error occurred).
Action - Buttons to edit and delete the schedule.
CREATING REPORT
Now, if you want to create a completely new report first you need to click on the button.

You will be moved to the new ‘Create report’ view.
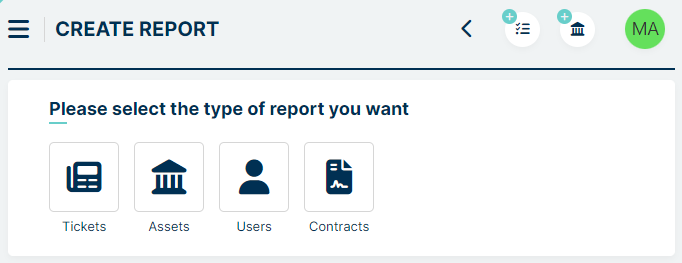
Right here the very first thing you need to do is to choose what kind of information the report will cover:
Tickets
Assets
Users
Contracts
SQL
Depending on your choice you will have different fields and filters available while creating a report. Additionally, when you start making for example a report related to Tickets you will notice that some fields have already been added. It is a standard set which you can change very easily.
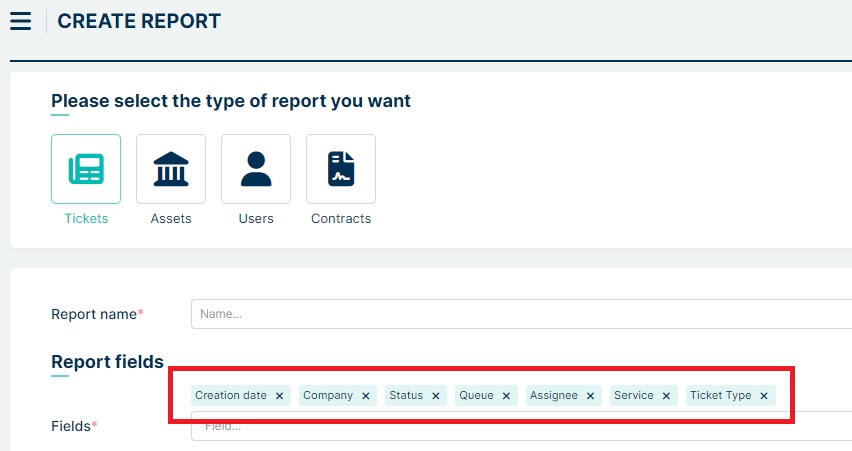
The next section is “Can view”
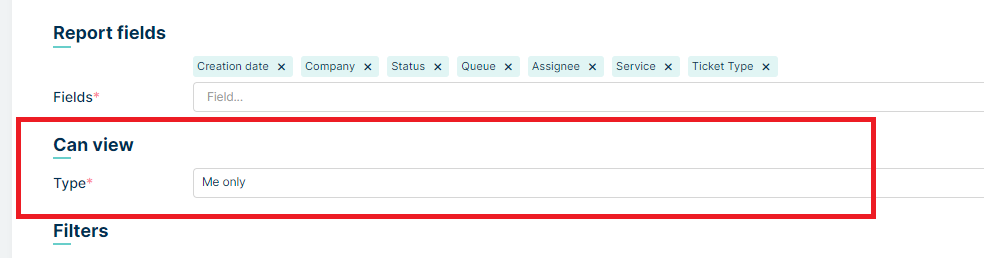
You can set here which Role will be able to view the report that you are creating

Right below them, you will also notice Filters section.
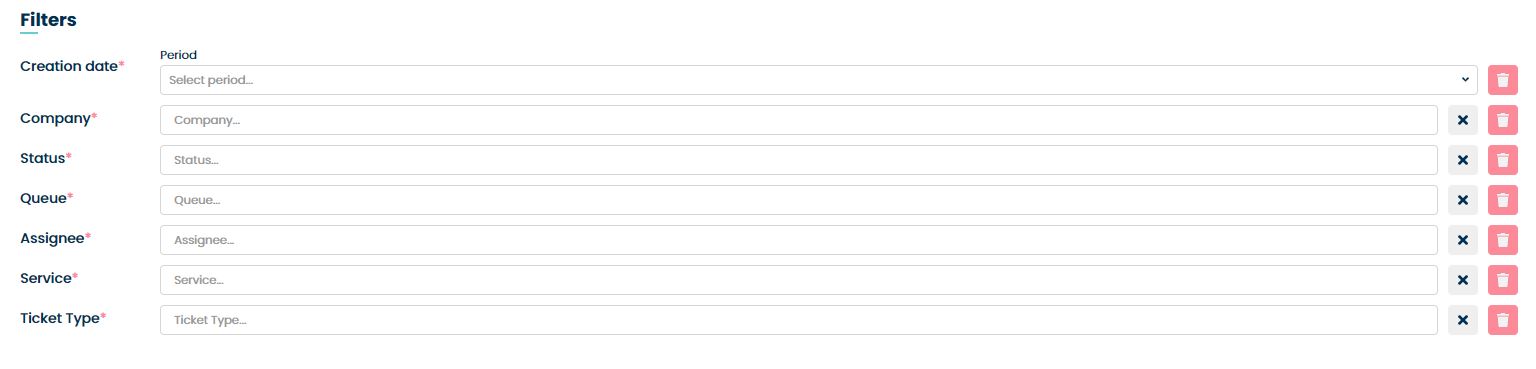
It’s also a standard set of filters. You can leave them that way or make some changes. However, you need to remember that filter cannot exist without the proper field.
When you delete e.g. ‘Ticket type’ field you will notice that ‘Ticket type’ filter has also been deleted. On the other hand, you can add a field without the need for adding the same filter. Use Add filter button if You want to add new specific filter.
In the drop-down list, after the basic fields, there is a section with custom fields.
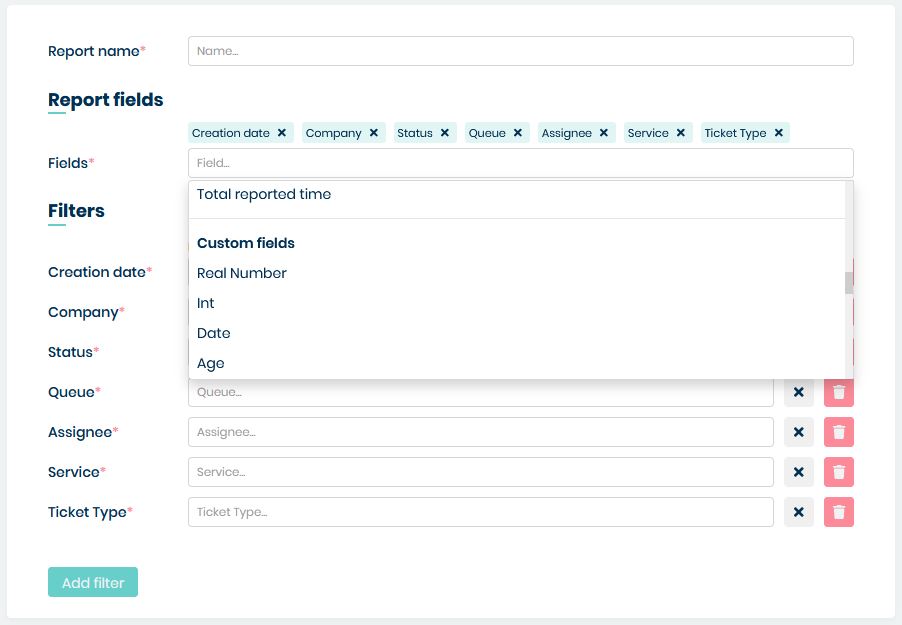
When you hover over the custom fields you can see what Ticket Type and Group it is from.
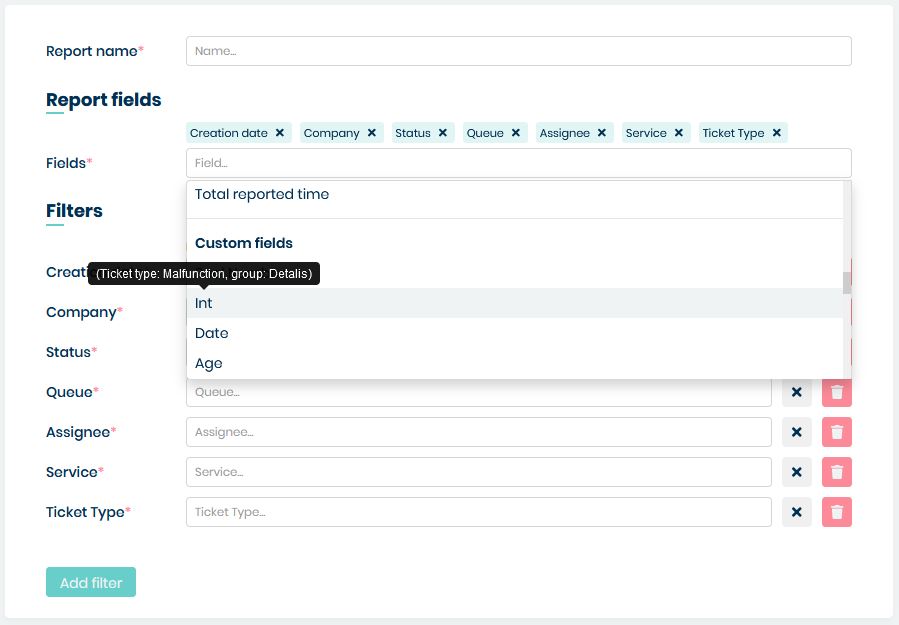
The same thing happens when Custom field is selected.
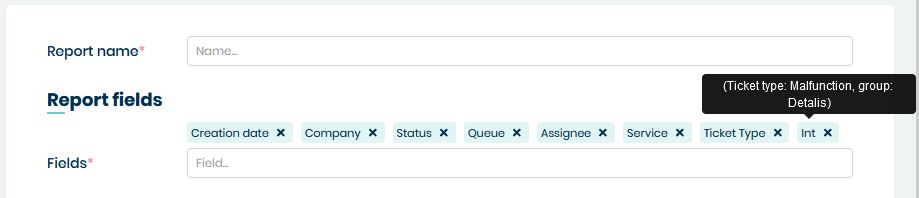
The next section is ‘Export’. If we want to be able to download the report to a file, we select the format we are interested in in the ‘Export type’ field and the language in the ‘Default language’ field.
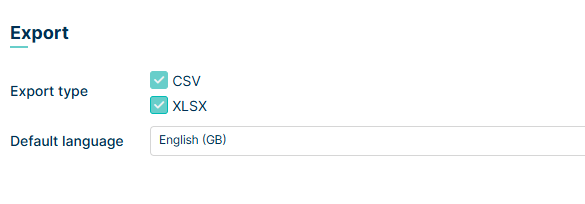
Below ‘Export’ there are ‘Report groups’. They are used to group tickets or assets according to your preferences. Currently you can add up to five items.

Example of a report using Report groups:
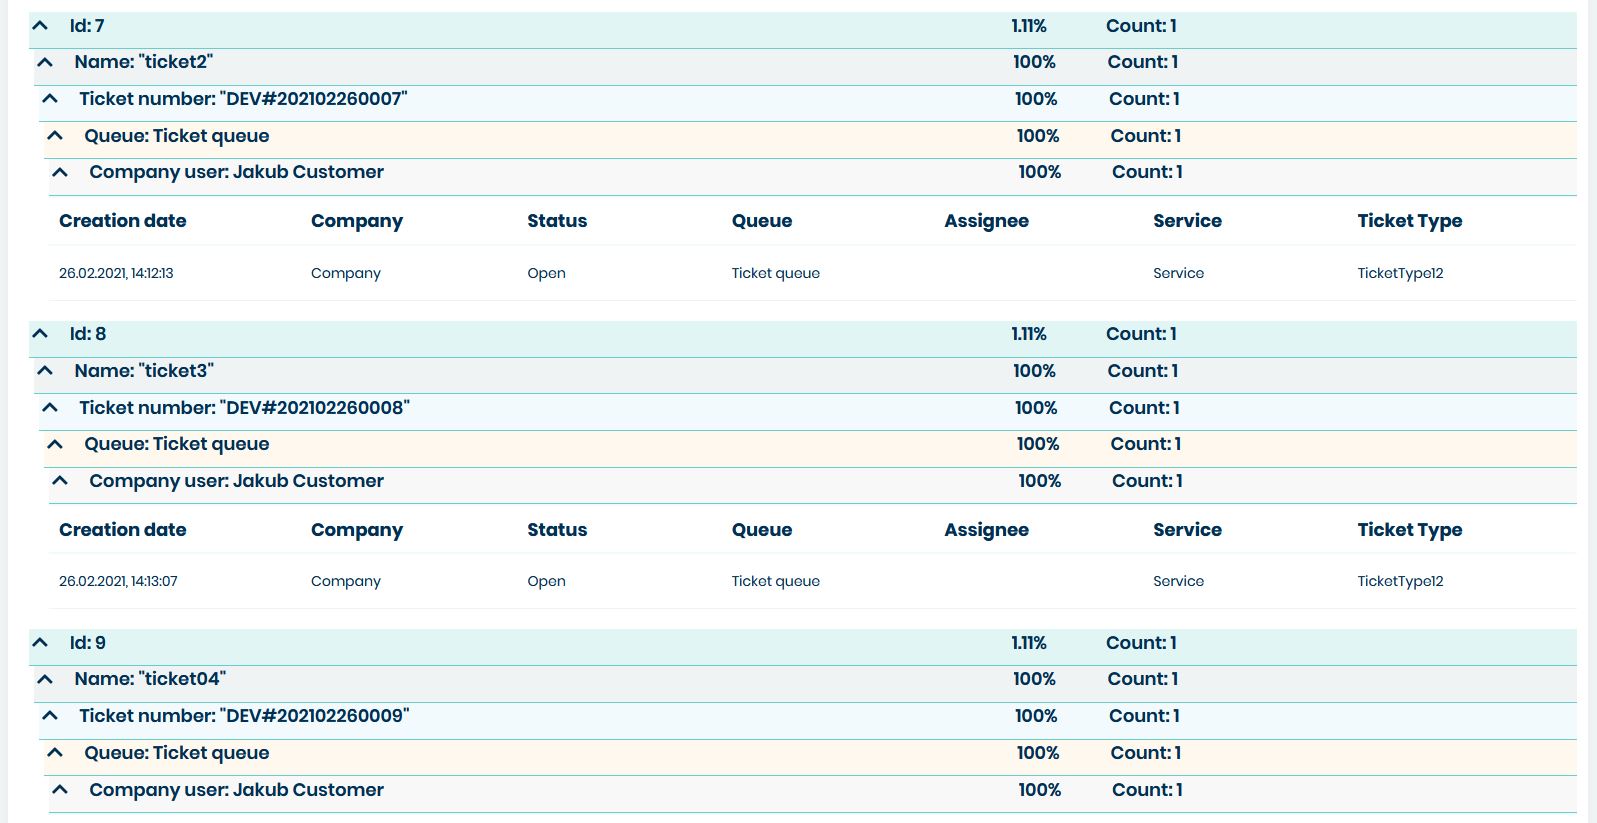
At the bottom is the ‘Report recipients’ section, where you can set the recipients to whom you want send the report by e-mail.
You can click on  button and select from the list of saved recipients:
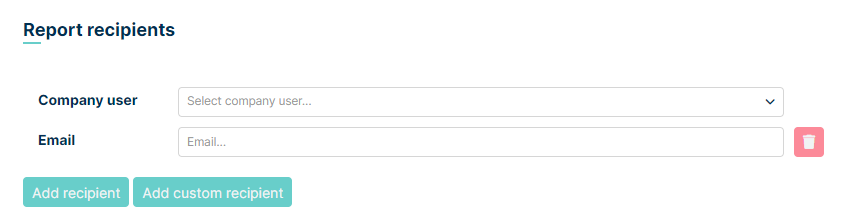
or you can click on  and add any email adress you want
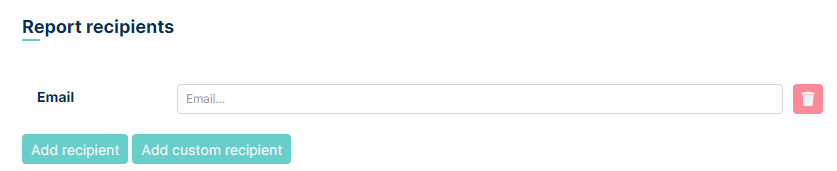
After filling in all the fields, click the button. The report configuration is now ready for generating a new report.
Let’s create an example report for all of the tickets:
assigned to ‘Mint Agent’
created within the current week,
having ‘In progress’ status,
owned (created) by ‘MINT Customer’ user.
In the ‘Please select the type of report you want’.
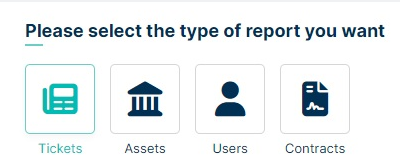
Now in the lower part of the view, you need to name your report (‘Name’) e.g. “Urgent Tickets”. Then, in the ‘Fields’ part, you need to select what information will be visible in the report (columns). You can either leave the default settings or make some changes.
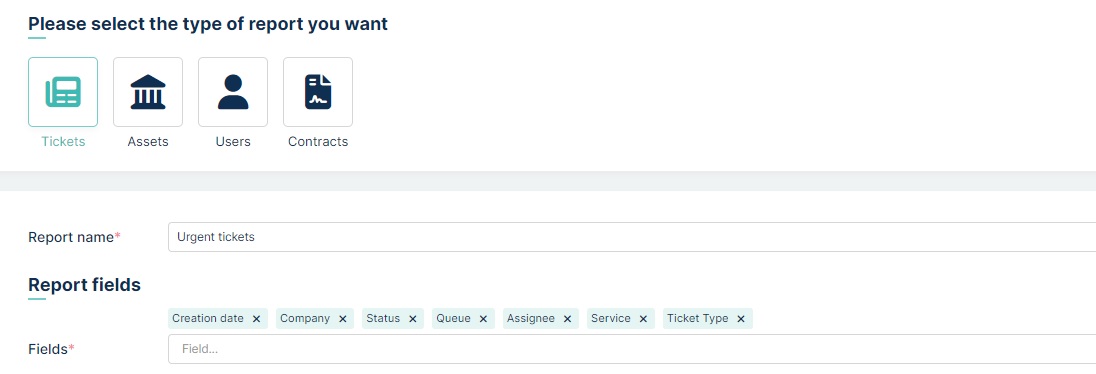
To remove any field simply click ‘X’ next to its name. Let’s remove ‘Ticket type’.

You will notice that the ‘Ticket type’ filter has also been removed. Now we need to add a new Field and Filter to cover the last condition “owned (created) by ‘MINT Customer’ user”.
To add a new field click on the field located below.

Once you do that you will see a list of available fields. You can add as many as you want until there are still some of them available. Let’s add only one: ‘Company user’.
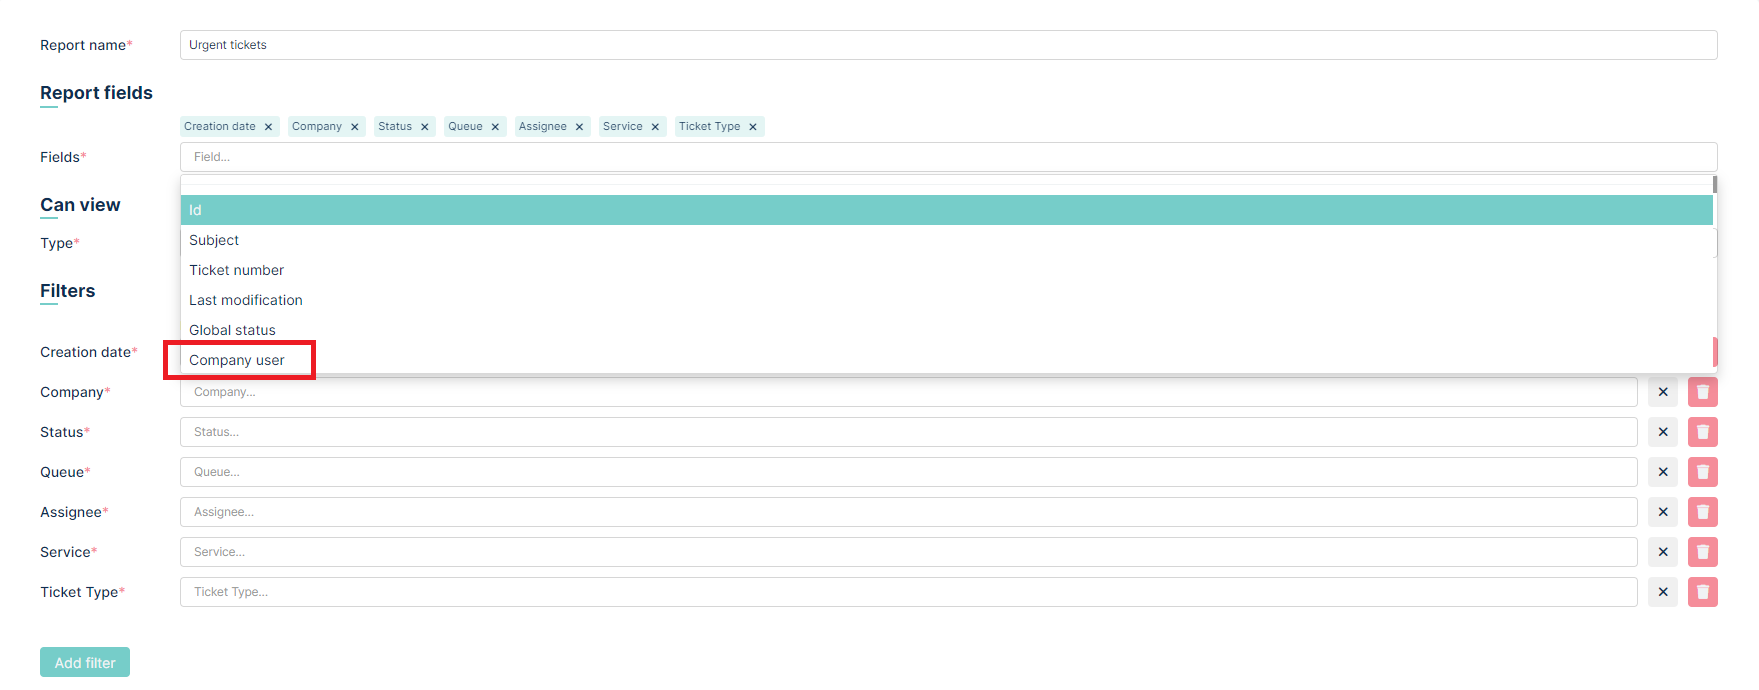
The moment you chose it you will see a new position in the ‘Fields’ part.

Now let’s add a filter for company users. Click on the  located below
the list of selected filters.
located below
the list of selected filters.
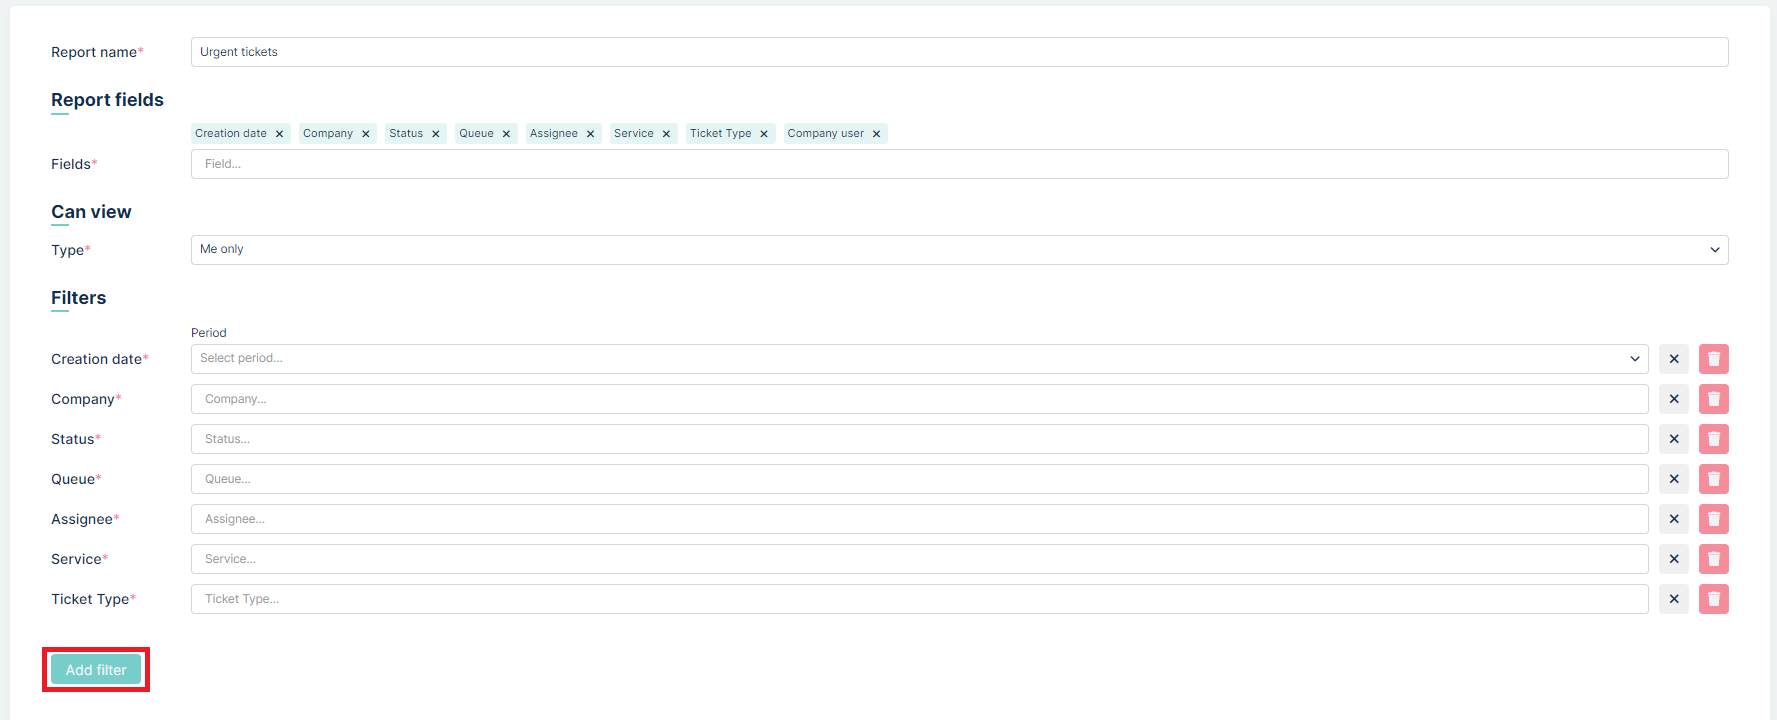
From the newly created ‘Filter fields’ list select ‘Company user’.
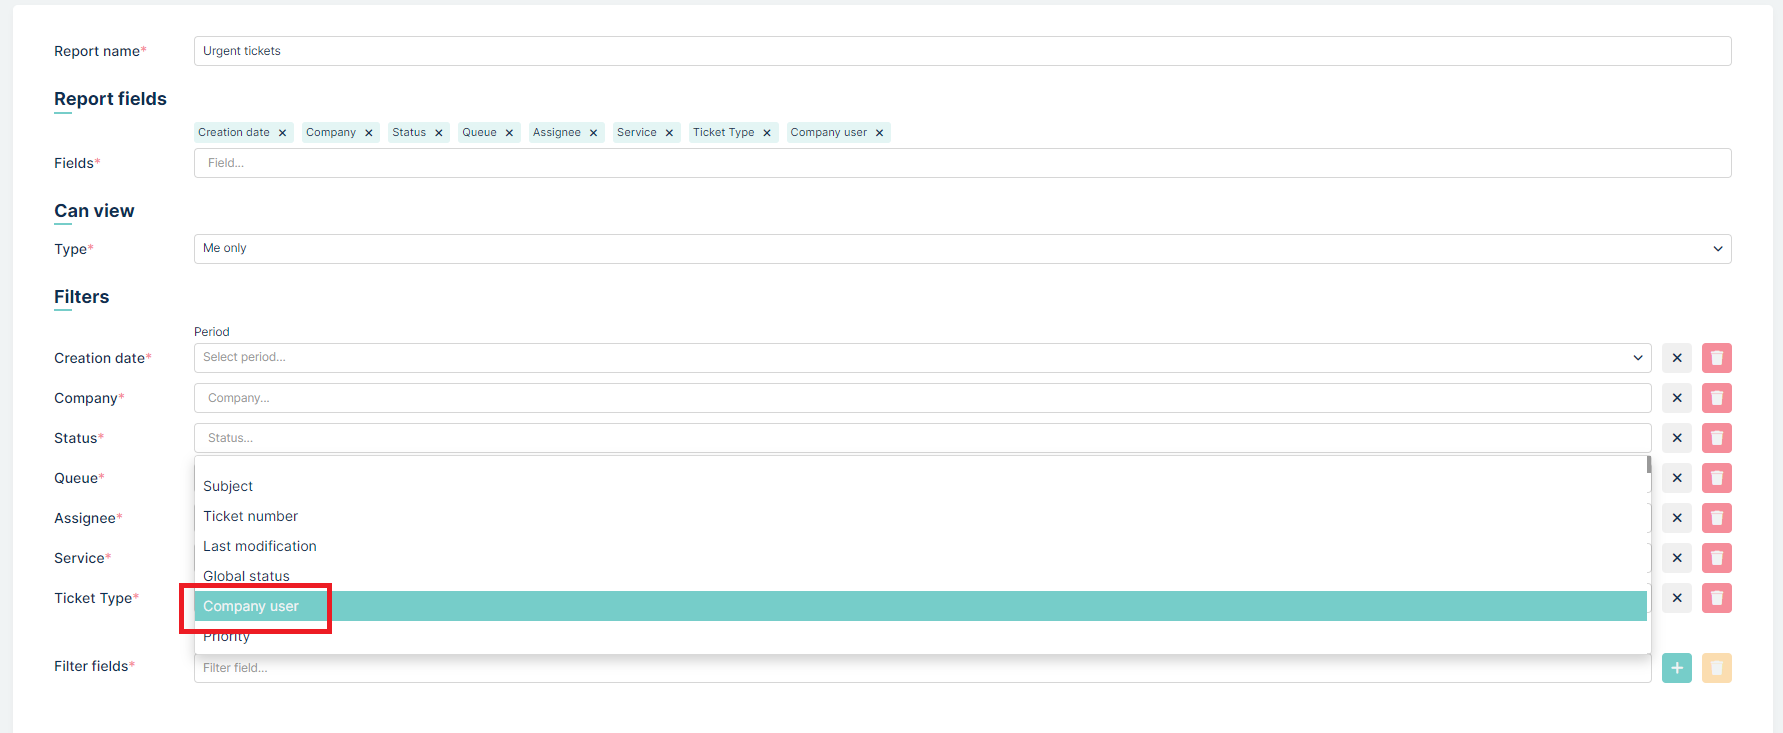
Now click button to add this filter (if you want to cancel
just click on the  button).

The moment you do it the filter will be added in the list of filters.
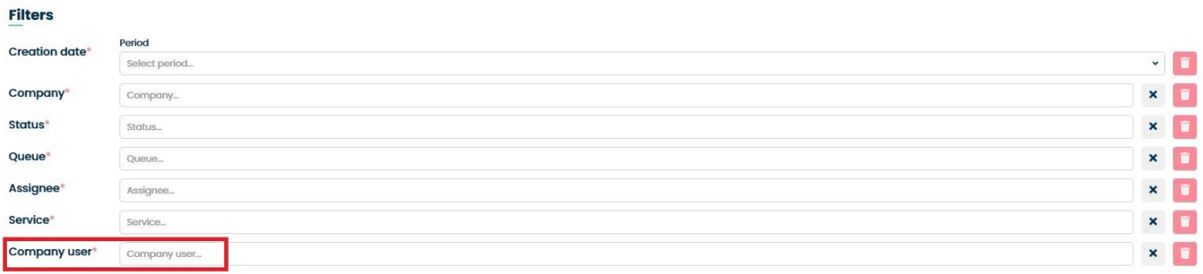
Let’s go back to the requirements = Tickets:
assigned to ‘Mint Agent’
created within the current week,
having ‘In progress’ status,
owned (created) by ‘MINT Customer’ user.
Now we only need to select the right options from available filters like on the following screen.
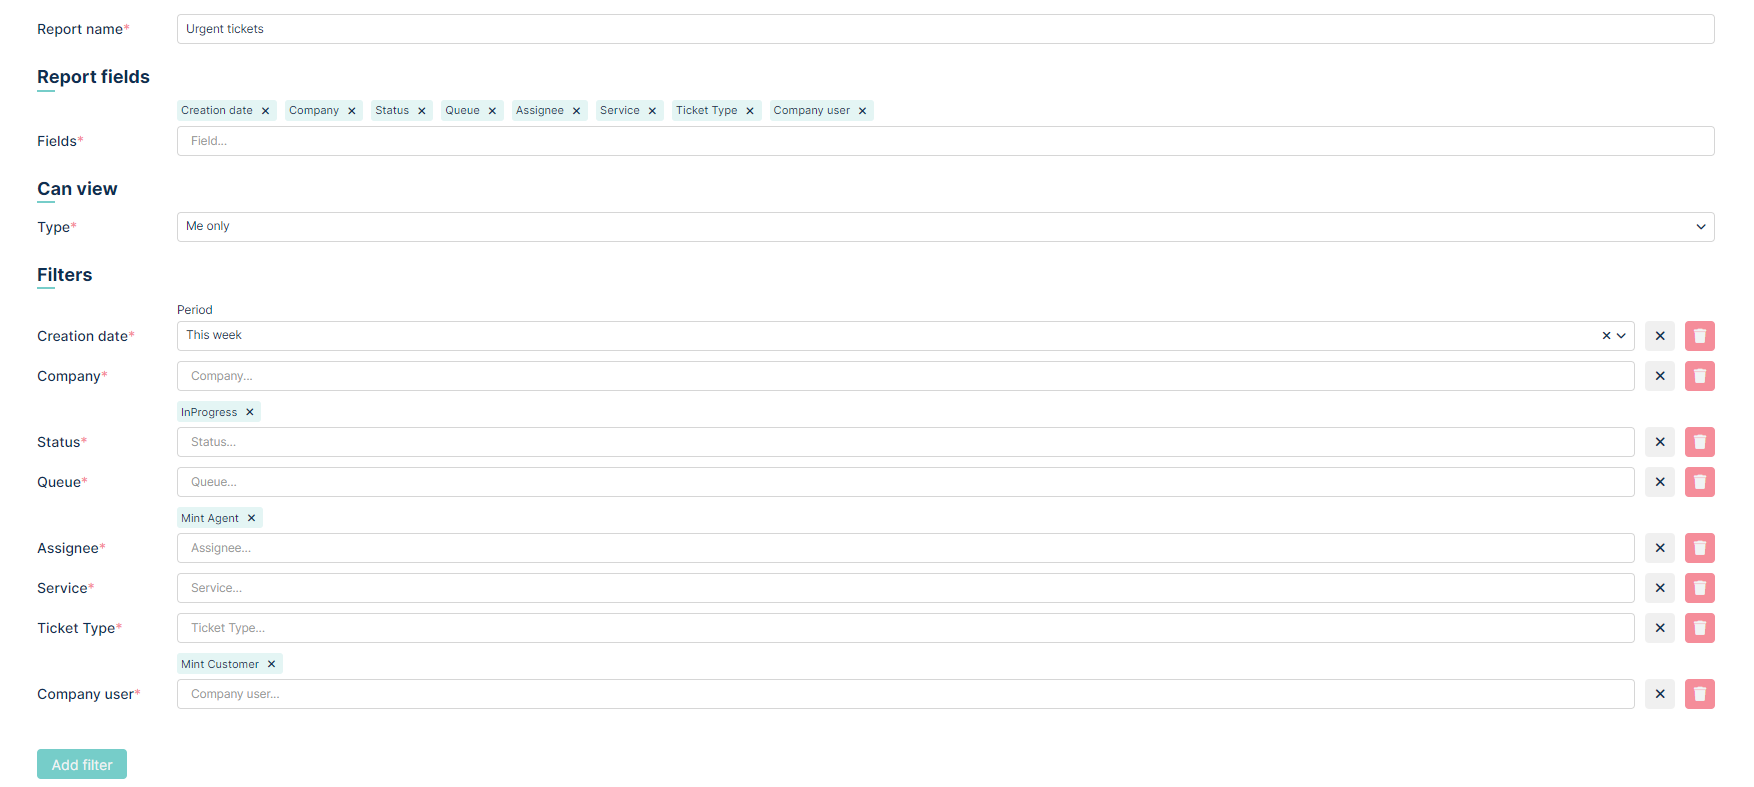
If you select the wrong option you can always delete it either by clicking ‘X’ next to its name or click on the ‘X’ button on the right side of the filter.

The first method is used for deleting single position, while the second one will delete all of the selected options for the filter.
If you try now to save the Report (‘Save’ button) you will notice that you cannot do it. Unused filters will be marked with a red frame.
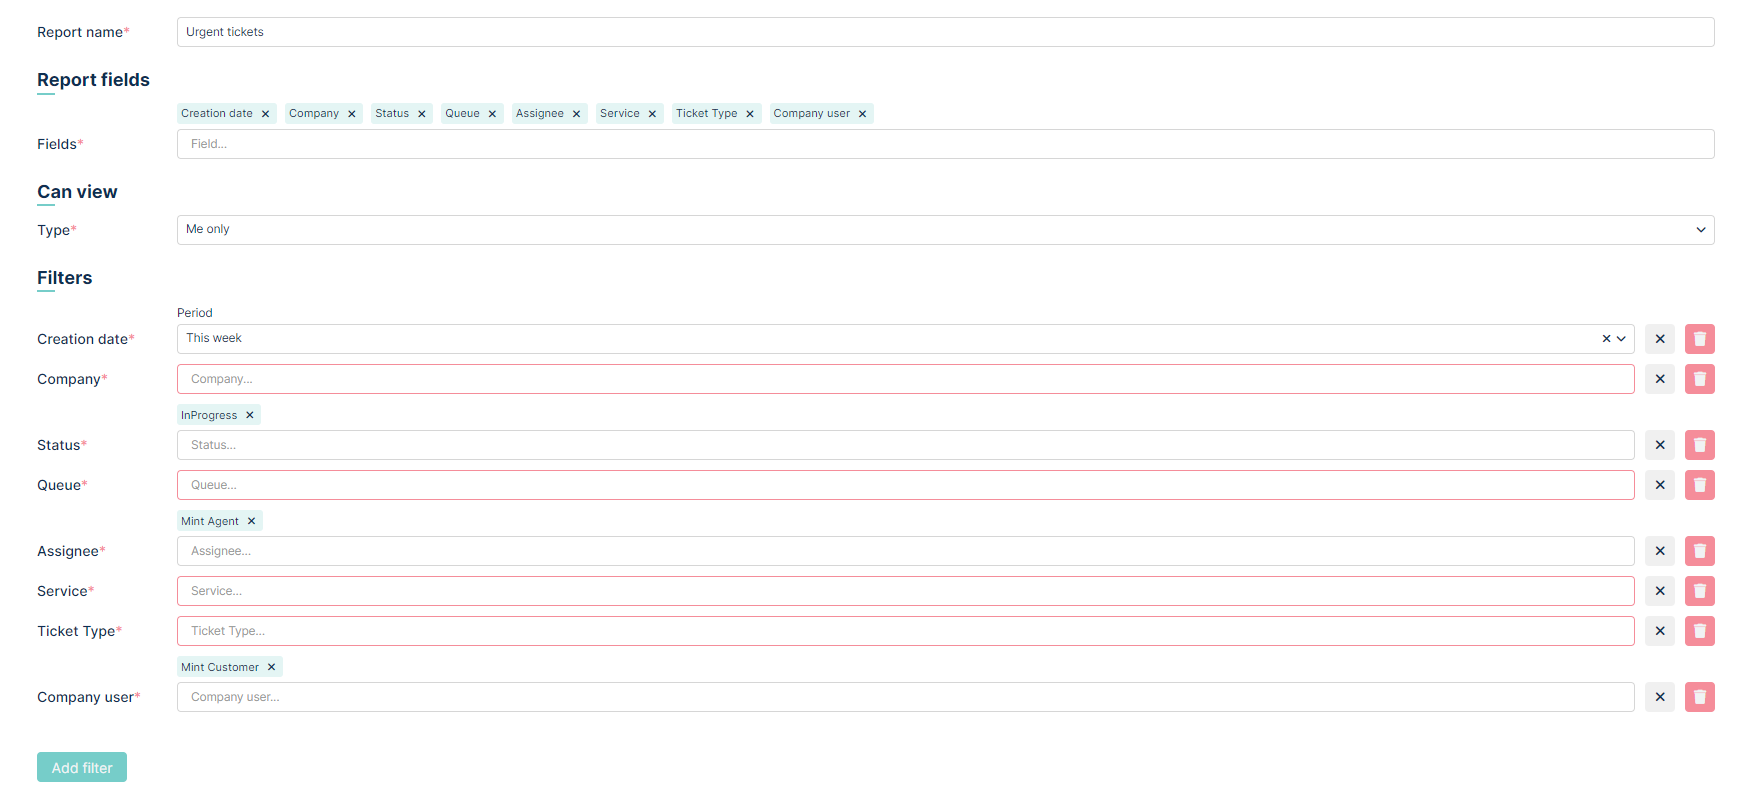
Delete those filters you don’t want to use by clicking  button
next to each of them.
button
next to each of them.
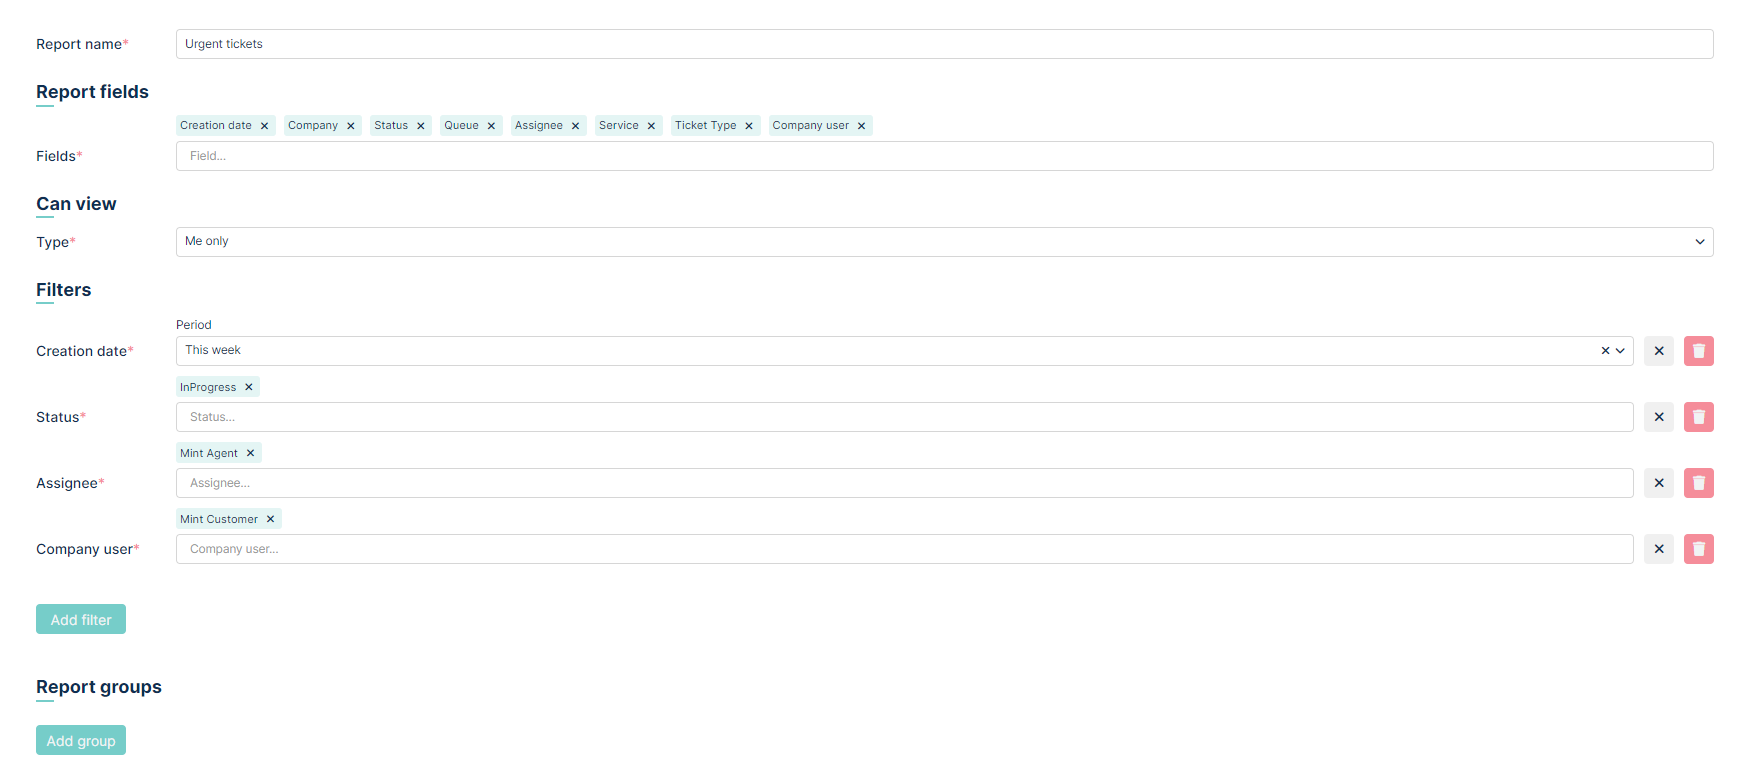
Click button to create the report. Once you do that you will
see a new position on the list in the ‘Report definitions’ view.
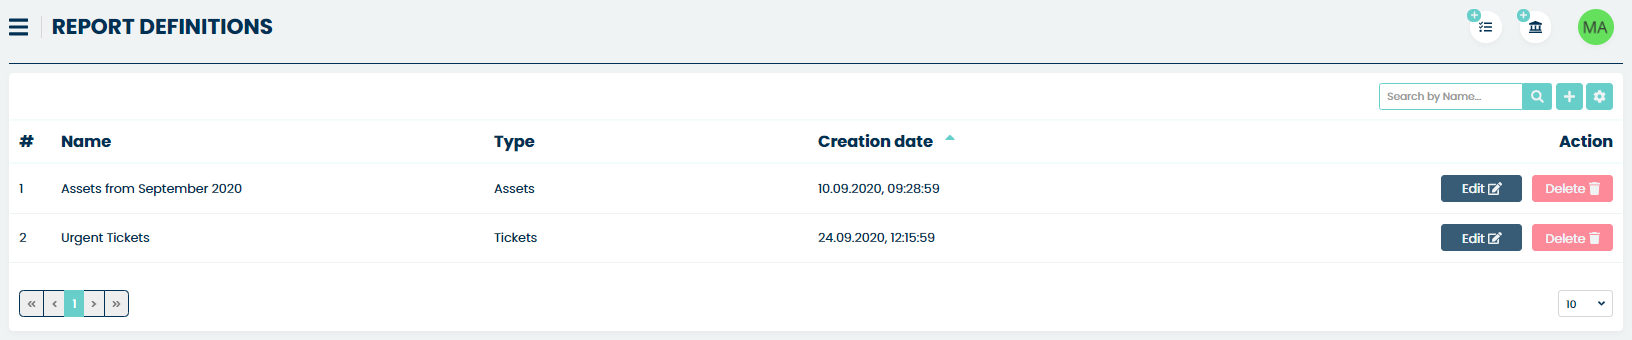
If you want to change anything in the already created report simply click the
button and you will be moved to the ‘Edit report’ view.
If, on the other hand, you would like to delete the report from the
system you can do it by clicking the  button and answering
‘Yes’ when the system asks for confirming your choice.
button and answering
‘Yes’ when the system asks for confirming your choice.
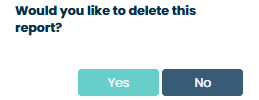
SQL Reports
SQL Reports allows you to create a SQL query directly into the Reports module database. In response, Mint Service Desk will display the available records in the selected table. We can also send the generated report to the selected email address.
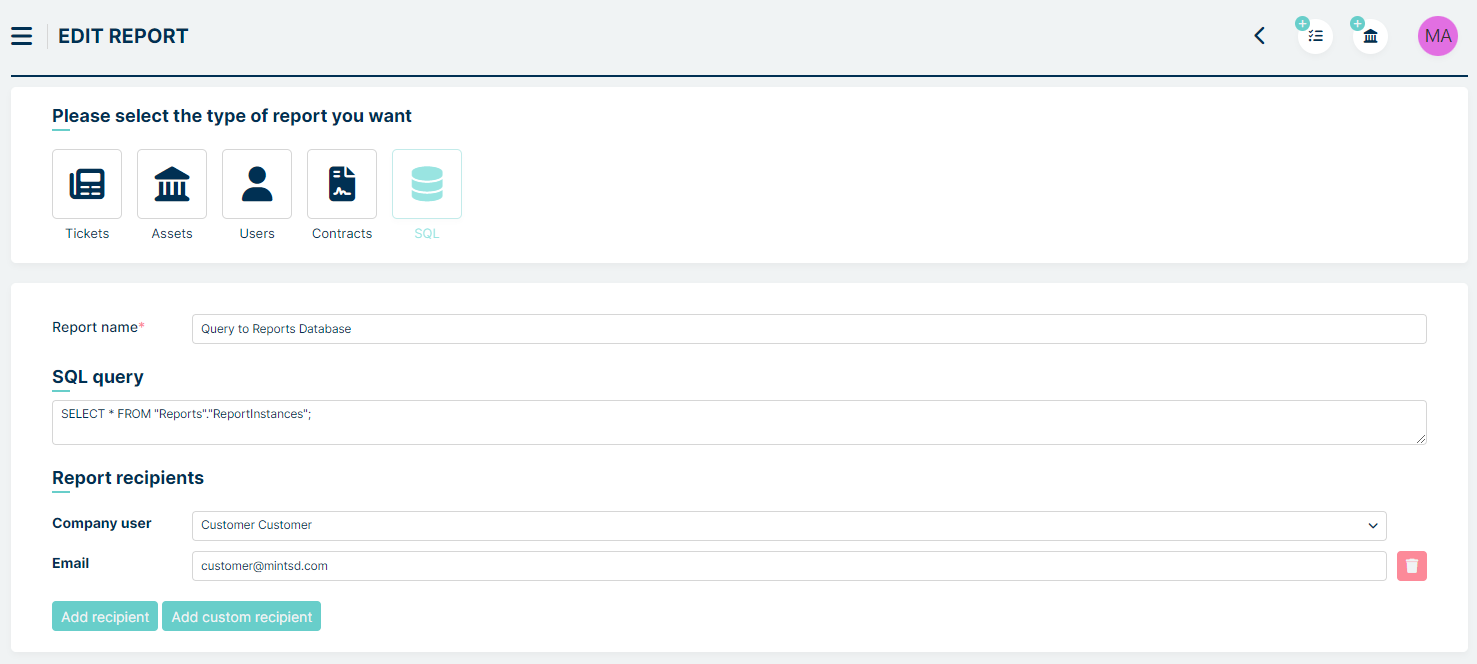
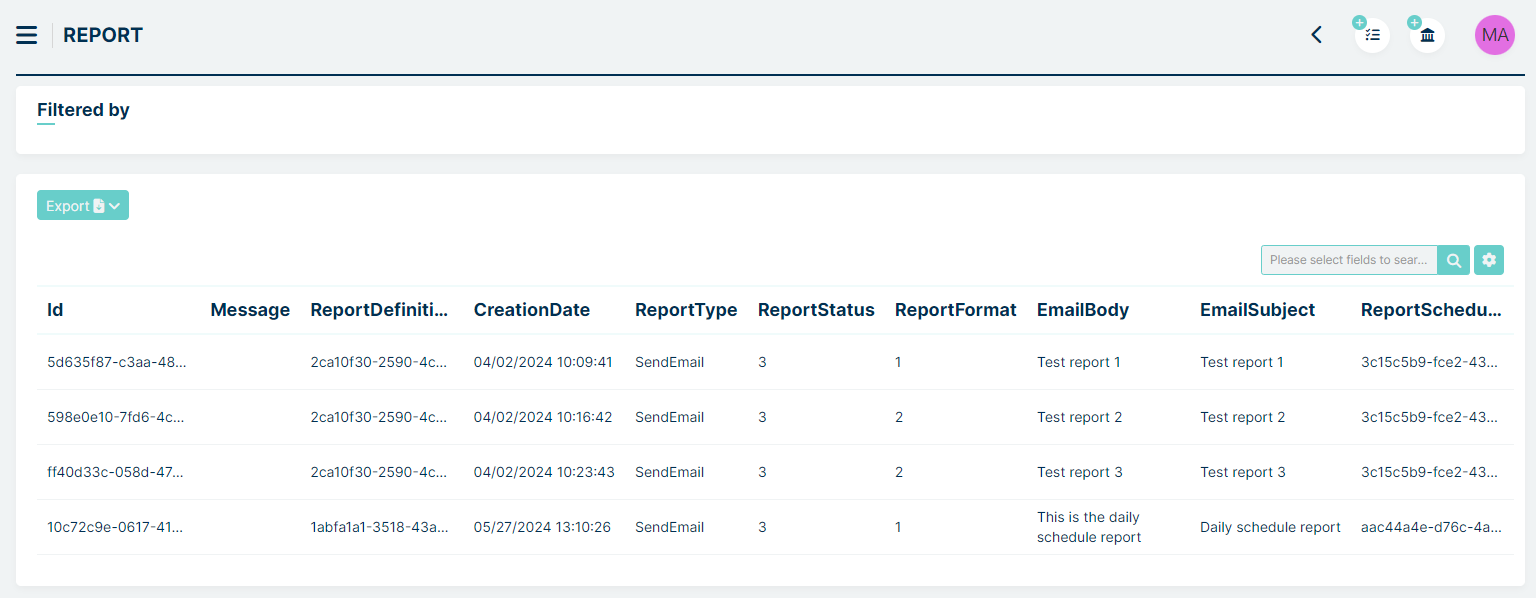
REPORT DETAILS
Let’s describe the report preview using an example of an Tickets Report. To access a specific report, click on its name.
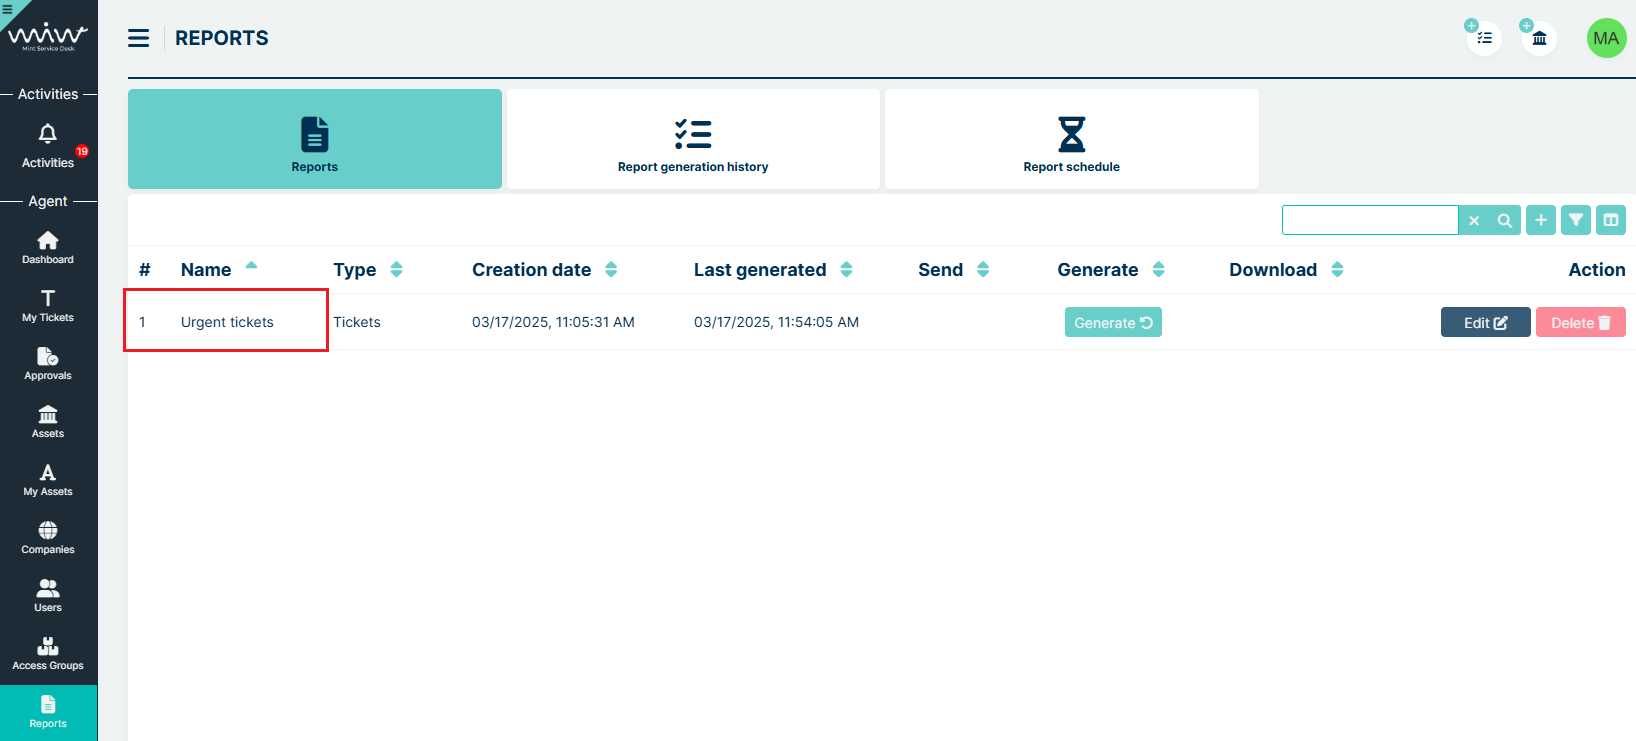
After clicking, a new page opens.

Below is a detailed description of all sections. At the very top, there is a bar with various buttons.

On the left side, you will find:
Refresh – used to refresh the view, e.g., after generating a report using the Generate button.
Generate – starts the generation of a new report. Once the process is complete, the report appears in the Report History section and its preview is displayed in the Preview section.
On the right side, you will find:
Hide/Show Preview – used to toggle the visibility of the Preview section.
Hide History – used to toggle the visibility of the Report History section.
Download – opens a dropdown menu that allows downloading the latest generated report as a CSV or XLSX file, depending on the selected format in the report configuration (If no format is selected in the configuration, the Download button is unavailable).
The next section is Preview (initially open).

Here you can see a preview of the report selected from the Report History section. The number and types of columns displayed in the preview correspond to the columns selected in the report configuration. The last column is Action, and within it, there is a View button that allows you to directly access the specific incident. At the top right you will find info about generation date, You can also search for specific values using the search bar.
The number of rows displayed is dependent on the settings in Admin → Settings → General → Reports under the Maximum number of rows in report preview field.
At the bottom, there is the Report History section.
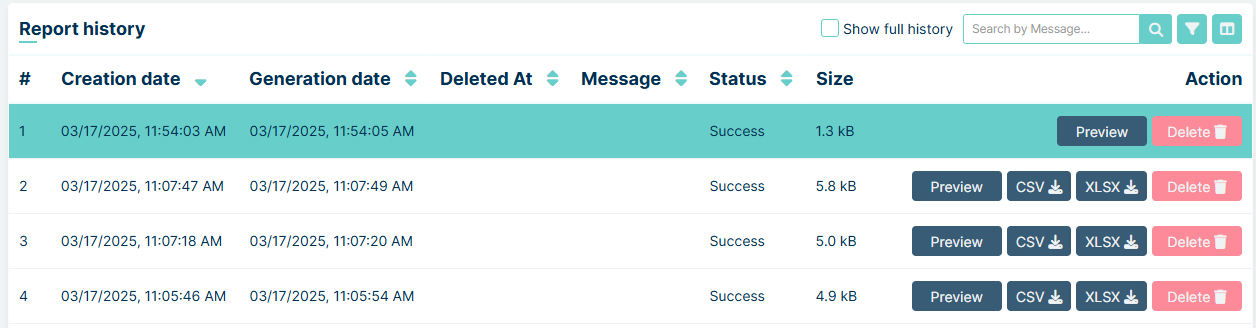
Here, you can see all the generated reports. By default, only successfully generated reports are displayed here. By clicking the Show full history checkbox, entries with statuses other than Success, such as Cancelled or Error, will also be shown. Clicking the Preview button will show the results of each historical report in Preview section. You can also download the reports as a CSV or XLSX file, depending on the selected format in the report configuration (If no format is selected in the configuration, these buttons are unavailable).
CREATING SCHEDULE
In Report Schedule tab we have a list of saved schedules for sending selected reports. From this point, we can also add new schedules.
To add a new schedule, press the button like below.
You will be moved to the new ‘Create report schedule’ view.
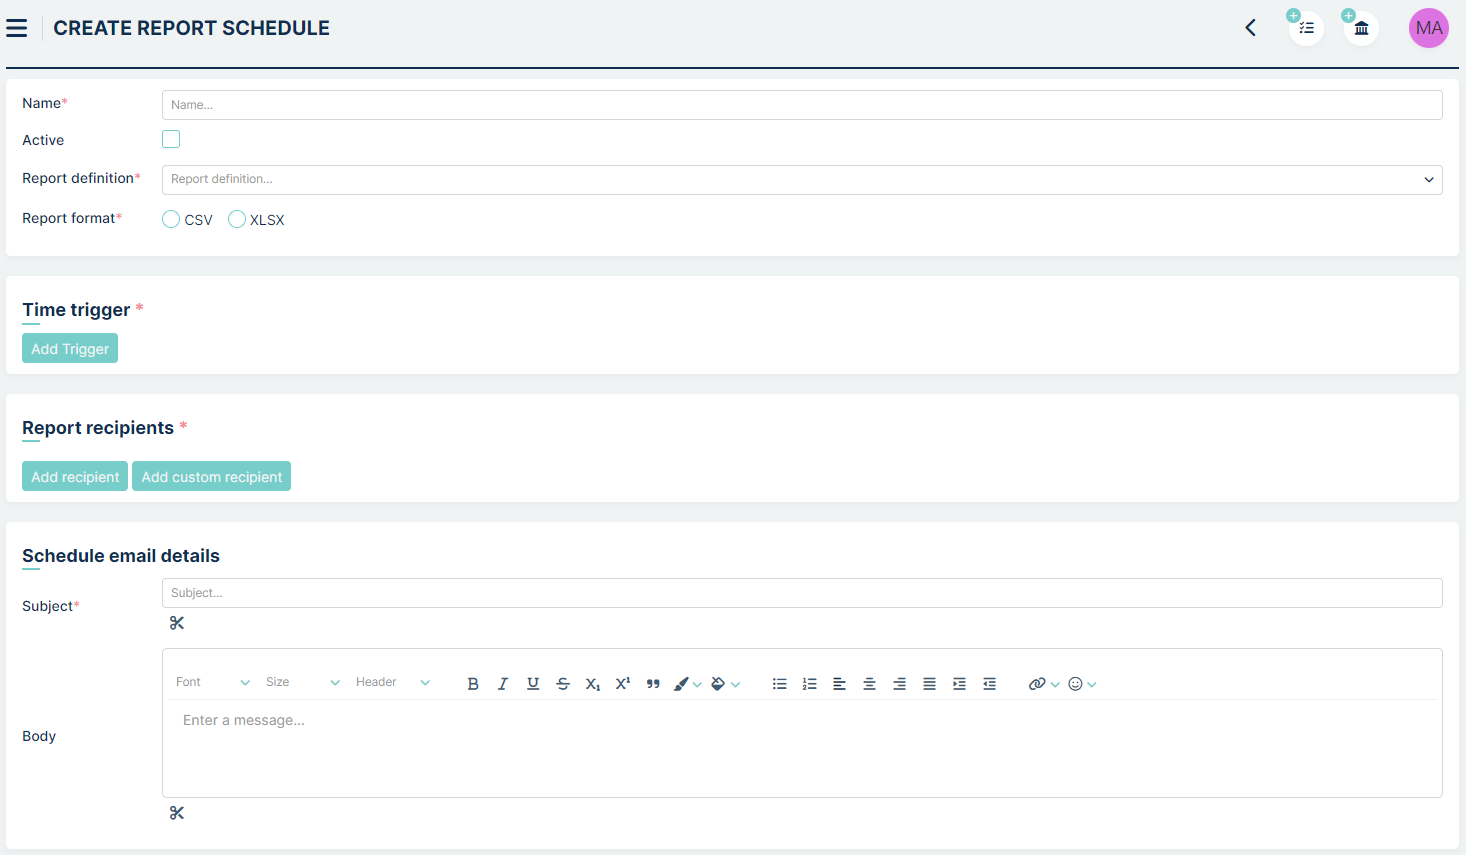
To create a schedule for a selected report, you need to fill in the following fields:
Name - This will be the name of your schedule in the system.
Checkbox “Active” - This determines whether the schedule is active or not.
Report definition - Here we select (from a dropdown list) the prepared and shared reports from the “Report definition” tab. We can choose one report per schedule.
Report format - you can choose between .CSV and .XLSX format
In the Time trigger section, we choose the frequency at which the reports will be sent to the recipients.
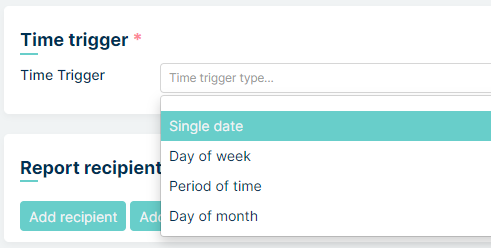
In the Report recipients section, we set the email recipients of our report. We can choose recipients registered in Mint Service Desk (“Add recipient” button) or type email manually (“Add custom recipient” button). We can add one or multiple recipients.
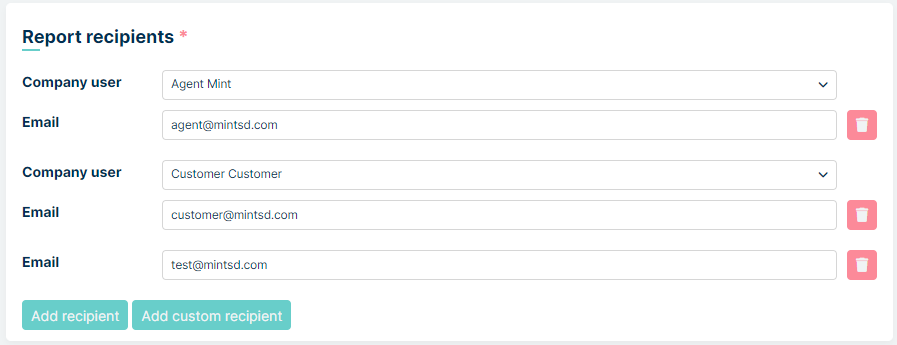
The last part is Schedule email details - the email template (subject and body) that the recipients of the scheduled report will receive.
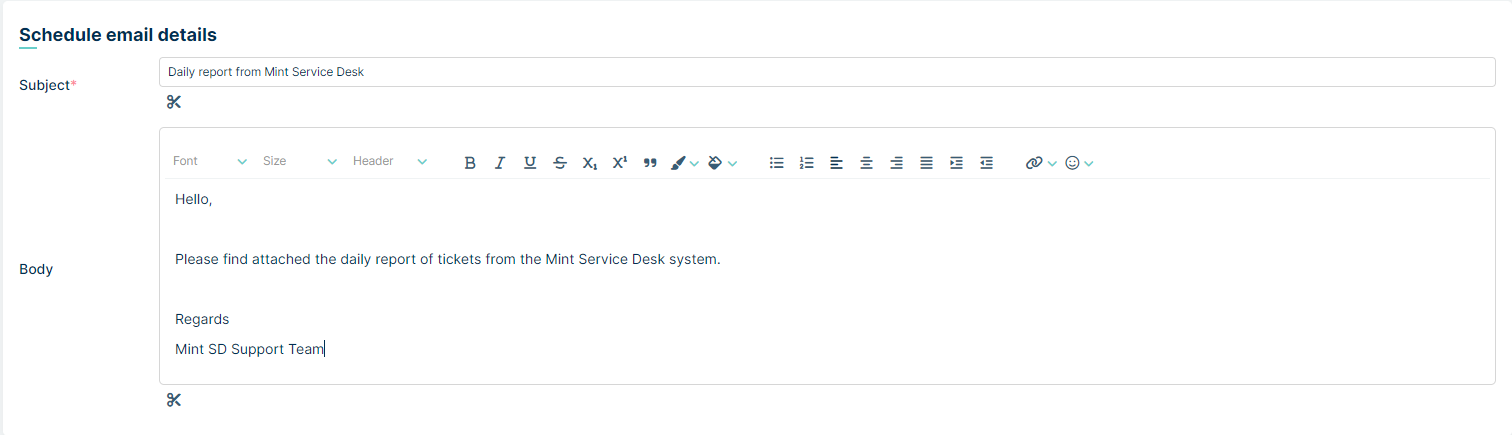
After filling all necessary fields press in lower right part of screen to save your report schedule.
SCHEDULE DETAILS
After clicking on the name of a specific schedule, a page with details is displayed.
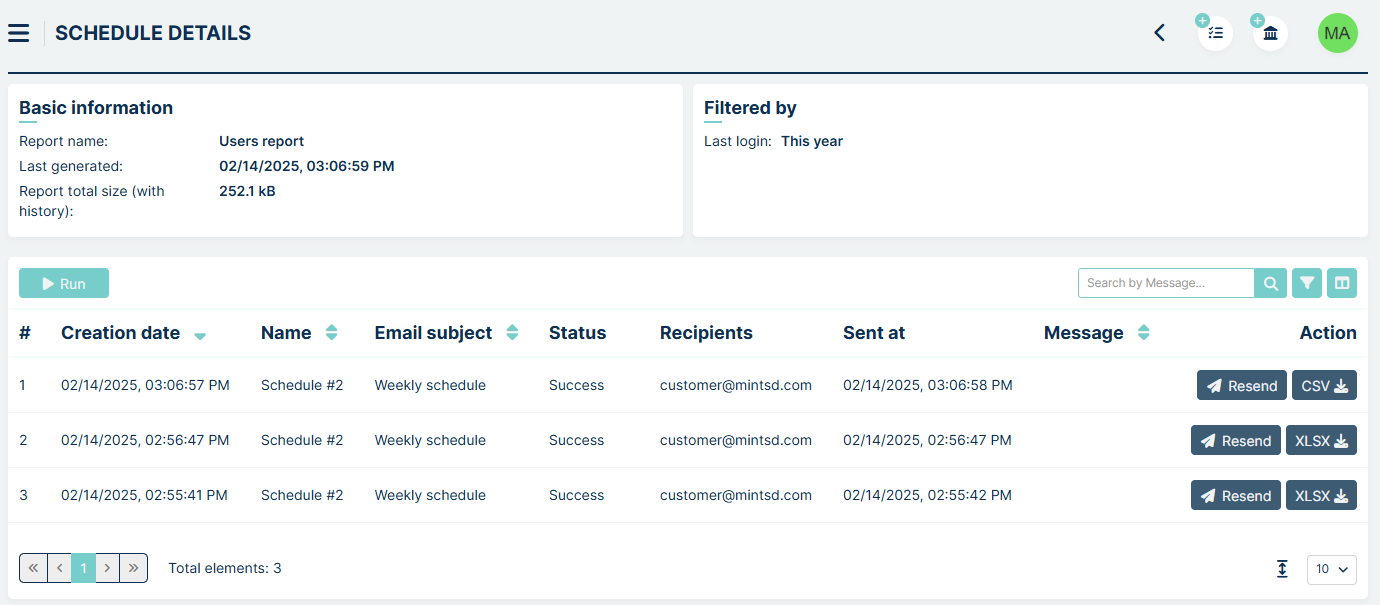
The top left section contains basic information, such as the report name, last generation date, and size.

The top right section displays the report filters.
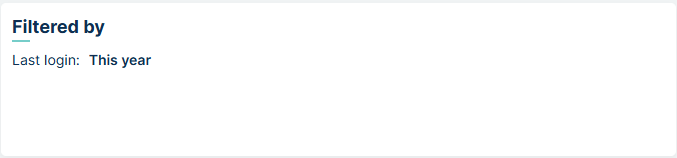
If no filters were used in the report, the Filters field is hidden.
The main part of the schedule details is a table containing the generated reports. These can be reports that are only generated and saved,
as well as reports that are additionally sent to the email addresses specified in the configuration. The top left corner of the table contains
 button, which allows you to manually generate or send the report, regardless of the date set in the configuration. The top right corner
contains the Search by section with buttons similar to those in the previously described tables.
button, which allows you to manually generate or send the report, regardless of the date set in the configuration. The top right corner
contains the Search by section with buttons similar to those in the previously described tables.
The table contains the following columns:
Creation date - the date when the report was generated by the schedule.
Name - the name of the report (the name may change depending on the report configuration currently attached to the schedule).
Email subject - the subject of the sent email message.
Status - the status of the report.
Recipients - the email recipients specified in the schedule configuration.
Sent at - the date when the email was sent.
Message - the error message, if the report generation was unsuccessful.
Action - this section contains the Resend button to resend the email (if sending is enabled in the schedule configuration), and the XLSX or CSV button to download the report (available depending on the format selected in the schedule configuration).
KNOWLEDGE BASE
In this section, Agent can see the whole list of Knowledge Base topics with questions assigned to them and their answers. Knowledge Base is used to help users (Customers, Agents):
Customer/Agent can find help while creating the Ticket (‘Create new ticket’),
Agent can also find help in the ‘Ticket Details’ the moment he enters the Ticket.
The default view shows the list of all available topics.
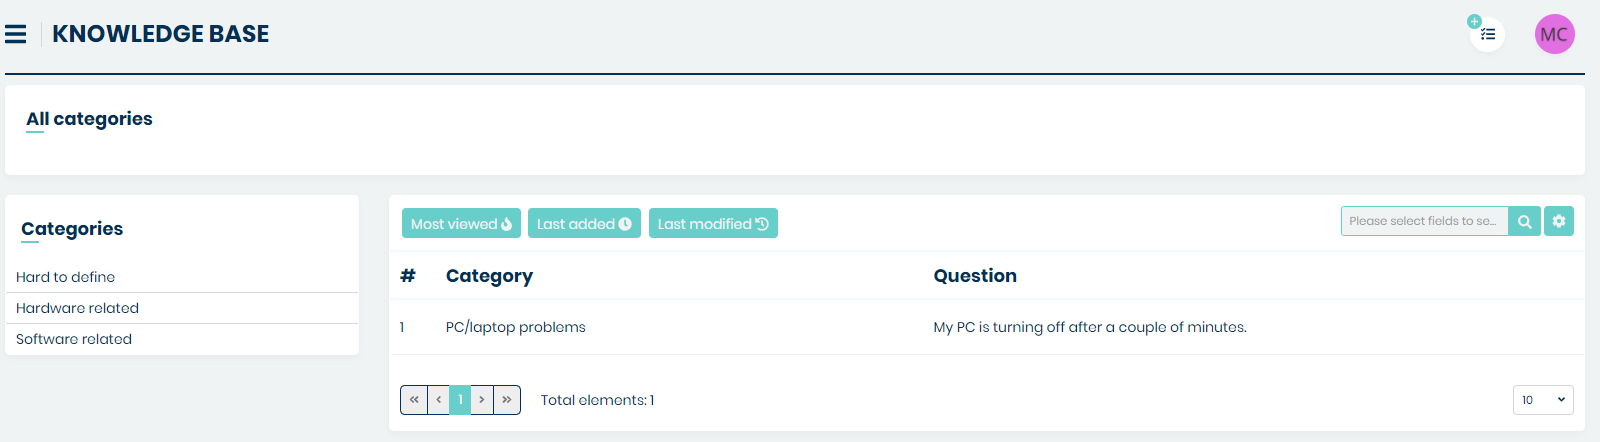
On the left side, you can see available categories.
Here you can choose one category, or go deeper to a sub-category in order to find the topic that fits your needs. If you do so you can easily go back to any level above in the category structure by clicking on the category path in the upper side of the view.

You can also click on the X button located on the right side of the currently selected category/sub-category. Each time you do it you will be moved one level above in the category structure.
By default, in the main view of the Knowledge Base section, you will see the list
topics with the following attribute columns: Category, Question, and Action.
In order to see more information, you need to click the button.
Once you do that you will see a small window, where you can select the desired information you want to see on the Knowledge Base list. Making any changes in ‘Set column properties’ is automatically saved, so you won’t lose anything once you go to any other part of the system.
Also, you can look for a specific topic by using the “Search” field. Whatever you type here will be searched for, depending on the things you marked in the ‘Search by’ section of the ‘Set column properties’ window.
In the upper part, above the topics list, you will see a three buttons:
‘Most viewed’
‘Last added’
‘Last modified’
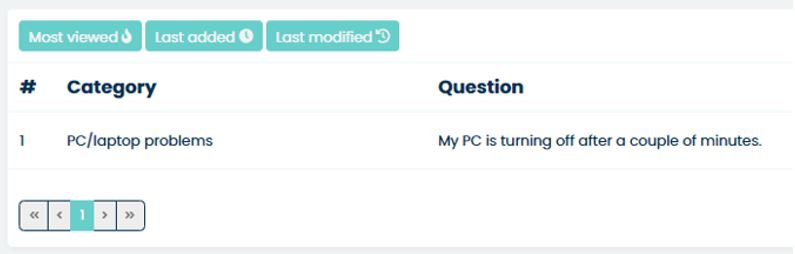
They are used for sorting the list by:
Most viewed - from most viewed to least viewed (column ‘Number of visits’)
Last added – from most recently added topic to the oldest one (column ‘Age’)
Last modified – from most recently modified / most up to date (column ‘Last modification’)
Remember that in order to see any changes on the list while selecting the options above you need to have the right above-mentioned attribute columns selected.
As an Agent user, you can create a new topic in any of the available categories. To do so simply click the button located next to the search field.

In the next view ‘Create Knowledge Base’ you need to fill up some fields:
Title (required),
Category (required): Here you have to choose a category to which the knowledge base belongs,
Companies (optional): right here you can add many different companies to which the knowledge base will belong,
Share with everyone (optional): Here you can decide whether a knowledge base should be accessible to all,
Questions (required): right here you can add multiple different questions which will be answered in the ‘Answer’ field,
Answer (required): here you can put detailed answers for all of the questions added in the previous ‘Questions’ field,
Attachments (optional): Here you can add attachments, for example a picture.
Description (optional): field where you can add some general description for the whole topic.
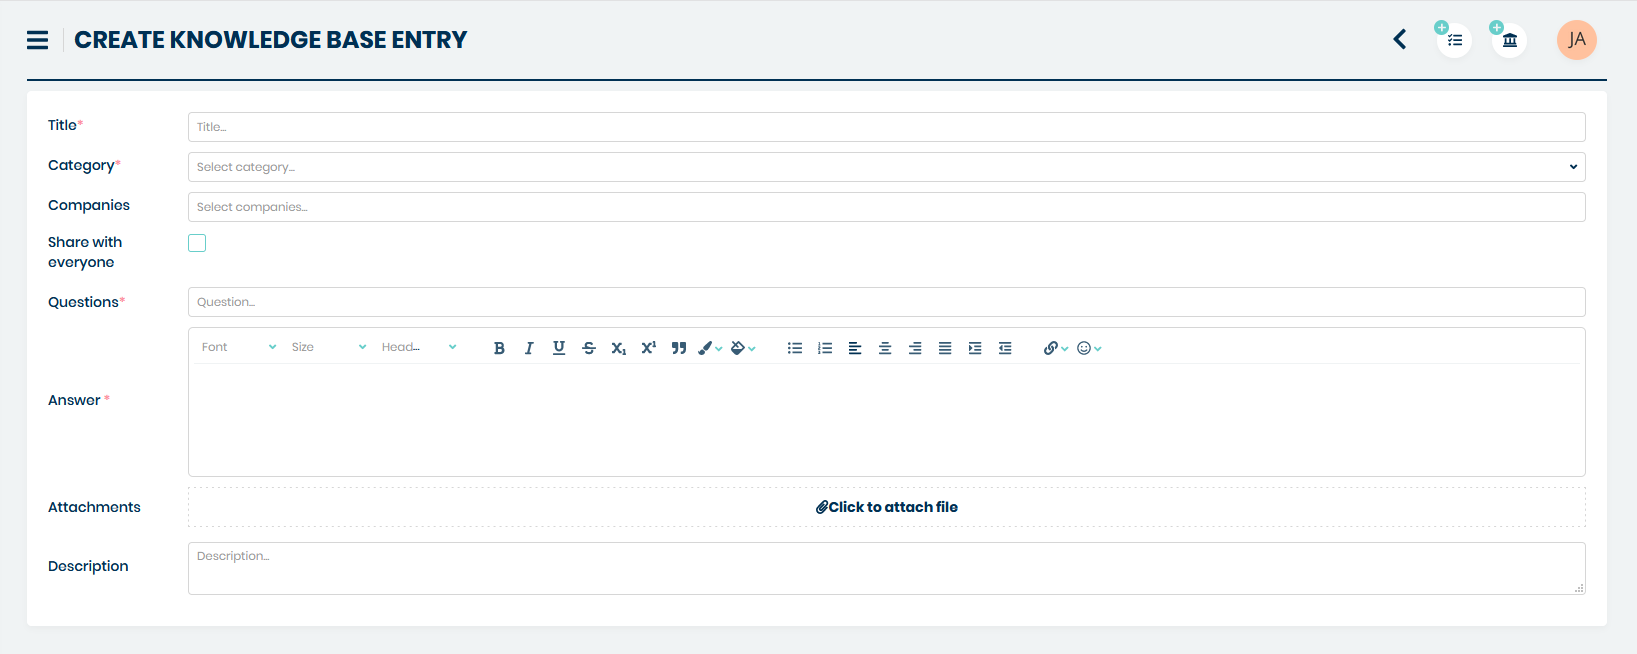
Once you do the steps mentioned above you can save your new topic by
clicking on the button located in the right bottom corner of the
view. After that you will see that a new position appeared on the list.
CONTRACTS
From this place, an Agent has acces to Contracts management. To do so, the Agent role must have checked option below:
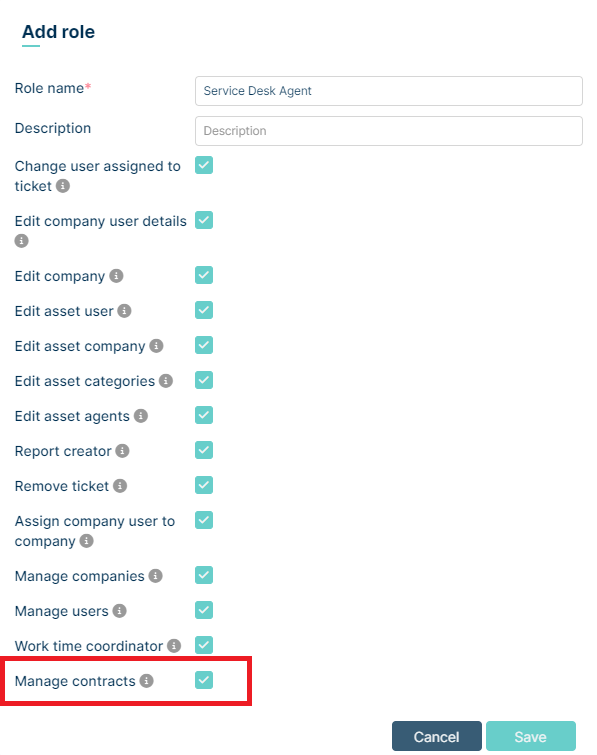

Creation, modifying and deleting contracts is similar as in Admin profile and it is outlined in the admin section of documentation.
ACTIVITIES
Just like with the Client account, on the left side, in the lower part of the sidebar menu, you will find the Activities section.
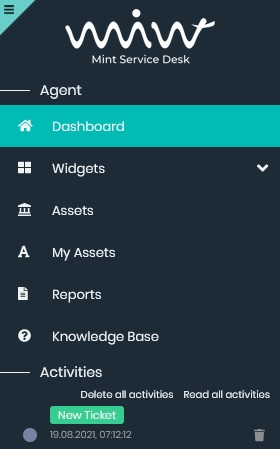
It will display the tickets with any new activity, so you could easily see what is new and go directly to the action. You will see a blinking position on the list each time a new change, like a new message (Article) from the Customer, has been made. The notifications are customizable (color, title, content, etc.), but only an admin user is allowed to do that.
You can delete any position from the Activities list, by clicking the
button. Also, the admin user can customize e.g. the color of
notification.
If you have more than one activity on the list you can either ‘Delete all’ of them (they will disappear) or mark all of them as already read (‘Read all’).
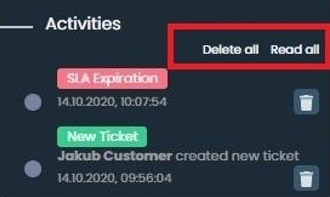
Also if you have a couple of unchecked notifications within one ticket, for example, a couple of unread messages from the Customer, you will notice a number presented on the right side inside the notification.

You can also click on the “Read’ button to mark the
notification as already read (it will be grayed out) or even click on
the ‘Read all’ button to mark all of the notifications
(described with a number) as already read.
Once you use those options the notifications would now look like on the following screen.
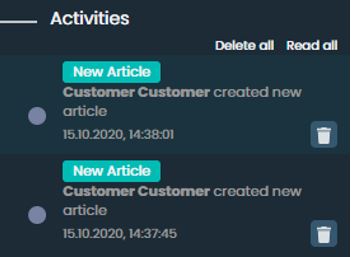
If you have plenty of positions available on the Activities list, you will see only part of them. To see more click on the button ‘See more activities’ located at the bottom of ‘Activities’ section, below the last notification. Once you do that more of them will be loaded.
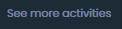
Each time you click on the notification in the ‘Activities’ section you will be moved to the Ticket Details screen where you can continue giving support to your customers.
Last, but now least, if you ever see the following message, while trying to access any Ticket or Asset, it means that the admin user has changed your access rights and you need to contact him and ask for help.