ADMIN PORTAL
The MINT Service Desk administrator is able to log in on the same page as all the users. The system will lead you to the default administration panel ‘Dashboard’ where you will find some general information like the number of active agents, latest updates, etc.
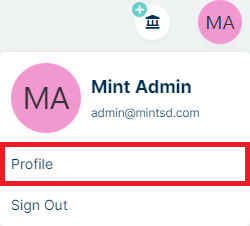
PROFILE
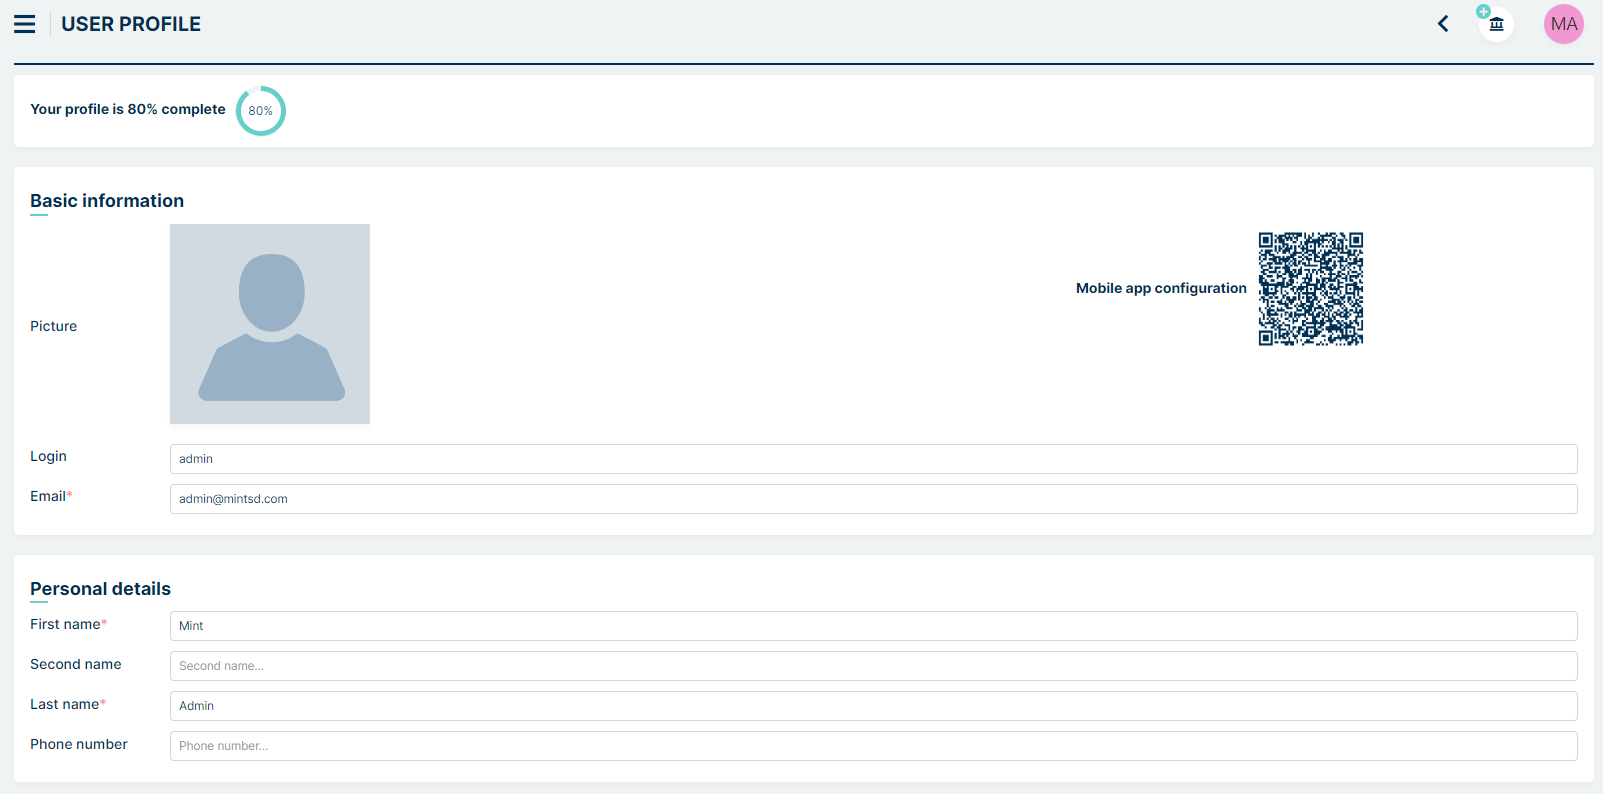
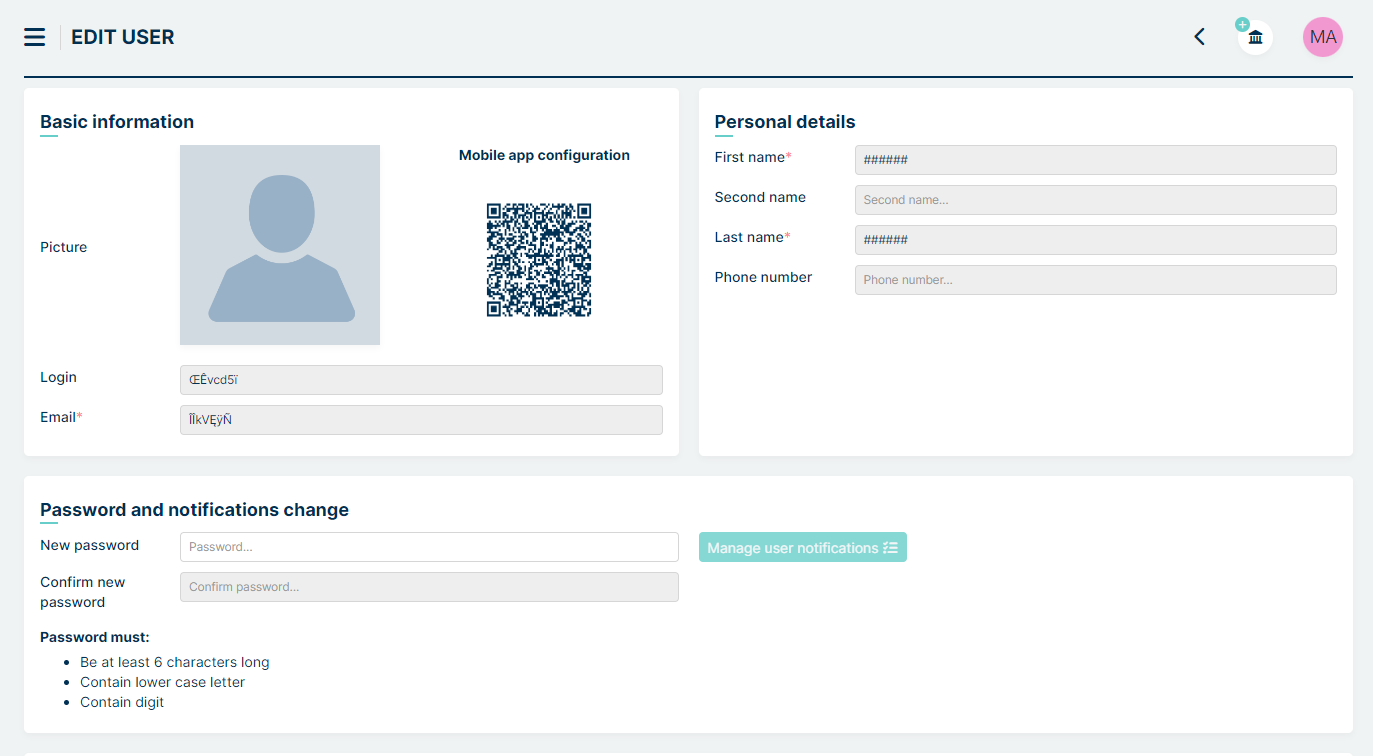
If you click on “Profile” it will lead you to the section where you can change your personal data.
Below “Picture” there is “Personal details” section with admin personal data
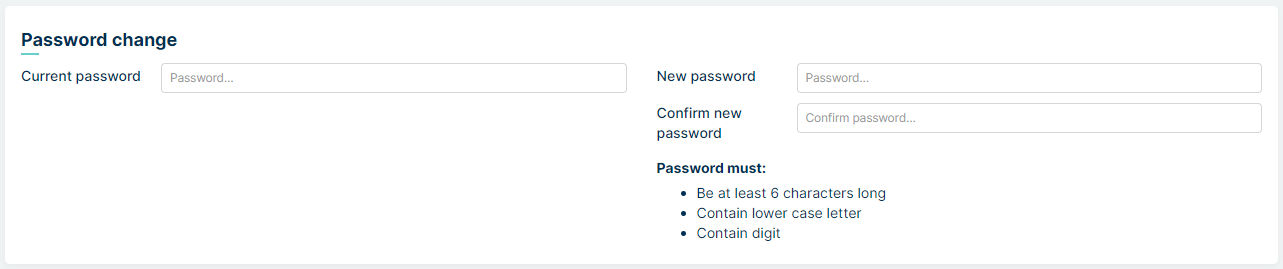
Next section is “Password change” with fields where password change is possibe. There is also a tip about password policy according to Password Policy configuration in Admin > Settings >User.
At the bottom part of the ‘User profile’ view, below the section ‘User settings’ you will section with additional information that can be created and managed in Admin > Companies > User fields. By default, there is nothing, here, but once you create some fields there (‘User fields’), you (and all of the users) will see them here.

For a description of the other fields, see Web Interface => Basics => Profiles.
DASHBOARD
After successful login to the admin account, you will see a Dashboard view that contains some general information such as:
number of Assets, Tickets, and Agents,
number of Agents currently used within your Subscription type,
Agents who are currently on-line and using the system,
latest Tweets from Twitter to be up to date with latest changes and updates,
the status of Mint SD configuration, which needed to be done before you started the proper work with the system. If you missed any of the steps you will notice that in this place.
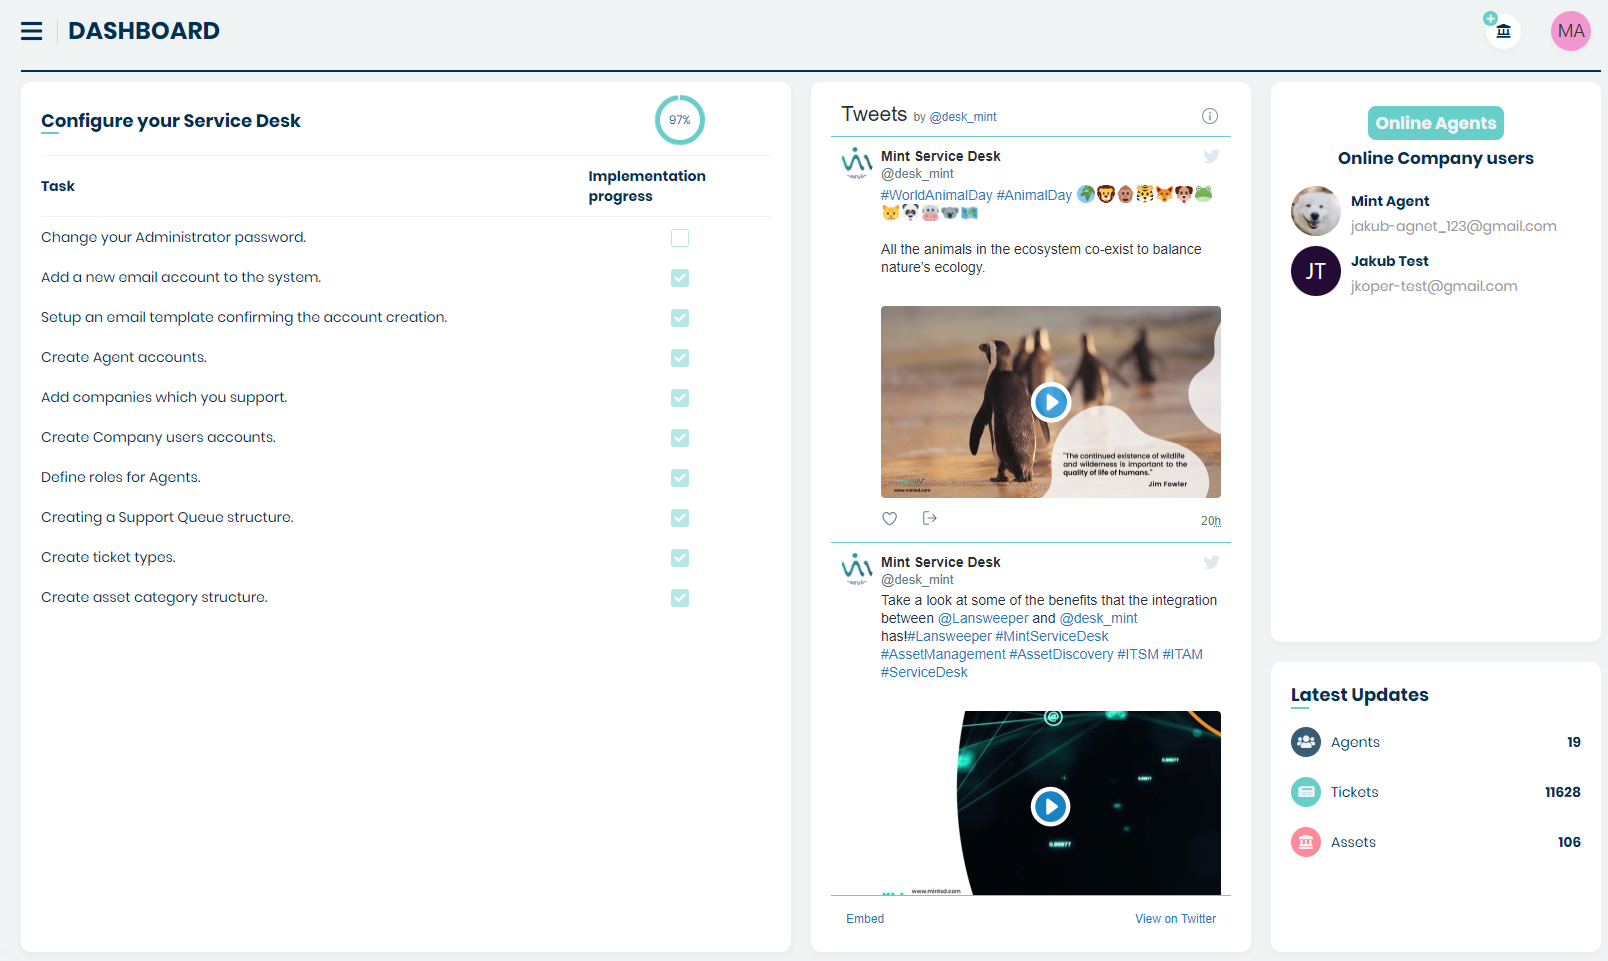
One thing worth explaining in more detail is the ‘Configure your Service Desk’ section. During your first login to the Mint Service Desk system, you had to follow some required steps like e.g., creating an Agent account.
In the ‘Upgrade’ section you can see the available features. ‘Synchronize feature flags now’ this button is used to synchronize the current settings with the License server.
If you have missed any of those steps, right here you will notice that – there will an empty check-box on the right side. If you want to go to the particular place in the system the missed position refers to, just click on that position on the list. The system will direct to the right place.
USERS
In this part of the MINT Service Desk system, you will find the tools that will help you configure Users and their roles or allow you to set up some additional information for any kind of user.
USER MANAGEMENT
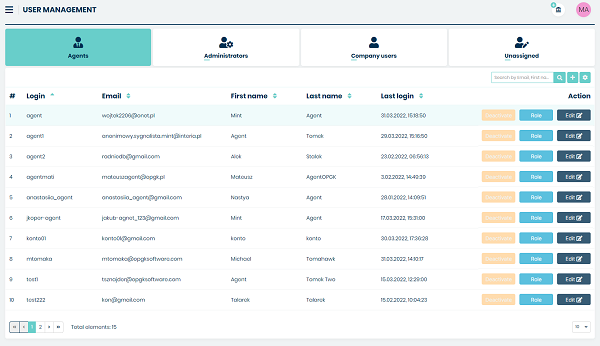
In this place you will be managing your Users.
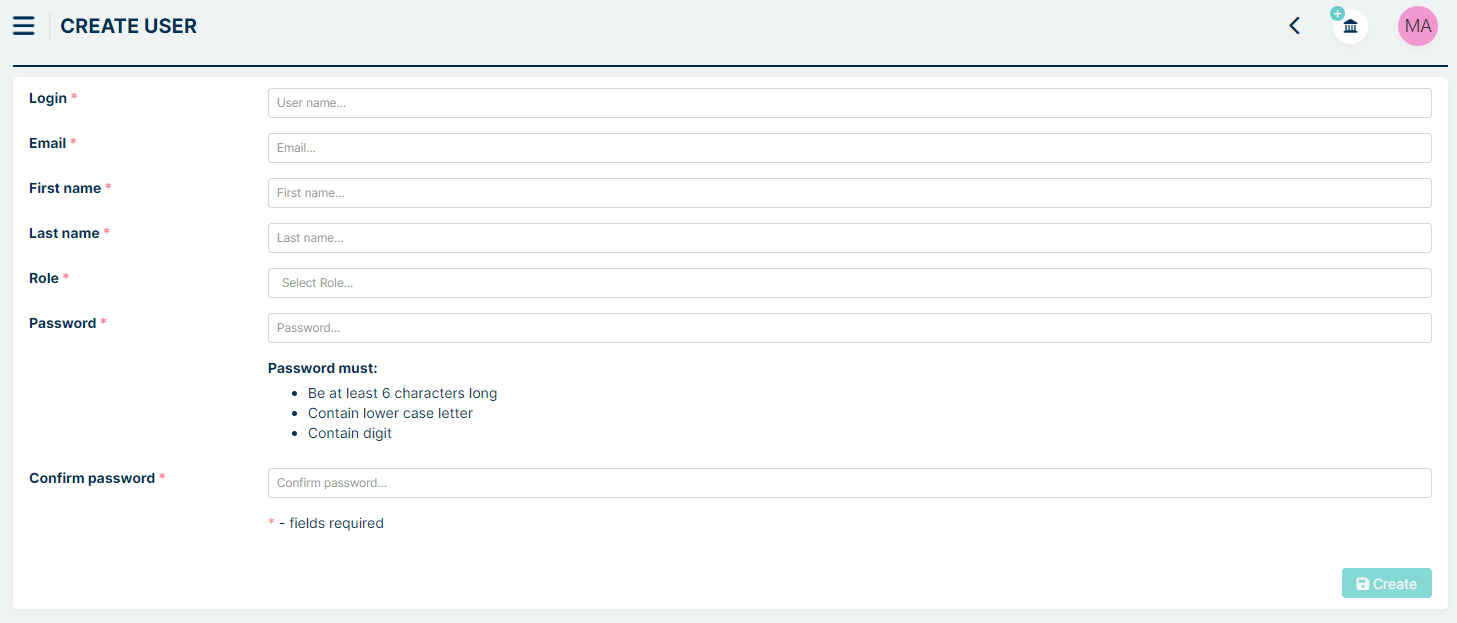
If you want to create a new user, you need to click on the  button, located on the right side of the search box.
Once you do that you will be moved to the ‘Create user’ form, where you need to put in some information regarding the new user. Depending on the role you choose for that user, he will be later shown on a different tab (Agents, Company users, or Administrators).
With every user, you can do a couple of things.
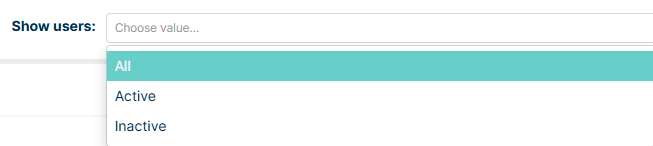
The first is that you can filter by active users, inactive users and all. To do this, select the option you are interested in from the list above the search bar.
The second thing is that you can Activate/Deactivate the user. Deactivating means that the user account will be locked, and he will not able to log in.


You can also change the user Role. Just click the  and in the
next window change the role for the desired one. Please remember that,
if you want to change the role from Agent type to e.g., Company user or
Administrator type, you first need to unselect the current chosen one.
In the following example, we have an Agent with the ‘Service Desk Agent’
Role.
and in the
next window change the role for the desired one. Please remember that,
if you want to change the role from Agent type to e.g., Company user or
Administrator type, you first need to unselect the current chosen one.
In the following example, we have an Agent with the ‘Service Desk Agent’
Role.
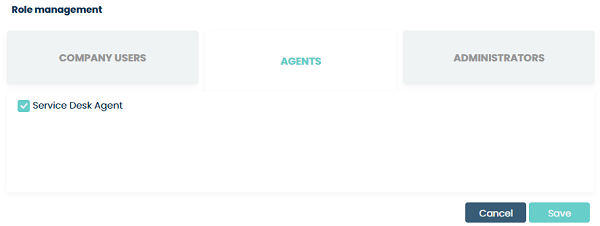
If we want to change it and grant the user a Company user type role, we need to unselect the ‘Service Desk Agent’ role and switch the tab to ‘Company users’.
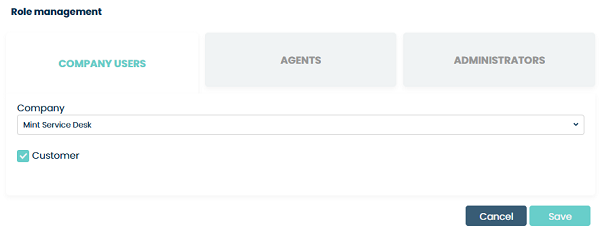
In this place, you need to choose and select one of the available
Companies and one of its roles and click  . Once you do that
the user will disappear from the ‘Agents’ tab and be moved to the
‘Company users” tab.
. Once you do that
the user will disappear from the ‘Agents’ tab and be moved to the
‘Company users” tab.
If you like to add or change some information about the specific user,
you can click on the  button. It will direct you to the ‘Edit
user’ screen containing information about the user you just choose.
button. It will direct you to the ‘Edit
user’ screen containing information about the user you just choose.
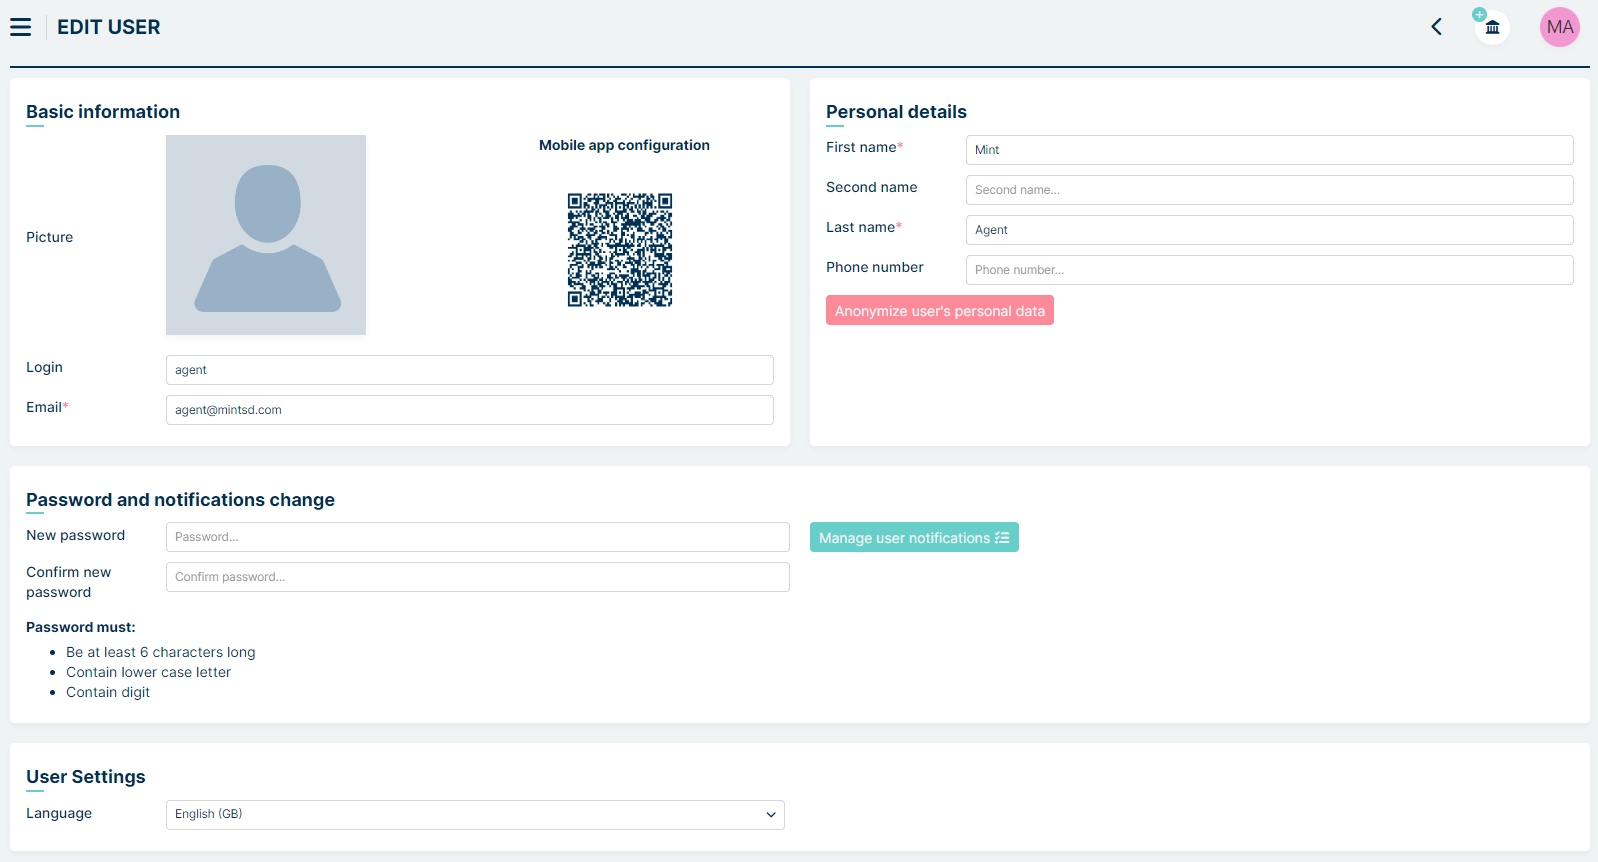
Now, make any changes you like and click the button.
User annonymization
From this place you can also annonimize user data (if admin set this in “Settings” => “Users” section). Annonymization makes user data unreadable, randomizing values as “Login”, “Email” “Name”, “Last Name” and deleting “Second name” and “Phone nubmer” data in these fields. After clicking on this button you have additional step to confirm
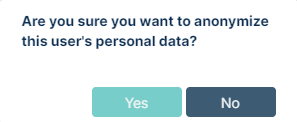
When you confirm it, data will be annonimized. User cannot use his account from now
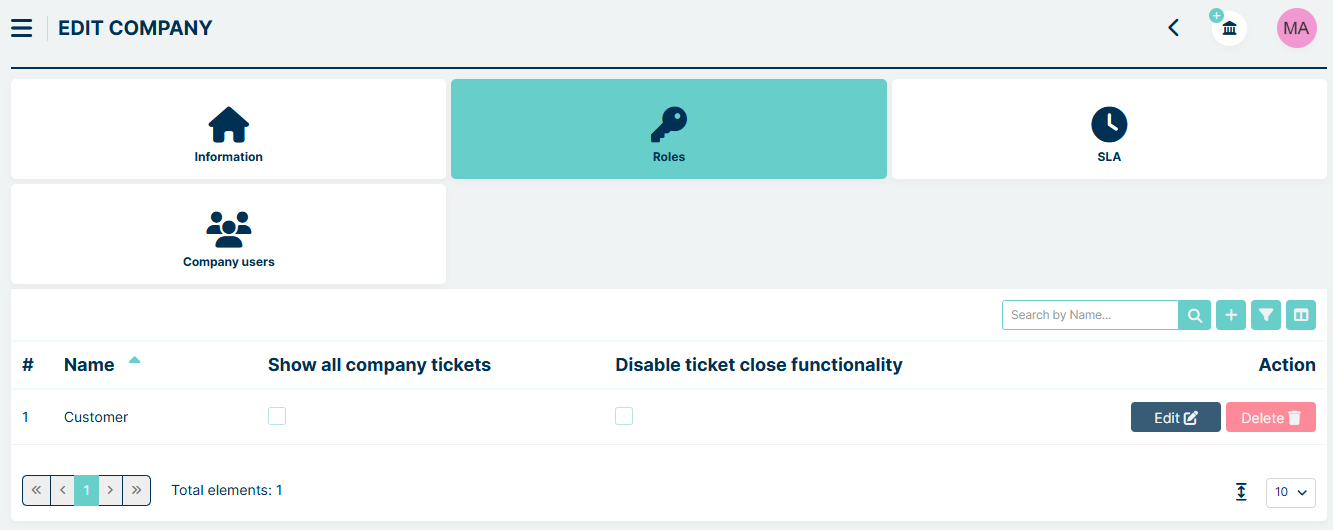
ROLES
In this section, you will be able to add new and manage already existing Agents Roles.
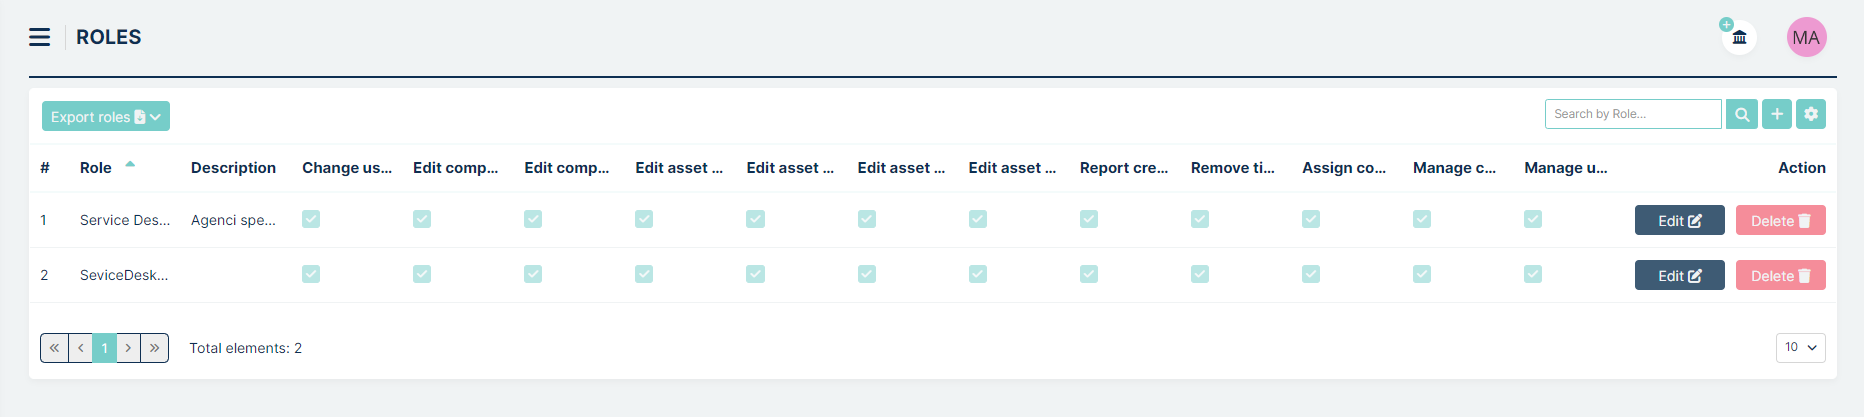
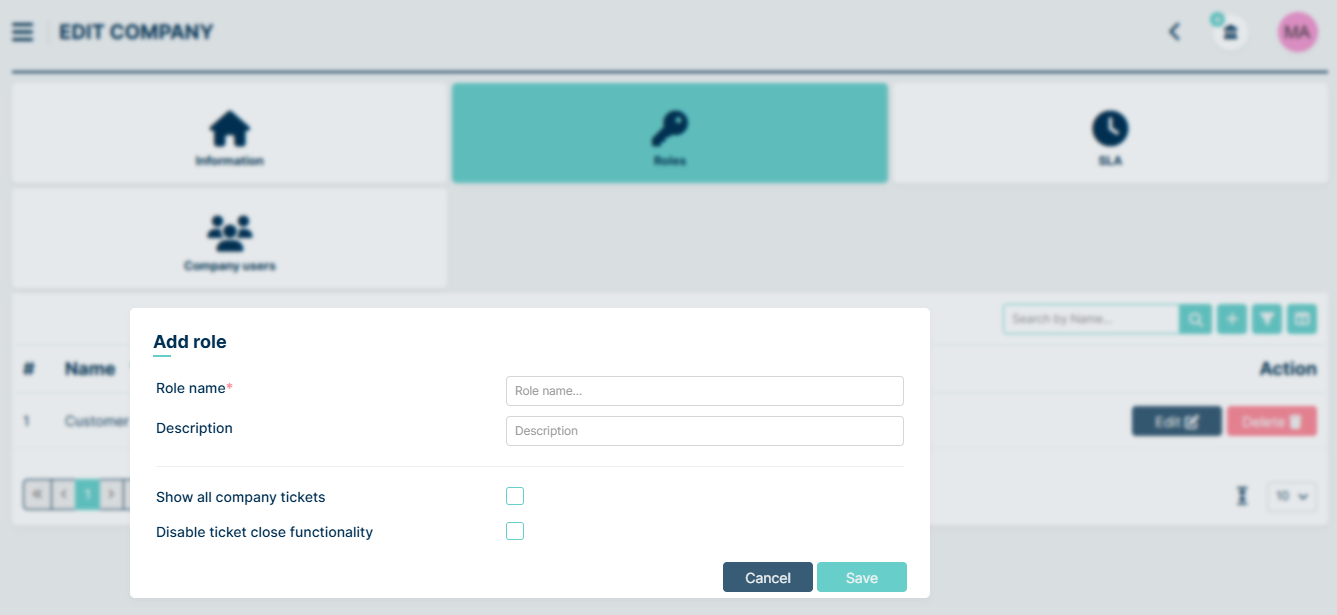
In order to add a new Agent Role, click on the button,
located on the right side of the search field. It will open an ‘Add
role’ window.

Right here you need to name your new Agent Role and decide what type of actions you want to allow this agent to make.
You can choose and allow an agent to do one or more things:
Change user assigned to ticket – means that an agent will be able to change the company user assigned to the ticket.
Hide the ability to create a client and company – means that the buttons for creating a new customer and company in the ticket creation view will be hidden for agent
Edit company user details – means that an agent will be able to change the basic company user data in the ticket view.
Edit company – means that an agent will be able to change the Company assigned to the ticket.
Edit asset user – means that an agent will be able to change the user assigned to the asset.
Edit asset company – Allows changning of company assigned to asset.
Edit asset categories – Allows changning of categories assigned to asset.
Edit asset agents – Allows changning of agents assigned to asset.
View access groups - Allows Agent to view access groups assigned to him
Manage access groups - Allows Agent to manage access groups in the same way as an administrator.
Report creator – allows to define reports.
Remove ticket – after selecting this option, the agent having this role will be able to delete tickets.
Assign company user to company – Allows agent to assign company user to company.
Manage companies – Allows agent to manage companies.
Manage users – Allows agent to manage users.
Work time coordinator – Allows to manage work time reports.
Manage contracts – Allows agent to add, modify and manage contracts.
Reports Scheduler - Allows the agent to create scheduled reports and send them to specified email recipients.
Allows the acceptance of potentially dangerous articles - Allows the agent to approve the display of articles identified by the Mint system as potentially dangerous in the ticket.
Generating SQL reports - Allows the agent to create database queries in the Reports module.
Expanding dictionary values - Allows the agent to add new values to dictionary attributes while creating and editing a ticket. The dictionary attribute must have the “Adding dictionary values” option enabled in Tickets -> Custom fields by the administrator.
Can only edit their own tickets – Allows Agent to edit only their own tickets. The agent can still view tickets assigned to other agents.
Can only view their own tickets – Allows Agent to view only their own tickets. Tickets assigned to other agents are not visible. Agent cannot edit their ticket unless Can only edit their own tickets role is selected
Cannot edit closed tickets – The Agent cannot edit ticket data or its custom fields if the ticket is closed.
Article search – Allows the agent to search for phrases in articles on the ticket list using the SOLR engine (see the SOLR section in Agent Portal → Full text search).
Attachment search – Allows the agent to search for phrases in attachments and attachment names on the ticket list using the SOLR engine (see the SOLR section in Agent Portal → Full text search).
Once you finish click button.
If you like to add/change anything later for the role, you can use the
button.
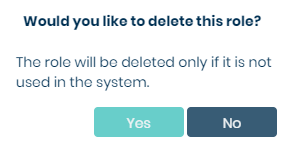
If you want to get rid of any Agent role on the list just click
 and confirm your choice by clicking YES on the confirmation
screen. You will also be informed that role will only be deleted if
it is not used in the system.
and confirm your choice by clicking YES on the confirmation
screen. You will also be informed that role will only be deleted if
it is not used in the system.
If you want to export your roles settings, you can click on  button and
simply export it to .csv or .xlsx file
button and
simply export it to .csv or .xlsx file

CUSTOM FIELDS
In this section, you will be managing the additional fields that might contain additional information for every type of user.
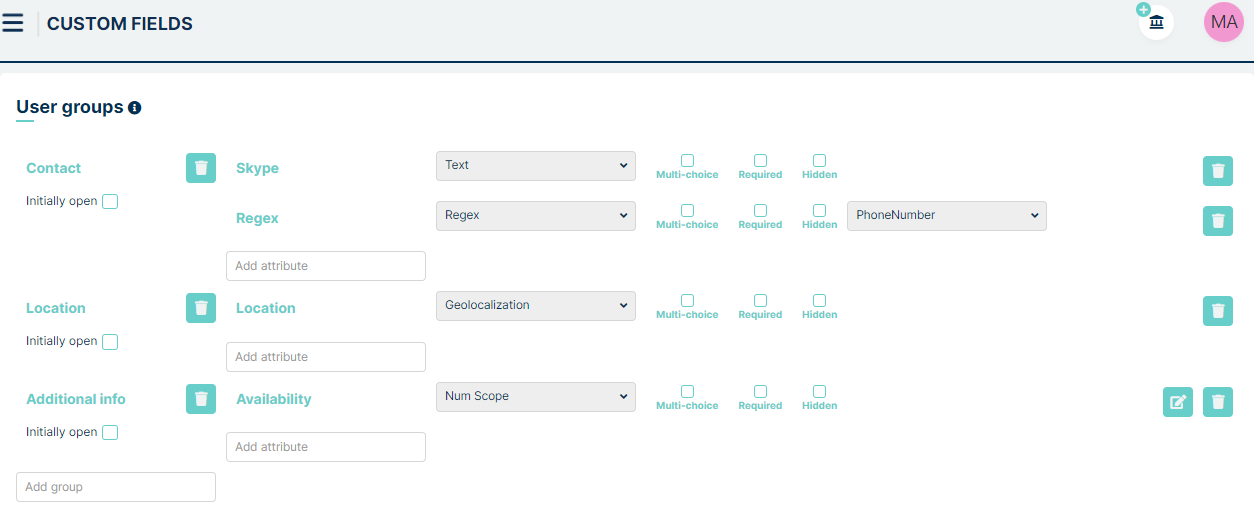
In the Mint Service Desk, each user has some pre-defined fields which are used for holding some information such as ‘First name’ or ‘Phone number’. That information is available for viewing in the ‘Profile’ part of the system.
If you click on the round icon (or round picture if you have uploaded one in your profile) it will open a dropdown menu. Click on ‘Profile’.
In the ‘Custom field’ section you can create an additional group of attributes for filling up (or selecting) with even more information. Those additional attributes will be later visible in the aforementioned ‘Profile’ section, at the bottom part of the view.
Let us create some. First, you need to create a group for those attributes. Click on the ‘Add group’ field and type some name.

Press ‘Enter’ on your keyboard to confirm the name. Once you do that a new field ‘Add attribute‘ will appear on the right side.
Now, add some attributes. First, in the ‘Add attribute field’ type a name and confirm it with ‘Enter’. On the right side, you will see a new field ‘Attribute type…”. Select one type from the dropdown list. You can also select a ‘MultiChoice’ check-box to allow selecting/adding more than just one Value later in the User profile view.

If you want to rename any of already existing elements just click on its name, make some changes, and click Enter.
If you want to remove anything just click on a trashcan icon  located on the right side. In the new window, you will be asked to
confirm the action.
located on the right side. In the new window, you will be asked to
confirm the action.
You can add plenty of attributes for the group. In the following screen, you can see a finished group with some important attributes already prepared.
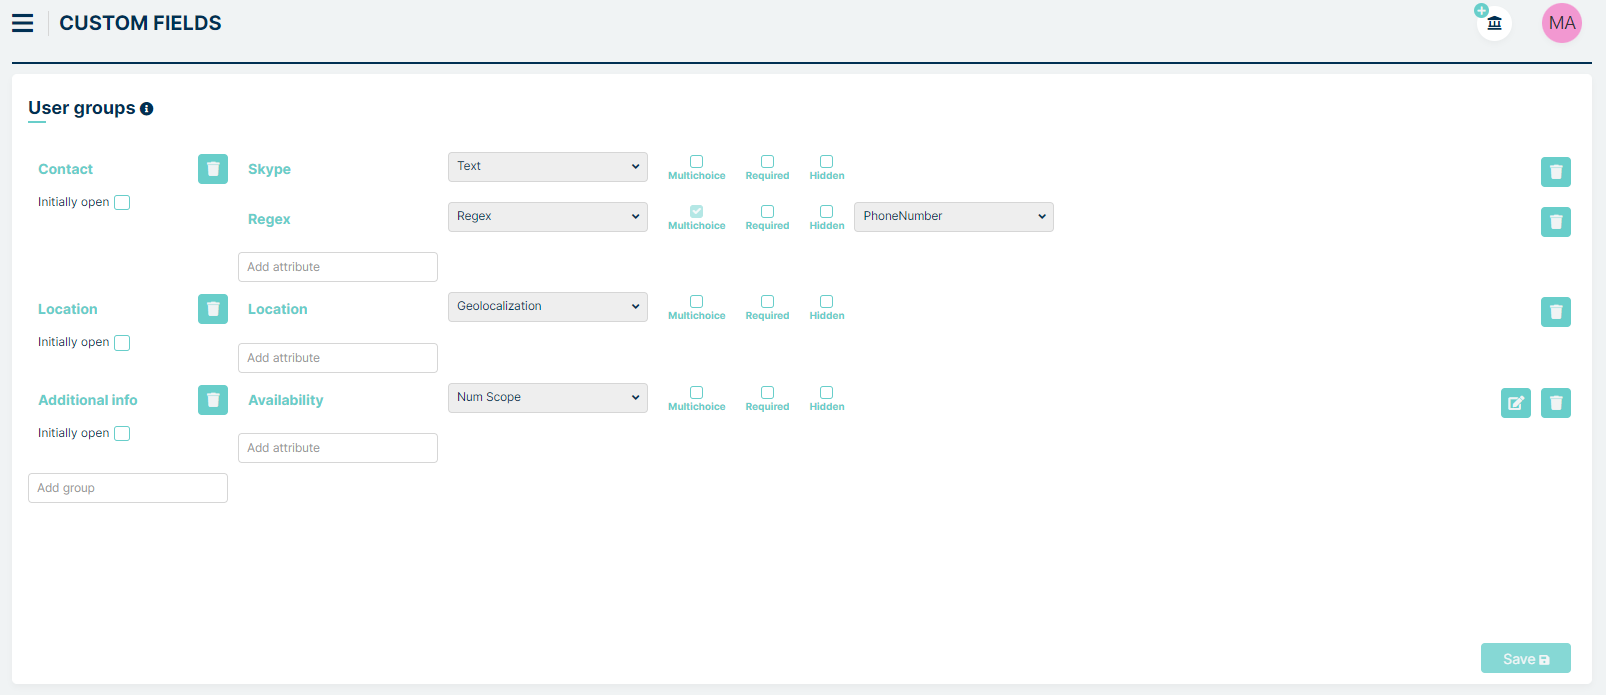
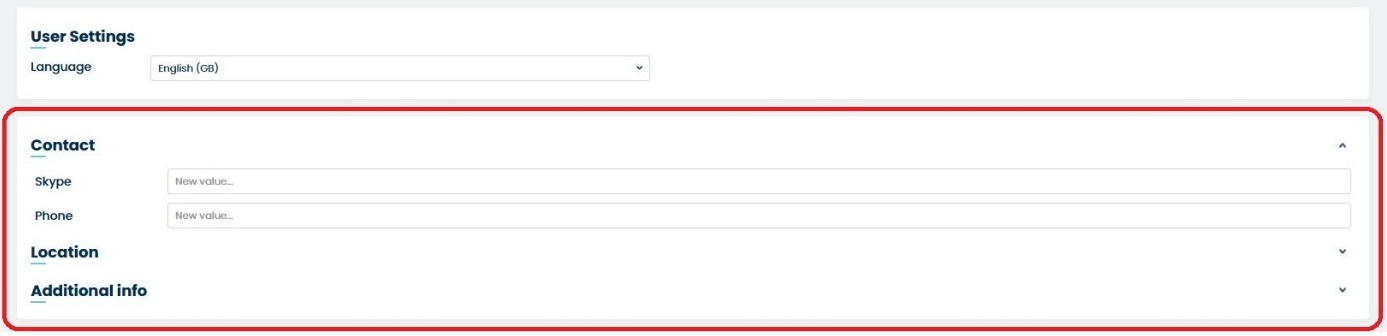
Now, if you move to the ‘User profile’ section, at the bottom of the view you will see those additional attributes.
USERS INTEGRATIONS
At this point in the system, you can perform user integration via Azure AD or LDAP. To do this, press the button.
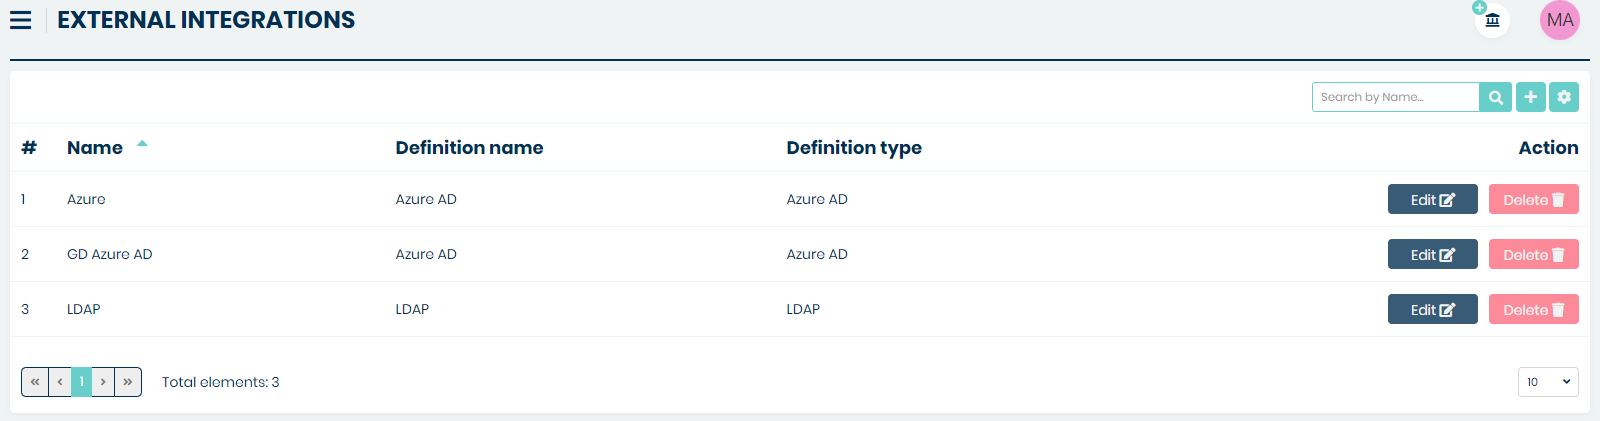
In the Name field, enter the name you want displayed on the list of all integrations. In the Definition field, select LDAP or Azure AD from the dropdown menu.
To complete the first configuration process, press the button.
Then return to the list with all available users integrations and edit the configuration of interest.
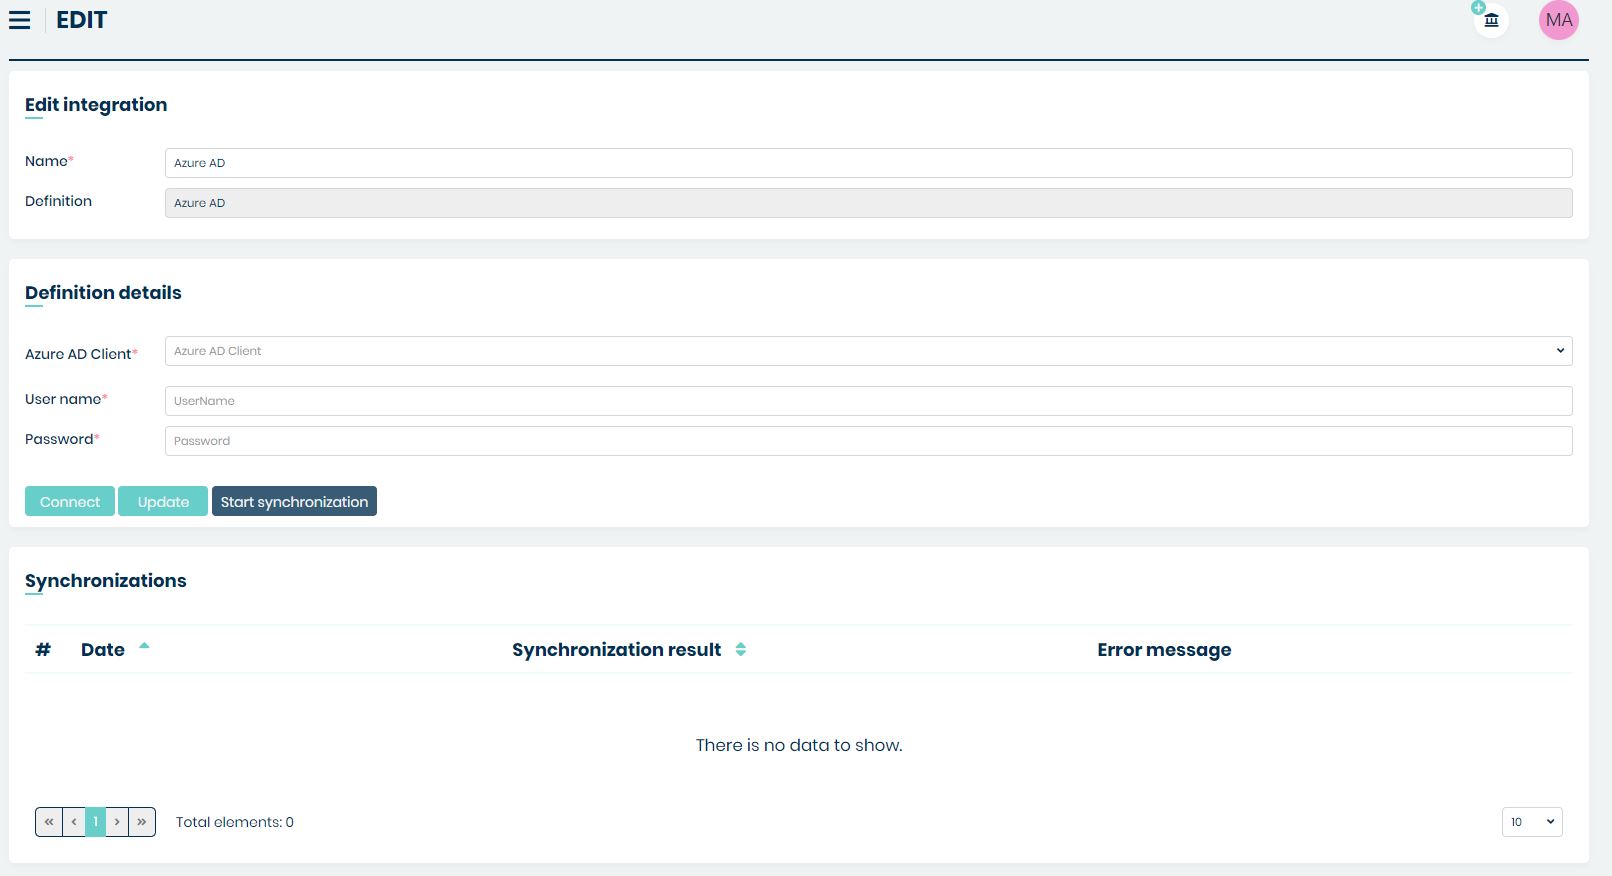
Azure AD Client/LDAP Client - Here, select the option you configured in Authentication Backends from the dropdown menu.
User name - user name of the person to integrate.
Password - password of the person to integrate.
Search filter - In the case of LDAP, you still need to add a search filter.
After entering the correct data, press the  button. When the page reloads, press the
  button. If the configuration
is correct, an appropriate message will be displayed. The next step is to press the
button. If the configuration
is correct, an appropriate message will be displayed. The next step is to press the  button. After refreshing the page, a
new entry will appear in Synchronizations.
button. After refreshing the page, a
new entry will appear in Synchronizations.

It is worth remembering that the page will be updated only when the page is reloaded. When you enter a particular sync, you will see a summary of how the sync went.
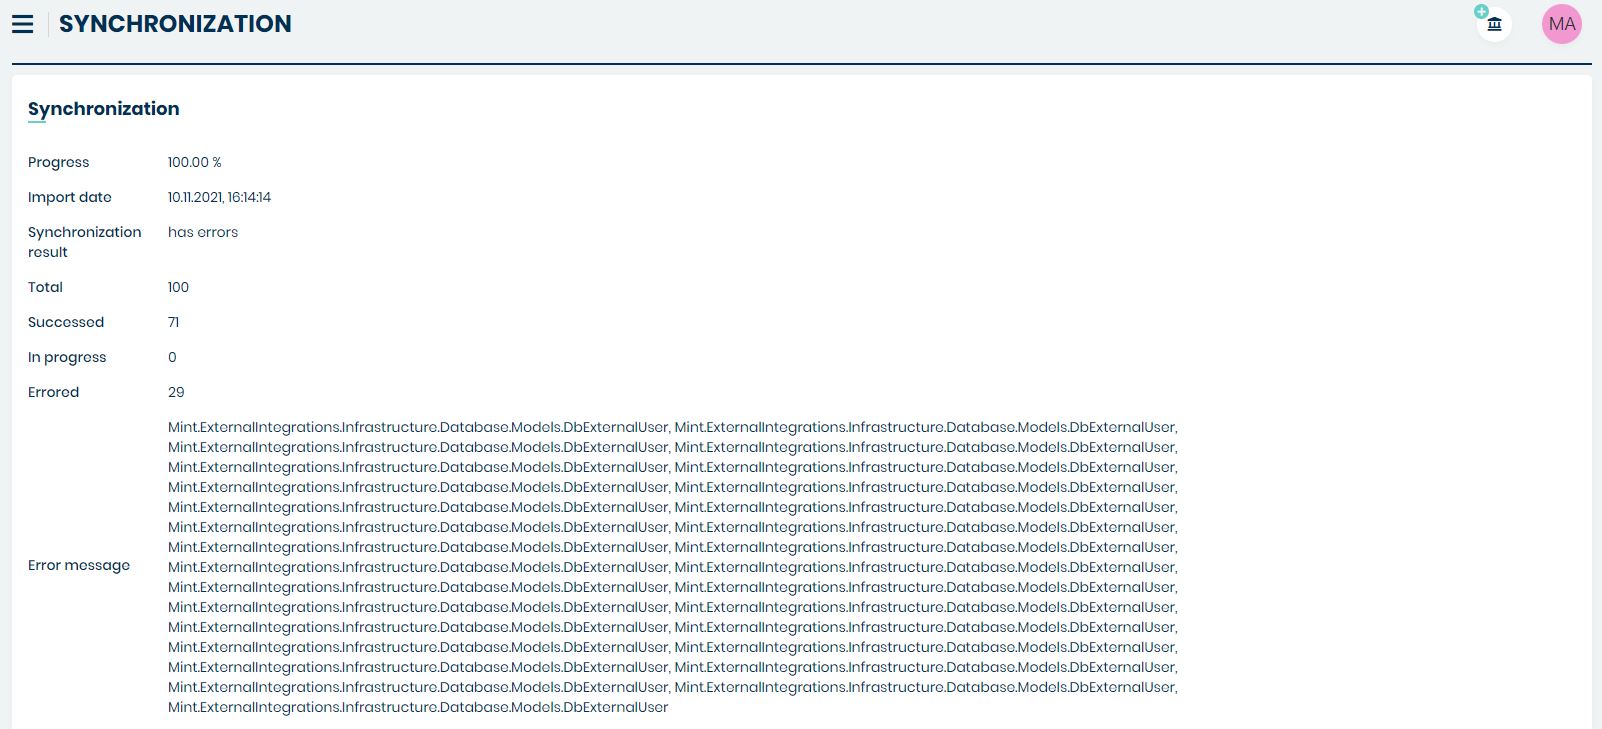
At the very top, progress, the date the sync was performed, the result of the sync, and the sum of all operations along with successes and errors appear.
USER ROLE RESOLVER
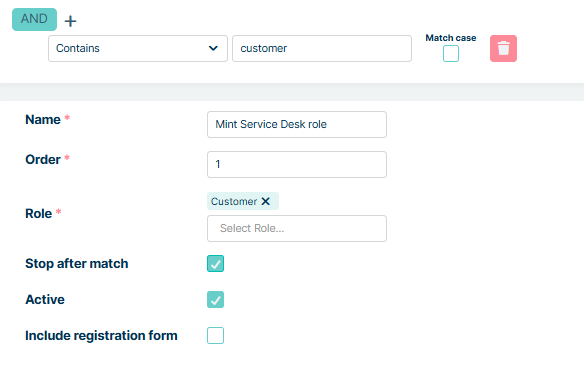
The User Role Resolver functionality automatically assigns specific company roles to users who create a ticket via email or, optionally, register as new users in the system. The role assignment is based on a configurable email filter that verifies whether the user’s email address matches defined conditions (e.g., if the filter is set to match emails containing “customer”, the new ticket created from the user with email: customer@mintsd.com will result in the selected company role being assigned to that user).
Upon opening the User Role Resolver tab, a table with the list of existing configurations is displayed, including the columns Name, Order, Stop after match, Active, and Action.
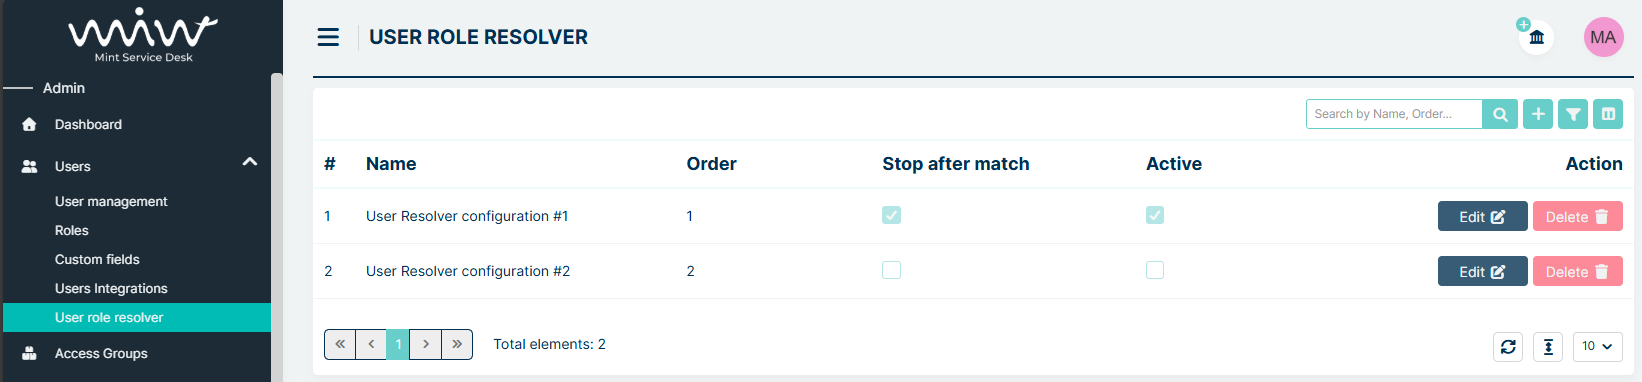
Administrators can manage column visibility and search the table by Name and Order; the Action column provides Edit and Delete buttons, while the remaining columns are described in detail in the configuration creation section below.
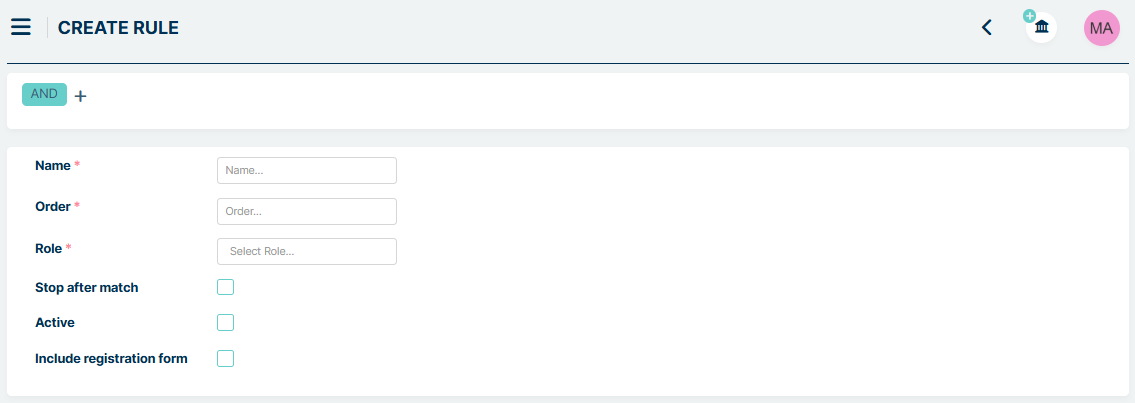
To create a configuration, click on the + button located in the upper right corner of the page below the user icon. After clicking, a configuration creation form will open.
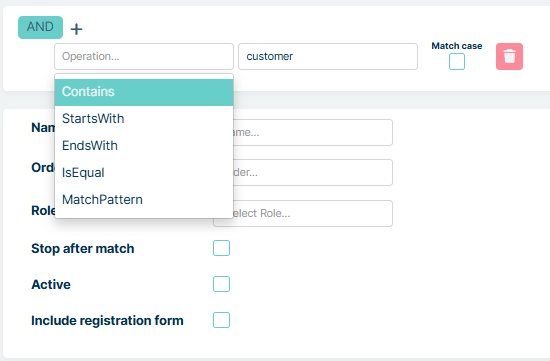
Filter section
In the Filter section, you define the logical conditions that determine whether a company role should be assigned to a user. The logical operator field allows you to toggle between AND and OR, defining how all conditions in the configuration are evaluated together. Next to this field, there is a plus (+) icon that lets you add a new condition row.

Each added row contains an operator selection list (Contains, StartsWith, EndsWith, IsEqual, or MatchPattern), a text field where you enter the full email address or its fragment (e.g., part of the username or domain), a Match case checkbox to enable case-sensitive comparison, and a delete (trash) icon to remove the condition if needed.
Configuration settings section
In the configuration settings section, you define how the rule behaves once the filter conditions are met.
The Name field is used to identify the configuration, while Order determines the sequence in which the system evaluates this rule in relation to others.
The Role field specifies which company role will be assigned to the user when the filter matches. You can set one or more company roles to assign. The Stop after match option ensures that no further configurations are evaluated after this rule is successfully applied. The Active checkbox controls whether the configuration is currently enabled in the system, and Include registration form determines whether the rule should also apply to users registering through the system’s registration form.
Example of use:
A new customer with the email address customer@mintsd.com sends a ticket to the Service Desk system. In the configuration, a rule has been defined so that any email address containing the word “customer” is assigned the Customer role of the Mint Service Desk company.
Once the message is received and processed by the system, the specified company role is automatically assigned to the new user.
ACCESS GROUPS
The Access Groups feature is a place where an administrator or agent can manage the scope of access of agent roles according to companies assigned to ticket. To be able to manage access, a company must be registered in the MINT system in the Companies section. An agent can manage Access Groups or only have view access to those assigned by the admin. This is determined by the “Manage Access Groups” role in Users -> Roles. If this role is active, the agent has management rights equal to those of the admin.

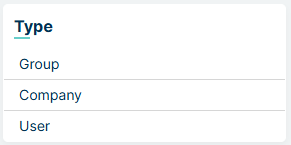
There are two types of groups
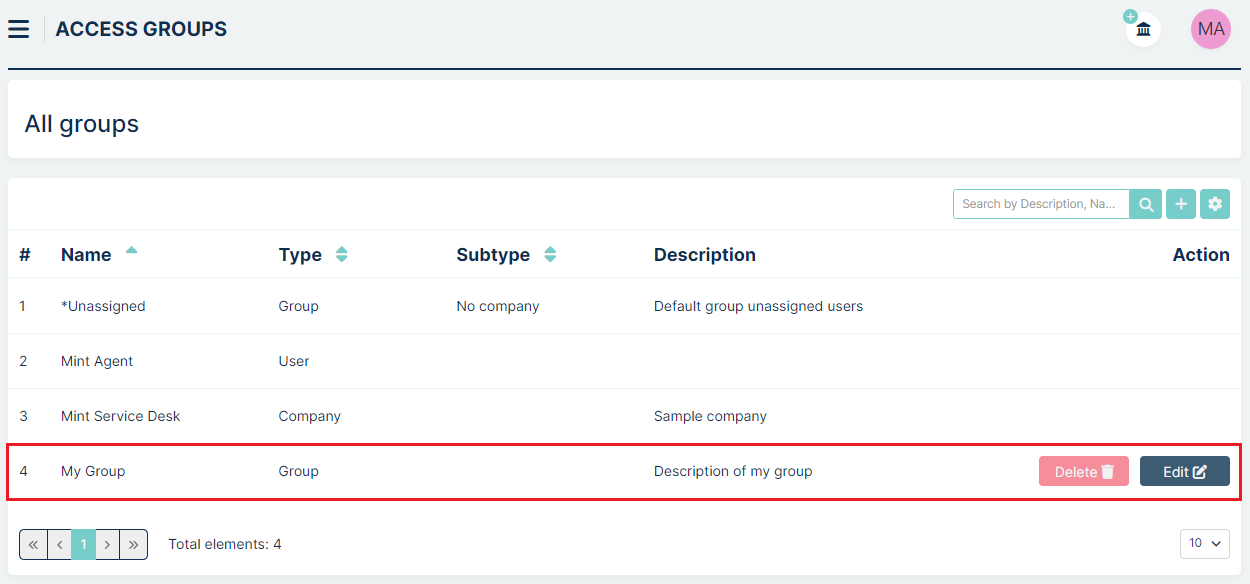
First are automatically created by the system. We cannot modify their name or delete them in this section. These include:
Unassigned user group - this is the default group for tickets that do not have a company assigned to them
User - for each agent, its access group is automatically created here
Company - for each company, its access group is automatically created here
The second type is groups created by the Administrator or Agent. They are defined in the Type column as ‘Group’, and we can modify their name and description, as well as delete them.
We can both include and exclude each group to another, however we cannot assign other groups to Company and Unassigned user group. You can also assing one agent group to another.
We can also filter access groups by types: Group, Company or User
Create a group
To do this, click on the button located in upper right part of window and you will see new window like below
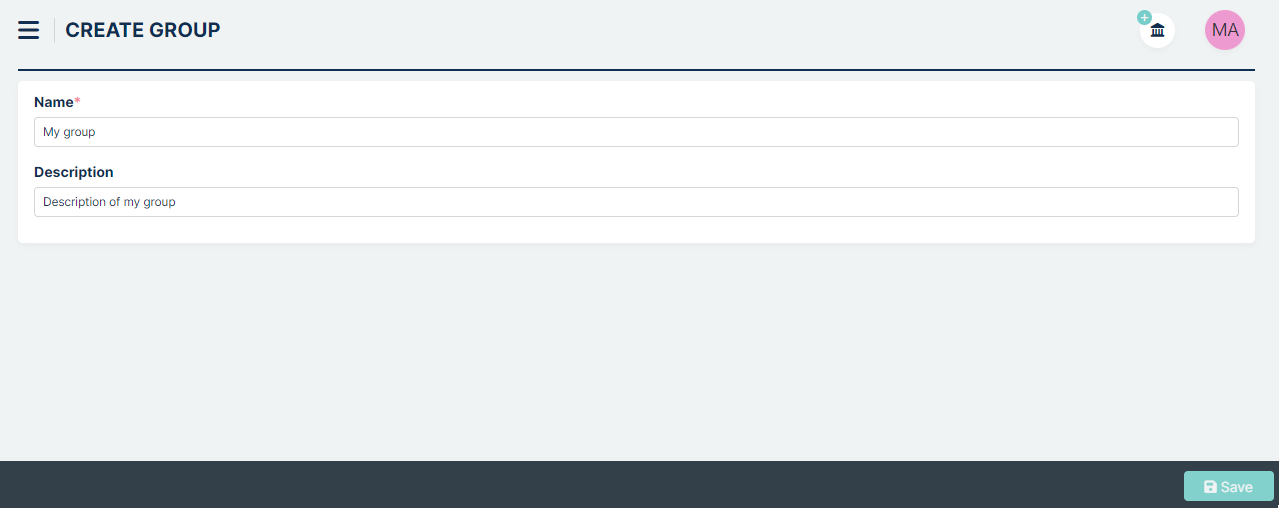
Fill al least the “Name” field and press . New group will appear on the list
We can name of this group and it.
Group view
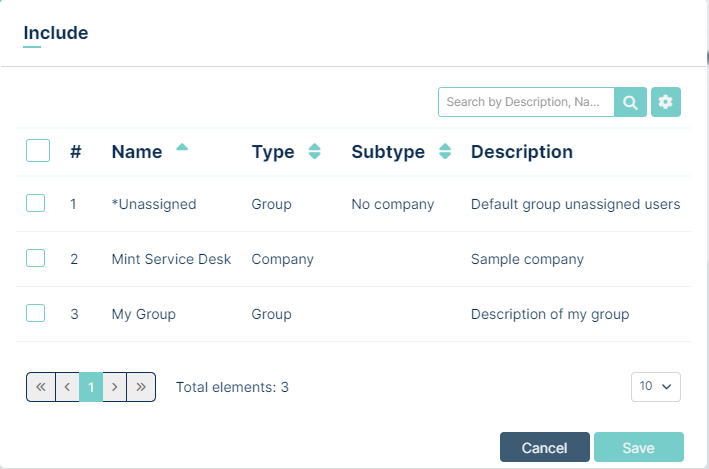
Let’s describe some more here. Enter the group (for example Mint Agent) by clicking on it

You see new window with  ,
,  and
and 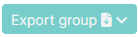 buttons located in upper left side.
In the centre you see a table with colums, where included or excluded groups will be shown. You can easily
modify view of these columns by
buttons located in upper left side.
In the centre you see a table with colums, where included or excluded groups will be shown. You can easily
modify view of these columns by  button located upper right.
Include group
To do this, press the button. You will see group list.
You can select as many of them you want. After selecting press . Groups will appear in table.
To remove group from table, press the again, uncheck selected gruops you want and press .
Use example
There are two companies in the MINT system: A and B. We want the Mint Agent user (who is in the agent role) to only have access to Company A tickets. We therefore assign the group of company A to the Mint Agent group. in result, the agent can only see the tickets of company A, assuming agent has permissions to the appropriate queue and ticket type.
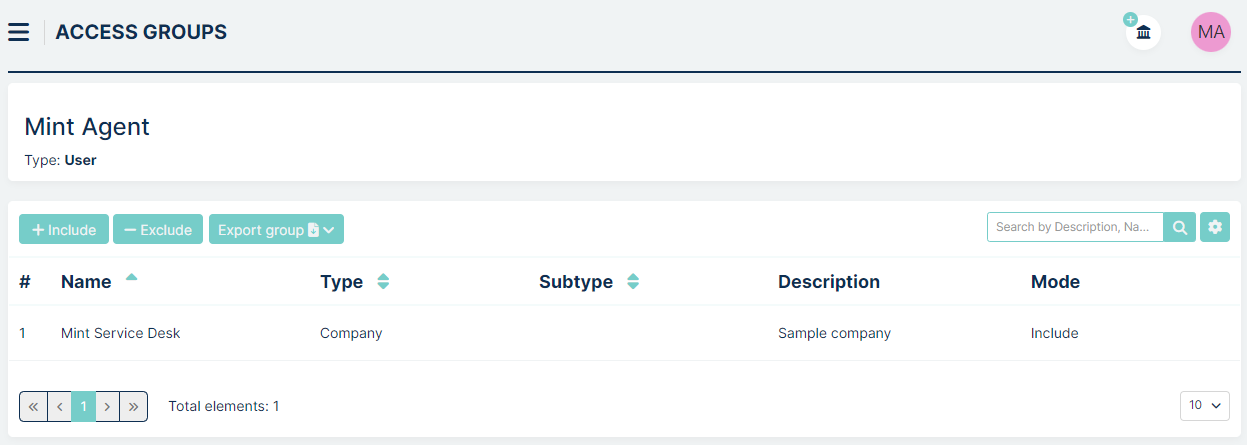
Exclude group
Press the button. You will see group list.
You can select as many of them you want. After selecting press . Groups will appear in table.
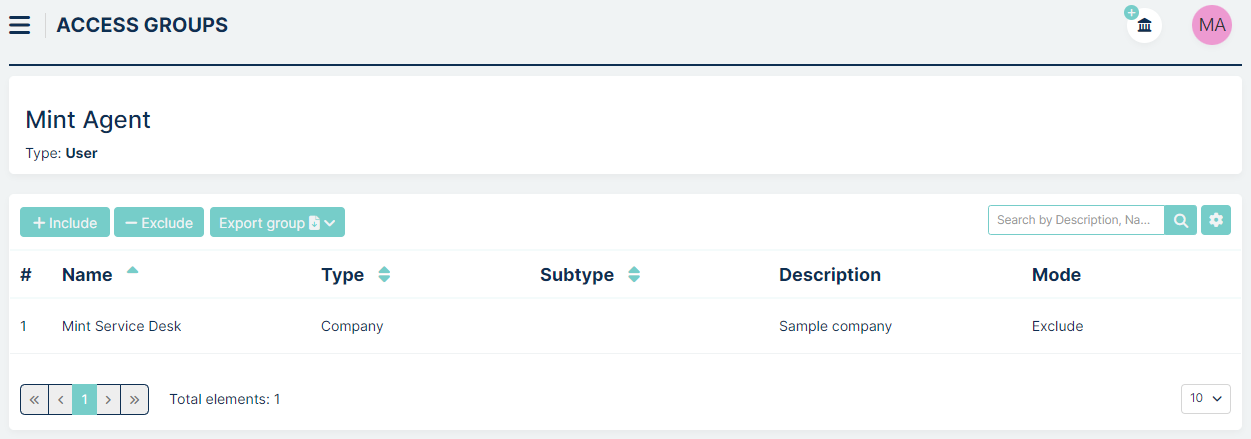
To remove group from table, press the again, uncheck selected gruops you want and press .
Use example
There are three companies in the MINT system: A, B and C. We want the user Mint Agent to have access to a group created from these three companies. Next we want to exclude company C in Mint Agent group. We therefore first create a group with the example name “Company Group” and add Companies A, B and C to it. We assign the “Company Group” to the Mint Agent group and next we exclude Company C. As a result, the agent sees Company A and B tickets, but does not see Company C tickets (assuming he also has permissions to the appropriate queue and ticket type).
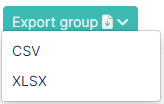
Export groups
By you can easily export group list to .csv or .xlsx format
APPROVALS
BASIC INFORMATION
Approvals functionality in Mint Service Desk is used for issuing decisions for requests in a new status: ‘Pending Approval’. This functionality is designed to allow decision-makers to make decisions on tickets (Accept or Reject the ticket), according to rules previously configured by the Administrator. Tickets awaiting for decision are blocked from editing until the required number of users approve or reject the ticket according to the configuration.
In brief, the process is as follows. Admin creates a configuration setting the rules and decision makers. He then creates a Pending Approval status in the selected ticket type and assigns a configuration to it. The next step is to configure the notification for the start of the decision process, positive decision and negative decision. Once the configuration is complete, agent or customer can create ticket requiring a decision on the selected ticket type. The agent changes the status of the ticket to the Pending Approval status created earlier. The ticket is blocked and cannot be changed or edited until a decision is issued. The users marked as decision makers then accept or reject the ticket. When the required number of votes with the predetermined configuration is reached, the ticket changes status to Accept or Reject and is unlocked. Throughout the process, the designated users receive notifications according to the configuration, while the history of the request records the decisions issued.
Once the process is complete for a given application, the same Pending Approval status cannot be set again.
Full configuration requires to do the following steps in Admin profile:
1. Creating configuration Approvals tab
2. Adding Pending Approval status in Statuses section
3. Creating Notifications
The process of moving to Pending Approval status and decision-making takes place in the Agent and Customer profile and is described in the last part of this section.
To go directly to the section that you are interested, use the menu on the left.
APPROVALS TAB
CONFIGURATION TREE
In the Approvals tab administrator can create rules that define the process for approving or rejecting tickets with the “Approval” status. Administrators can configure decision logic using conditions based on users, user roles, and logical operators (AND, OR). The system allows for the creation of multiple configurations, which can then be assigned to specific ticket types with the “Approval” status. In the created logic tree, administrators can specify how many users or what percentage of users in certain roles must approve or reject the ticket for it to change status. Tickets awaiting a decision are locked for editing until they are approved or rejected by the required number of users as per the configuration.
Important! The configuration is highly flexible, allowing it to meet even the most complex client requirements. However, there is a risk that incorrect logical conditions could result in no decision being made, leaving the ticket blocked. If your business processes allow it, consider adding a single user (e.g., the CEO) with permissions to make single-person decisions in exceptional cases.
Upon accessing the tab, a table of configurations appears with the columns: Name, Description, and an Action column containing buttons to delete the selected configuration.
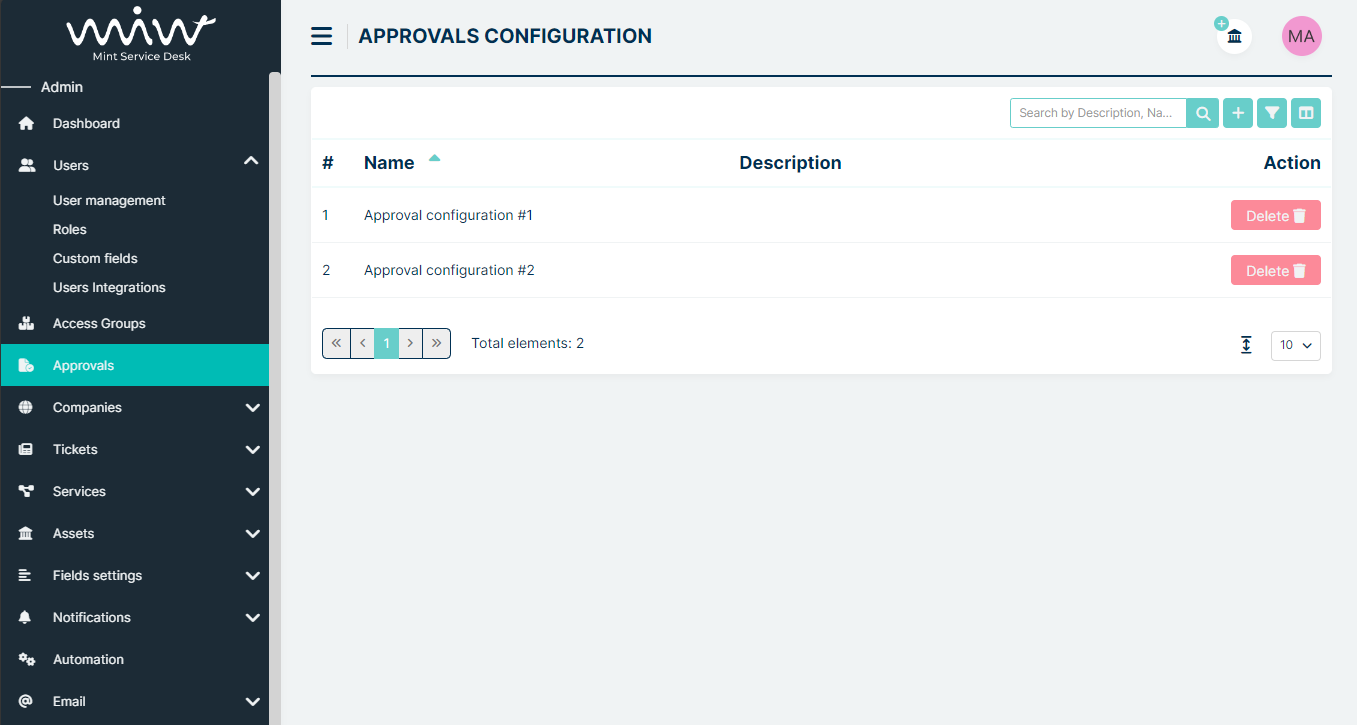
In the upper-right corner of the table, there is a panel containing a search field and buttons for Add Configuration, Search by, and Set Column Properties.

Clicking the Add Configuration button opens a modal with the following fields:
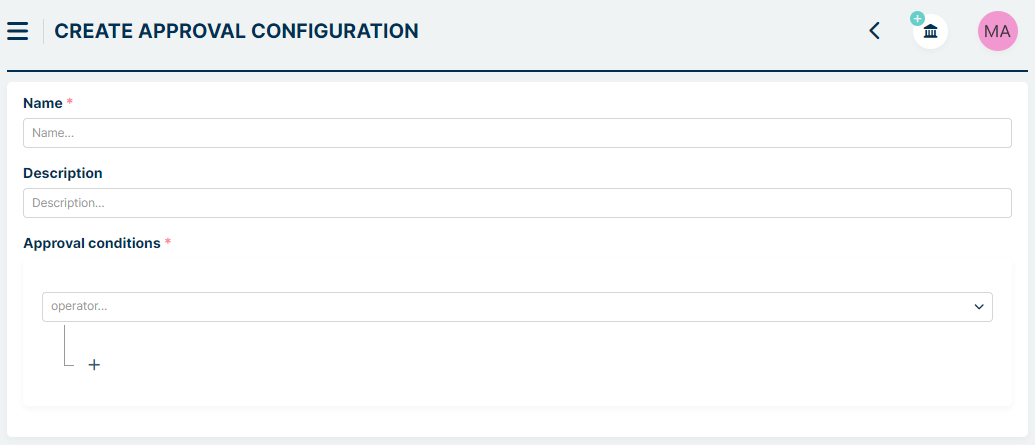
Name - the configuration’s name (required, must be unique)
Description - a short description of the configuration
Approval conditions - a required section where you build the logic structure, starting with a single Operator field.
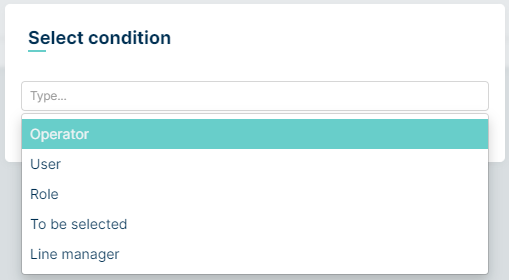
The following options can be set in the Approval conditions configuration tree:
operator – logic operator: AND, OR
user - here can be selected Agent or Customer
role - the selected Agent role
to be selected - the Agent chooses himself who will be the decision-maker when the ‘Pending approval’ status is selected in ticket details
line manager - the supervisor of the user assigned in the Customer field in the ticket details. Each user can set up his or her manager in his or her profile, and this can also be done by an Admin or - for Customer - an Agent.
The default branch structure starts with operator field:

here you can choose AND or OR

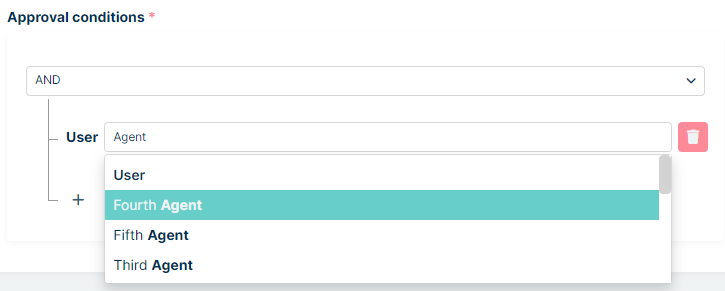
After choosing operator, click PLUS icon to open modal with additional options

Here we can choose: another Operator, USER, ROLE, To Be Selected and Line Manager
Let’s describe above options we can select:
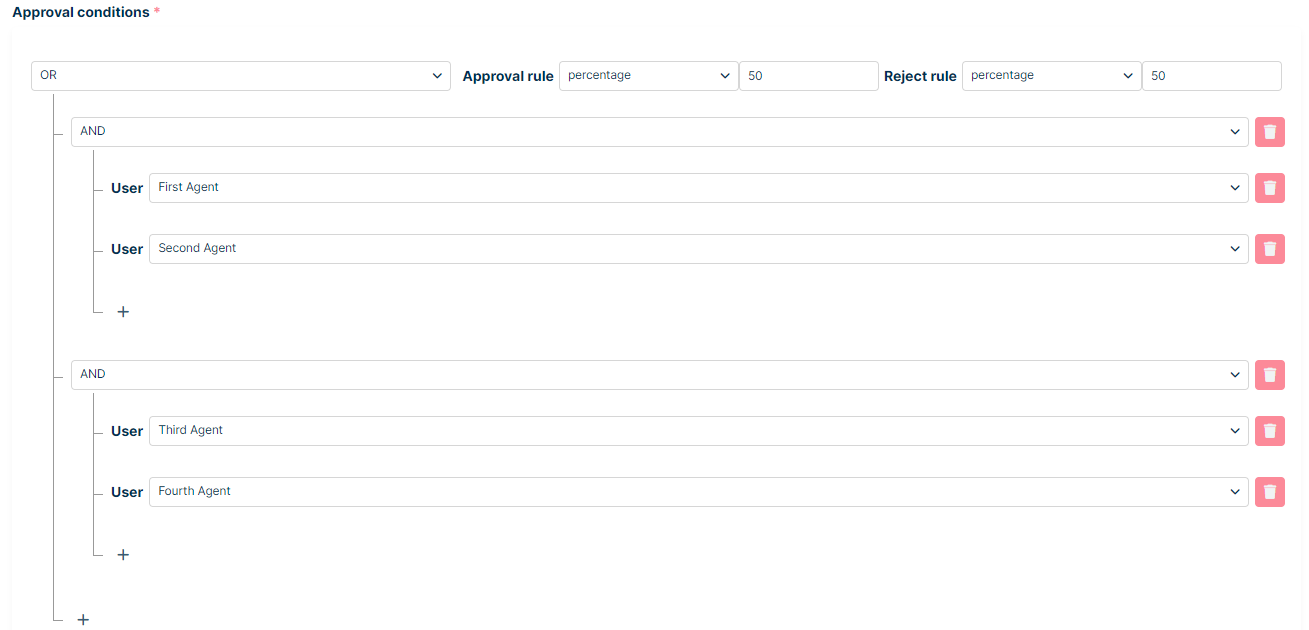
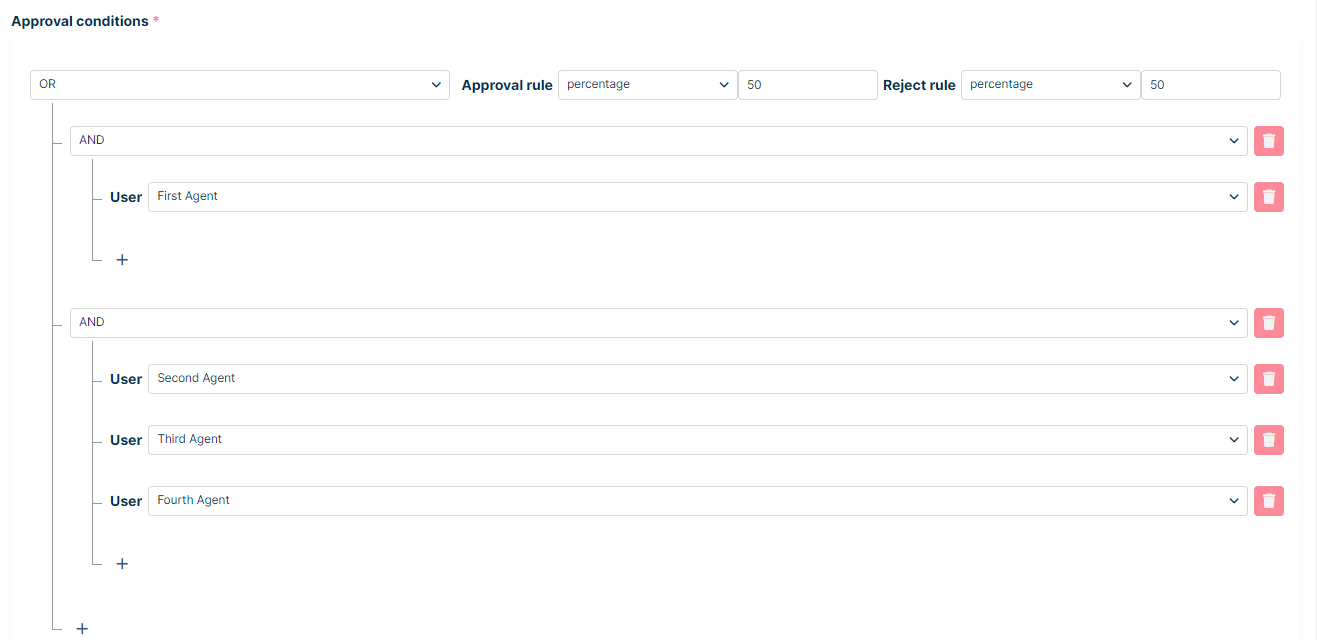
Operator AND – this means that all conditions must be met/approved.
Example:
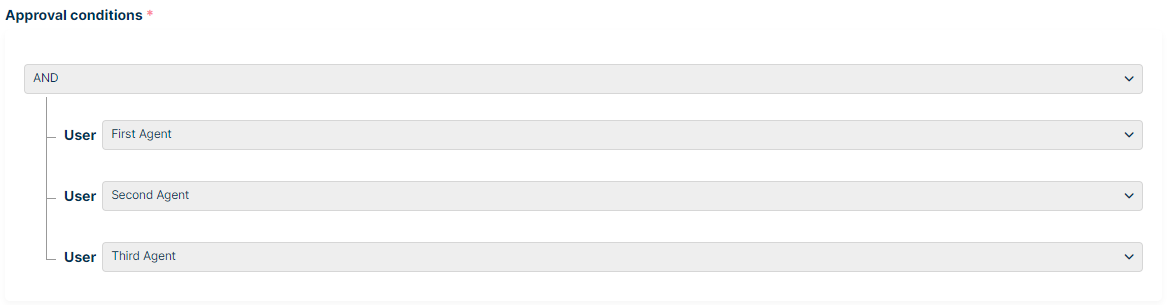
In the example above, the users First Agent, Second Agent, and Third Agent must all give a positive decision for the process status to be approved. If any of them issues a negative decision, the status will be marked as rejected.
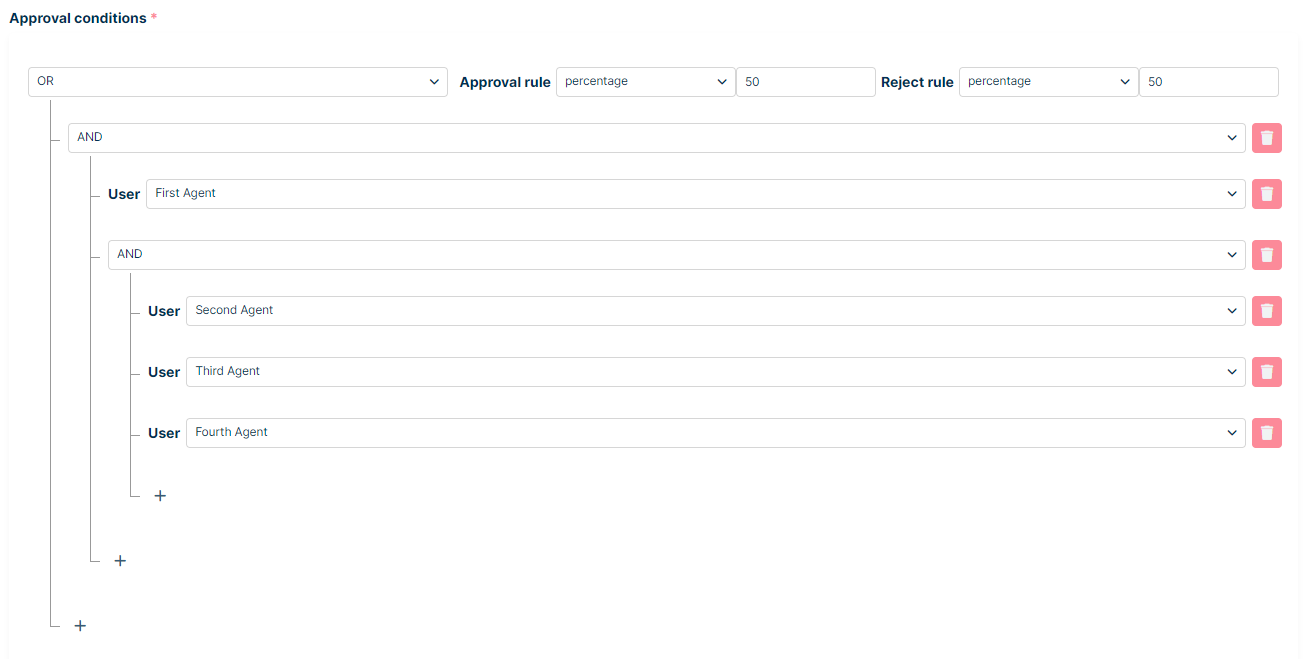
Operator OR – this means that one or more of the conditions must be met/approved. The number or percentage of required conditions is determined by the Approval Rule setting. Similarly, the number or percentage of negative decisions needed to reject the process is set in the Reject Rule.
Example:
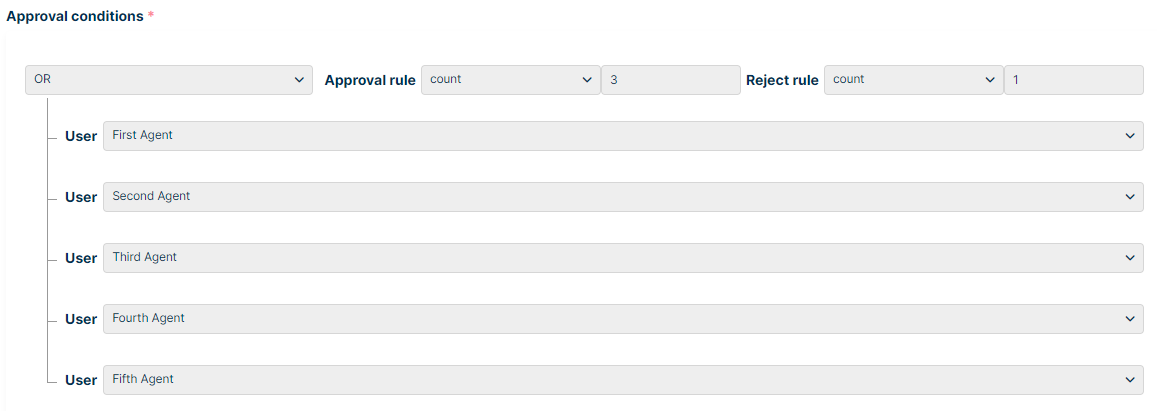
In the example above, it is set that three agents must give a positive decision for the process to be approved (Approval Rule set to 3). Conversely, the process will be rejected after one negative decision (Reject Rule set to 1).
User - here we can choose from all agent and customer users that we want to involve to the decision process.
Role - here we can choose the agent role that we want to involve to the decision process. The number or percentage of users from chosen role required to make positive decisions is determined by the Approval Rule setting. Similarly, the number or percentage of users making negative decisions required to reject a process is set in the reject rule.
Example:

In the example above, it is set that 50% agents from Service Desk Agent role must make positive decision for the process to be approved. Ticket will be rejected, if 30% of agents make negative decision
To be selected - selecting this option allows the agent to choose in ticket details the user (Agent or Customer) who will be the decision maker for this configuration branch. Only one ‘To be selected’ option can be selected per configuration. The possibility for the agent to select the user appears when the Pending Approval status is selected in the application with an assigned configuration containing the ‘To be selected’ option.
Example:
Admin created configuration like below
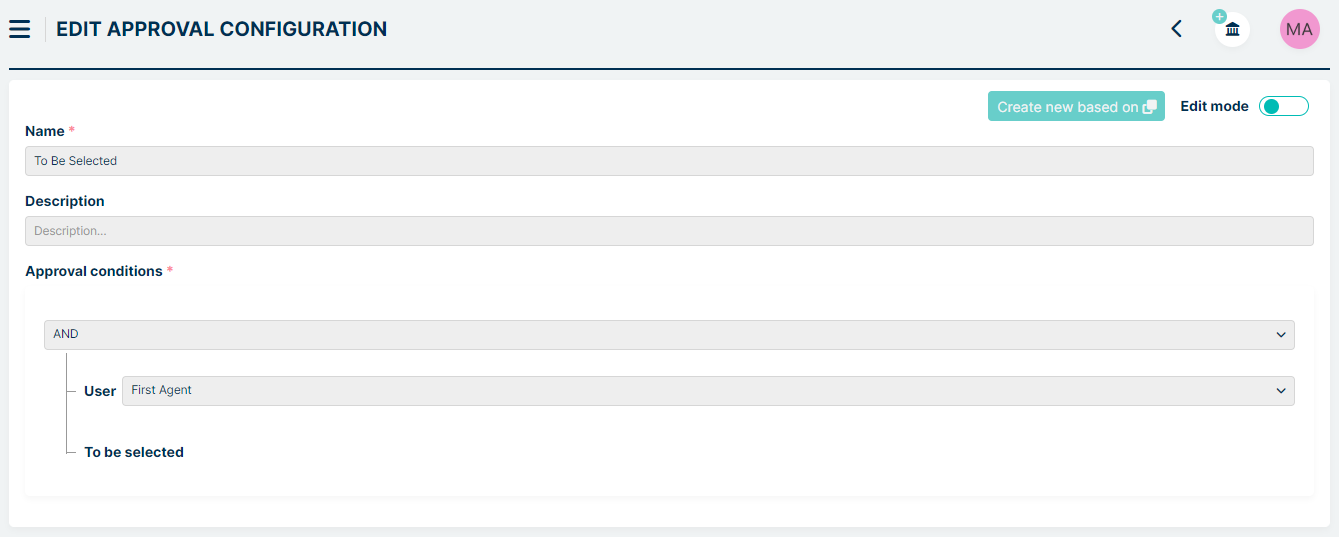
According to the above, two users are involved in the process - one is the First Agent and the other will be the user designated by the Agent.
Next, Admin assigned above configuration to a new ‘Pending Approval’ status named: ‘To Be Selected’ (Assigning configurations to statuses is described HERE )
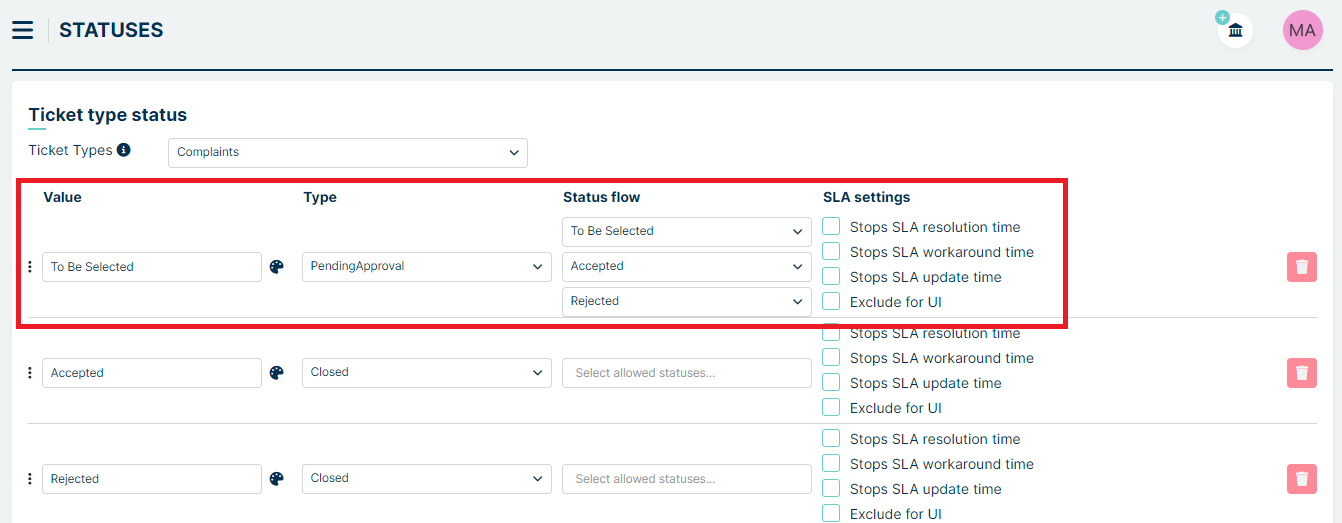
Now, Agent starts approval process by selecting status named: To Be Selected in ticket details.
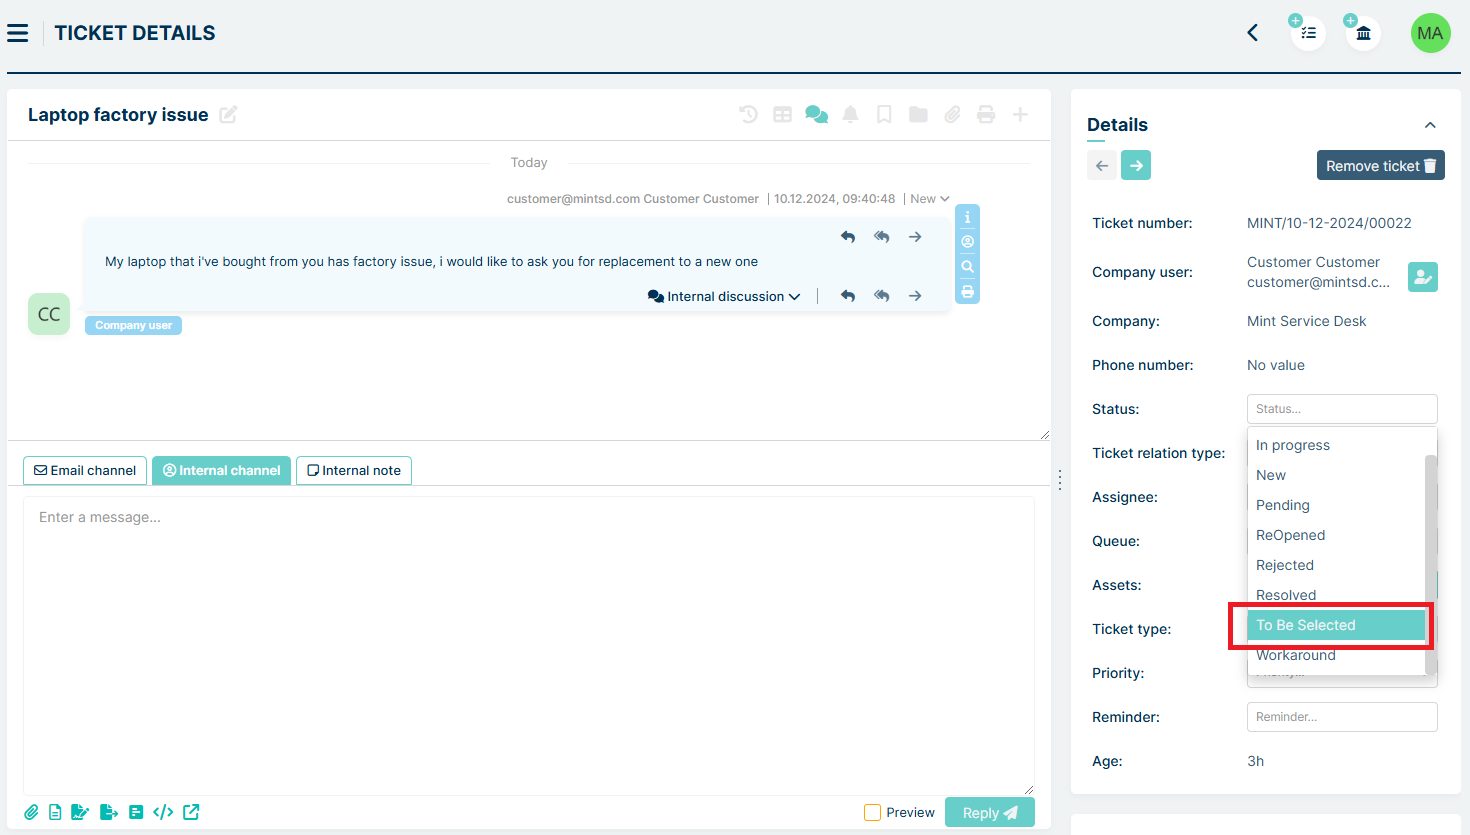
When this status is selected, a new modal appears
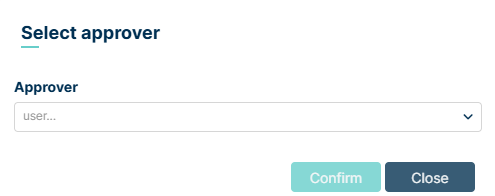
Agent chooses the user (Agent or Customer) who will participate in the decision process.
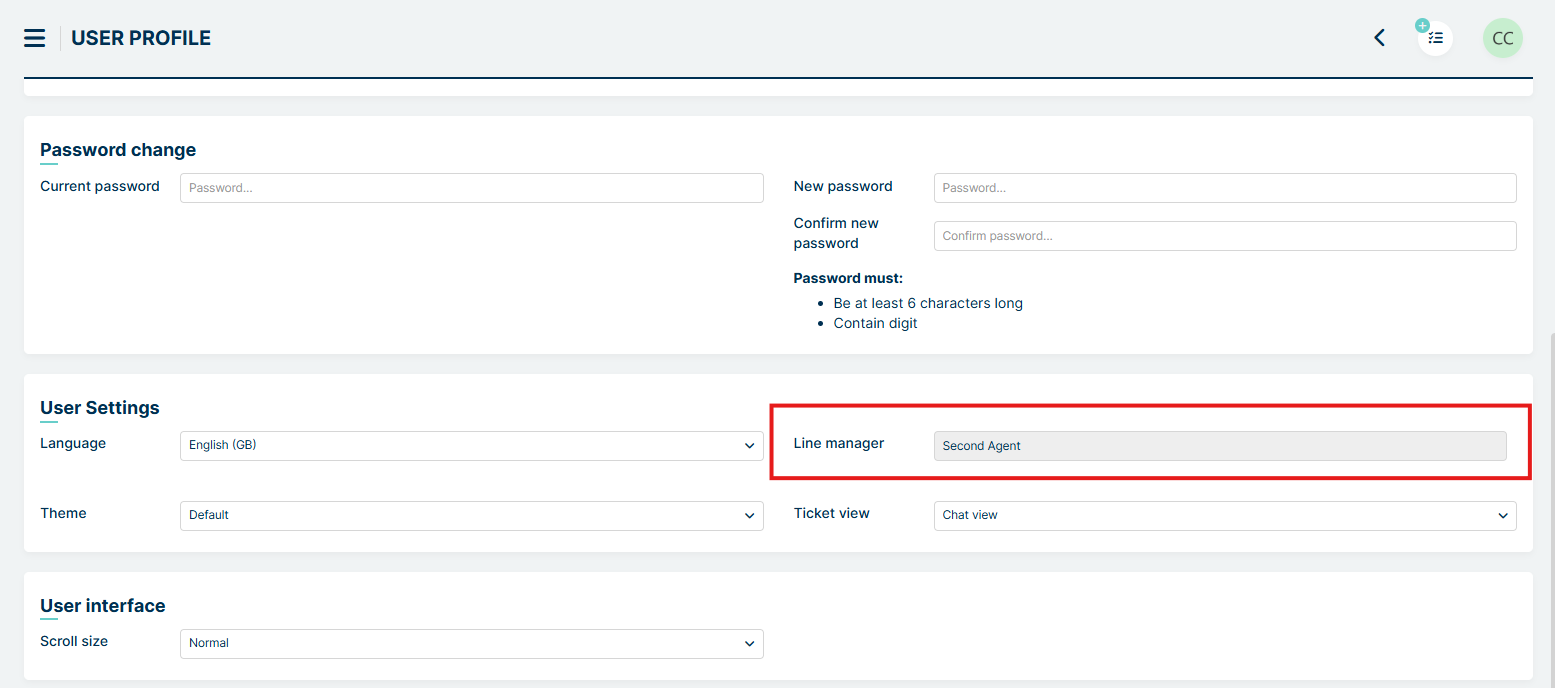
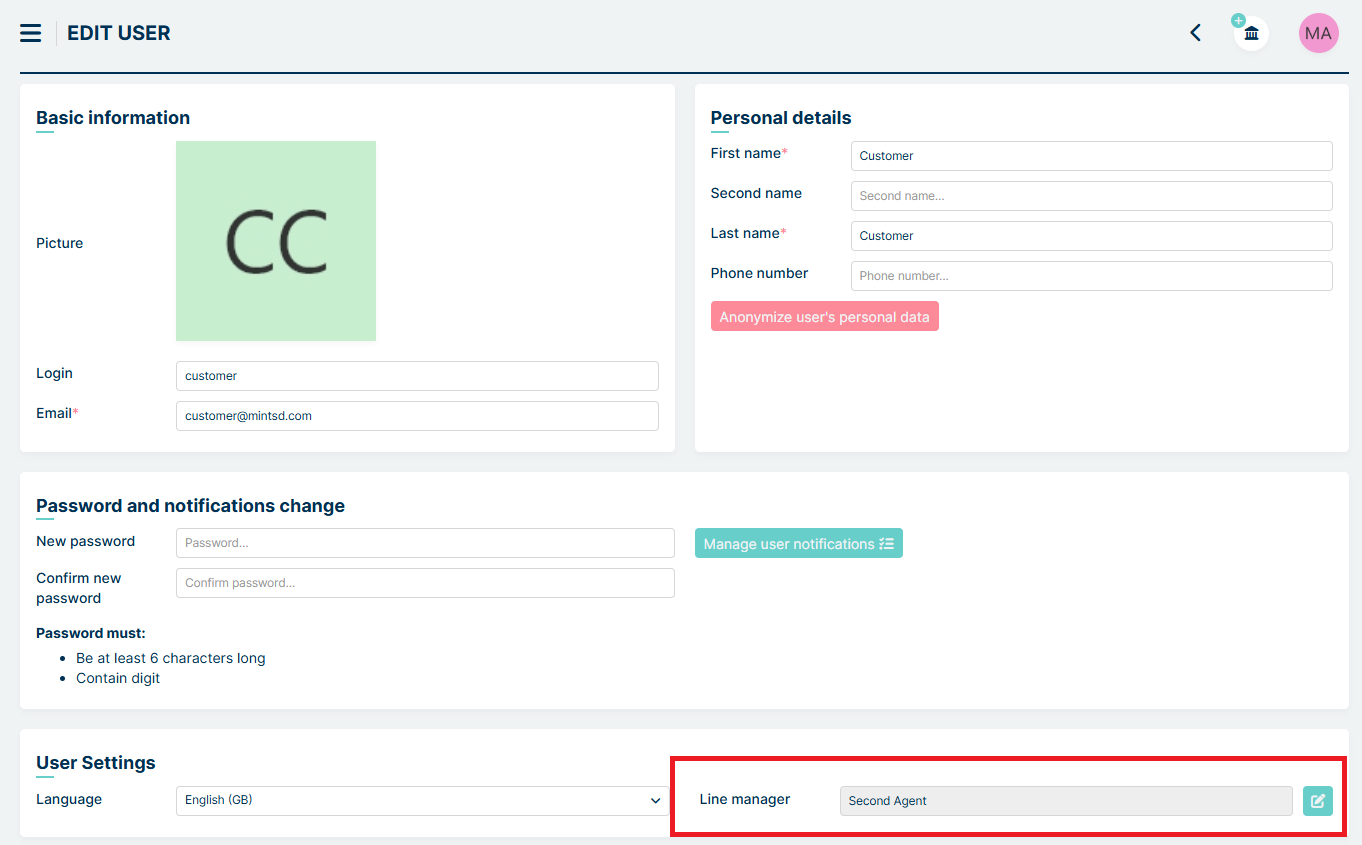
Line manager - Selecting this option adds a user to the decision-making process, who is the manager for the user creating the request.
The manager is added in the user profile:

in the ‘Line Manager’ field:
The line manager can be set up by Admin, Agent (with User management role) or via data from the user integration process (for example LDAP).
Example:
Admin would like to set up the Secondary Agent as the Line Manager of the user Customer
First we need to enter to Customer User profile by User Management section (editing of user data is described under Admin portal -> Users -> User management).
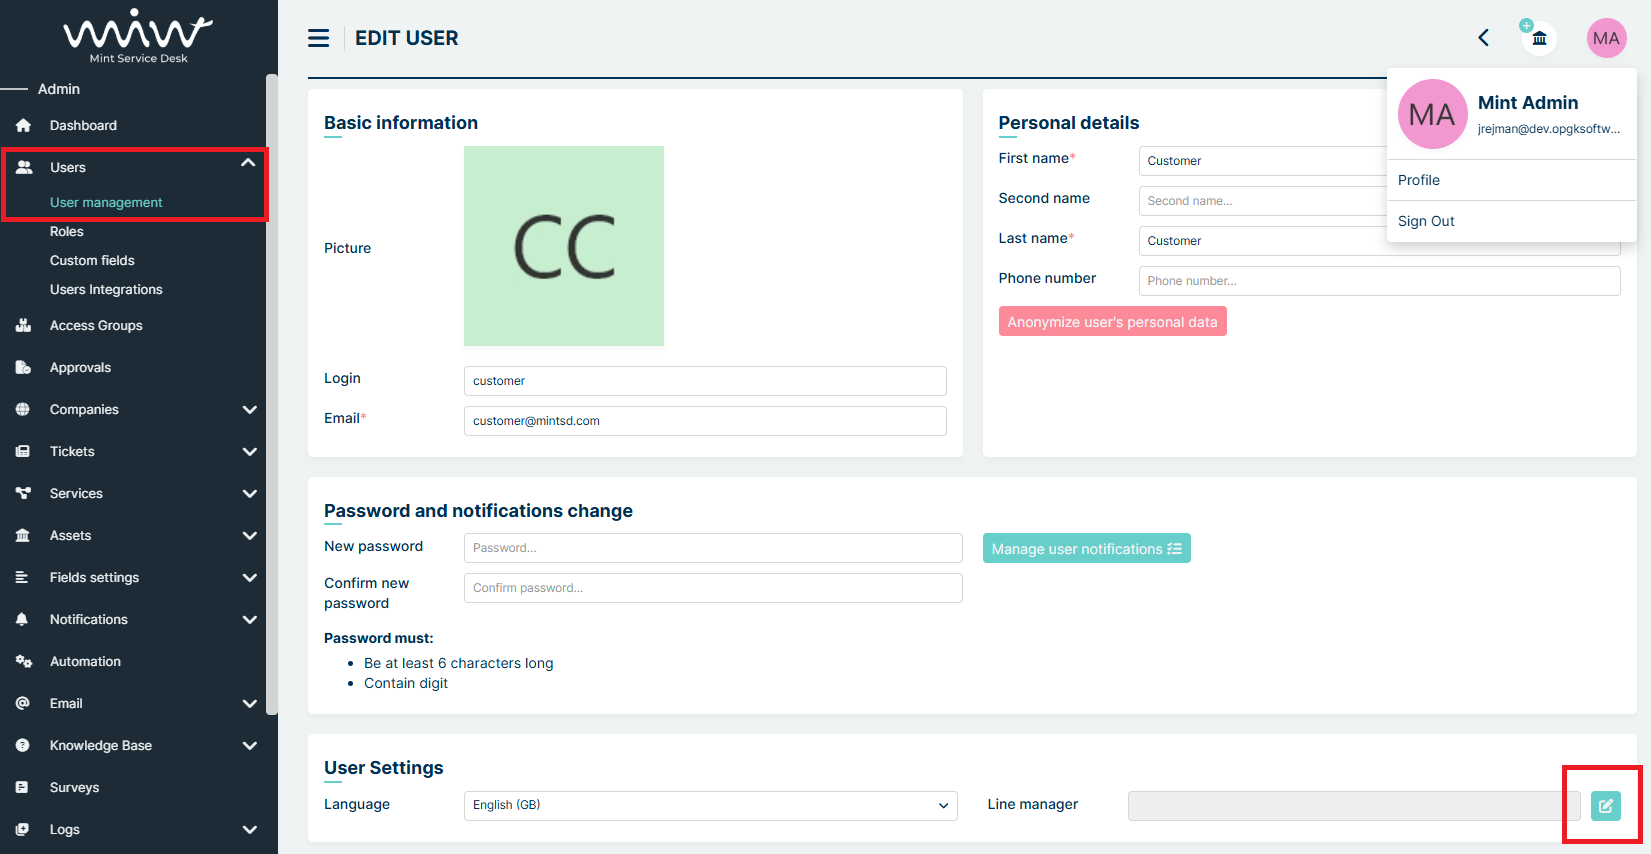
Clicking on the edit button opens a modal with the possibility of selecting the Agent or Customer who will be the Line Manager for the user whose profile we are in.
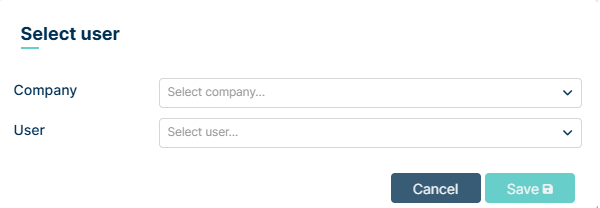
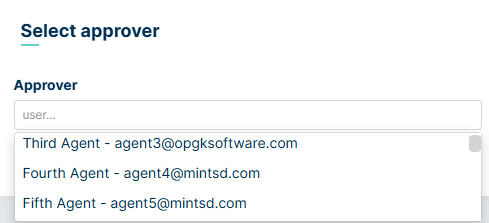
To select an Agent or Customer, click on the drop-down list called User and select the user or start typing their name
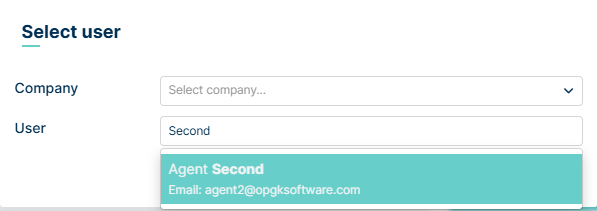
After choosing the Line Manager, press Save button. Line Manager has been set up.
We can also change or delete assigned Line Manager. Deleting a user can be done by clicking on the edit button, then deleting the current user with the ‘x’ button to the right of their name:
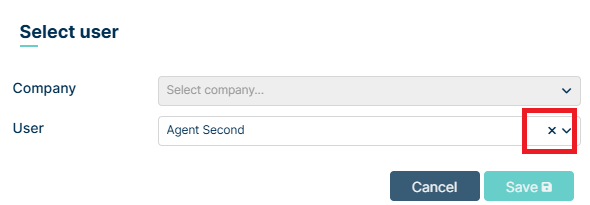
and then saving the changes with the Save button.
DRAG AND DROP
While creating new configuration, you can easily drag and drop any part of your tree, just simply click on branch you are interested to move and drag it to another place.
For example, you want to move First Agent from first branch to second:
Click and hold left mouse button at Second Agent and move it to second branch:
You can do the same with whole branch - for example, you want to put second operator AND to first. Click and hold left mouse button on first AND and drag it to place you want:
ADVANCED STRUCTURES
In the Approvals module of Mint Service Desk, we have the ability to create advanced structures with deeply nested logic. Below is an example of logic with nested operators and the option for approval by the CEO.
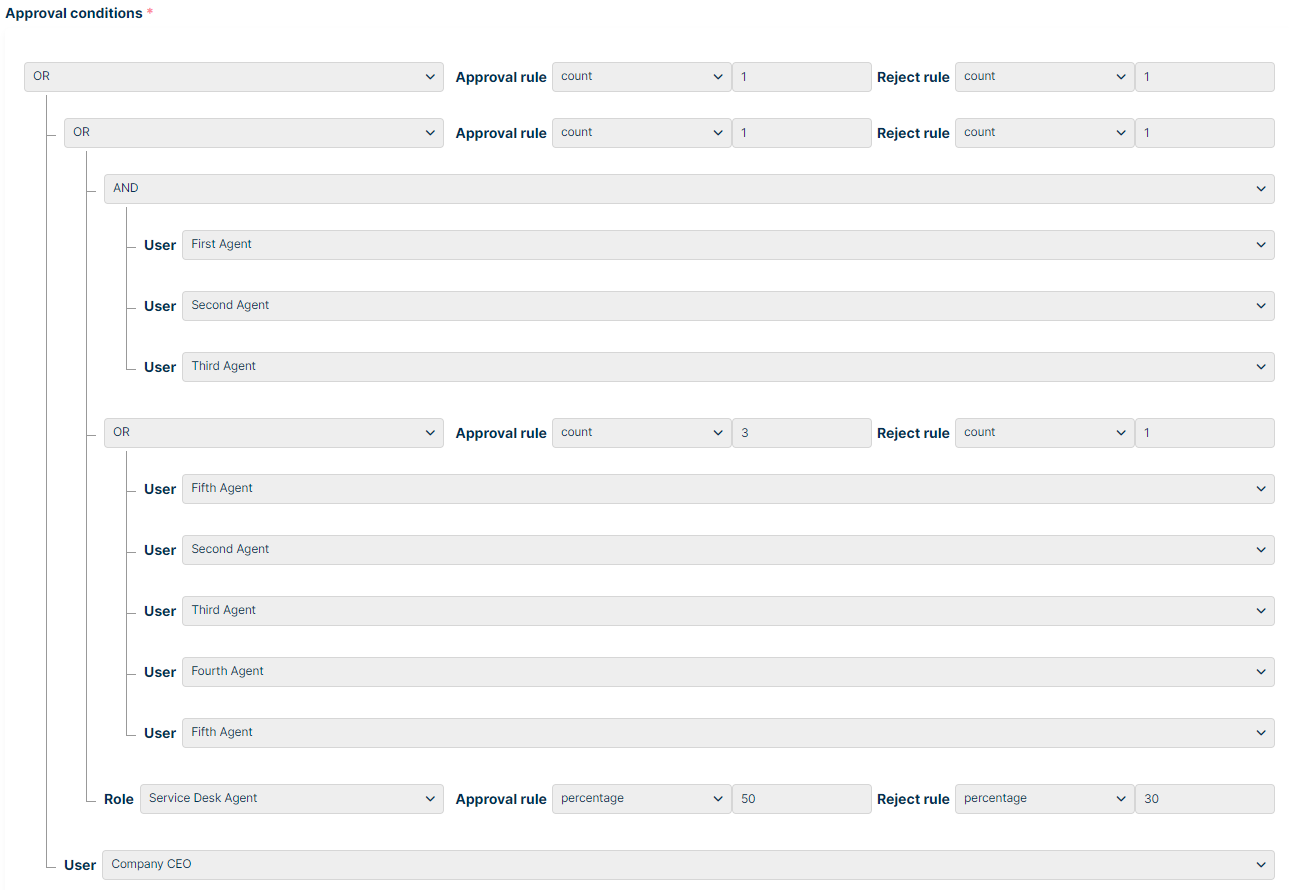
On the screen above, you can gain Approval or Reject for your ticket by three ways:
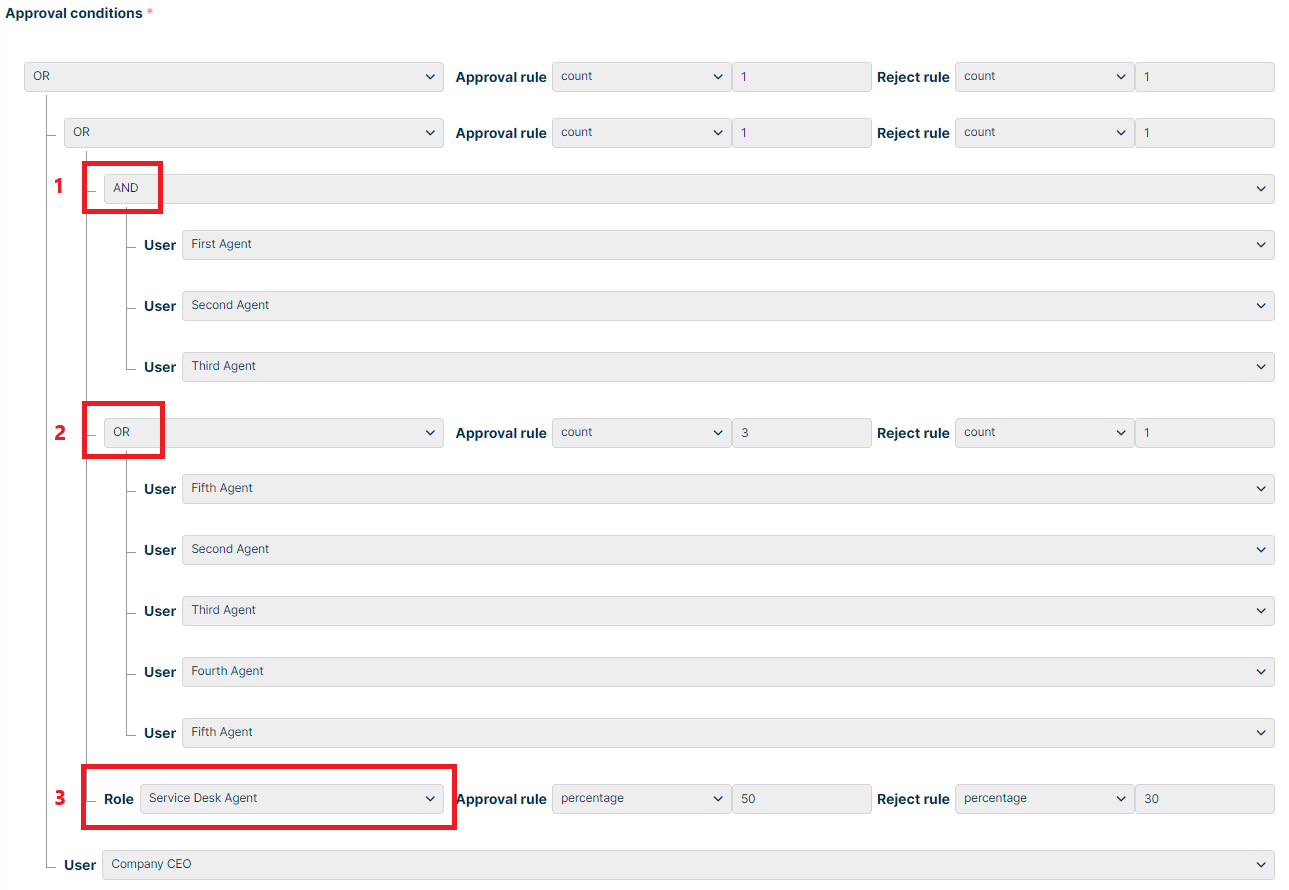
or you can ask the CEO for approve if for some reason none of branches you have set can give approve or reject path.
DELETING CONFIGURATION
The administrator has the possibility to delete any configuration, but it cannot be assigned to a status. However, if you try to delete an assigned configuration, you will receive the following message along with a path directing you to the specific status
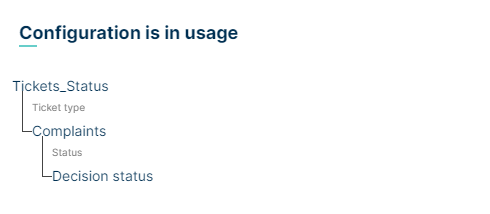
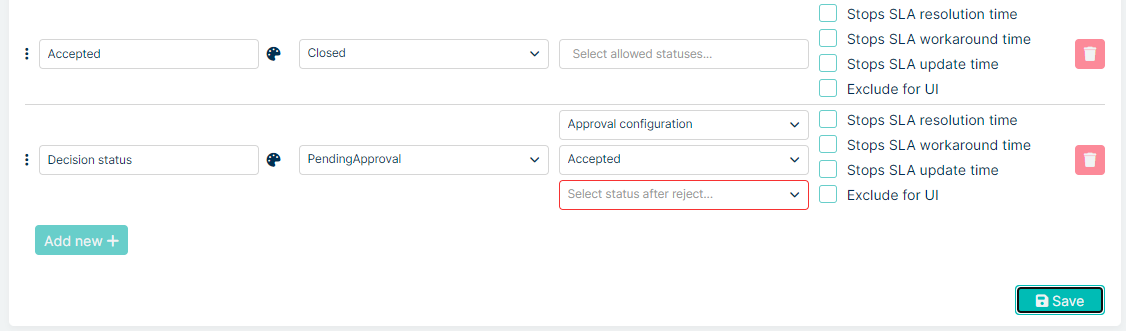
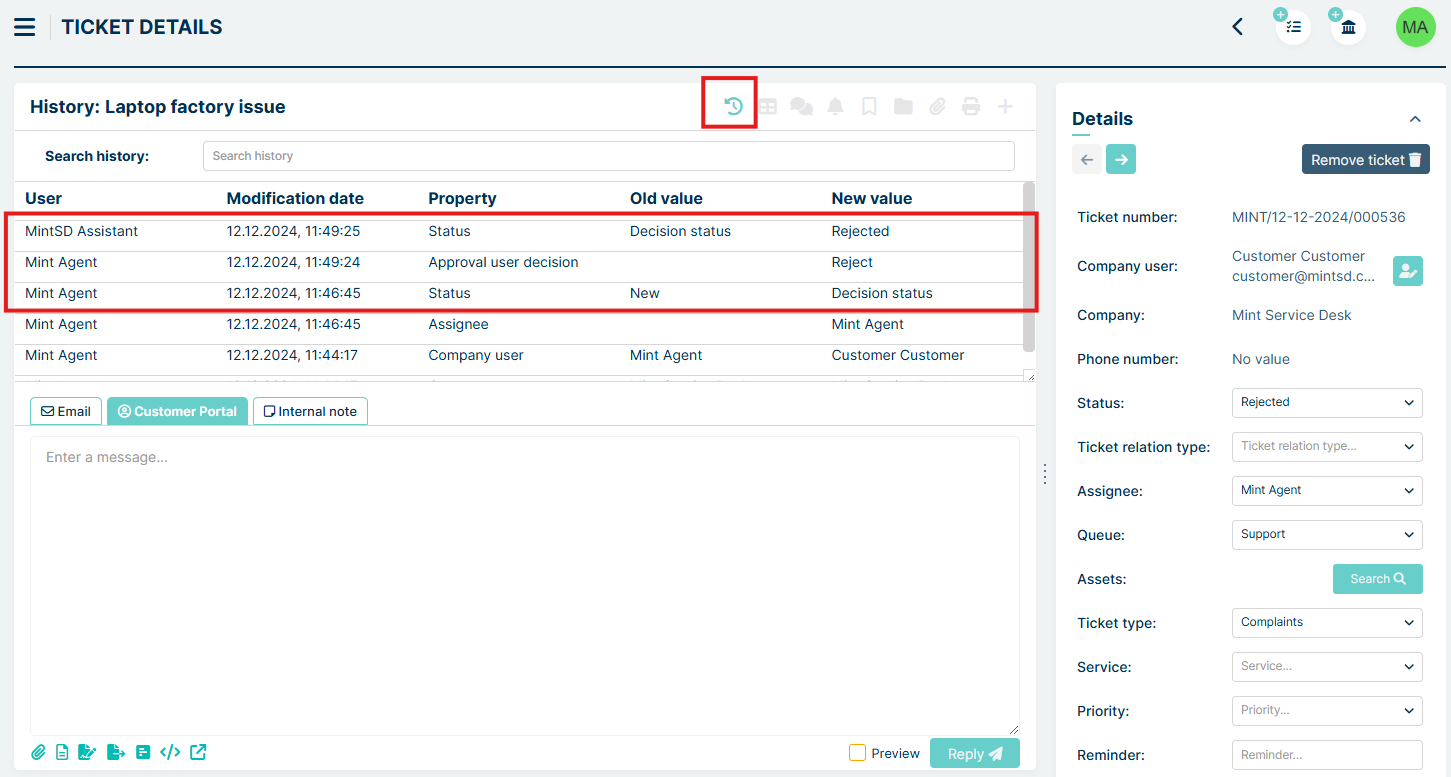
This means that the configuration is used on the Tickets tab in the Status section, in the Ticket type called Complaints, in the status called Decision status
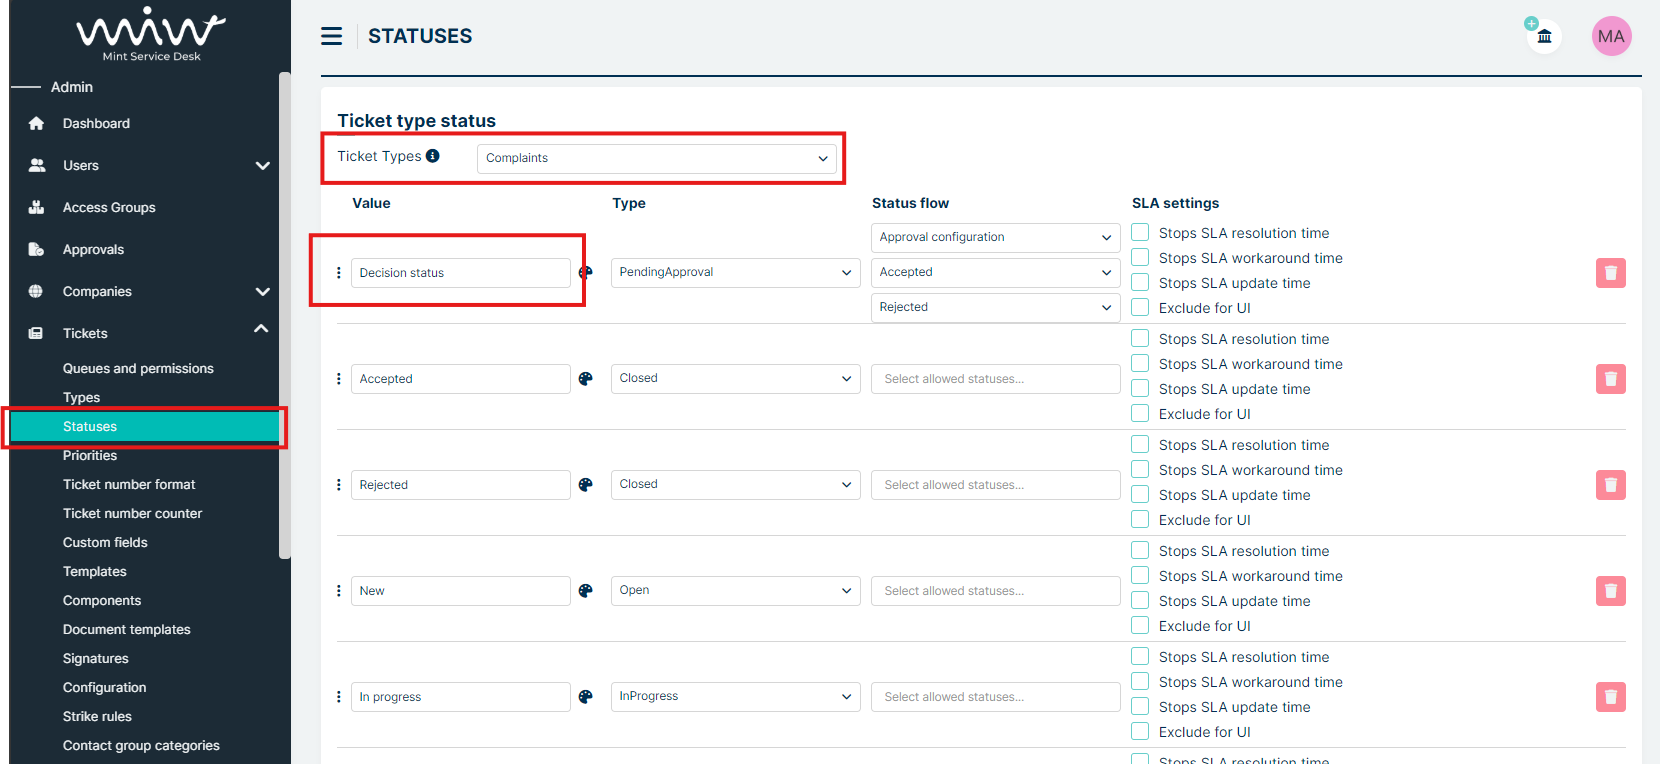
STATUSES
CONFIGURATION
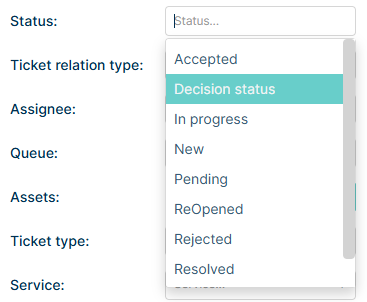
Admin can create and configure status type named: ‘Pending approval’. To do this, the previously prepared approval configuration from the Approvals tab is needed. In Pending Approva status it is determined which status the ticket should change depending on whether the decision was positive or negative. The new status can be given any name, analogous to the name given to the others. It is possible to add several Pending Approval statuses and assign the same or different configuration to them.
More info about assigning configurations to statuses is described HERE
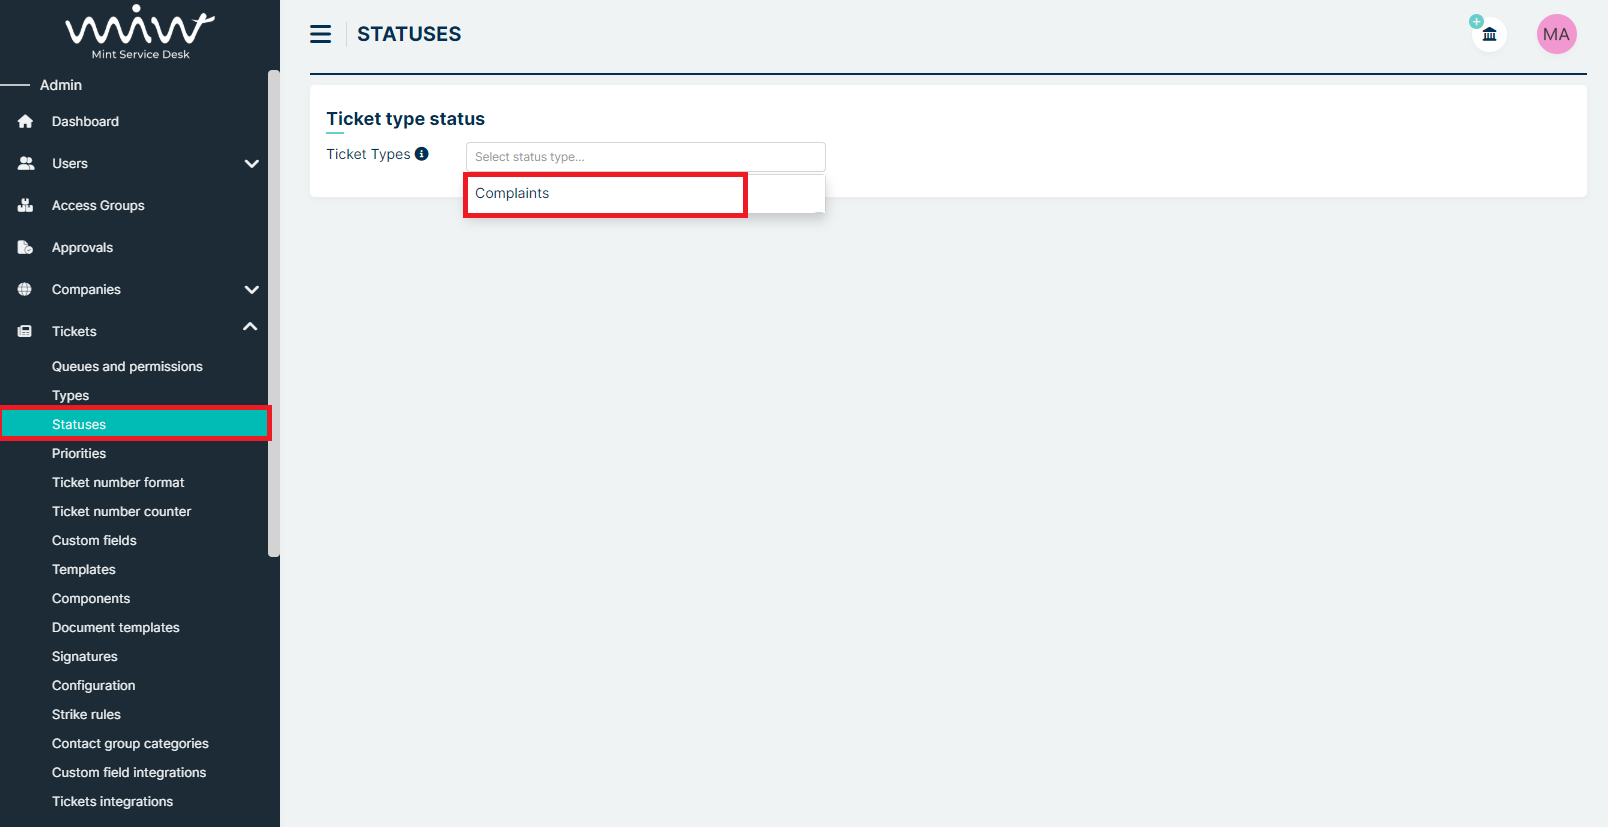
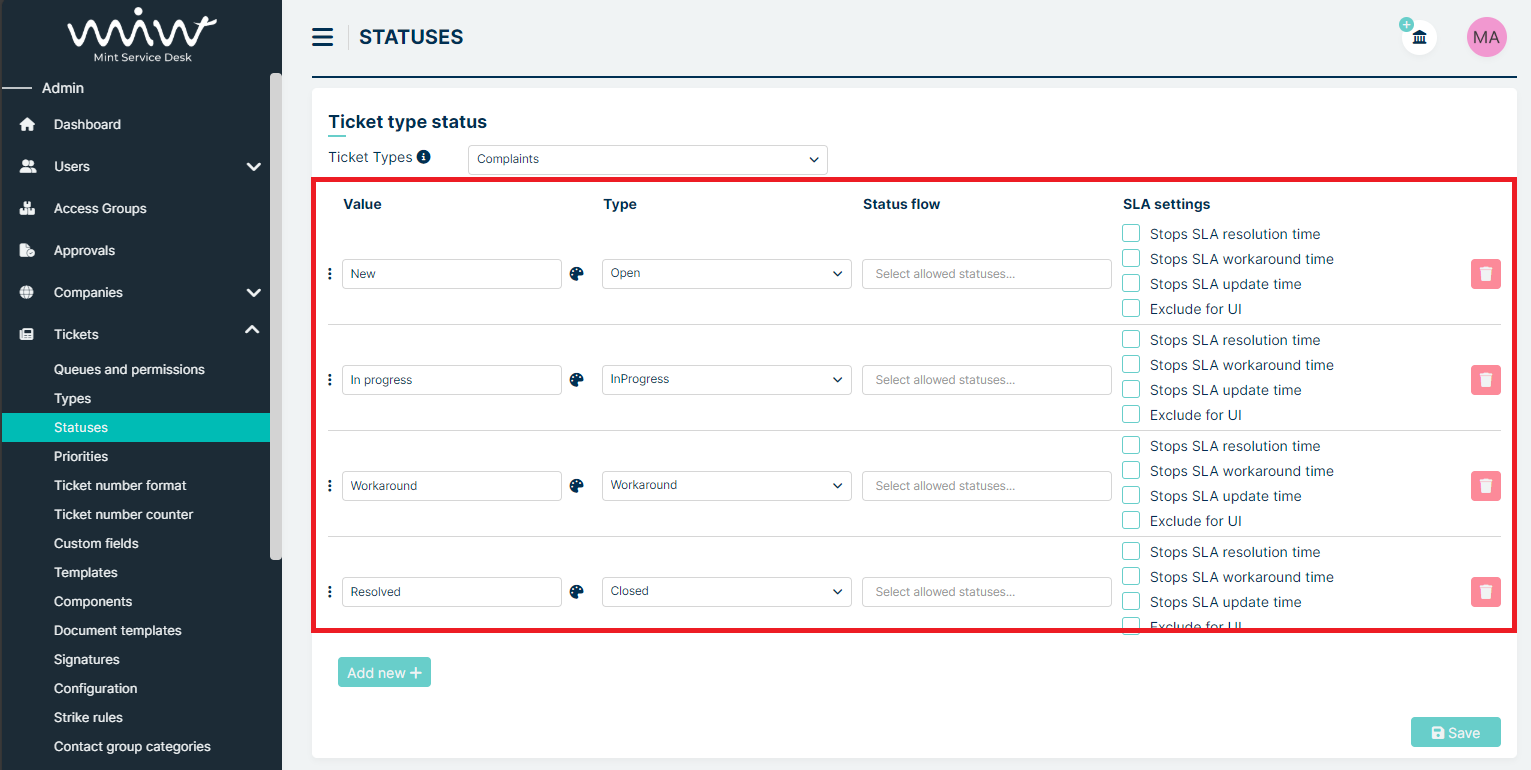
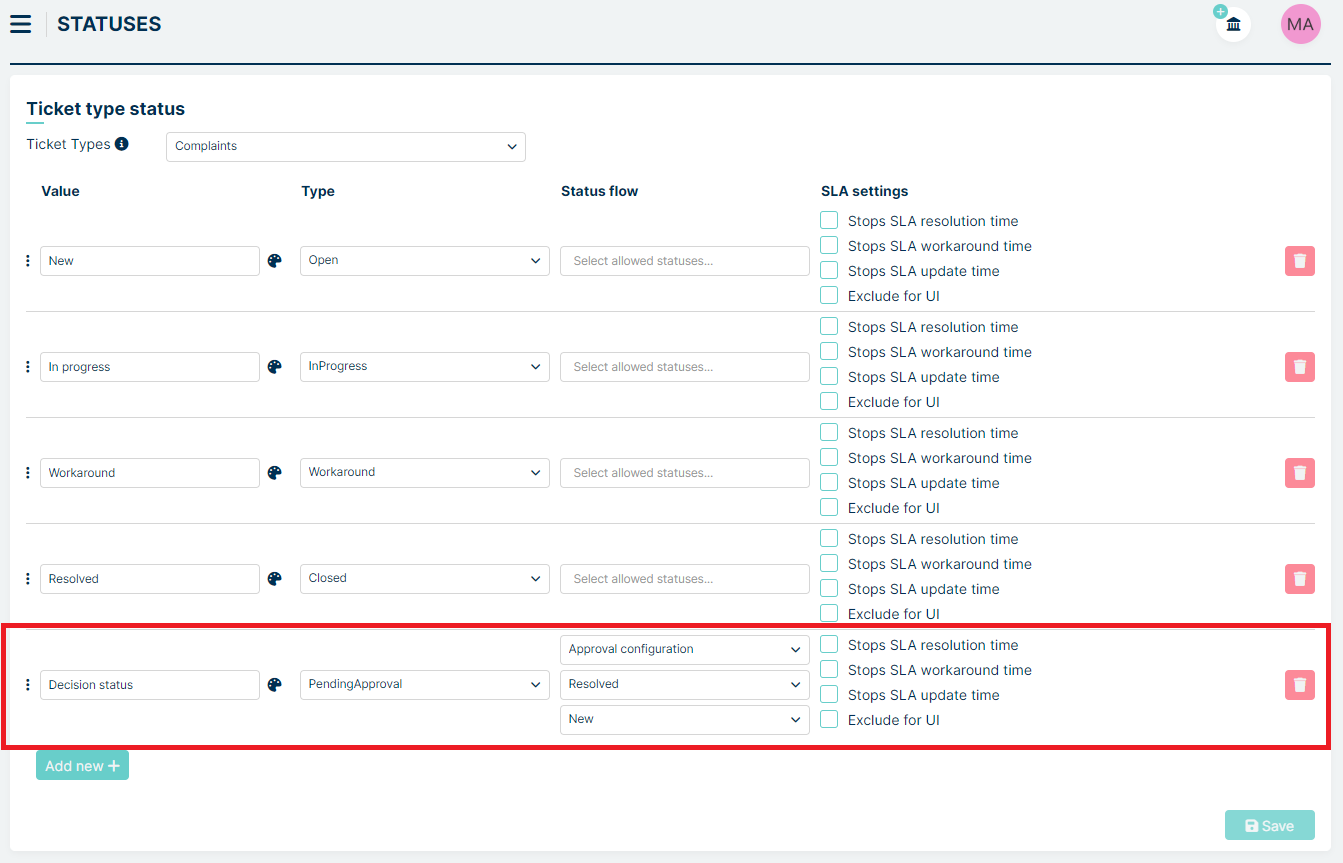
The configuration starts in Statuses section in Tictets tab. First step is to select ticket type we are interested (for example – Complaints).
After choosing the ticket type we can see peviously added statuses
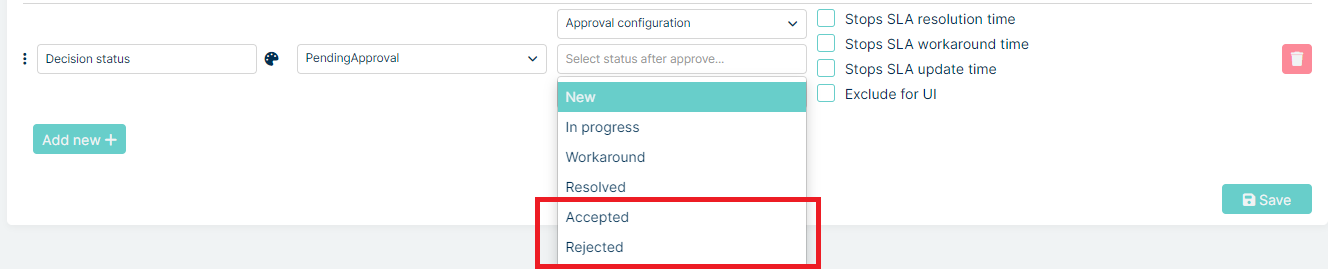
To create a Pending Approval status, we add a new status type using the Add New button, give it a name and select Pending Approval from the list of available statuses.
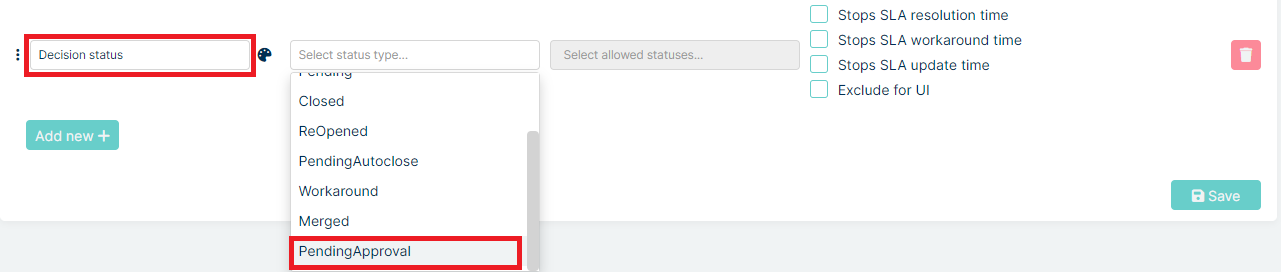
After selecting the status, a new section appears:

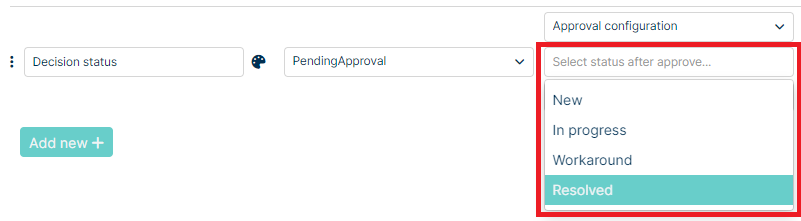
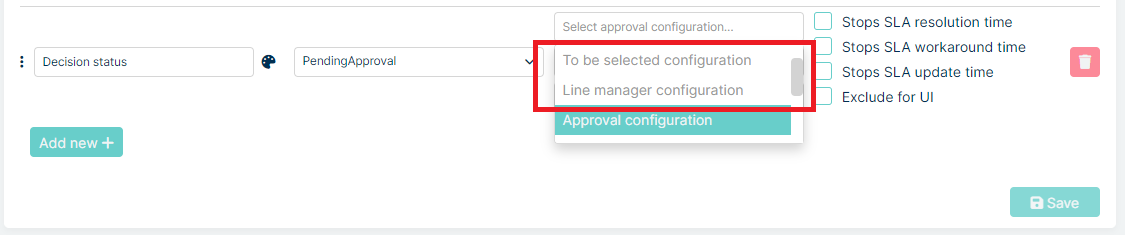
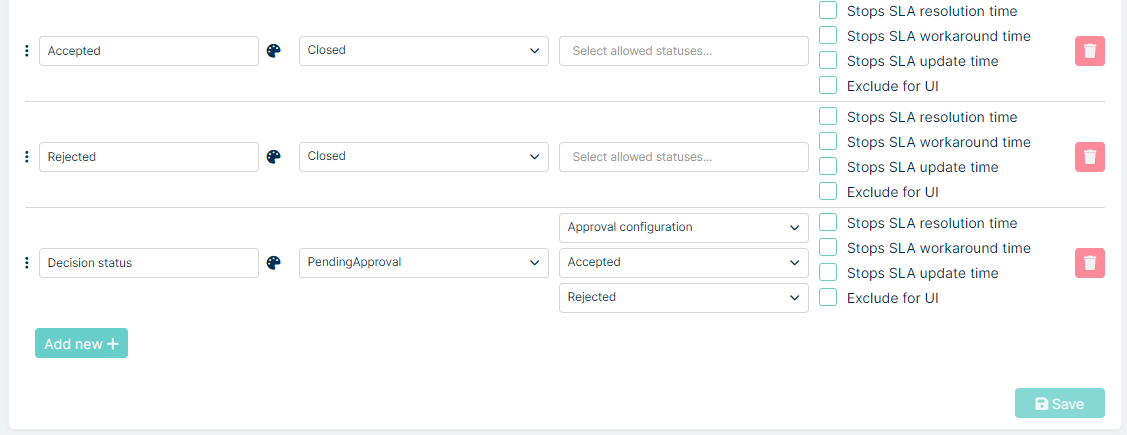
In the Select approval configuration field, we select the previously created configuration from the Approvals tab.

In the Select status after approve field, we select the status to which the ticket should change if it is approved.
In the field Select status after reject, select the status to which the ticket will be forwarded if it is rejected.
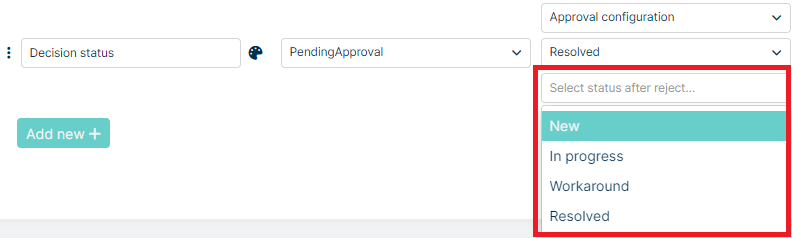
Once you have chosen your configuration and statuses, click Save button to save. Status is ready to use in ticket.
Important: If you want to use new, custom statuses in the Select status after approve and Select status after reject fields during configuration, you must configure and save them before adding the Pending Approval status.
Example:
We want do add our custom statuses - Approved and Rejected, and connect them with Pending Approval status type
First we adding new statuses named Approved and Rejected, both with the type Closed and we saved it using the Save button.
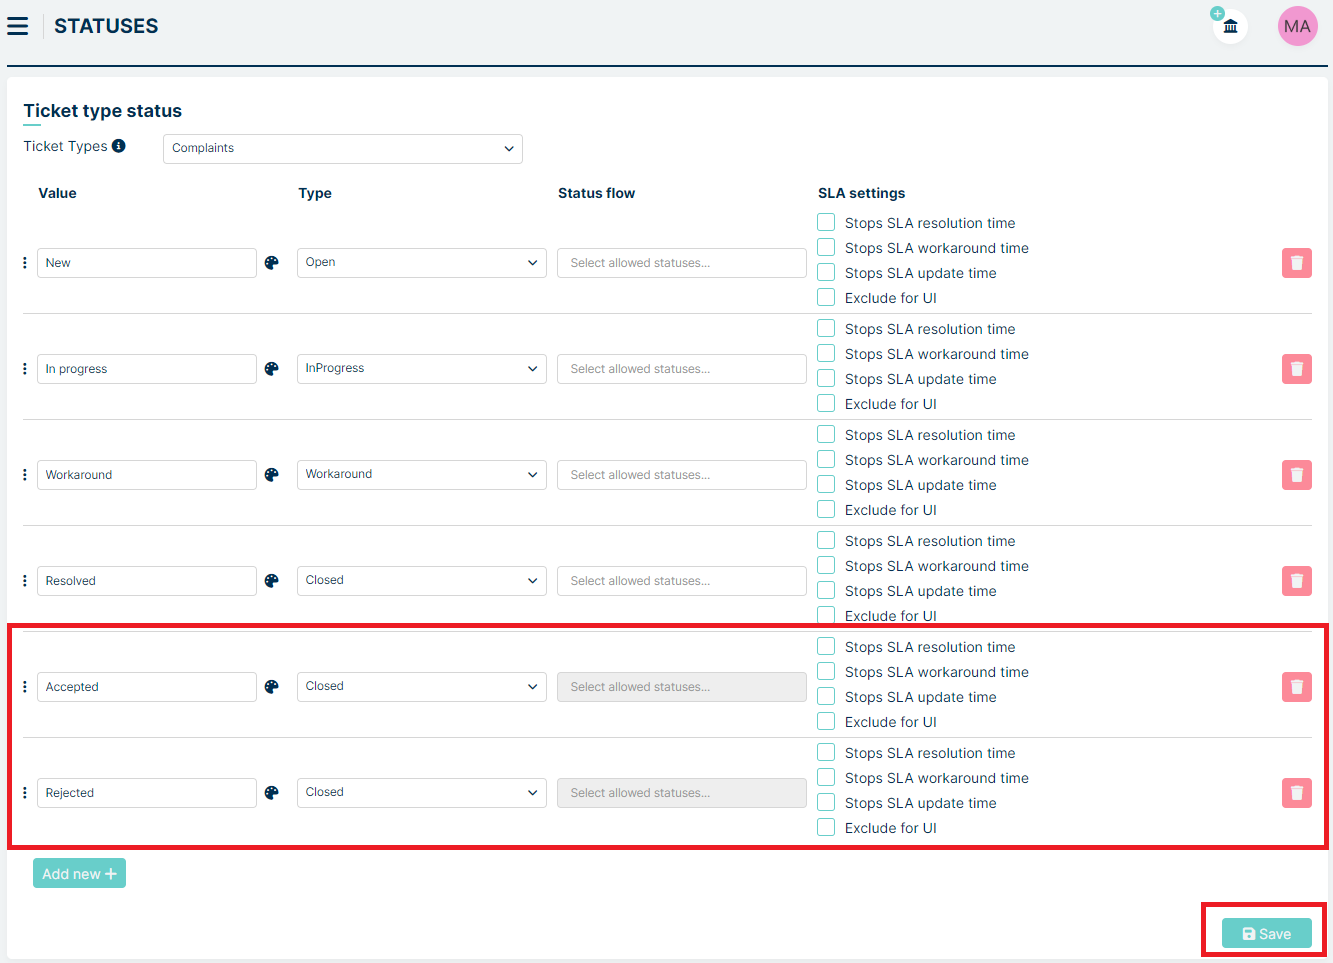
Now we can move on to creating the status Pending Approval. The new statuses will be available in the list
CONFIGURATION CHANGE
The administrator can change the saved configuration in the Select approval configuration field to another configuration. The exceptions are those configurations that include To Be Selected and Line Manager in the decision tree - such configurations will then be greyed out and not selectable.
If, after changing the assigned configuration, there are already requests in this status and some users have already issued a decision, their result will go to the new configuration provided that they are also involved in it as decision makers.
Example
In Mint Service Desk there is a ticket in Pending Appoval status with a configuration requiring a decision from Agent 1 and Agent2. Agent 2 issues a decision. The administrator changes the configuration in the status to one that requires a decision from Agent 2 and Agent 3. Agent 2 no longer needs to issue a decision because he participated in the first configuration and it was already issued there. If there were several configuration changes, the decision succession will only cover the last configuration before the change.
DELETING STATUSES
When an administrator attempts to delete a status associated with a Pending approval status, the associated fields Select status after approve / Select status after reject are becoming empty. It is then required to select a new status, otherwise the system will not allow the changes to be saved, highlighting the required fields.
Example
There are two statuses connected with Pending Approval status : Approve and Reject.
User deleted Reject status and tried to Save. Then the Select status after reject highlihted which mean that system requires to choose other status.
Deleting the Pending Approval status
The administrator can delete any status of type Pending Approval. After deleting, all tickets on that status are moved to the status that has been set before in the Select status after reject field.
NOTIFICATIONS
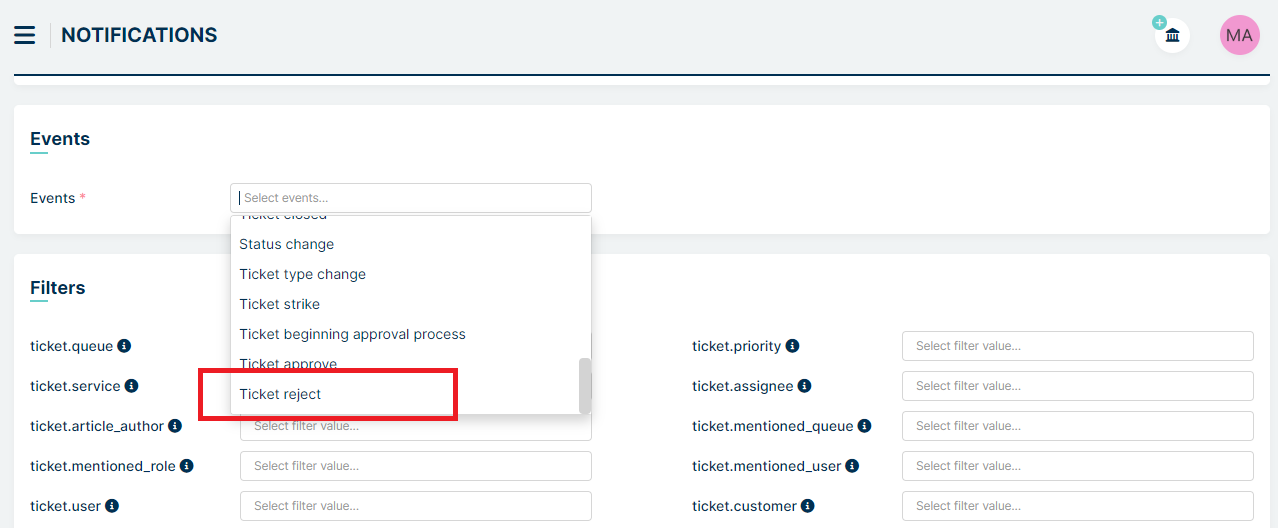
The administrator can set up notifications for actions related to notifications (see HERE for a detailed description of the notification configuration). In addition to the standard notifications, it is possible to configure notifications for actions related to the approval process, such as:
Ticket begining approval process - the moment when the Agent transfers the ticket to the Pending Approval type status
Ticket approve - the moment when a positive decision is issued for a ticket
Ticket reject - the moment when a negative decision is issued for an application
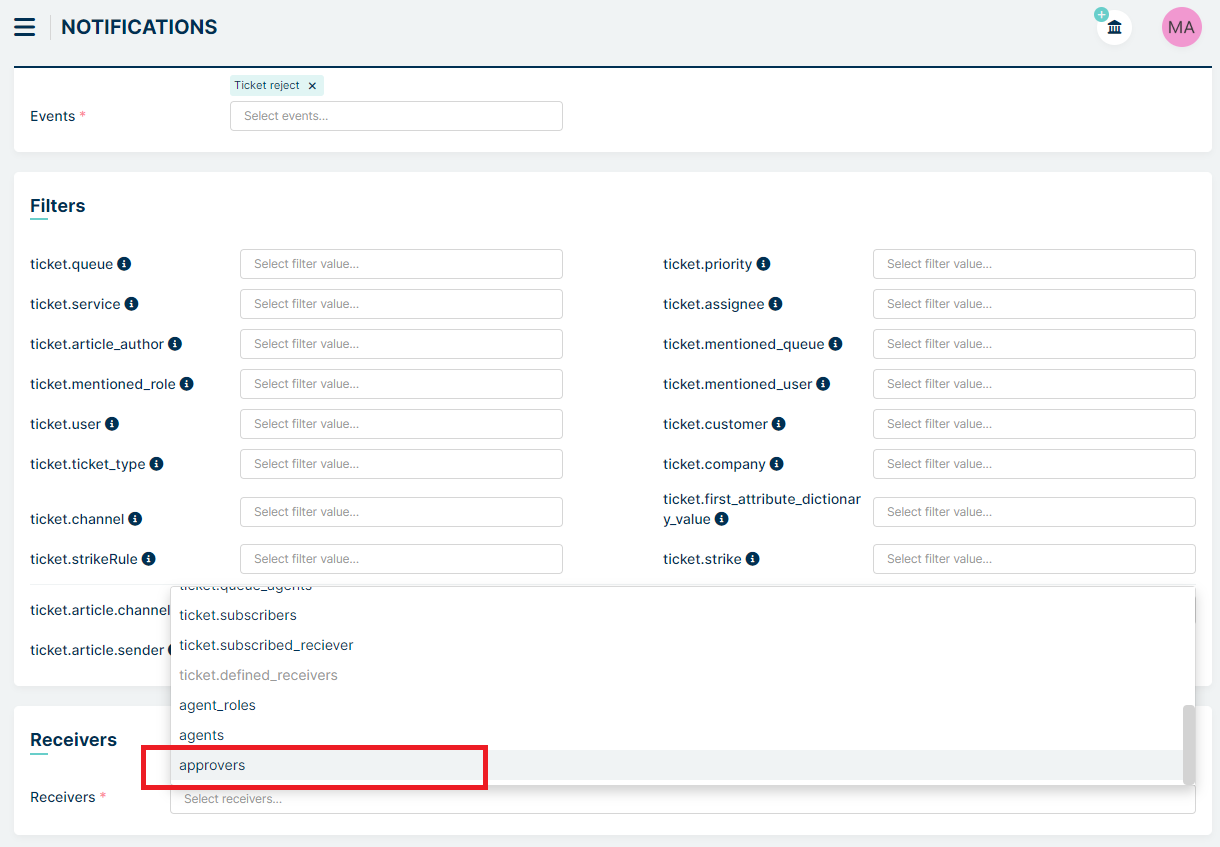
Admin can set users, user roles and more as recipients of notifications. For the approval process, it is recommended to select Approvers in the Recipients section. This ensures that only those users who are involved in the approval process for a particular submission (are assigned to a particular configuration) will receive notifications.
You can use so-called snippets in the content of the notifications. These are links to specific content or fields in the system. For the approval process, the snippet {{ApprovalLastRejectJustification}} is used in rejection notifications. Its use results in the notification receiving the content of the reason for the refusal of the last user issuing a negative decision, which was the reason for the refusal of the request.
Example:
We want to create a rejection notification, informing users involved in acceptance processes via System channel. We also want to communicate the reason for the rejection of a particular ticket.
We go to the Notifications tab of the Tickets section and add a new notification using the PLUS button. We fill in the Name field and mark the notification as Active.
In the Events section, we select Ticket reject from the list.
Go down to the Receivers section and select Approvers from the list.
In the Channels section, select the channel for sending the notification: System
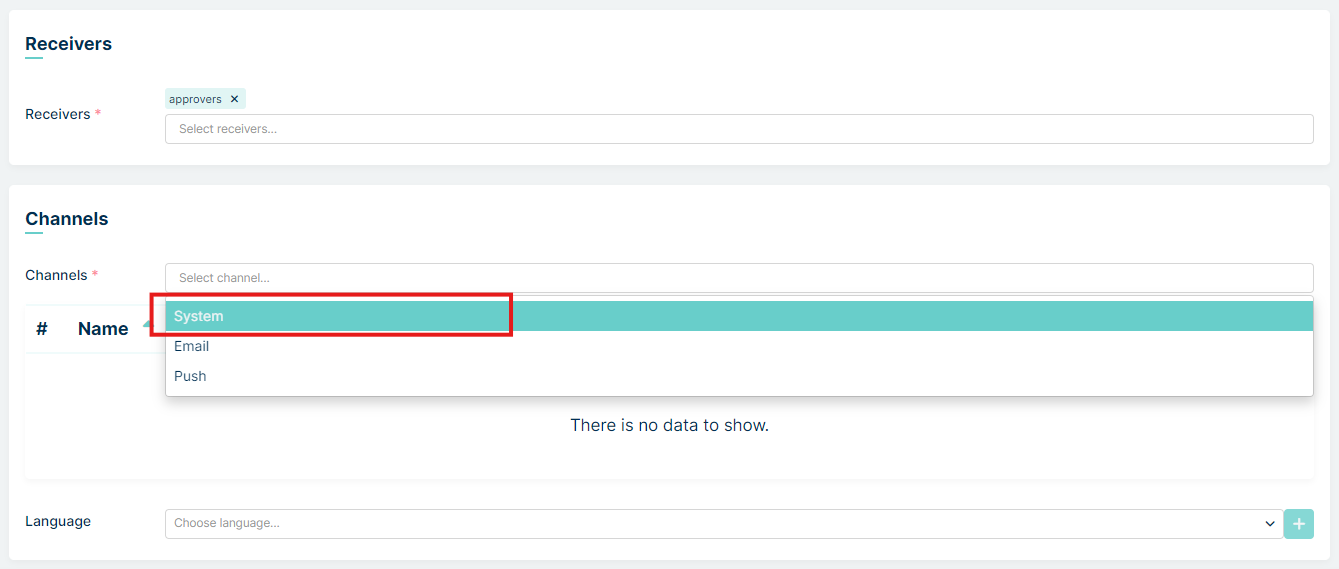
Select the language

and add it using the plus button. The language will appear in the list. Click the Edit button, fill in the Title field (title of the notification). It is recommended to add the snippet {{TicketNumber}} from the scissors icon. Click the icon:
and select the snippet that will appear in the Title field

Then fill in the field Template for: system - enter the content and add the snippet {{ApprovalLastRejectJustification}}.
The last step is to click Create button.
The notification has been created
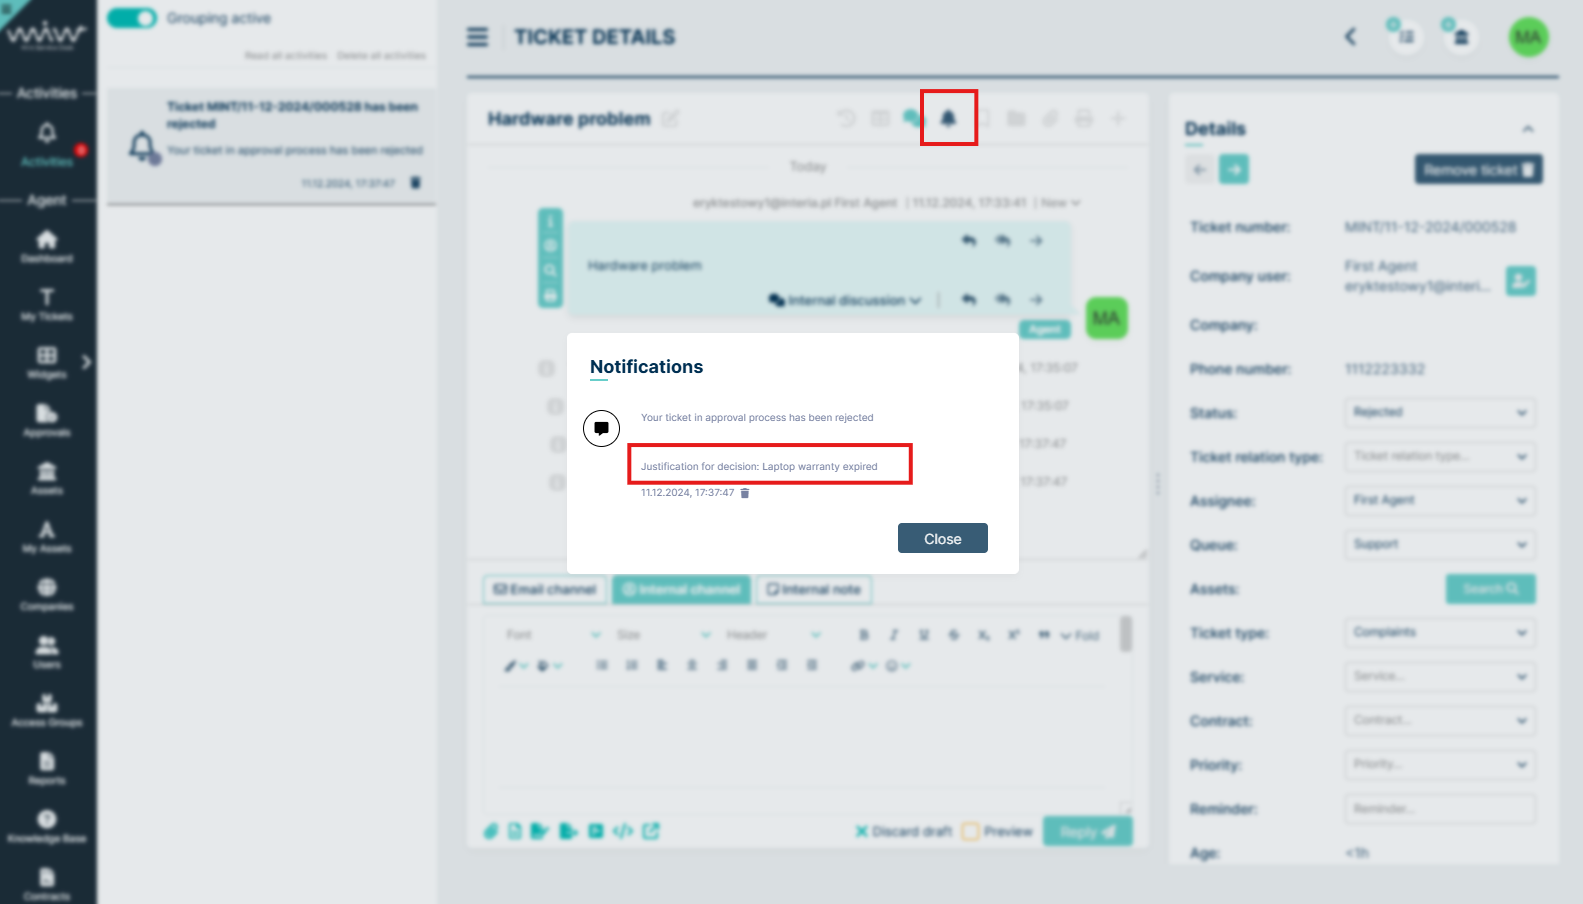
Now, when ticket wil be rejected, Agents involved in decision process will have notification in Activity section
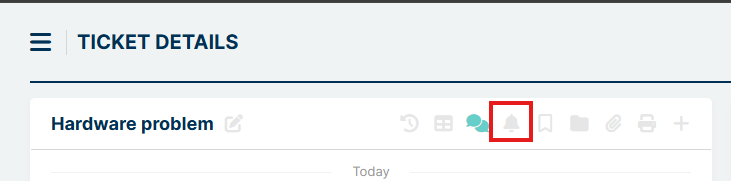
Clicking on notification will redirect you to the ticket. Clicking on bell icon in ticket details:
will show full information about decision justification
AGENT/CUSTOMER PROFILE
Agents in the decision-making process are responsible for transferring the ticket to Pending Approval status, issuing decisions (if they participate in the configuration) and, if necessary, assigning Line Managers to users in the Customers role. The process is managed via the Approvals tab and directly in the ticket details. The following section describes these two views in more detail.
Customers are responsible only for issuing decisions (if they participate in the configuration)
APPROVALS TAB
In order to introduce the ability to manage tickets, an additional tab called Approvals has been introduced in the Agent and Customer profiles. It can be accessed from the sidebar.
The tab consists of three views:
- My Requests
- To Approve
- History
Management of the views is similar to that on the Dashboard tab, so we can add and sort columns, search for tickets via Search by field, sort columns and reset the settings to default with the Clear Filters button.
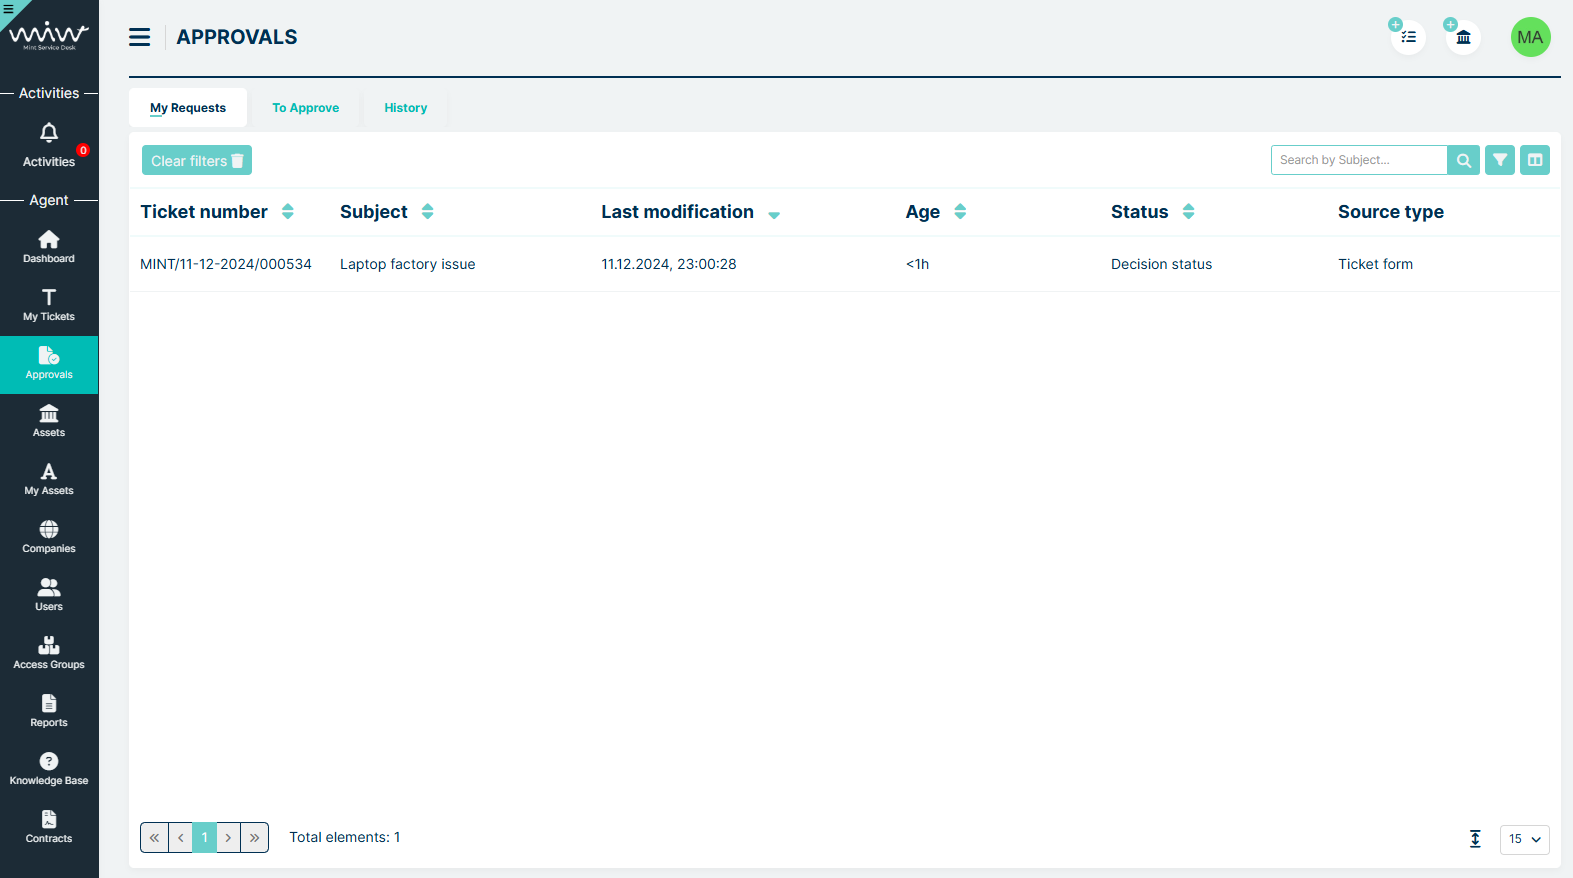
My Requests
This view shows the submitted tickets that are awaiting for decision (Approve/Reject). Tickets are visible only for user assigned in “Customer” field in ticket details. This view refreshes automatically after a decision is made in any of the displayed tickets.
To Approve
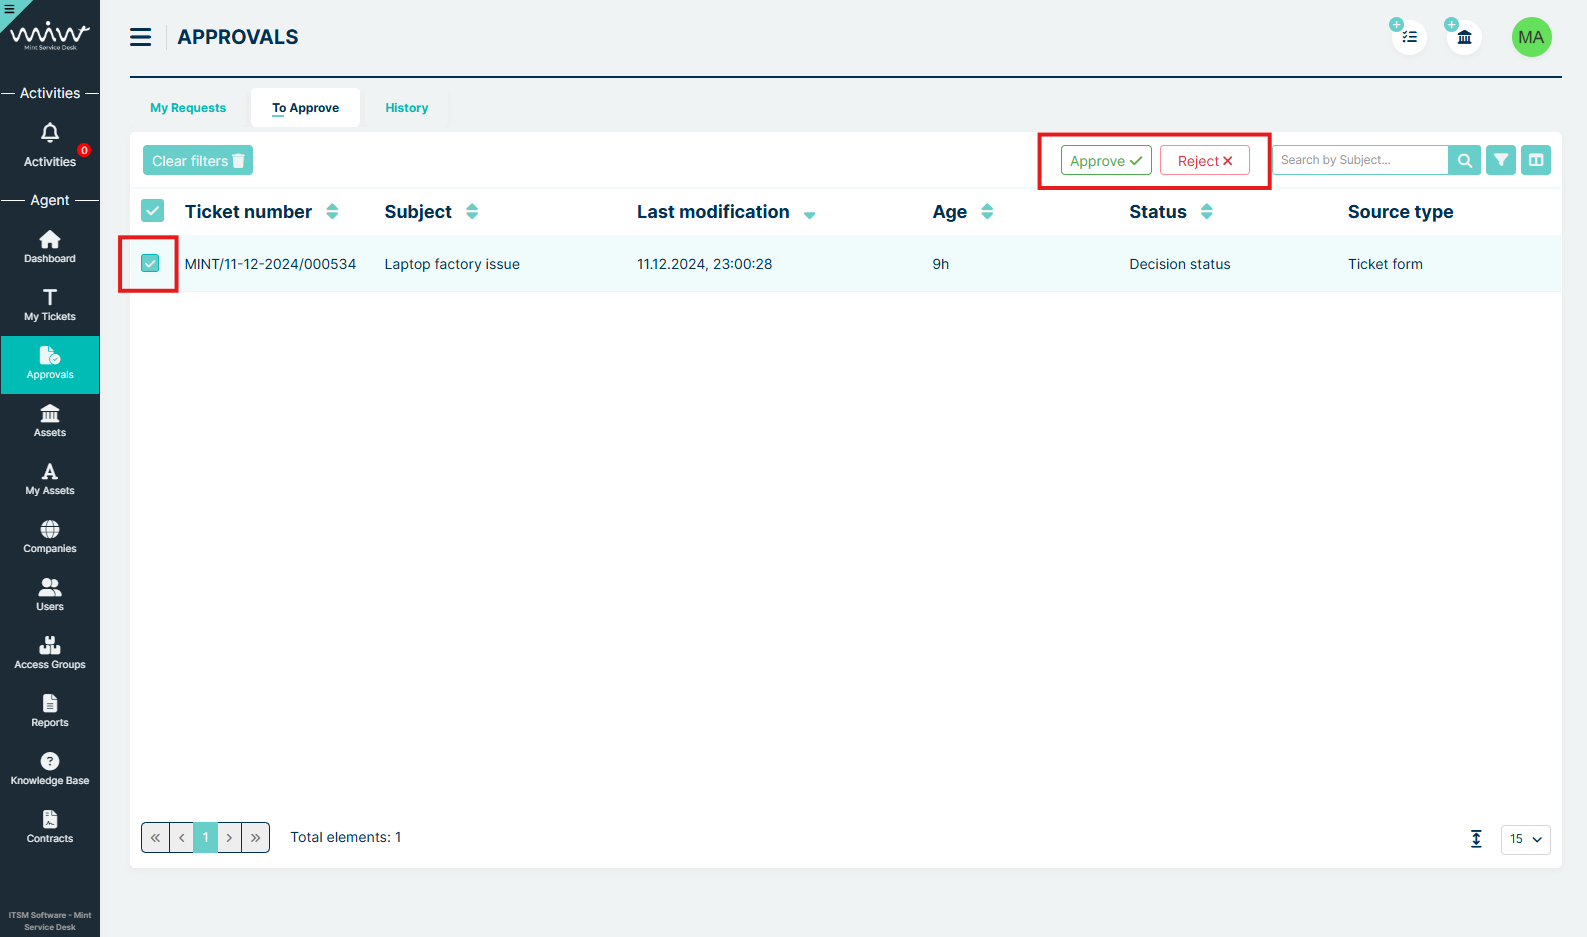
This view shows tickets awaiting decisions in which the user is a participant (decision-maker) .

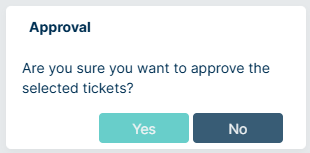
The table of tickets refreshes automatically both when new ticket for a user’s decision appears in the system and when the user has made a decision (the notification then disappears from this tab). This view also has the option of selecting tickets. Once they have been selected, two buttons appear (Approve/Reject) with which the user makes his decision.
After clicking on the Approve button, a confirmation message appears
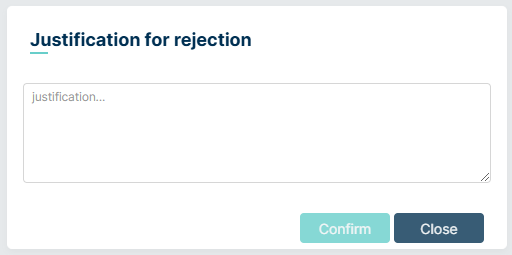
When the Reject button is clicked, a modal appears with the reason for the rejection. Providing the reason is required to perform the action.
If a ticket is rejected as a result of a negative decision by a user, the reason for the rejection of this user is presented in the details of the relevant ticket in the section marked below
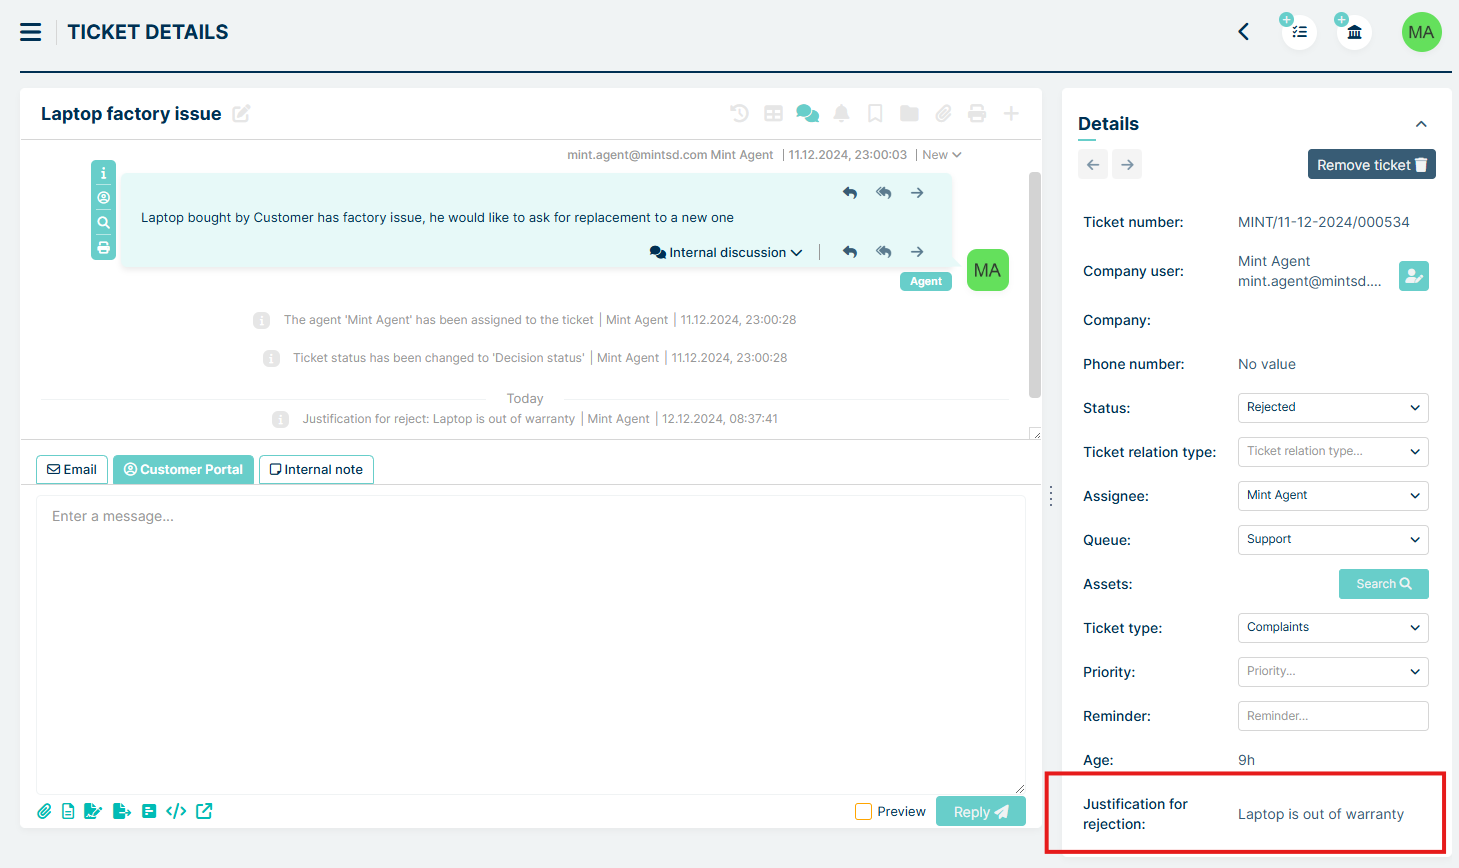
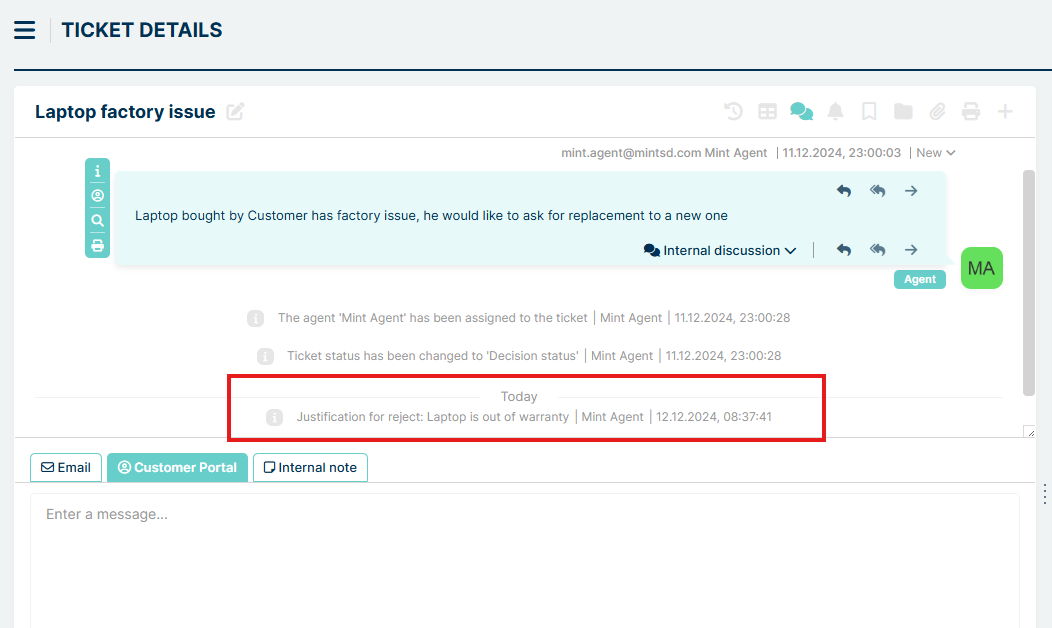
In addition, the content of the reason for rejection also appears in the article field in ticket details
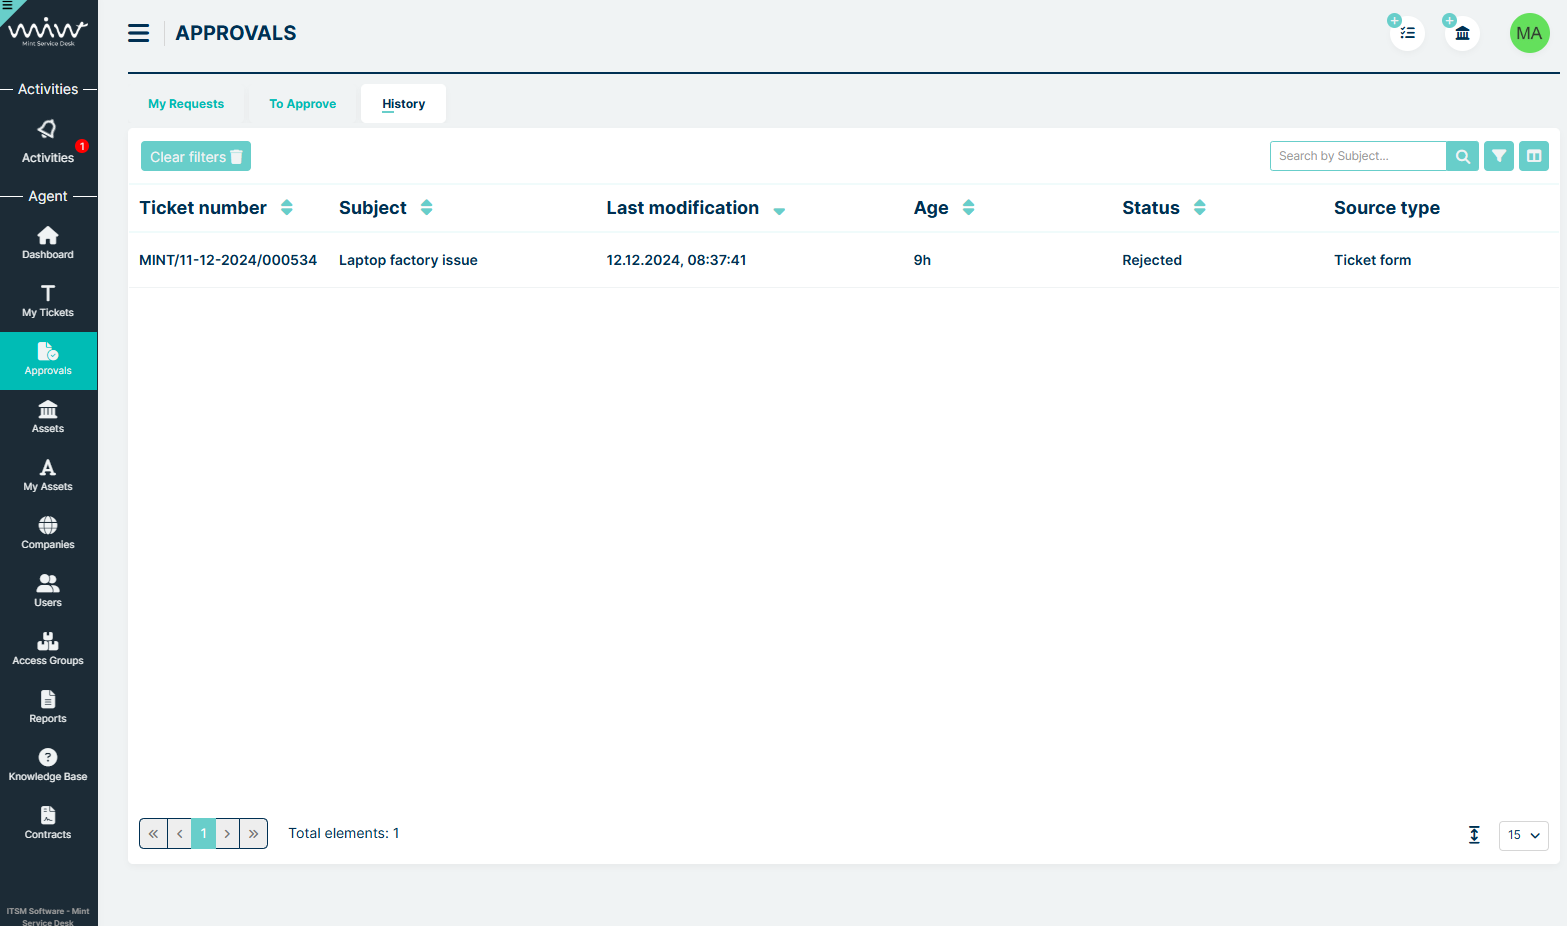
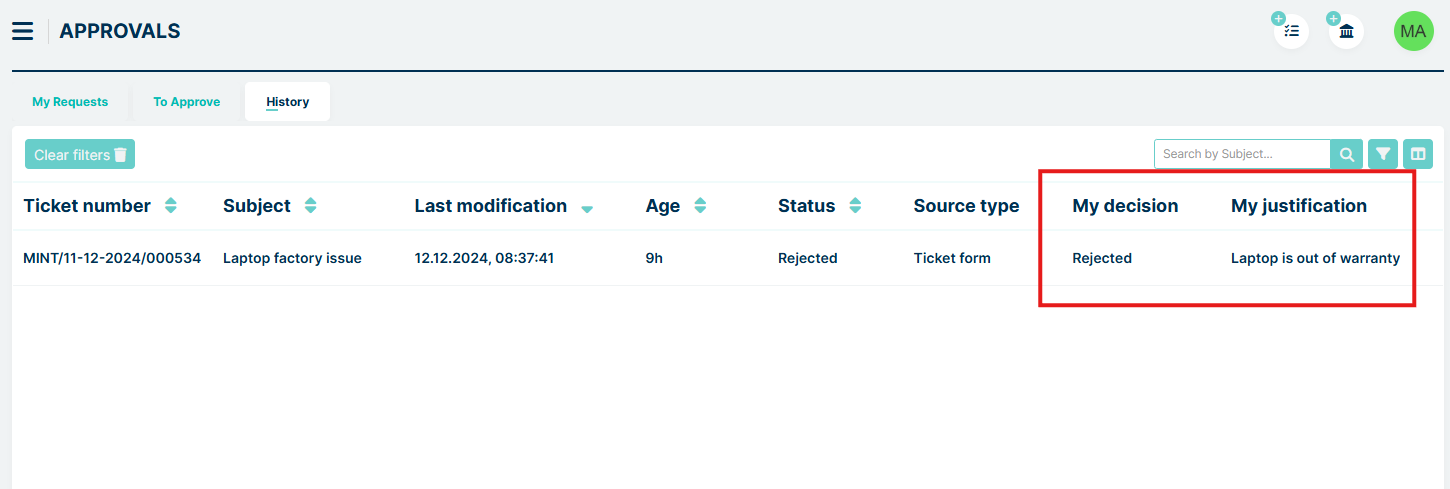
History
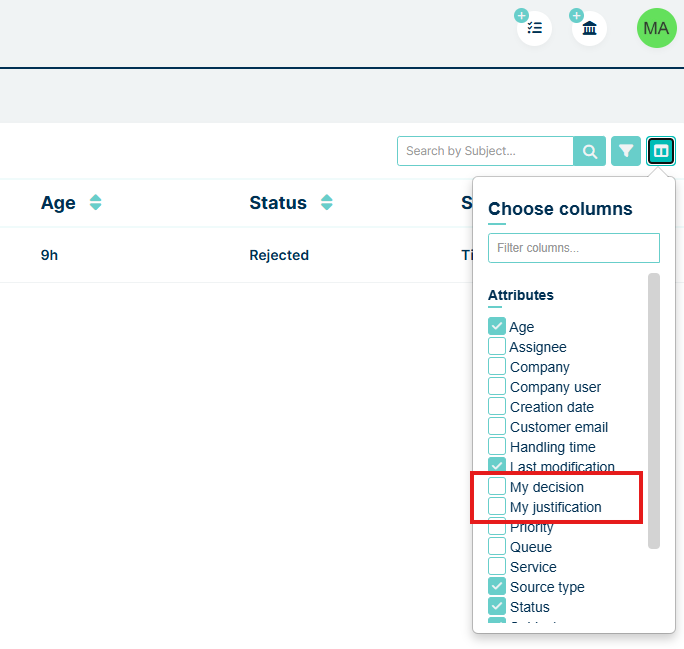
This view shows the tickets for which the current user has made a decision. History tab has additional columns: My decision and My justification.
User can add them into view via Set column properties button in upper right,
User can now see what decision he has made and - in case he made a rejection - the justification the user gave when issuing a negative decision in the Justification modal.
TICKET DETAILS
The most important actions in the ticket details related to the approval process are outlined below.
Changing the ticket status to Pending Approval
The agent transfers the ticket to Pending Approval status by changing the status in the section below:
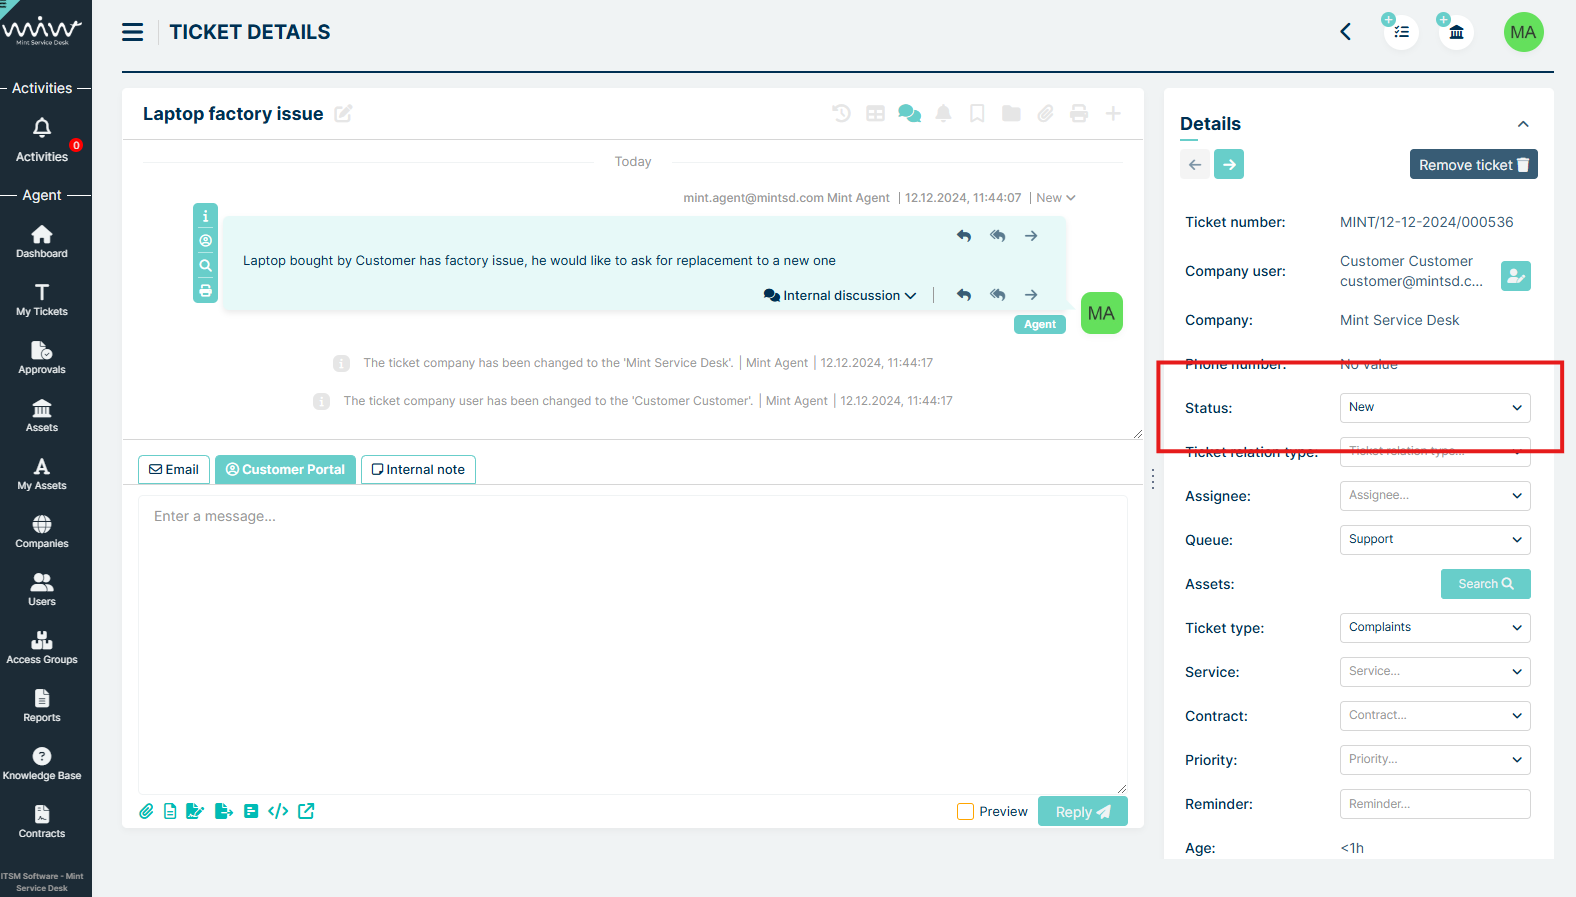
From the dropdown menu Agent chooses Pending Appvoral status
Once the status is changed, the ticket becomes greyed out and read-only.
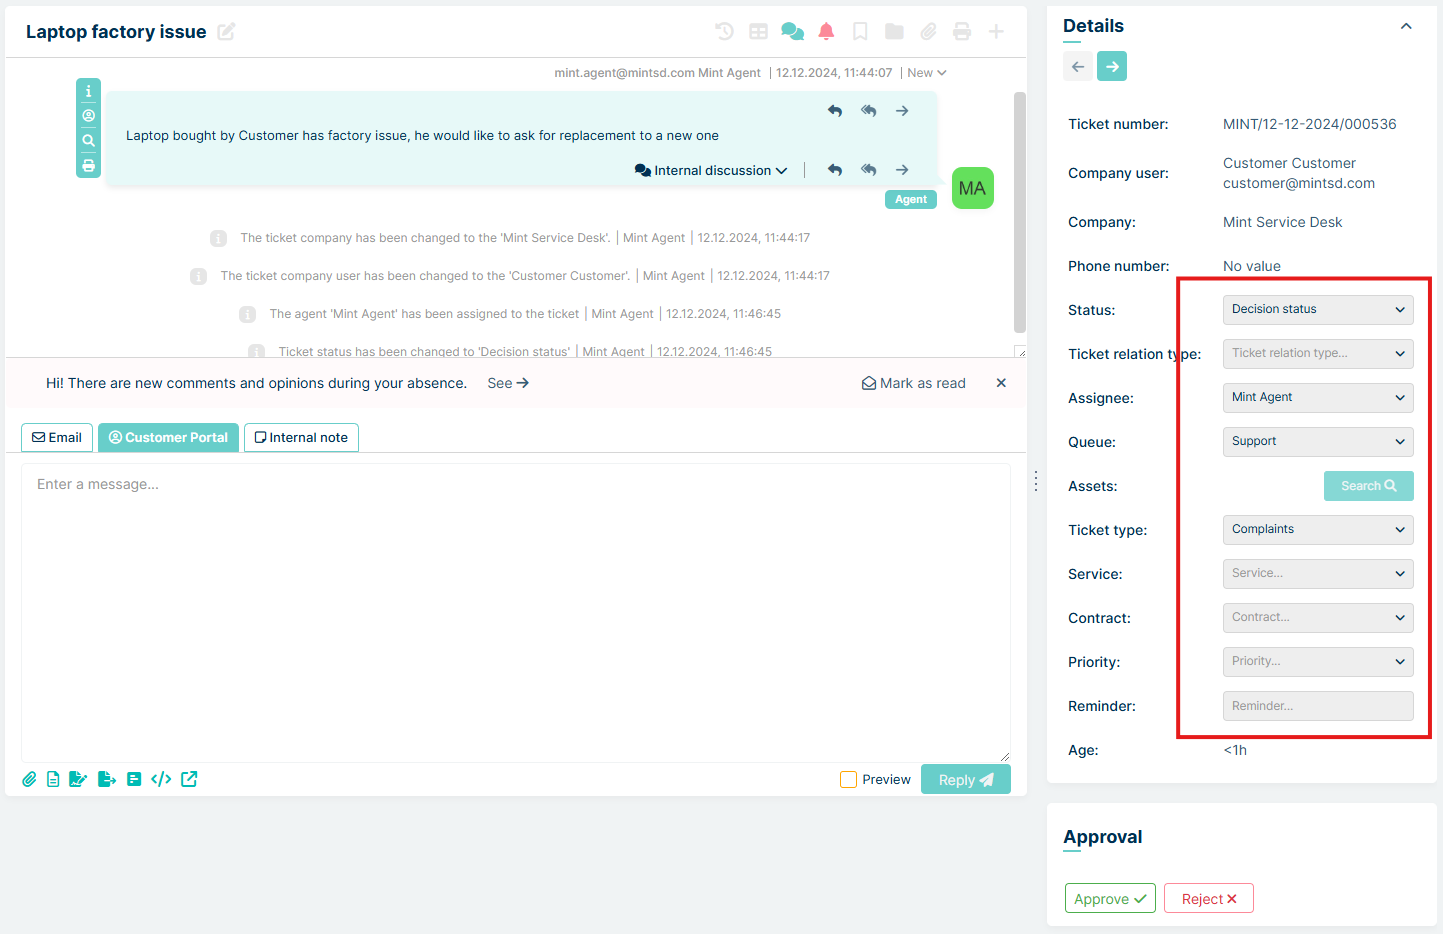
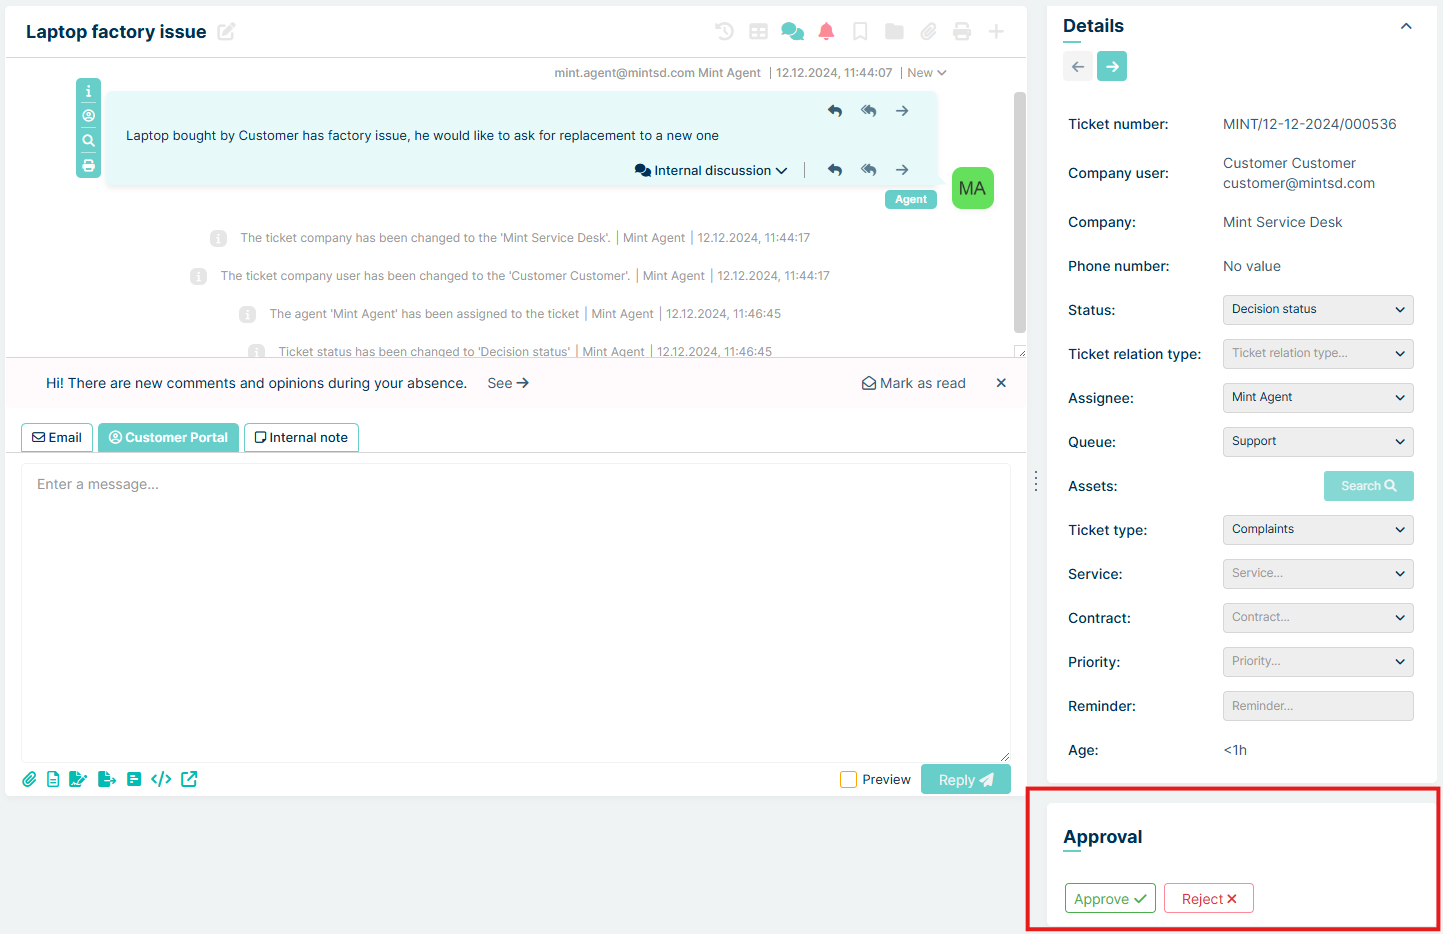
Approval panel in the ticket details
If the Agent is involved in the decision-making process, an additional panel appears in the section below with the option to accept or reject. The panel disappears once the Agent has made a decision
Information about the reason for rejection
If a ticket has been rejected, the section below shows the reason for rejection given by the last rejecting user
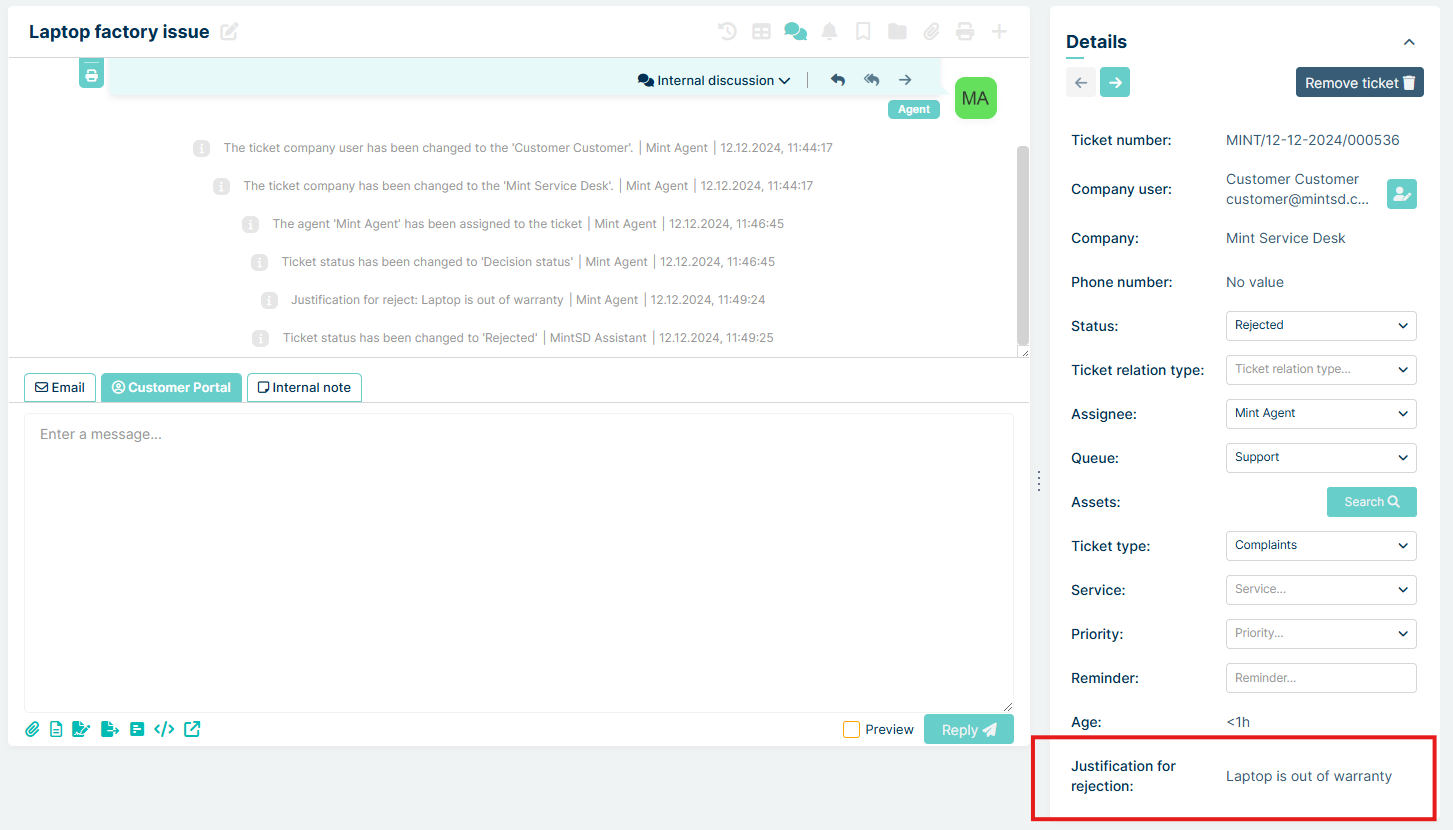
Ticket history
In the ticket history, you will find entries related to the decision-making process, i.e. information on decisions made by users, information on reasons for rejections, information on the decision made for the ticket
COMPANIES
If you provide support to many customers from different companies, in this section you are going to manage them.
COMPANY MANAGER
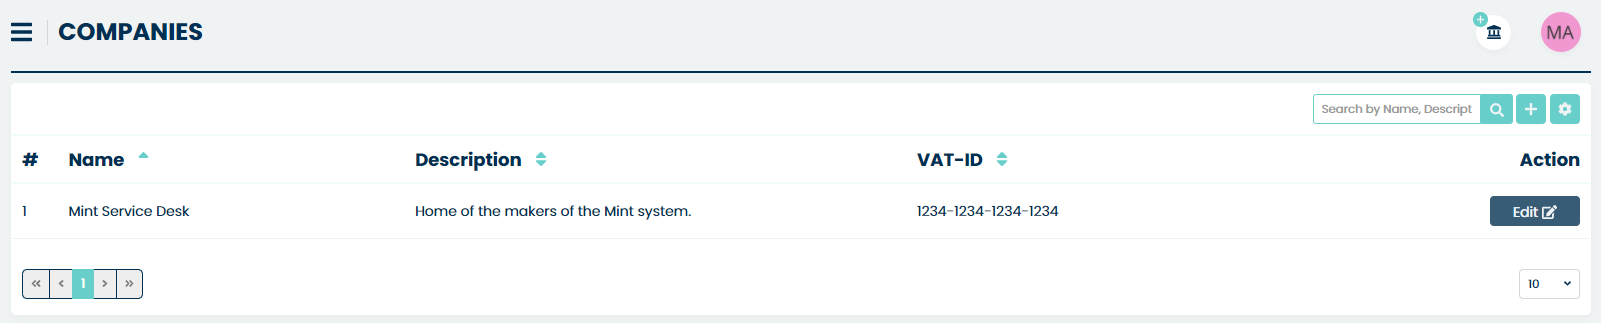
In the ‘Company manager’ part you will see the list of all the companies that have already been configured. Mint Service Desk has one pre-defined company at the start. You can, of course, change its information.
If you want to create a new company, simply click the button,
located on the right side of a search box. It will open a ‘Create new
company’ form.
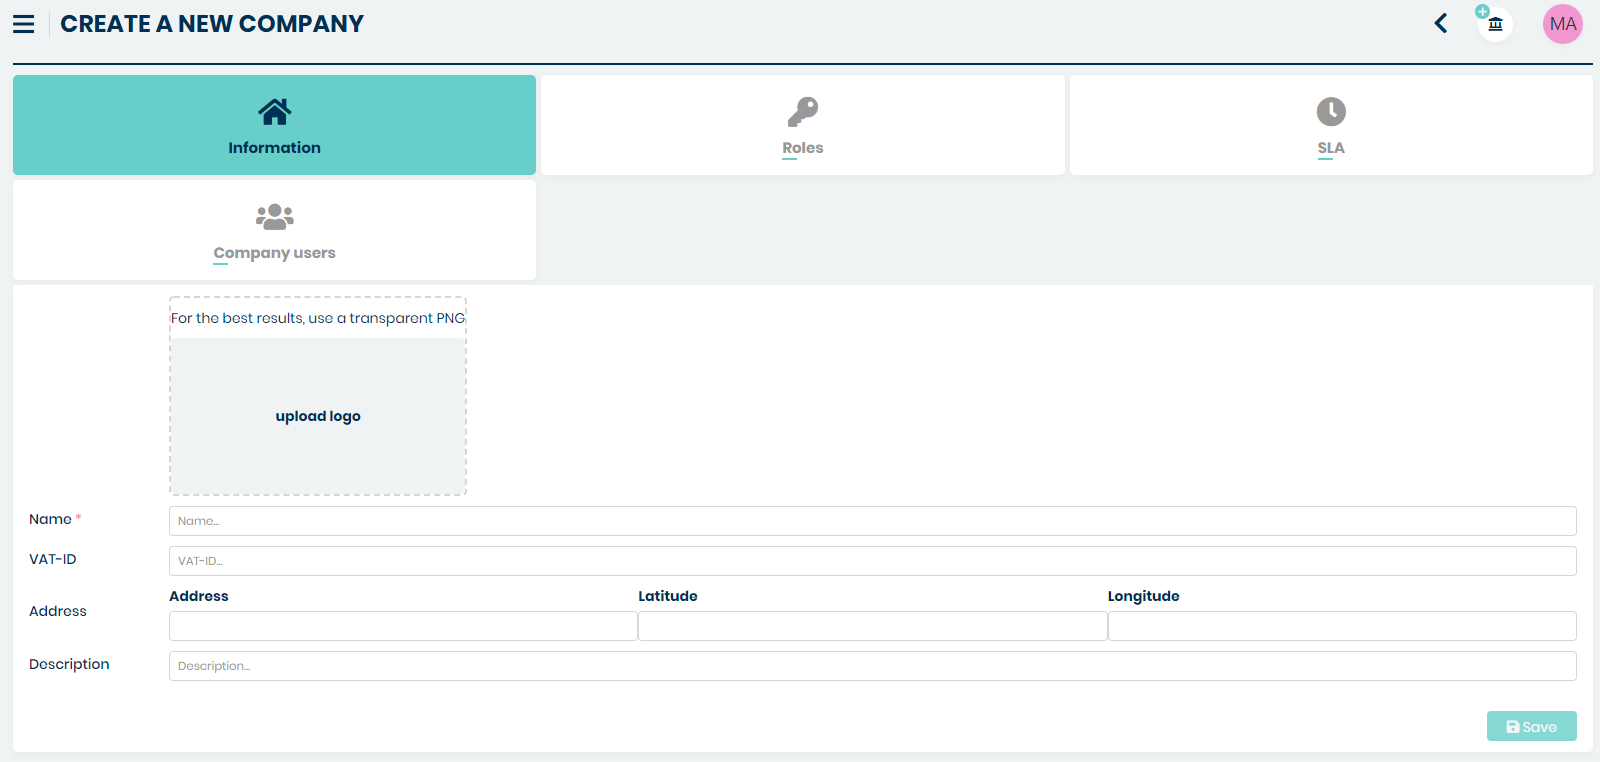
INFORMATION
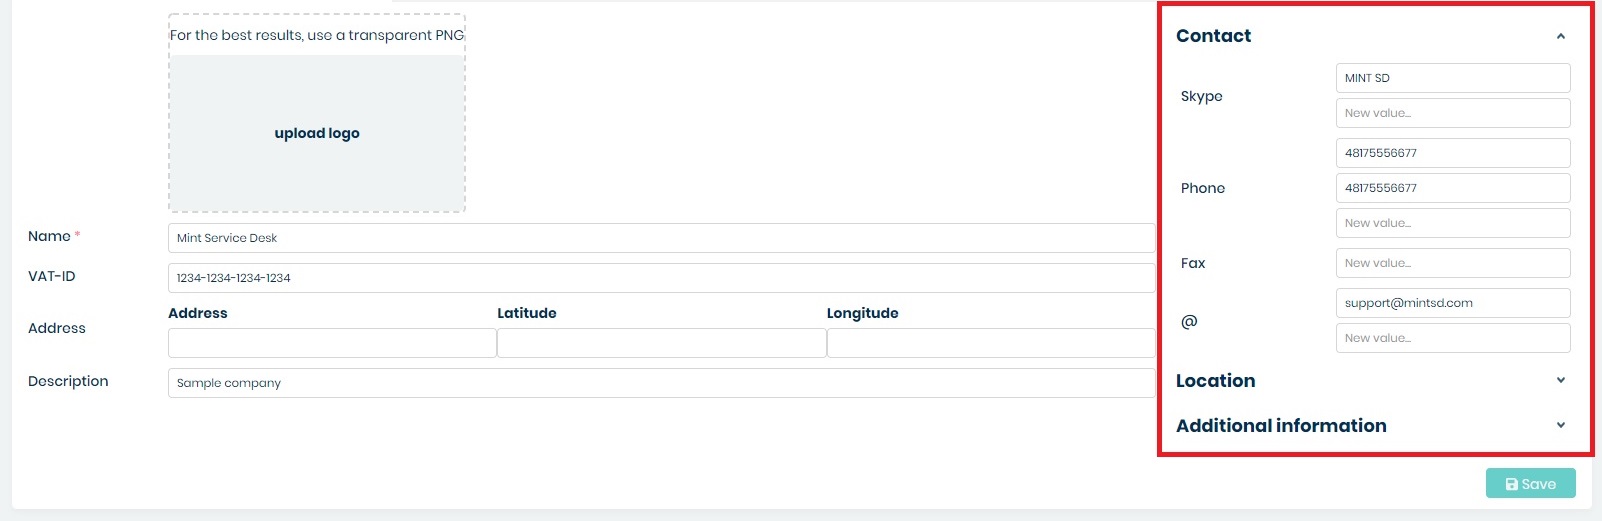
In this place you can type some basic information about the company: ‘Name’ (required), ‘VAT ID’, ‘Address’, and description. You can also add a logo/picture – just click on the gray box ‘upload logo’.
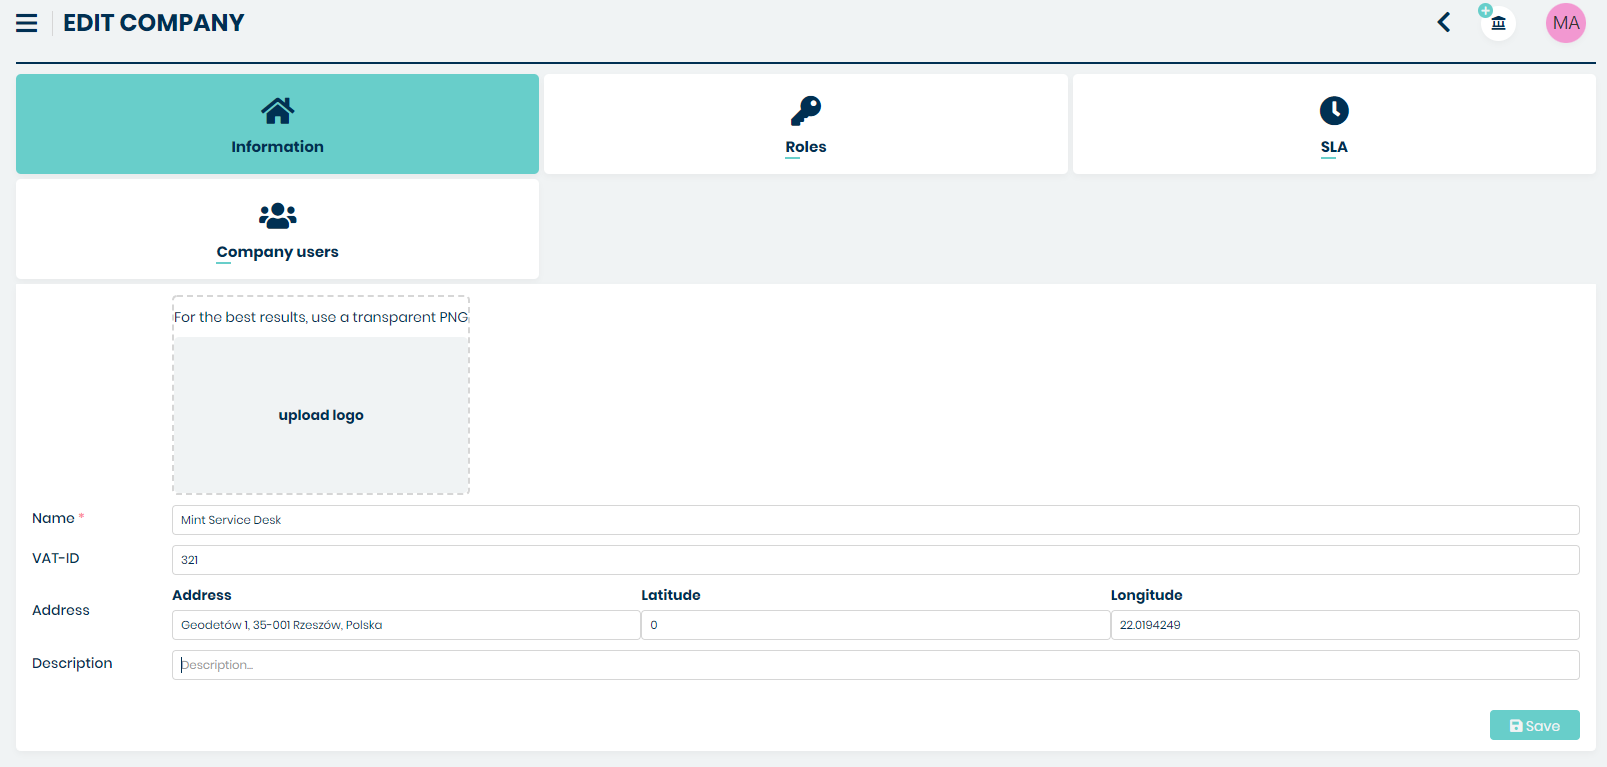
Once you finish click on the button. The screen will be
refreshed and you will notice that other tabs (‘Roles’, ‘SLA’, ‘Company
users’) have been unblocked. Also on the right side, you will see a new
block with some additional attributes (if you created them in Companies
> Company fields).
Now, while being in this part of the system, you can do a couple more things.
ROLES
The first one is that you can create a company ‘Role’.
To do that, just go to the ‘Roles’ tab and click on the
button. It will open a small window where you need to type the name for
that new role and click the button.
That role can be later selected for a particular user under ‘Role management’ available e.g. in the Agents > Agents or Companies > Company manager > Company users parts of the system. It will be explained later in this guide.
SLA
In the next section called ‘SLA’, you can manage your SLAs and add/remove any of them. Normally, once you created a new company, this tab will be empty and you have to add a new SLA.

If you want to add any SLA you need to click on the  button.
Once you do that, on the right side a new section ‘SLA Details’ will
appear.
button.
Once you do that, on the right side a new section ‘SLA Details’ will
appear.
Now you need to click on the ‘SLA name…’ field and select one of the already existing SLAs from the dropdown list. If you’re adding second/third etc. SLA to this company you will see that some positions on the list are dimmed and you cannot add them.
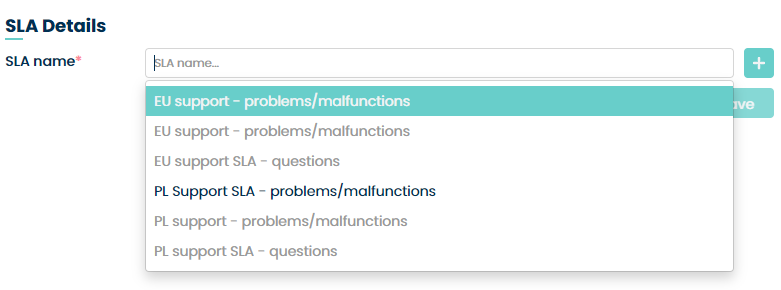
Select one that is available and click .
If, on the other hand, you don’t want to use any of already existing SLAs, you can create a totally new SLA in this place.

Just click the button and a form for creating new SLA will be
loaded.
The whole process of creating and managing SLA (and also Services, Priorities and Parameters) is described in ‘Services’ part of this guide.
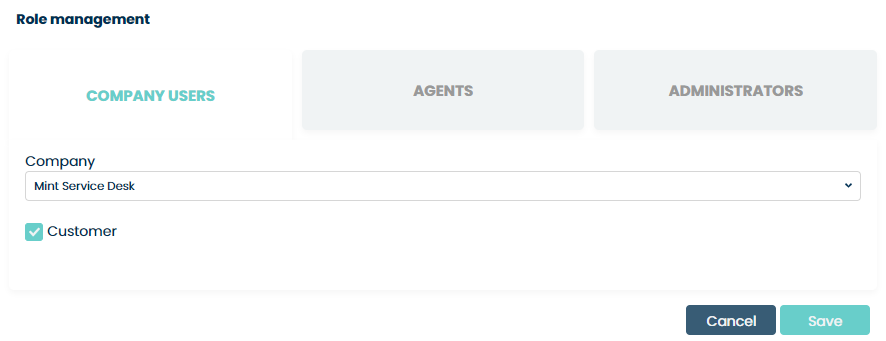
COMPANY USERS
In the ‘Edit company’ view normally the last tab ‘Company users’ is empty (if you just created a new company). To see any customer here, you need to grant some users the correct role (customer role) among those available for this company. Only once you do that (for example, as mentioned a moment before, in the Settings > Users) you will see a customer here.
Now you will be able to do a couple of things. You can Activate/Deactivate the user. Deactivating means that the user account will be locked and he will not able to log in.
If you want to change the user role click the button and in
the next window (‘Role management’) change the role for the desired one.
Please remember that, if you want to change the role from Customer type
to e.g. Agent or Administrator type, you first need to unselect the
current chosen one.
In the following example, we have chosen a Company ‘Mint Service Desk’ and available for this particular Company Customer type role: ‘Customer’.

If we want to change it and grant the user an Agent type role, we need to unselect ‘Customer’ and switch the tab to ‘Agents’. Take notice that one you have unselected ‘Customer’ the Agent tab became available.

In this place, you need to choose and select one of the available
Companies and their roles and click the button. Once you do
that the user will disappear from the ‘Customers’ tab and be moved under
the ‘Agents’.
CUSTOM FIELDS
In the MINT Service Desk, we have some fields pre-defined where you can add some information about each company. Those are: ‘Name;, ‘VAT-ID’, ‘Address’’ and ‘Description.
In the ‘Custom fields’ part you can create an additional group of fields for filling up (or selecting from the list) with even more information.
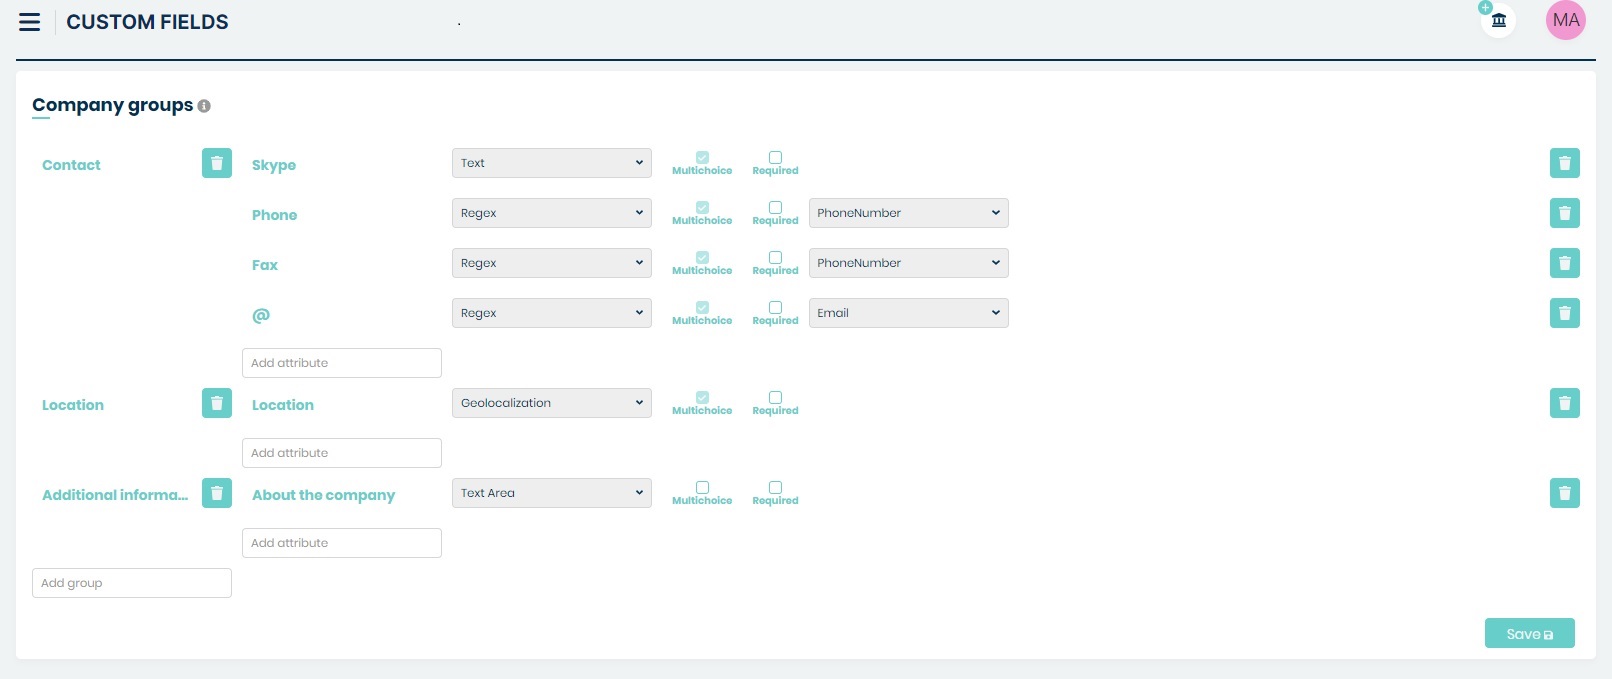
Those additional fields will be later visible in the ‘Company Manager’ section in the ‘Edit company’ view.
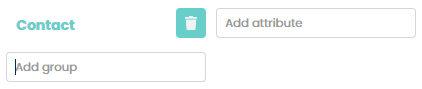
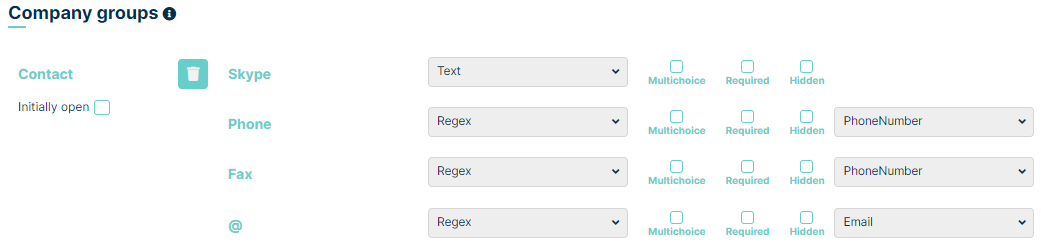
Let’s add some new fields. First, in the default view of the ‘Company fields’, you need to create and name a new group (for example ‘ Contact’). Click on the empty field ‘Add group’.

Type some name and press ‘Enter’ on your keyboard to confirm the name. Once you do that, on the right side you will see a new field ‘Add attribute’.
Now, let’s add some attributes. First, in the ‘Add attribute’ field type a name and confirm it with ‘Enter’. On the right side, you will see a new field ‘Attribute type…”.

Select one type from the dropdown list. You can also select a ‘MultiChoice’ check-box to allow selecting/adding more than just one Value later in the Company details view.

You can add plenty of attributes for the group. In the following screen, you can see a finished group with some important attributes already prepared.
Now, if you go to Companies > Company manager section and click on
button on the right side of the company, you will see those
additional attributes on the right side of the ‘Edit Company’ view.

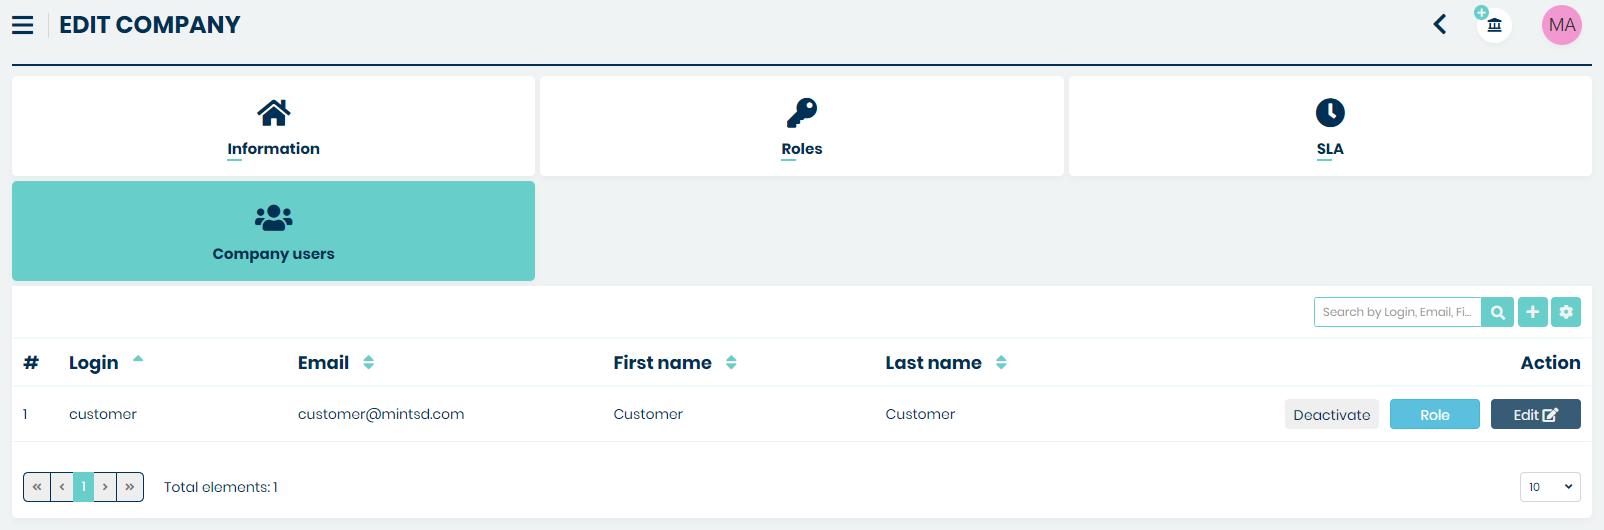
COMPANY USERS
In this part of the system, you will be managing the users. By default, the view will be set to the ‘Company users’ tab and you will see the list of all company users.
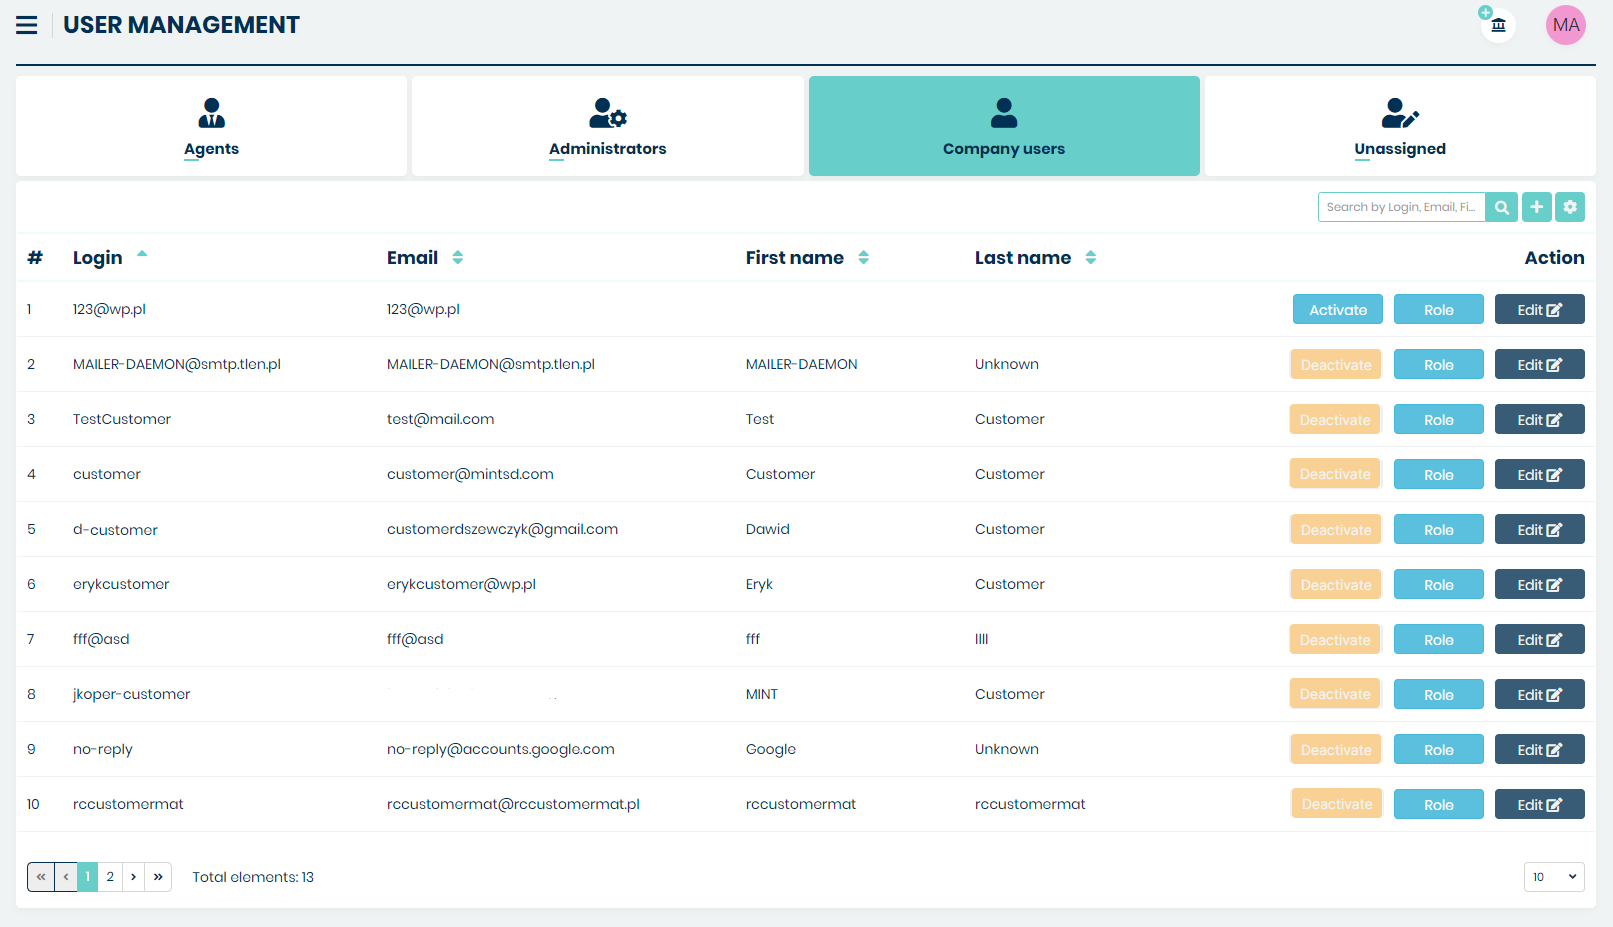
If you want to create a new user, you need to click on
button, located on the right side of the search box. This button is
available for you in three tabs of the Users section: ‘Agents’,
‘Customers’, ‘Administrators’. You won’t be able to create a new user
while being in the ‘Unassigned’ tab.
Once you do that you will be moved to the ‘Create user’ form, where you need to put in some information regarding the new user. Depending on the role you choose for that user, he will be later shown on a different tab (Agents, Customers, or Administrators).
With every user, you are able to do a couple of things. You can Activate/Deactivate the user. Deactivating means that the user account will be locked and he will not able to log in.
You can also change the user Role. Just click the button and
in the next window change the role for the desired one.
Please remember that, if you want to change the role from Company user type to e.g. Agent user or Administrator type, you first need to unselect the current chosen one. Only then the other tabs inside ‘Role management’ will be unblocked.
Once you change the role and click the user account will be
moved to a different tab (in the ‘Company users view), depending on your
choice.
One last thing worth mentioning is that when you save the account without any role chosen, it will be moved to the ‘Unassigned’ tab.
TICKETS
QUEUES AND PERMISSIONS
The queues in MINT Service Desk are “containers” of tickets. You can define your queues based on resolution teams, departments, logical units, processes, and workflow interaction teams. In order to define your queue structure and have it configured you will have to use functions available in the “Queues” section.
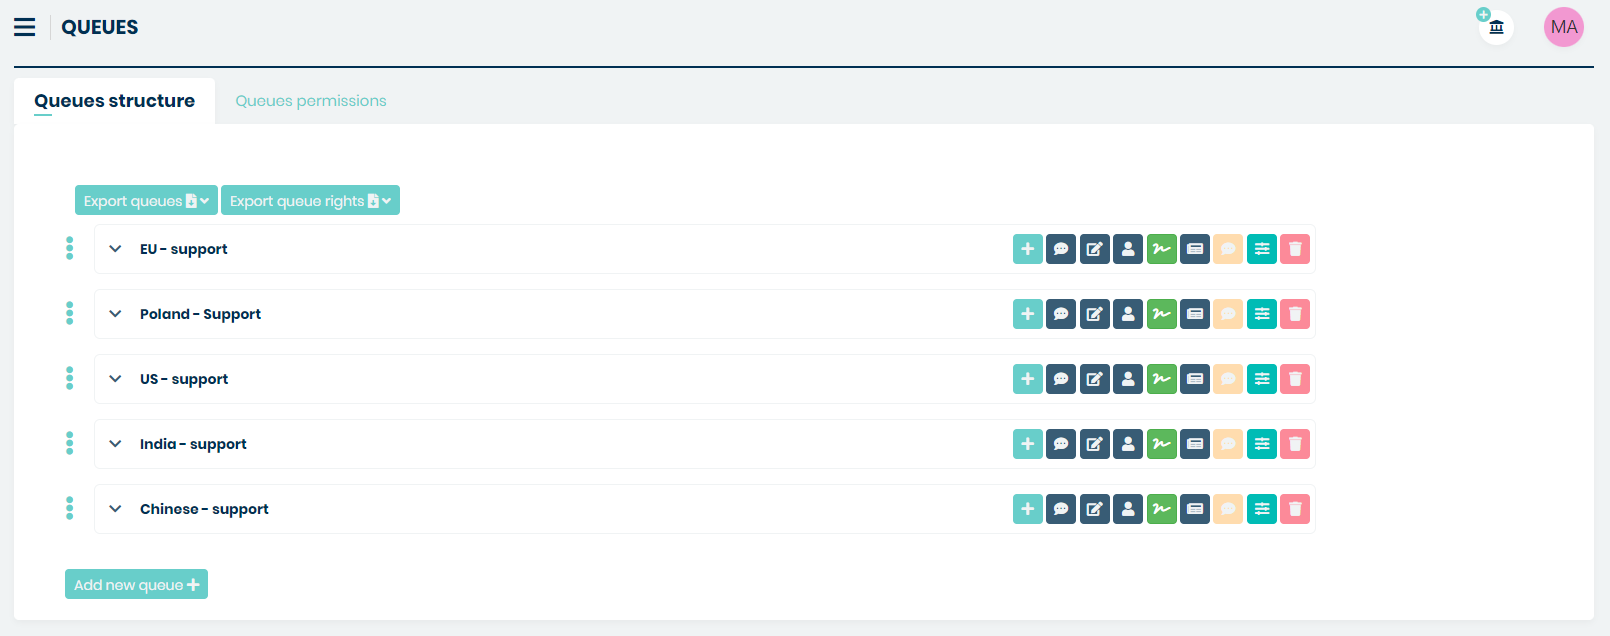
As you already noticed, the default view will show you the ‘Queue structure’ tab. The second one is ‘Queues permissions’.
Queue structure
At the bottom of this view, you will find one button  . It is
used for creating and adding a new queue to the structure. Once you
click on this button a new position will appear right below the last one
already existing.
. It is
used for creating and adding a new queue to the structure. Once you
click on this button a new position will appear right below the last one
already existing.

Now, you only need to type the right name for this queue and either hit
‘enter’ on your keyboard or click on the  button.
Once a new queue has been created, you can do several things with it.

The first one is that you can add a sub-queue by clicking on the
button and adding a sub-queue in the same way as you did it
with the main queue.
Each queue that also has sconub-queues will be displayed by default with
those sub-queues hidden. In order to see them, you must expand the queue
by clicking on  button. Then you will see the queue along
with its sub-queues just like on the following screen.
button. Then you will see the queue along
with its sub-queues just like on the following screen.
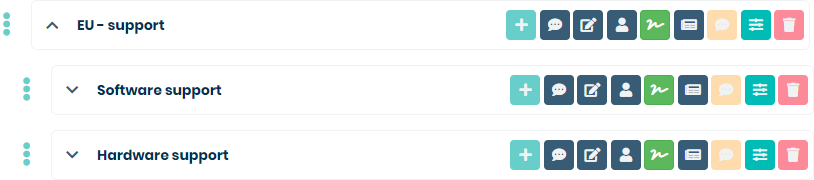
If you want to change the name of any queue, just click the  button, change the name, and hit ‘Enter’ or click the button.
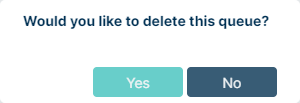
To delete a queue, click on the button, and in the
new window click ‘Yes’.
Remember that you can always change the position of each queue and
sub-queue in the structure. To do that just click the  button
next to the position you want to move. Now, while holding the Left Mouse
Button just drag and drop this position to the plane you want it to be.
Releasing the Left Mouse button will put this position in the newly
chosen place.
button
next to the position you want to move. Now, while holding the Left Mouse
Button just drag and drop this position to the plane you want it to be.
Releasing the Left Mouse button will put this position in the newly
chosen place.
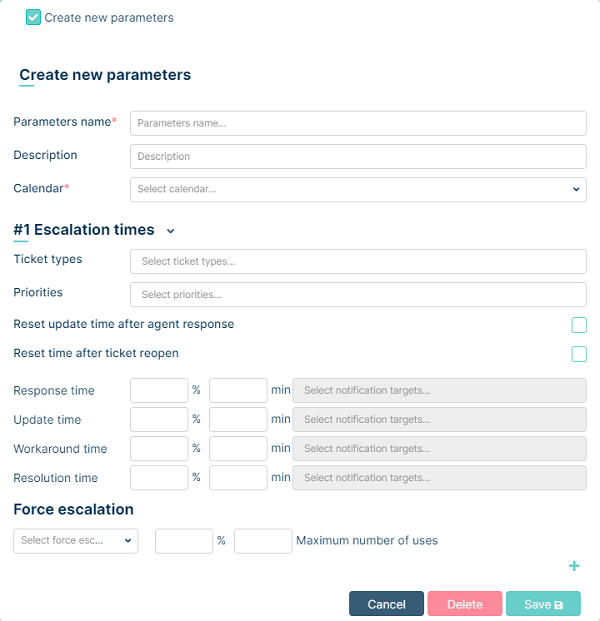
To assign parameters to queue, click the  button. In the new
window select one of the parameters available from the list and click
on the button.
button. In the new
window select one of the parameters available from the list and click
on the button.
To create new parameters click on  , fill in the required fields
(Parameters name, Calendar, Response time, Resolution time) and any other if
you want, then click on the button.
, fill in the required fields
(Parameters name, Calendar, Response time, Resolution time) and any other if
you want, then click on the button.
For each queue and sub-queue, you can configure ‘auto-responses’. Those are the automated messages that will be sent by the system in the Ticket Details communication section.
To do that, click the  button. In the new window select one of
the auto-responses available from the list and click on the
button.
button. In the new window select one of
the auto-responses available from the list and click on the
button.

The detailed information on how to create custom auto responses will be described later in this guide, in the Tickets > Templates section.
To configure the default agent assigned to the queue click the  button.
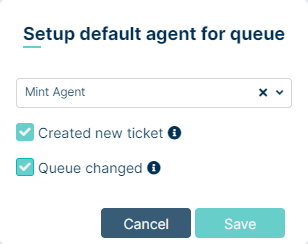
Clicking on the drop-down list will display a list of agents with permissions to the selected queue (see Queue permissions in this section). You can select the default agent and decide when this agent will be assigned. To do that you only need to check one (or both) of available options: ‘Created new ticket’ and ‘Queue changed’. For ‘Queue changed’ the default agent will only be assigned if no agent is assigned to the ticket.
To configure the default signature, press the  button.
After pressing this button, a modal will be displayed with the signature selection.
button.
After pressing this button, a modal will be displayed with the signature selection.
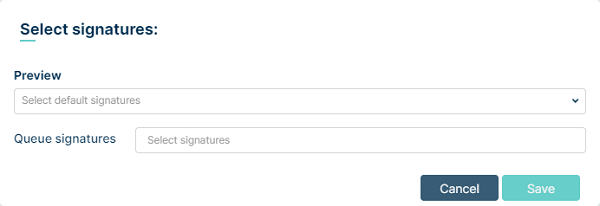
In the ‘Preview’ field, the admin can select a signature of interest and preview what the selection will look like. (Signature creation is found later in the documentation under ‘Signatures’) When the admin has decided which signatures he wants to assign to a queue he selects them in the ‘Queue signatures’ field.
To configure the ticket counter, press the  button.
After pressing this button, a dropdown menu will be displayed with the ticket number selection. (Ticket number creation is found later in the documentation under ‘Ticket number counter’)
After selecting an interesting counter, confirm the action by pressing the
button.
After pressing this button, a dropdown menu will be displayed with the ticket number selection. (Ticket number creation is found later in the documentation under ‘Ticket number counter’)
After selecting an interesting counter, confirm the action by pressing the  button.
Last, but not least, you can configure the queue description by clicking on the  button
In ‘Value’ field enter the description text and click the button to apply changes.
Queue permissions
The second tab is the place where you manage rights for viewing or editing Ticket information within a particular queue and sub-queue.
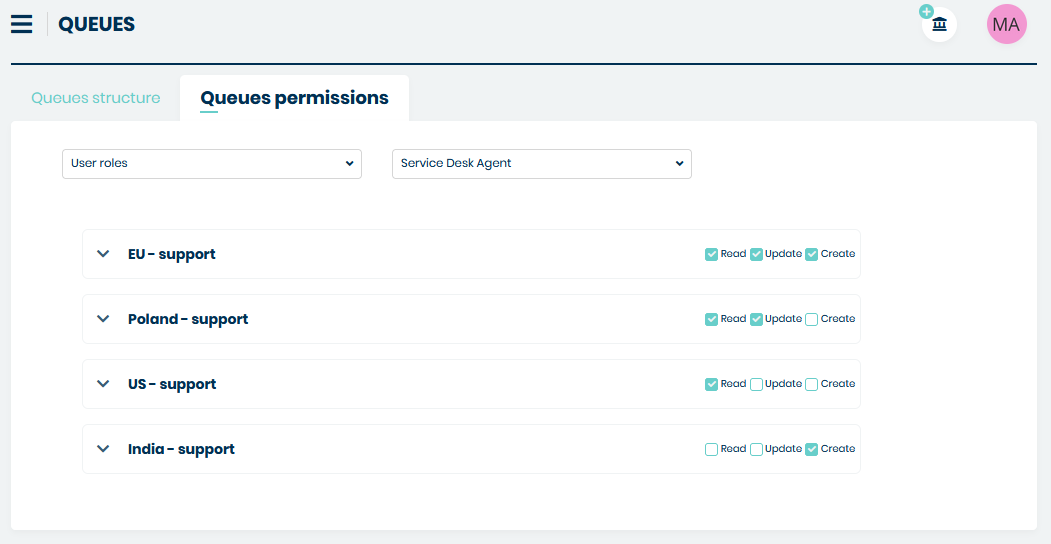
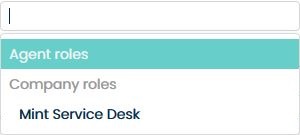
If you want to change rights, first you need to select one position from the list of available General types of roles. They can be e.g. ‘Agent Roles’ (if you have more than one created in the Agent Roles section) or ‘Company Roles’ (located in Companies > Company users section, separately for each company in ‘Role management’ > Company users tab.
After you do that, from the second list you need to select a particular type of Role for which you want to change the right.
The screen below shows the situation when we’ve decided to select ‘Agent roles’ and then one particular role: ‘Service Desk Agent’, which means that we will be able to change the rights for this particular role.

Now we can change the rights by selecting some check-boxes located on the right side of each queue.

There are two types of rights in the Mint Service Desk:
Read – allows the user only to view the content of the Tickets on a queue
Update – allows the user to make changes in the content of a Ticket on a queue. For example, Agent will be allowed to answer the client (to create a message in the communication section, change the ticket parameters).
Create – allows the user to create tickets. The user can have Create but not Update and Read rights.
Please notice that when you select the ‘Read’ it will be selected, but the ‘Update’ will not be selected.
However, when you select ‘Update’ it will also select ‘Read’. Update means that you can view and change the content of a Ticket.
Once you finish making the changes, you need to click button,
otherwise, when you try to leave this part of the system it will inform
you that you have some unsaved changes.
In this section, you can configure the whole structure for Tickets. Step by step you can create, edit or delete: ‘Ticket types’, ‘Groups’ (of attributes), as well as single ‘Attributes’ along with their values. You will also set custom Statuses for your Ticket Types and unique Ticket number pattern.
TYPES
In this part of the system, you can customize the structure for Ticket Types as well as change rights for viewing or making any changes to ticket types or their attributes.
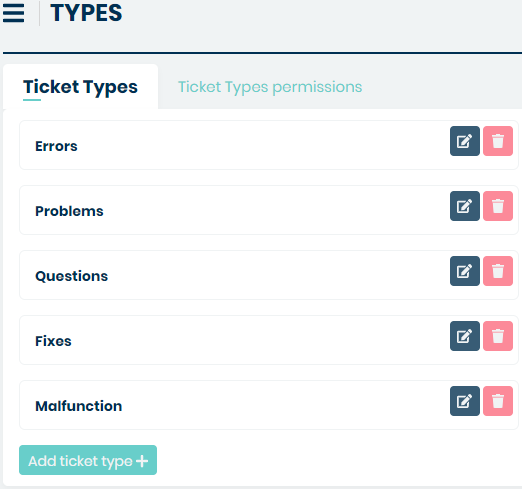
TICKET TYPES
It is the default view when you go to the ‘Types’ part of the system.
At the bottom of this view, you will find one button 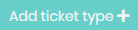 . It is
used for creating and adding a new ticket type to the structure. Once you
click on this button a new section will appear
. It is
used for creating and adding a new ticket type to the structure. Once you
click on this button a new section will appear
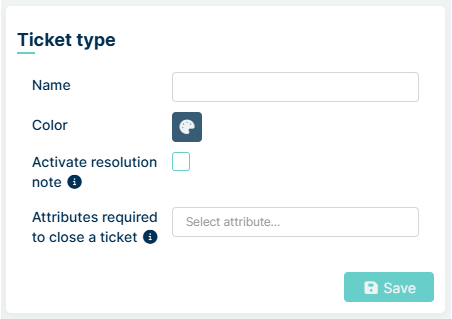
Here you can type the right name for this ticket type and also select a custom color. See ‘Tickets – Custom fields’ in the Admin section to learn more about setting custom colours. You can also enable the ‘Resolution note’ option and select attributes that will be required to close tickets of this type. These options are described below.
If you want to change the name of any already existing ticket type, just click
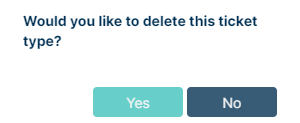
the button. In order to delete a ticket type, click on the button, and in the
new window click ‘Yes’.
Resolution note
This option is available for each ticket type. When enabled, a modal dialog is displayed in ticket details whenever an agent changes the ticket status to Pending Autoclose or Closed.
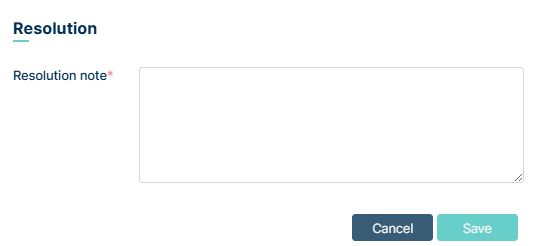
The agent is required to fill in a resolution note explaining the reason for closure. The modal appears every time the ticket transitions to one of the statuses mentioned above. All resolution notes are recorded in the ticket history, and if the ticket is closed by a mechanism other than a direct agent action (e.g., an automatic process or a bulk status update), the note content is automatically set to: “Ticket closed automatically.”
Attributes required to close a ticket
Here, we can choose which of the custom fields for our ticket type should be marked as required for the ticket to be transferred to the status: Closed.
TICKET TYPES PERMISSIONS
The second tab is the place where you manage rights for viewing or editing Ticket information. You can do this separately for each Ticket Type you currently have.
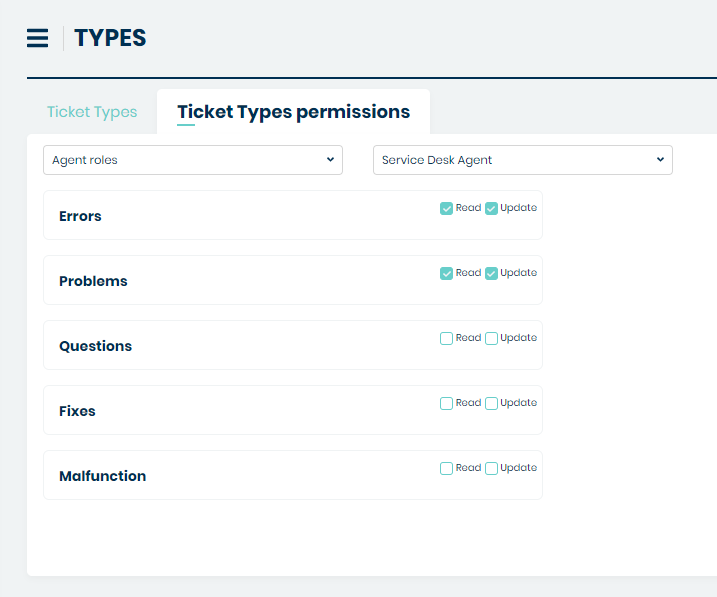
If you want to change rights, first you need to select one position from the list of available General types of roles.

They can be e.g. ‘Agent Roles’ (if you have more than one created in Admin > Agents > Roles section) or ‘Company Roles’ (located in Admin > Companies > Company Manager section.
After you do that, from the second list you need to select a particular type of Role for which you want to change the rights.

The screen below shows the situation when we’ve decided to select ‘Agent roles’ and then one particular role: ‘Service Desk Agent’, which means that we will be able to change the rights for this particular role.

Now we can change the rights by selecting some check-boxes located on the right side of each Ticket type.
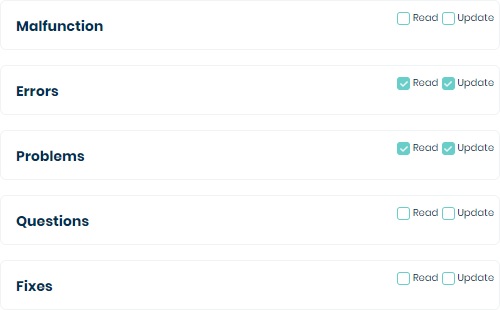
There are two types of rights in the Mint Service Desk:
Read – allows the user only to view the content of the Tickets
Update – allows the user to make changes in the content of a Ticket. For example, Agent will be allowed to answer the client (to create a message in the communication section)
Please notice that when you select the ‘Read’ it will be selected, but the ‘Update’ will not be selected.
However, when you select ‘update’ it will also select ‘Read’. Update means that you can view and change the content of a Ticket.
Once you finish making the changes, you need to click button,
otherwise, when you try to leave this part of the system it will inform
you that you have some unsaved changes.
STATUSES
Mint Service Desk includes the feature “Statuses”. It helps you to create different states for your ticket types. Normally the defined processes for each ticket type also include different stages or status, sometimes they use the same states but also sometimes they are totally different, especially in ITSM where the status for Incident Management or Problem Management is different.

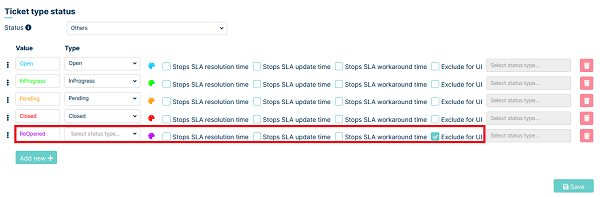
If you want to create some statuses first you need to choose the Ticket Type they will be connected with.
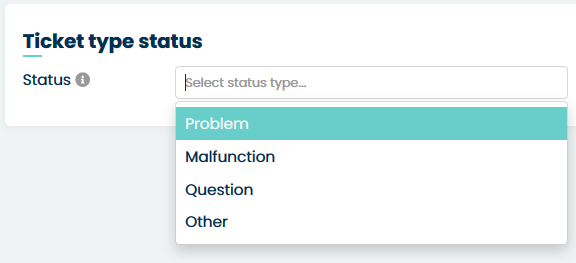
Once selected you need to add a couple of new statuses by clicking on the ‘Add new’ button.
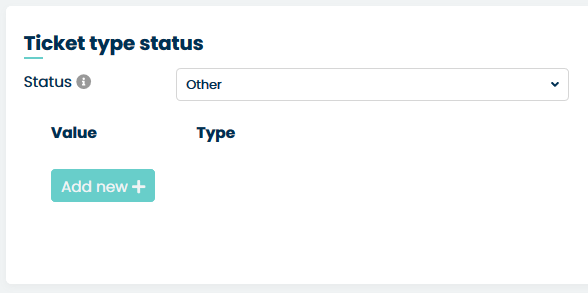

Now you have to name each status by adding ‘Value’ (any text) and select
‘Status type’ from the available list. At any moment you can add new
status – just click the ‘Add new’ button. To delete any of the positions
use the button.
For each status, you can also select a custom color. Click on the
 button to open a small window where you can choose a desired
color from the palette.
button to open a small window where you can choose a desired
color from the palette.
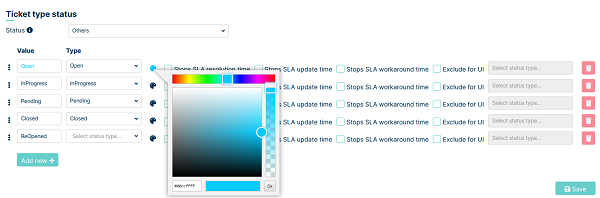
Now repeat that for each status and as a result, you will have colors for each status.
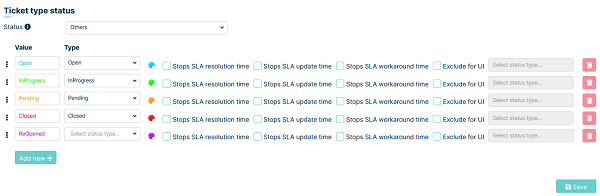
Those particular colors will be visible for Agent and Client in the ‘Dashboard’ view, on the list of tickets, in the ‘Status’ column.
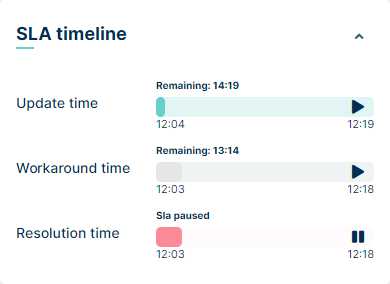
One of last thing in this part of the system is that for any of the statuses you can select ‘Stops SLA resolution time’ and ‘Stops SLA update time’. It means that when a Ticket enters this particular status (either automatically or manually when an Agent changes the status) SLA timer for this ticket (if there is a Service along with SLA attached) will be stopped. For example, if a status has the checkbox ‘Stops SLA resolution time’ checked
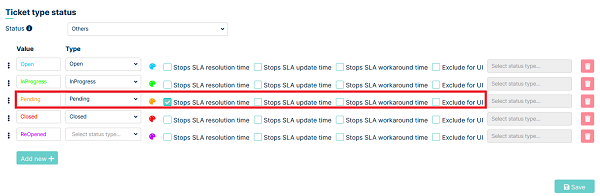
and the status of the ticket is changed, then the resolution time counter will stop
The last option is the ‘Exclude for UI’ checkbox. Checking this option means that the given status will be hidden from the available options on the ticket preview.
Once you finish, in order to save your changes, use the button.
When the button to save is pressed, the option to specify workflow statuses will be unlocked.
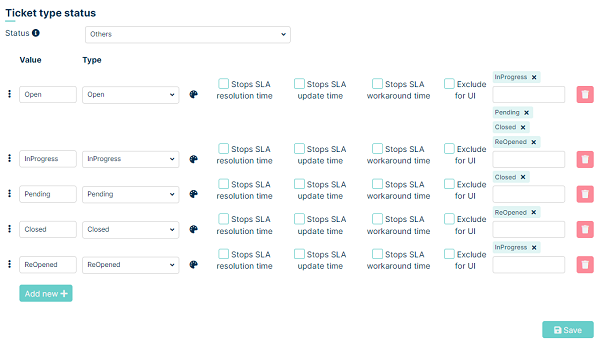
This configuration indicates that you can only go from open status to InProgress status. From InProgress status, you can switch to Pending, Closed and ReOpened.
Pending autoclose
In Pending Autoclose you can specify how much time must elapse for a ticket in this status to be closed. It is important that after a timeout, the system will automatically select the first status of type Closed from the list in Admin → Statuses, ignoring the settings in the Statuses Flow field. If there are several statuses of type Closed, the one highest on the list will be selected.
Lets configure the status for the selected ticket type
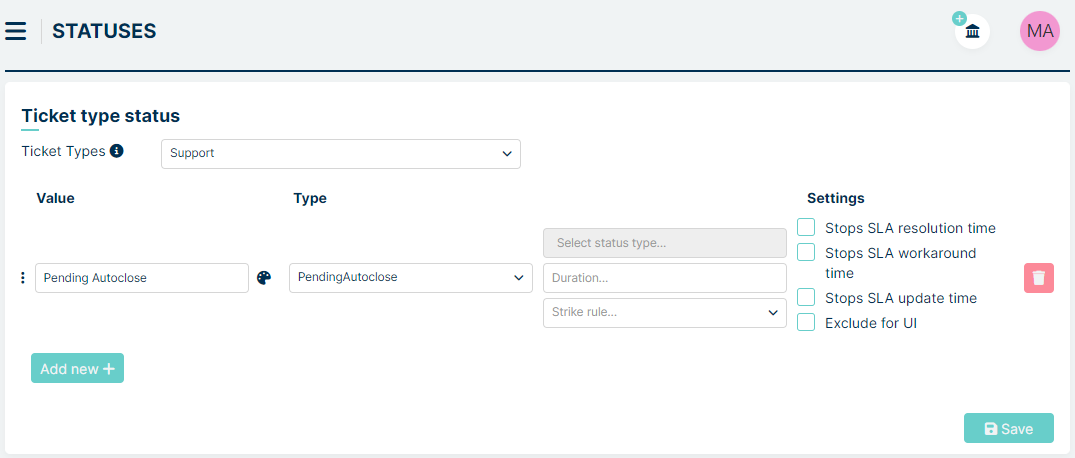
In the Duration field, we set the time that must elapse before the ticket is closed. You can set:
1m = 1 minute
1h = 1 hour
1d = 1 day
1w = 1 week
For example: 1w6h30m = 1 week 6 hours 30 minutes. Lets fill this field with 1 day (1d).

We are also able to establish Strike rules, which involve the configuration of notifications for this status as a certain amount of time elapses. To do this, first, we establish the configuration described in the Tickets → Strike rule section (click here to visit). Then we proceed to the Pending Autoclose status we want to set, and after clicking on the Strike rule dropdown menu, we select the configuration we have set.
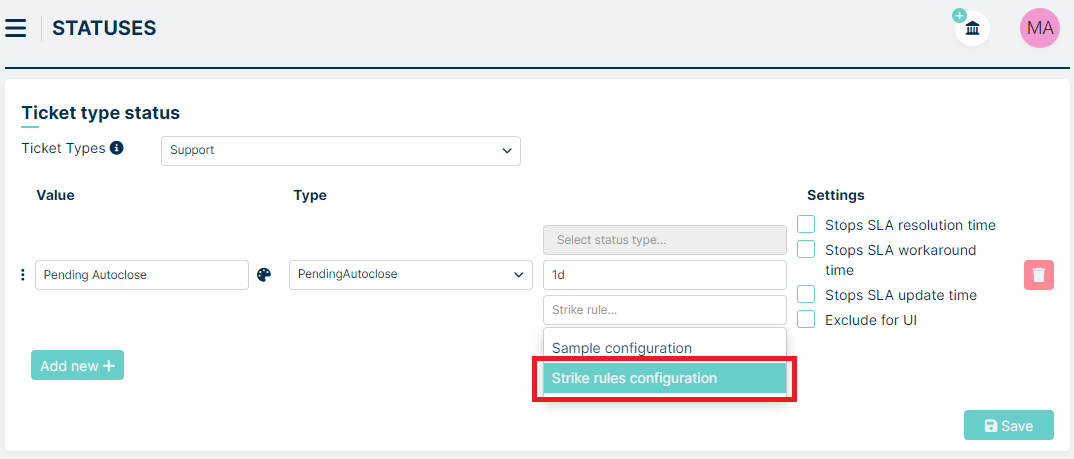
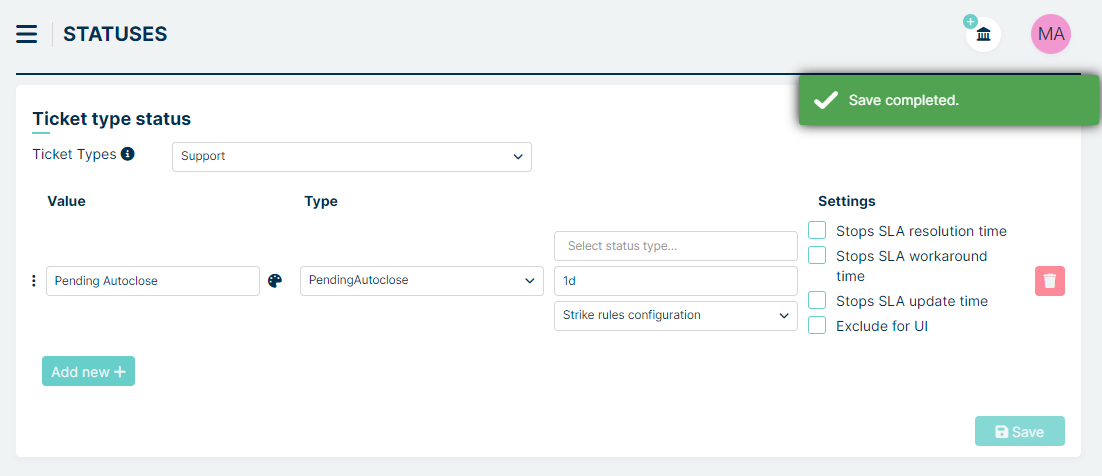
After clicking the button, the setting is saved.
When a ticket transitions to Pending Autoclose and its status isn’t changed within the predetermined time frame, the ticket will be closed automatically. Additionally, designated recipients will receive reminders according to settings in Notifications and based on the percentage of time elapsed, as configured in the Strike rule. For instance, if we’ve chosen a configuration with three notifications, they will be sent according to the following example schedule saved in Strike rule section:
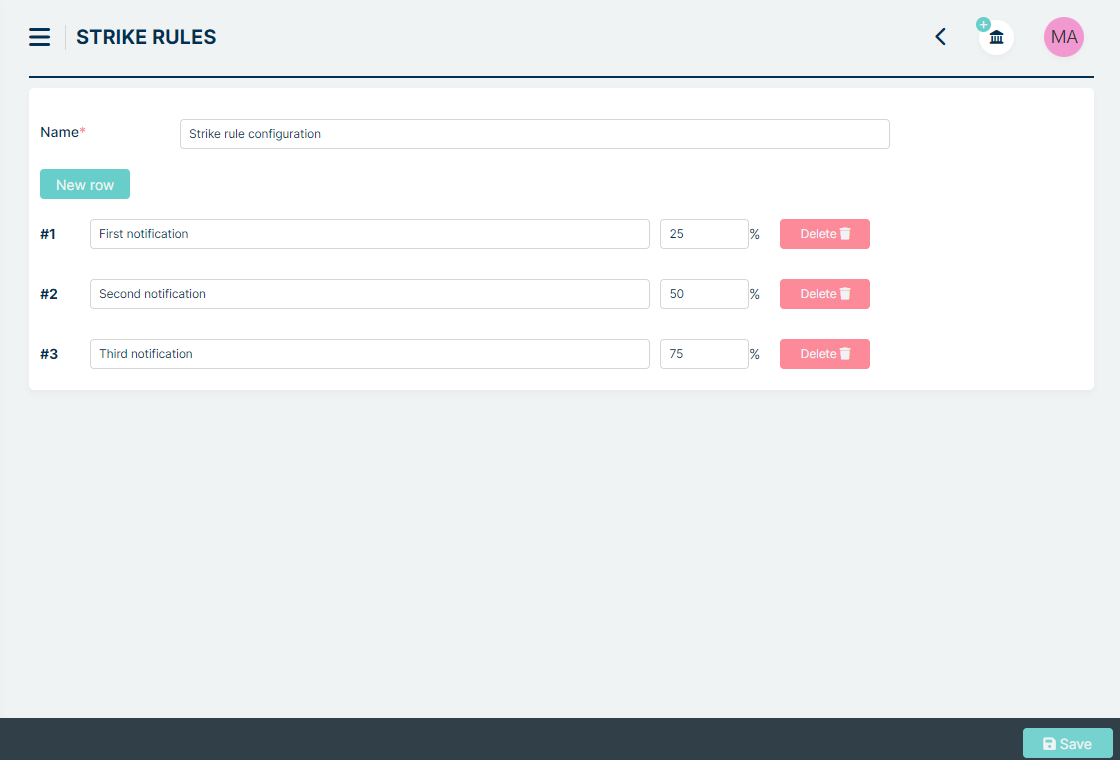
This means that reminders will be sent respectively after: • 6 hours (first reminder) • 12 hours (second reminder) • 18 hours (third reminder)
The notification configuration is described in the Notifications section (click here to visit).
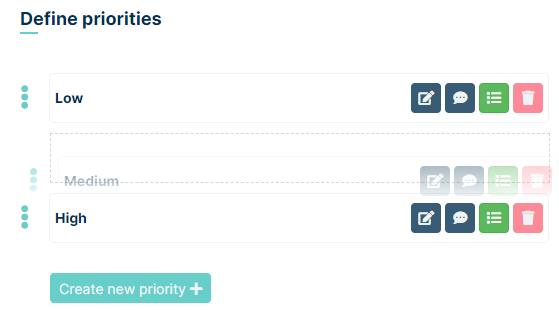
PRIORITIES
In this part of a system, you can add and manage all of the priorities which can be added to SLA rules.
If you want to change the name of the priority press the button.
If your priority needs a description, you can add one by pressing the button.
By pressing the  button, you can assign the appropriate priority to the ticket type.
At the bottom of this view, you will find one button  . It is
used for creating and adding a new priority to the structure. Once you
click on this button a new position will appear right below the last one
already existing.
. It is
used for creating and adding a new priority to the structure. Once you
click on this button a new position will appear right below the last one
already existing.

Now, you only need to type the right name for this queue. If you want to
delete the name of the parameter you’re creating, click on the
 button.
To delete any of the positions use the button on the right
side.
If you want to save your changes, make sure you are done with everything
and use the button located in the bottom right corner of the
view.
Changing the order the priorities are displayed is done in the same way
as it was in the Queue section. Just use the button and move
(drag & drop) the desired priority to the new place.
TICKET NUMBER FORMAT
In this place, you can set up your unique Ticket number pattern.
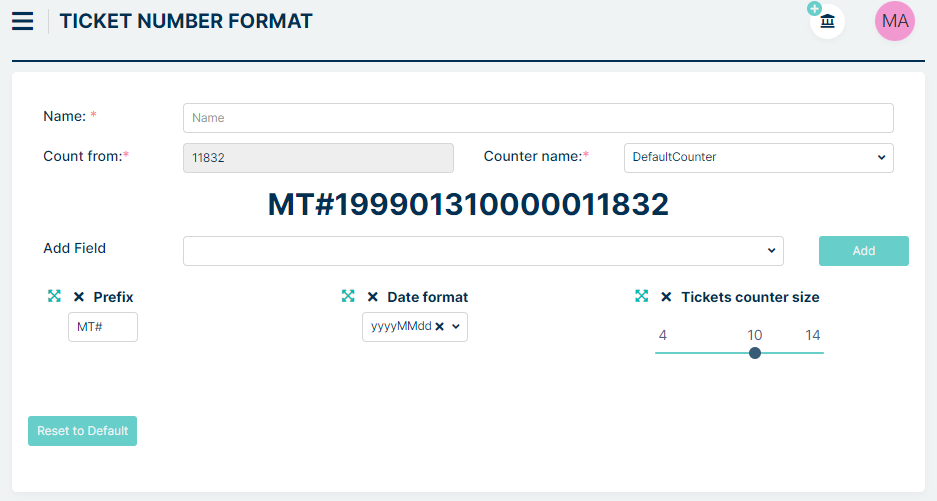
The ticket number is built from a couple of parts, which you can easily change:
Name: This is where the admin enters the name of the ticket number format
Count from: This field shows at which number the countdown will start, which is configured in the Ticket number counter tab
Counter name: In this field, the admin selects one of the options created in Ticket number counter tab. A preview of the selected option can be found in Count from
Prefix: a unique identifier for your company, for example for Mint it can be MT or MINT
Date format: means date when the ticket was created, for example in year/month/format
Tickets counter size: means how long the ticket counter should be. Please take notice that this number will be incrementing from 1 to xxx (the newest ticket) and it will not be reset each day. When you notice that the pull of available numbers is close to ending you can change it simply by changing the value of the Ticket counter size.
In addition to these three fields, you can add two more by selecting them from the list and then clicking  button. Additional fields:
Pin: In this field you select how long you want the pin to be. The possible length starts at 4 and ends at 10. These numbers are a random number.
Separator: Here you can add a separator consisting of three values. There can be special characters like ‘/’, ‘-’, ‘|’ etc. You can add up to 6 separators to your configuration.
When you make too many changes and want to go back to the default settings just press the  button.
Also, at any moment you can look how the Ticket number would look like. Each time you make any changes it will be changed in real-time to show you the final result.

TICKET NUMBER COUNTER
This section of the system shows all created Ticket number counter. To add a new counter, press the button.
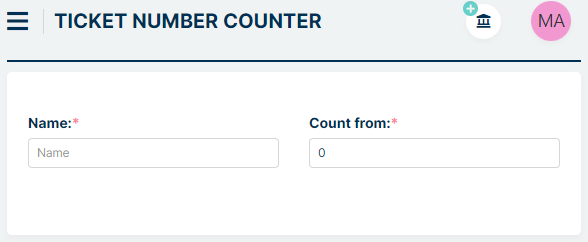
Two fields must be completed on this view:
Name: This is where the admin enters the name of the ticket number format
Count from: In this field, the admin determines at what number the request number will start counting down.
To complete the counter configuration, press the button.
CUSTOM FIELDS
TICKETS STRUCTURE
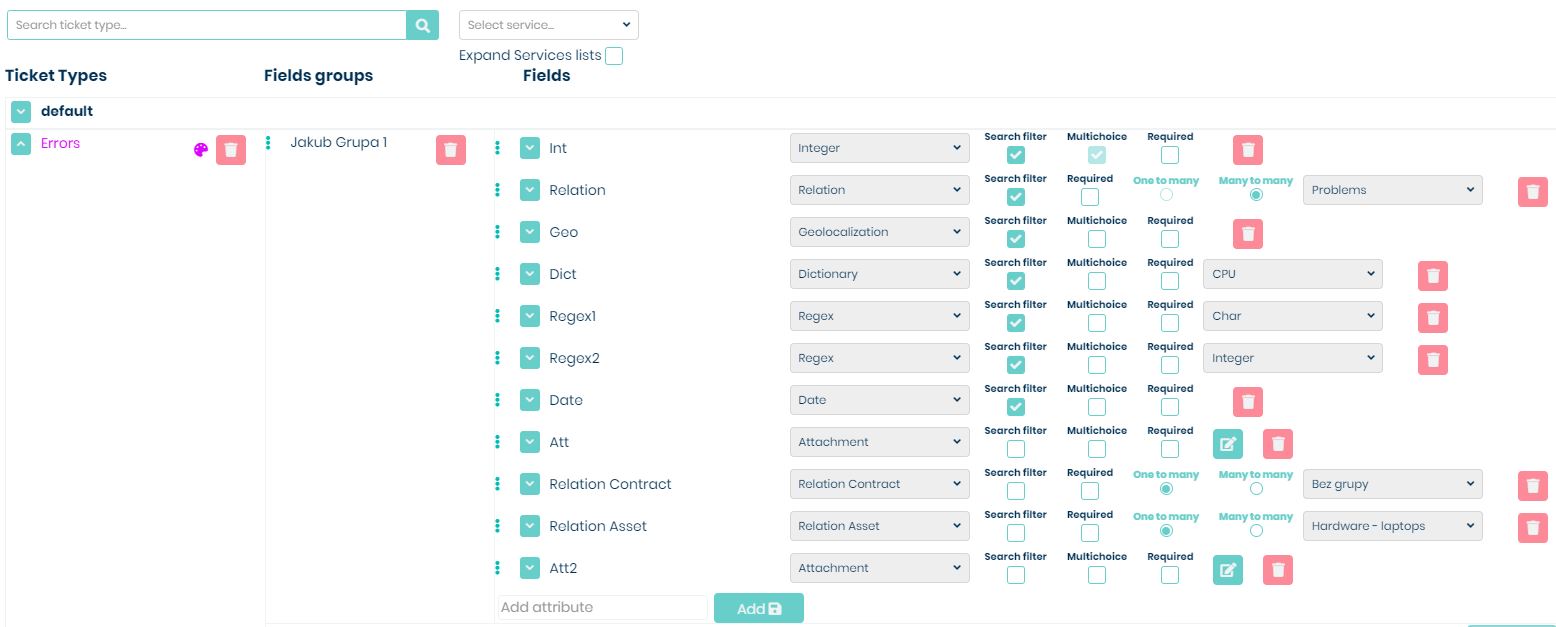
Here you can customize the whole structure for Ticket Types along with its groups of Attributes and single attributes.
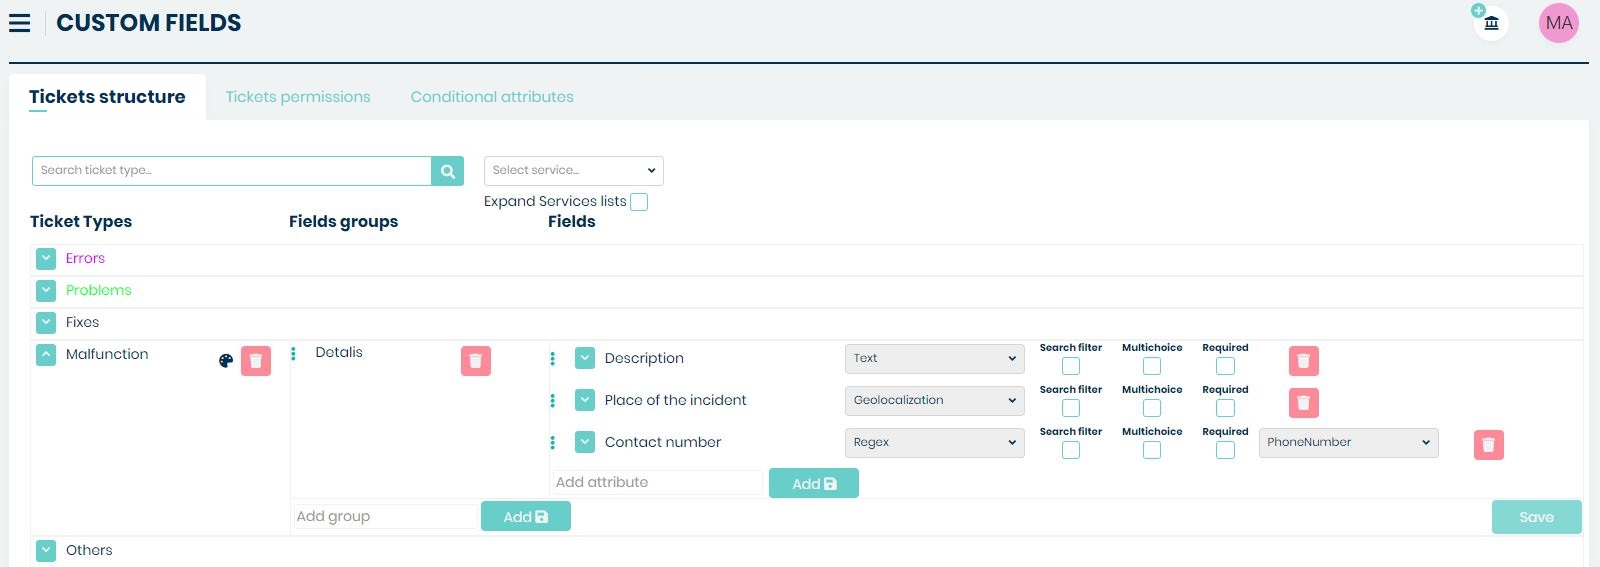
By default, the content of each Ticket Type is hidden and you only see the Ticket type name.

If you want to see the full content of a Ticket Type you need to click
the  button, located on the left side of the ticket type name.
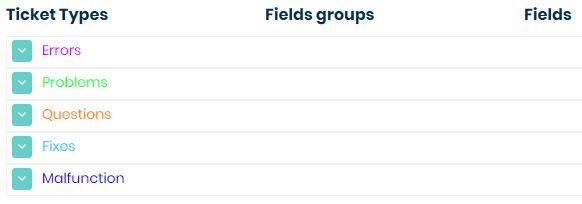
Ticket types
You can create different ticket types like “Question” or “Complaint”, ‘1st level of support’ and also types for ITSM processes like: “Service Request”, “Incident”, “Problem” and “RFC” (Request For Change).
To add a new Ticket type just click on the empty field ‘Add ticket name’, type the desired name, and hit ‘Enter’ on your keyboard.

You can also look for a specific Ticket type by using the search field. Just type the name of the ticket Type you’re looking for and hit ‘enter’ on your keyboard.

To select a service, press the  button. Then the whole list of services
will be displayed, just select one of them.
button. Then the whole list of services
will be displayed, just select one of them.
To expand services on a ticket type press the checkmark next to ‘Expand Services lists’.
Effect before selection:
Effect after selection:
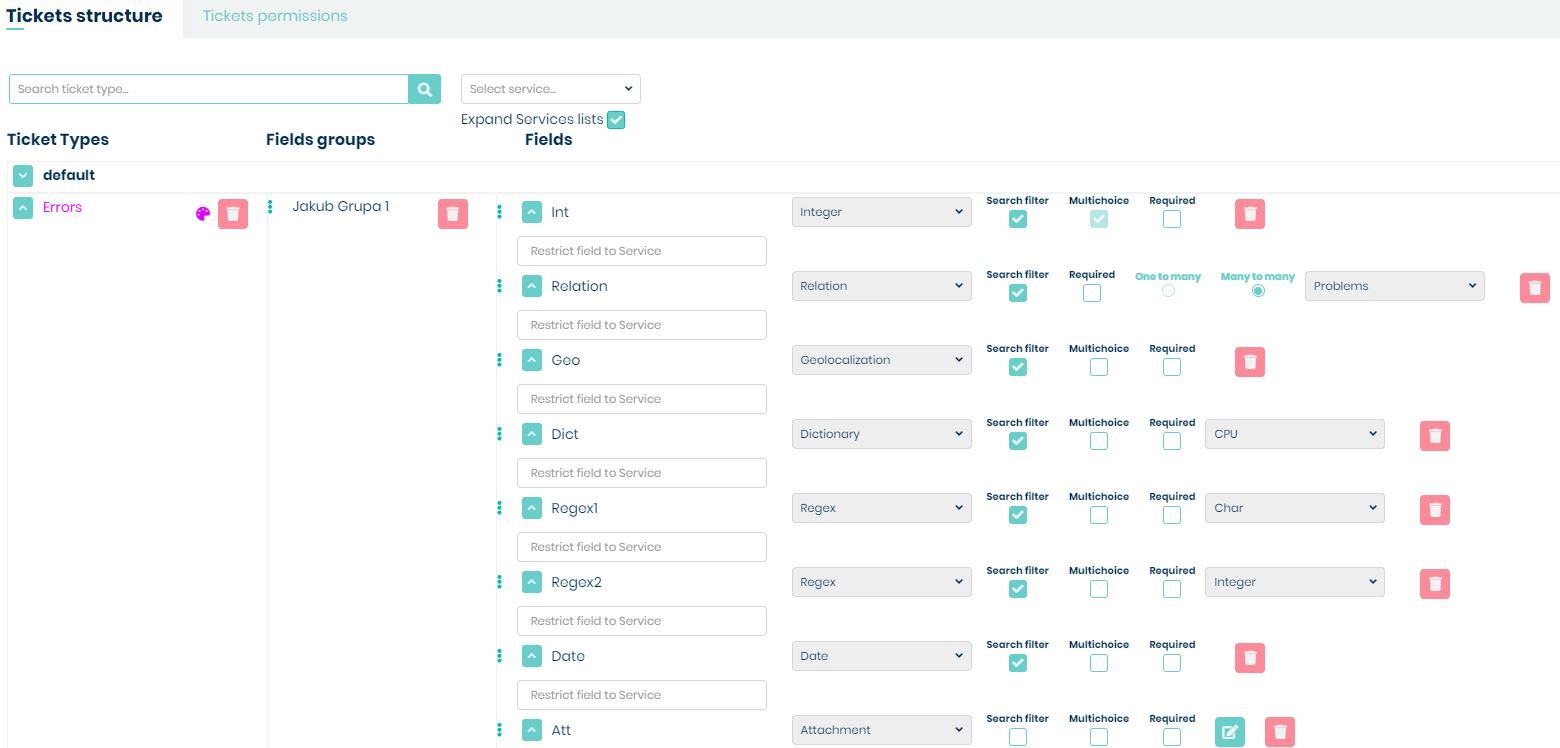
You can now restrict the field for the service of your choice by clicking on the  button and selecting the appropriate service.
If you want to rename already existing ticket Type just click on its name, make some changes and click Enter.
If you want to remove it just click on a trashcan icon located
on the right side. In the new window, you will be asked to confirm the
action.

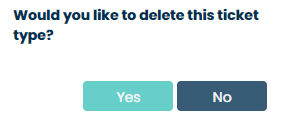
Click ‘Yes’ and the Ticket Type will be removed. Remember that deleting a ticket type means also deleting all custom Groups of attributes and single attributes that you have added to this Ticket type.
For each ticket type, you can also select a custom color. Click on the
button to open a small window where you can choose a desired
color from the palette.
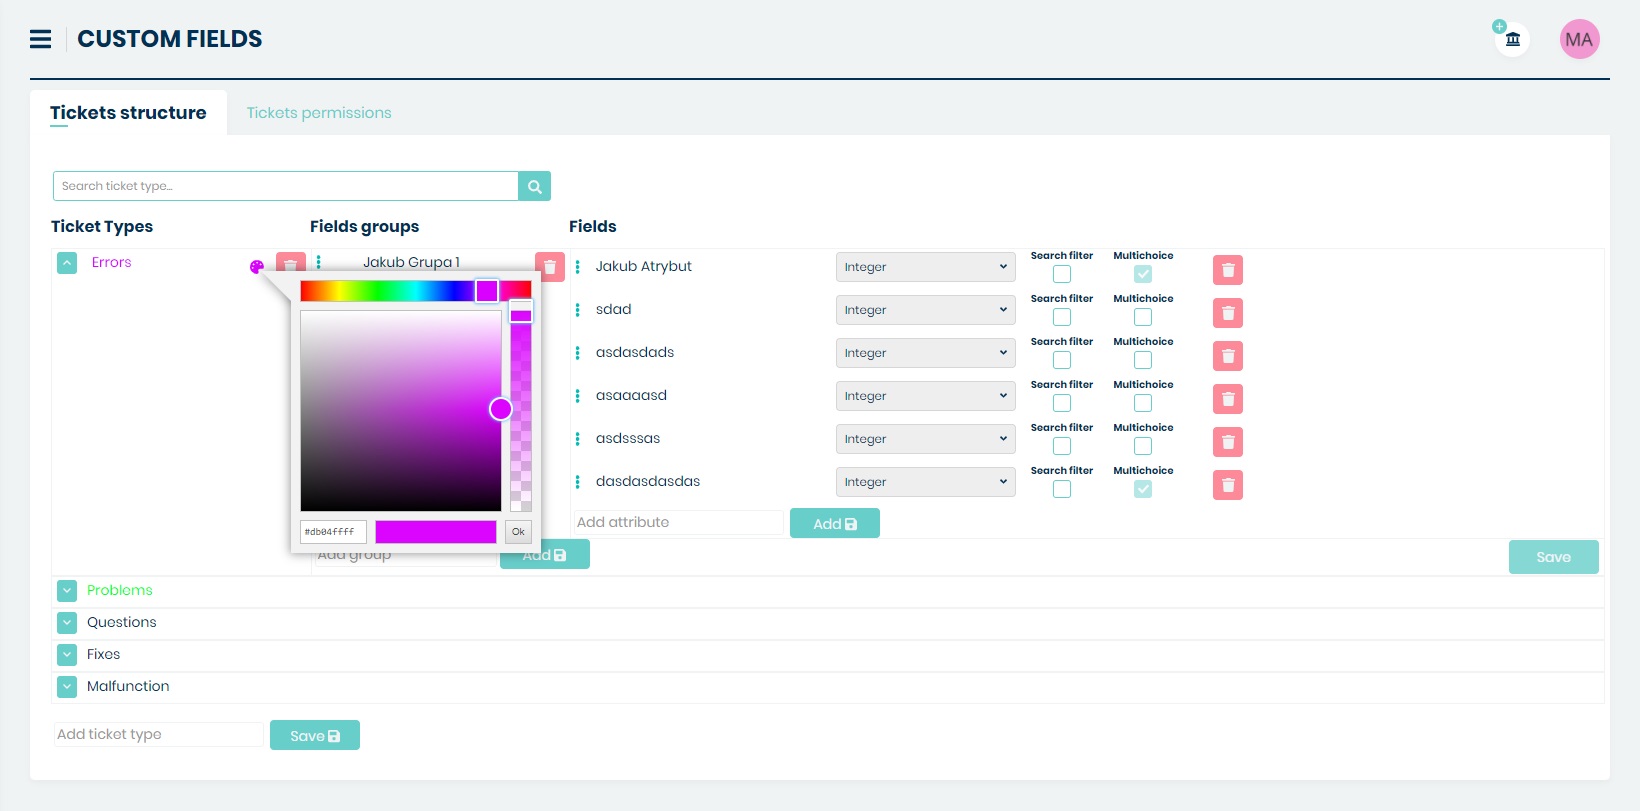
Now repeat that for each ticket type and as a result, you will have colors for each ticket type.
Groups
Creating and editing groups works almost the same as it is for Ticket types. In order to create a new group click on an empty field ‘Add group’ and type the desired name.

Now click enter on your keyboard. Try to save the changes by clicking
on the right side of the screen. You will see information
saying “Group must have at least one attribute”. Before you’ll be
able to save a group you need to create at least one attribute.

To change the name of the group just click on it, type a new one, and accept the change by clicking enter.
To remove the group use the trashcan icon on the right side.
Please notice that along with a group you will delete attributes that
are inside this group.
Fields
Those fields are called attributes that you will use to add detailed information for your tickets. Each group must have at least one attribute. Without it, you won’t be able to save a new, fresh group.

Adding and modifying attribute name as well as removing the whole attribute works the same way as for ticket types and groups.
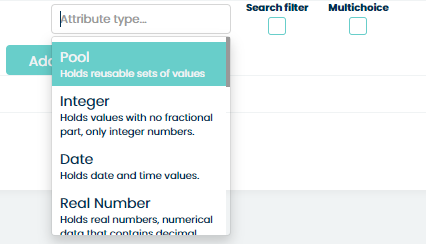
However, after typing and accepting a name for the attribute you will have to choose attribute type, decide if you want to be able to search by this attribute in the list of tickets (‘Search filter’ check-box) or be able to select more than one value of the attribute (‘Multichoice’ check-box).

MINT Service Desk includes a lot of different types of attributes. While selecting ‘Attribute type’ you can choose it from the long list.
The available types are “Pool”, “Integer”, “Date”, “Real Number”, “Text”, “Relation”, “Date Scope”, “Num Scope”, “Geolocation”, “Text Area”, “Attachment”, “Radio”, “Checkbox”, “Label”, “Hypertext”, “Existing” “Subscribed Receiver”, “Regex”, “Dictionary”, “Relation Asset”, “Relation Contract”, “Relation Company” and “Relation User”
POOL
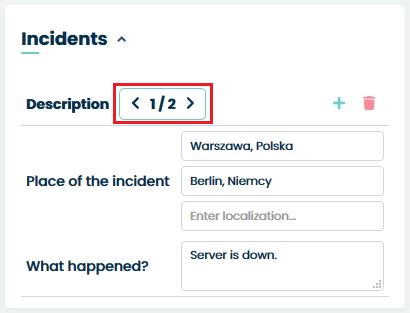
With ‘Pool” you can create more than one (as many you want) small groups of attributes.
For example: if you want to be able to add additional information (Place of the incident and incident description) about more than one incident, you can add a new attribute, rename it to ‘Description’ and mark ‘MultiChoice’, then select ‘Pool’ from the list of available types.
Now add two attributes, name them ‘Place of the incident” and ‘Impact level’ and as a type choose ‘Geolocalization’ and ‘Text area’.
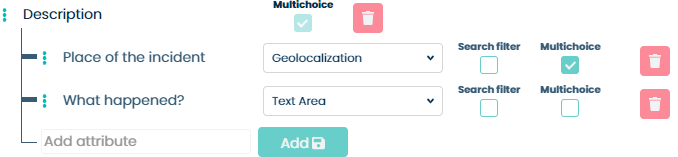
Now if the user (Agent or Client) will see the following attributes allowing to add incidents description one after another.
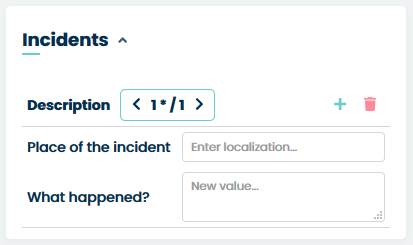
To add another (second/third etc.) incident just click the  button and a new empty page will be opened allowing you to type those
attributes once again but this time for the second incident. You can
also delete any of them with the
button and a new empty page will be opened allowing you to type those
attributes once again but this time for the second incident. You can
also delete any of them with the  button.
If you want to move between those ‘incidents’ use the navigation options
 .
.
INTEGER
This type allows you to enter an integer number which is the number without fractional components. For example, 1, 6, 77, and not 1.2, 6.5, 7.6.
DATE
This type allows you to enter an date. The value will be displayed in the format “dd.mm.yyyy hh.mm”.
If you do not want hours and minutes in your date field then press the  button and check the “No Time” checkbox.
REAL NUMBER
This field allows you to enter a real number which is the number wit fractional components, for example, 1.44 or 23.95.
If you want your number to have more numbers after the decimal point, for example, 5, then press the
button and enter the number you want in the step field.
TEXT
With ‘Text’ you can create a simple field where you can add some text
(however with limited space to show). Remember that, unlike when using
the ‘Text area’, you will only have one line available for your typed
text to be displayed. In this field, you can additionally specify the
maximum allowable number of characters a user can enter. Simply click
on the button and set a number between 1 and 150.

RELATION
With “Relation” you can create an attribute related to a Ticket type or Asset Category.
If you add a ‘Relation’ type attribute while creating the structure for Ticket Types (Admin > Tickets > Custom fields > Tickets structure) you will have to select one from already existing Ticket Types.

If, on the other hand, you add a ‘Relation’ type attribute while creating the structure for Assets categories (Admin > Assets > Assets definition > Assets structure) you will have to select one from already existing Assets categories.

Also, while doing that, you can select one of two available types of relations:
One to many
Many to many
DATE SCOPE
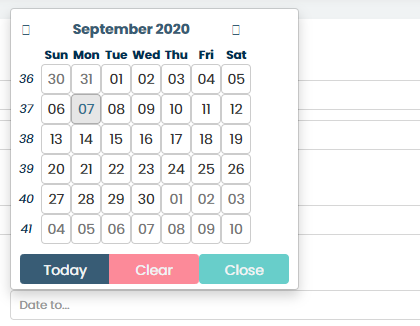
This type of field allows you to create a date range like: “Date from” and “Date to”. You can specify each of those dates with a simple calendar.
NUM SCOPE
This type of field allows you to choose a value from the defined range.

You won’t be able to save any changes until you specify all of the
information: minimum and maximum value, as well as a ‘Step’. To do that
click the button. Now, in the new window define those values
and click .
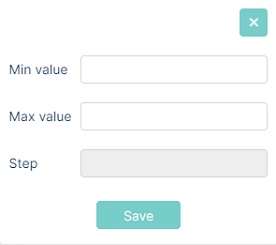
After you do that a user (Agent or Client) will be able to select one particular value from the value range with a 1by moving the selector to the left or right.

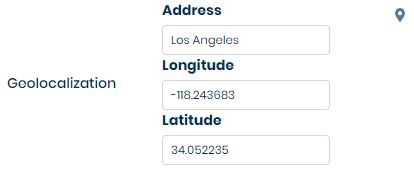
GEOLOCALIZATION
This type of field allows you to define locations by longitude and latitude. The user (Agent or client) needs to type the name of a place in ‘Address’ field and enter the longitude and latitude in the following boxes.
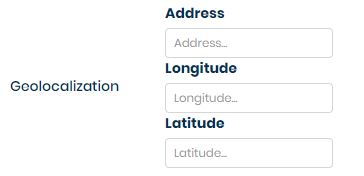
Example, I want to write down the address to Los Angeles:
Then he will be able to either click on  to be directed to
Google Maps webpage with information about this location.
to be directed to
Google Maps webpage with information about this location.

TEXT AREA
With ‘Text Area’ you can create a large field where you can add some text - more than just one line. A text area can hold an unlimited amount of text.

Also, you can enlarge this field, just grab the right bottom corner and drag it down.
ATTACHMENT
If you want to attach an attachment to your application you can do so in the Attachment field.
The initial extensions are: pdf, doc, docx, odt, rtf, txt, jpg.
If you need more extensions then it can add it at the press button.
RADIO
The radio field consists of a true/false selection.
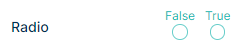
Remember that you can only select one option. It is not possible to select true and false at the same time.
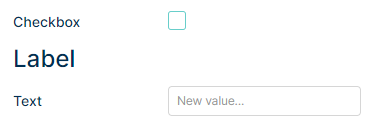
CHECKBOX
This field is used to add a checkbox type field to the configuration.
By default, this field is unchecked. If you want the checkbox to be
checked from the very beginning you can change this by pressing the button.
LABEL
If you need a separation between two custom fields then use the Label field.
If you need a different font size then press the button. You can choose from these sizes: 12, 14, 16, 18, 20, 24.
HYPERTEXT
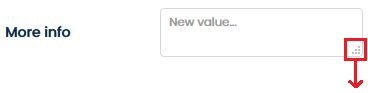
In this field you can store any kind of hyper text like URL, Path and others. Any text you write in this field will be converted to hypertext.
Type any text in field:

and you will have it in format like below

You can click on hypertext and will be redirected to specific page (if exists).
EXISTING
This field inherits all properties and value from another custom field in the ticket type that field belongs. To do it, the attribute that we want to inherit must have selected checkbox “Shared”.

Let’s make an example. We want to make attribute with type: “Existing” and inherit attribute properties like on picture above.
First create new attribute named for example “Existing” and choose correct type. The new field “Pattern…” appear

Click on it and you will see the list of available attributes (with “Shared” checkbox selected) that you can inherit

Choose the attribute you want from the list and save. Your existing field has from now the same attribute type and the same values. In our exmaple, Existing attribue has “Dictionary” type with “Computer types” dictionary assigned. If Agent or Customer will change any data in one of this field in ticket details and save, the other field will also iherit the changes, like on picture below
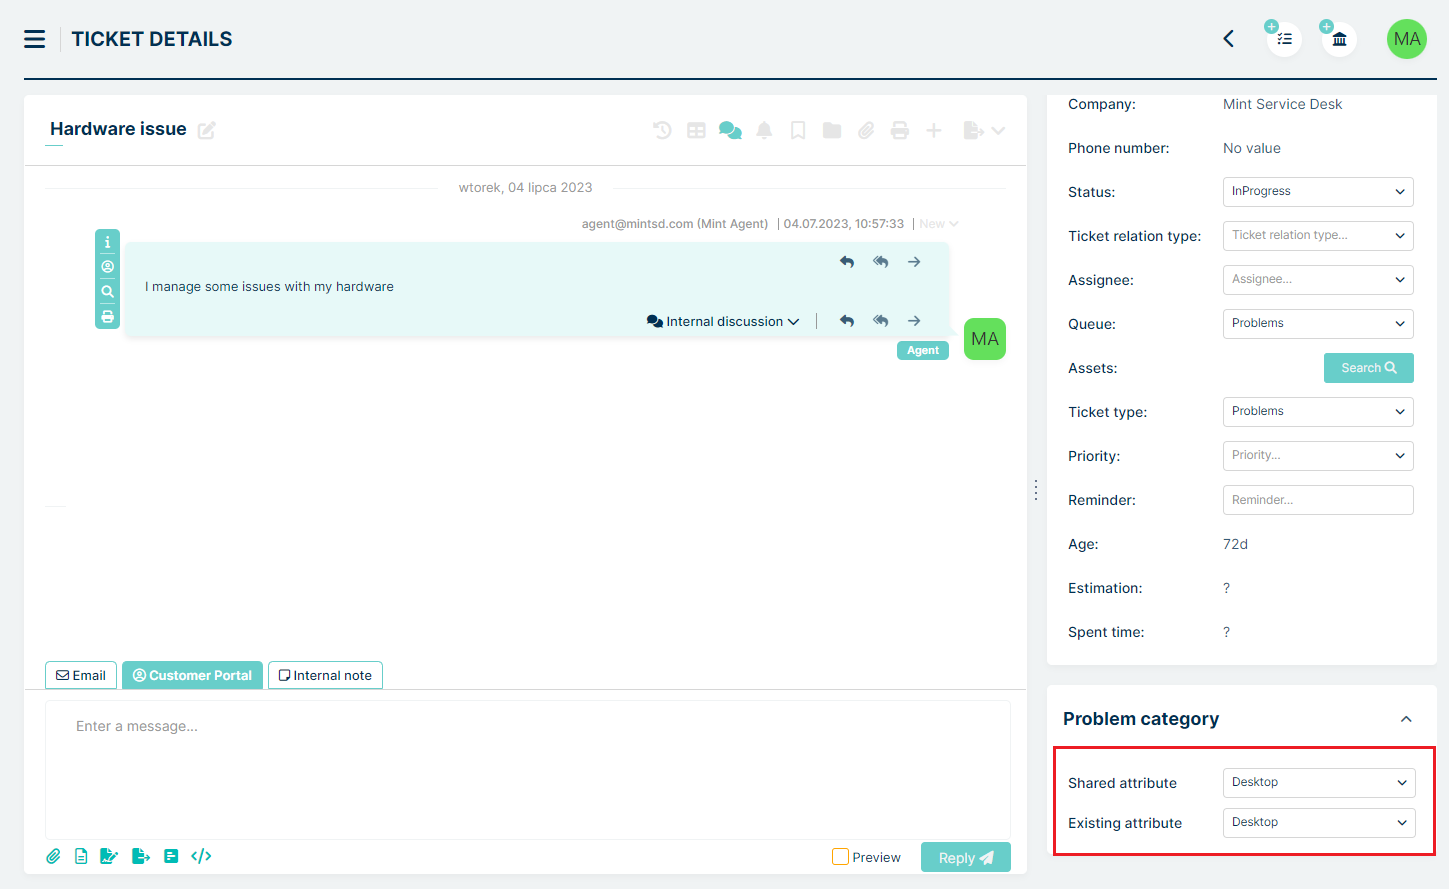
You can choose any other attribute types like “text”, “date” etc.
COUNTDOWN
Countdown field displays in the ticket details how much time remains between two dates. These can be values from “Date” type field or system values (such as Ticket Creation Date).
To configure this field, add it to the chosen ticket type and click the button. The following modal appears:
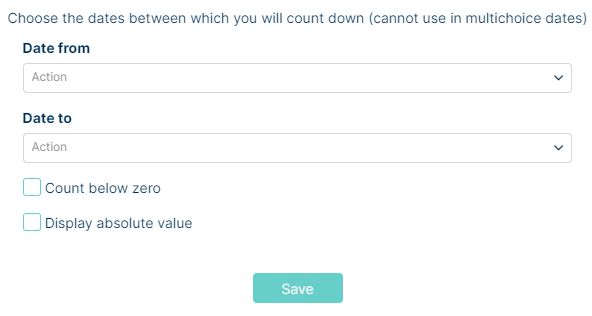
Date from - Here we can select: “Now”, “Creation Date”, “Modification Date” or assign a value from a custom field of type “Date”
Date to - Here we can select: “Creation Date”, “Modification Date” or assign a value from a custom field of type “Date”
Count below zero - Check this box if you want the field to also show negative values, e.g. when the end time has already passed
Display absolute value - Check this box if you want the displayed values to be non-negative
Let’s enter some example data. Suppose we want to display the remaining time to a specific deadline date in each ticket.
We configure custom field Date type:
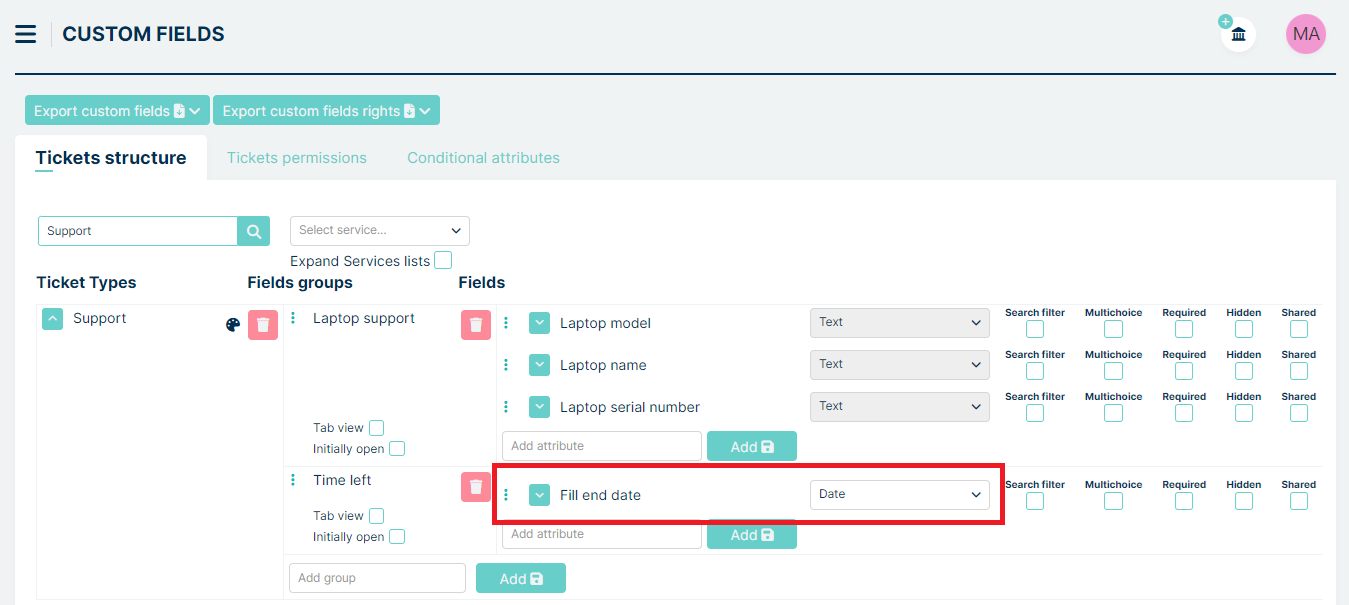
Next, we add a Countdown field
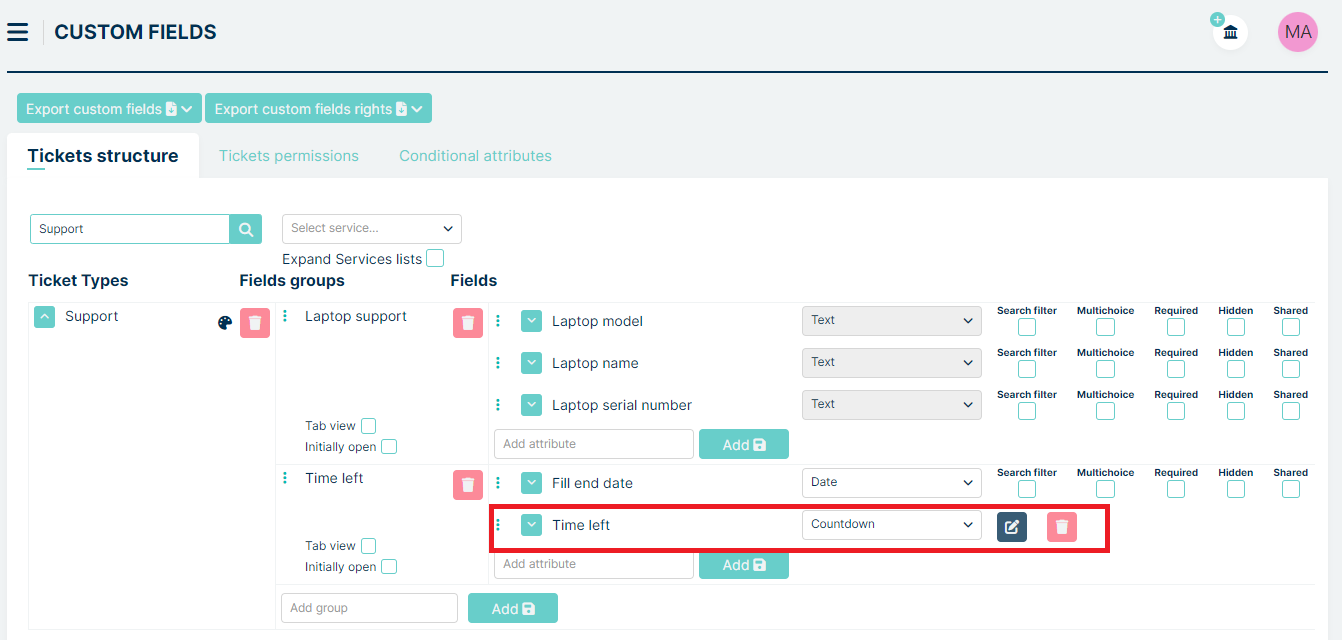
click , then assign “NOW” in the “Date from” and a custom field Date type in the “Date to” field.

Finally, we save the entire configuration.
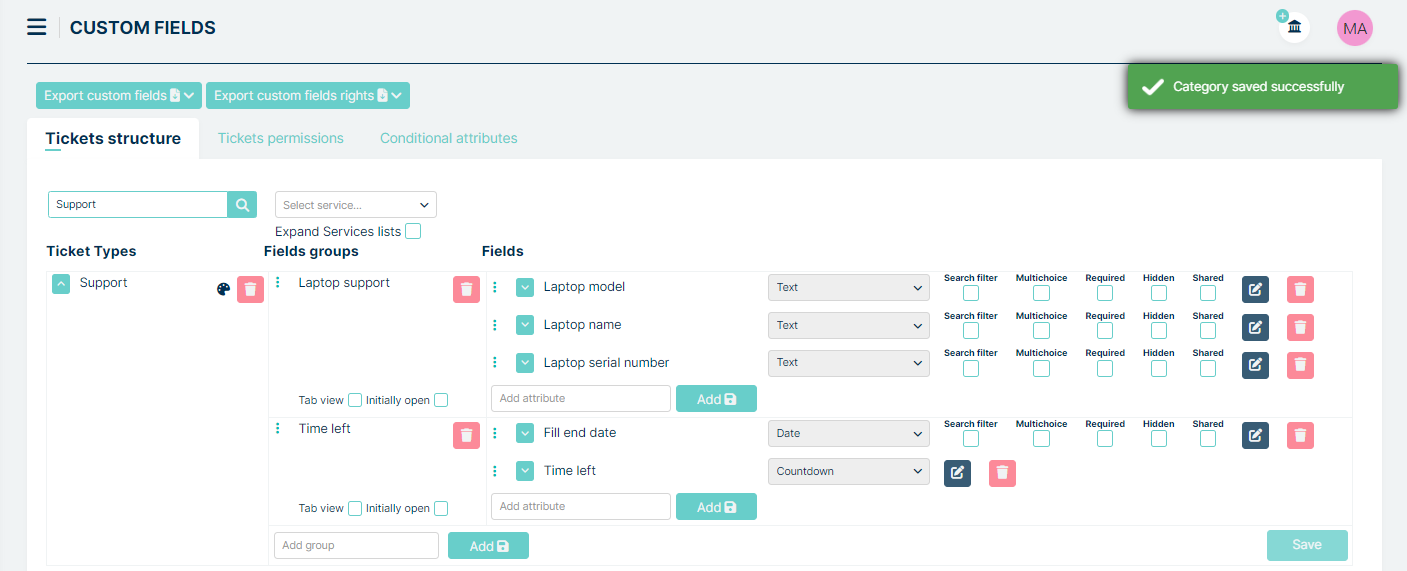
Next, we grant the agent permissions for the ticket type and the created fields. The agent then creates a ticket, filling in the “Date” field with a chosen future date.
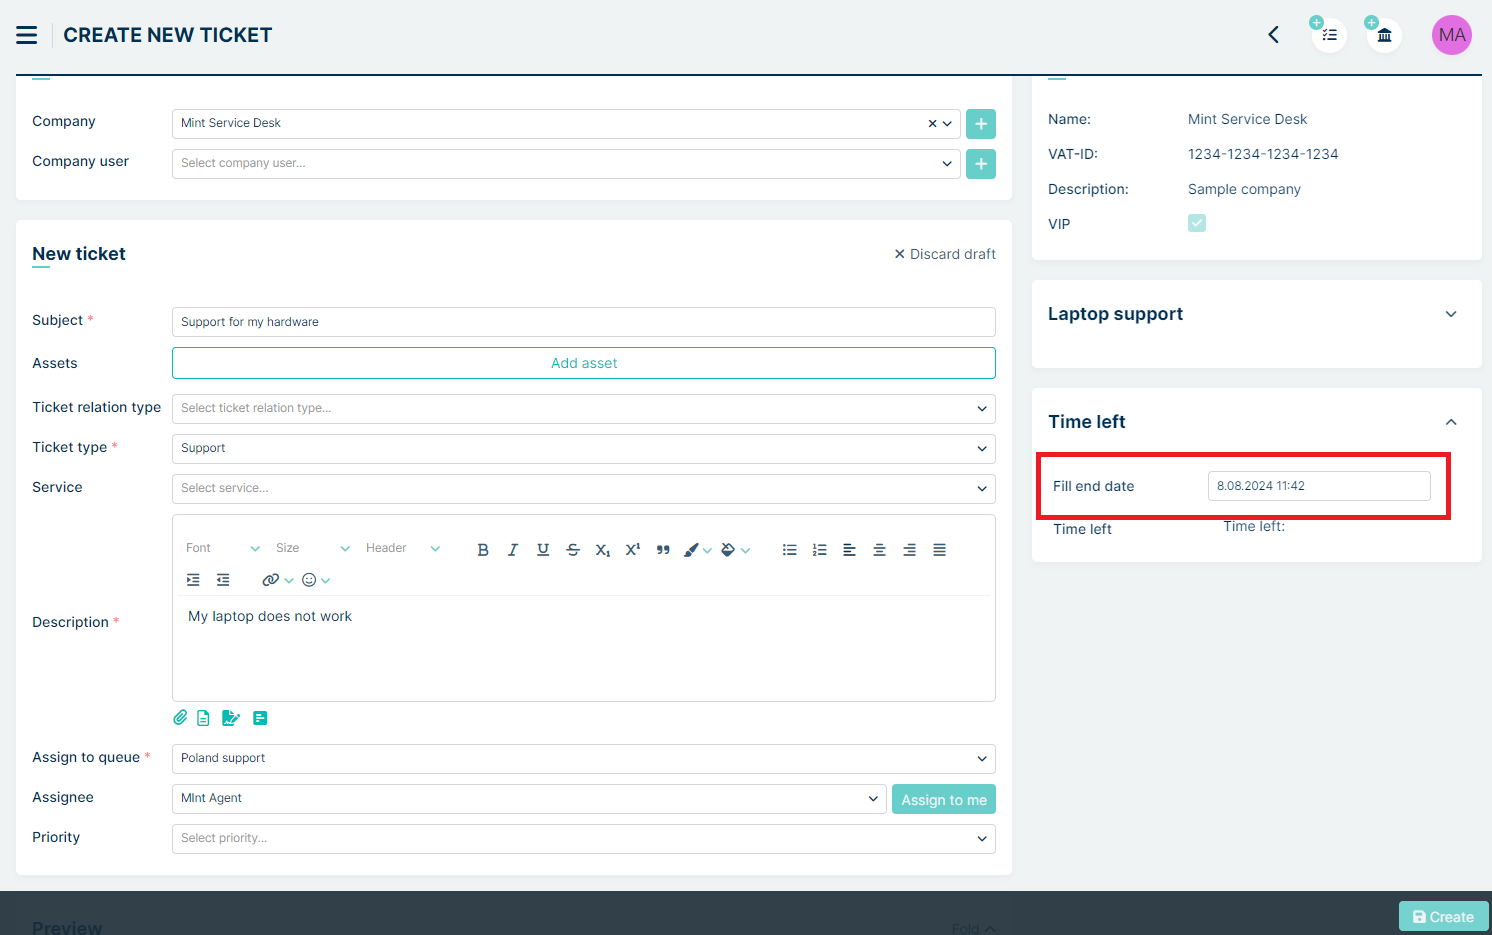
After creating the ticket, the Countdown field displays the time remaining until the selected date.
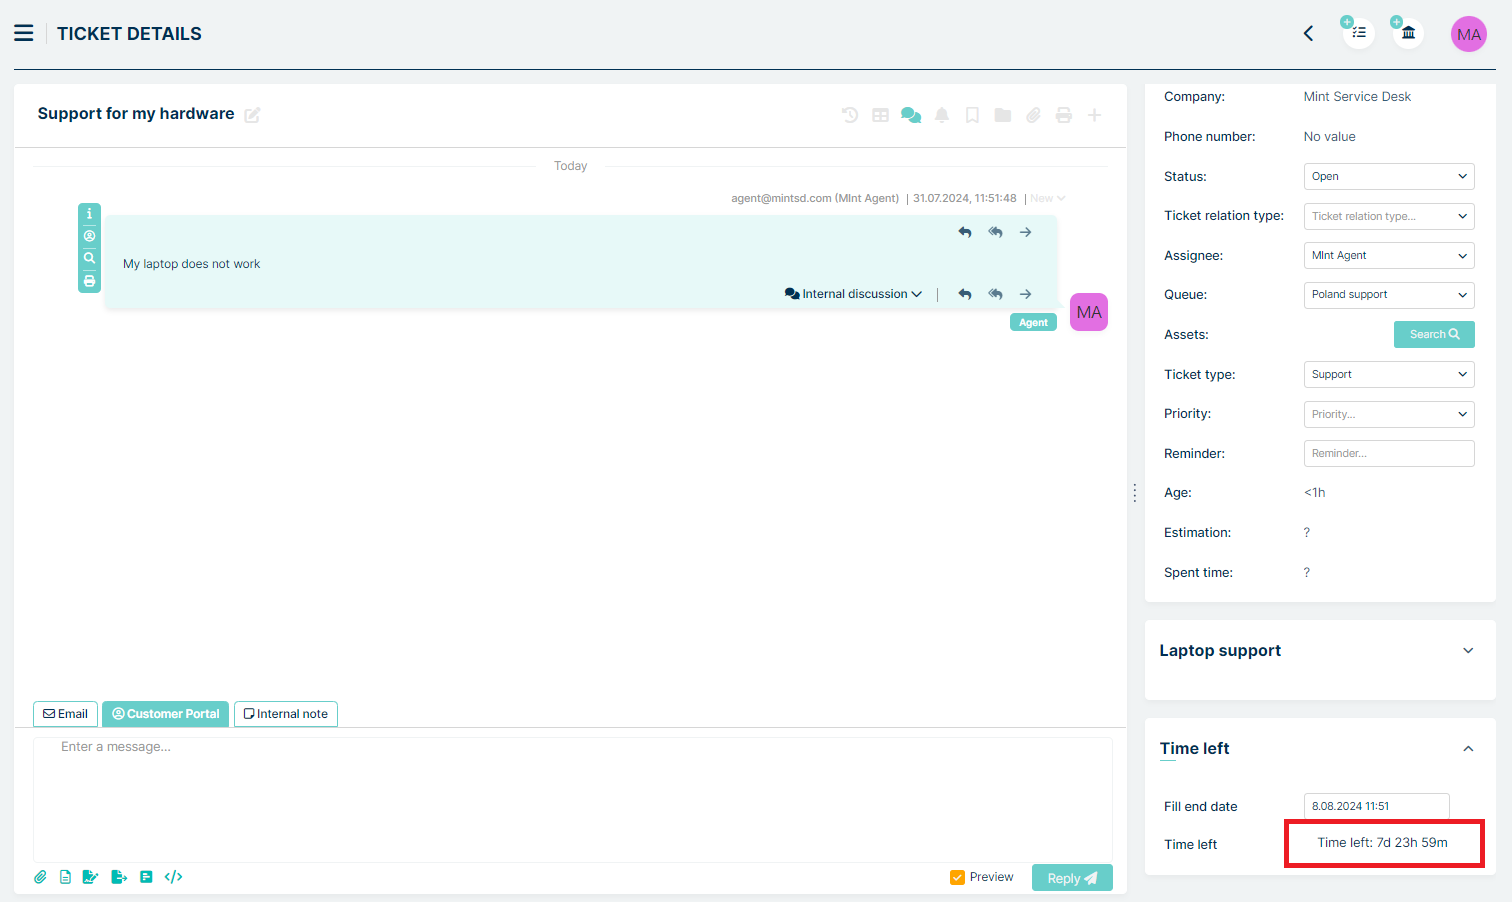
This field can also be displayed on the dashboard. To do this, an agent can add it as an additional column, or an administrator can set this column a default in the Searchable Columns under Settings -> General -> Tickets -> Ticket search default settings.
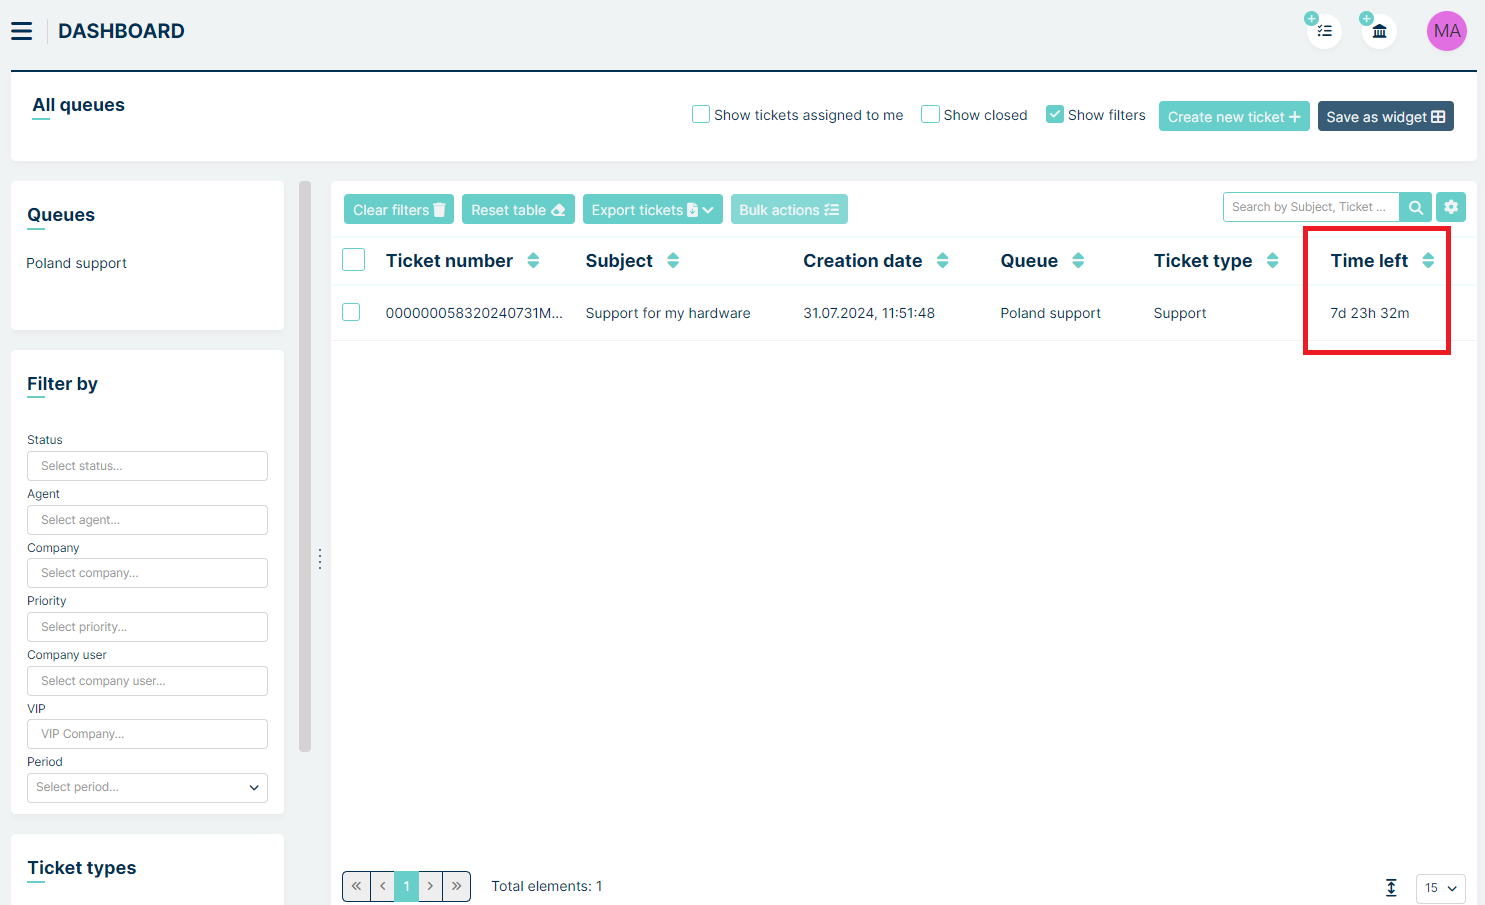
SUBSCRIBED RECEIVER
This field is used to subscribe to a particular application. This field consists of two fields Language and Email address.
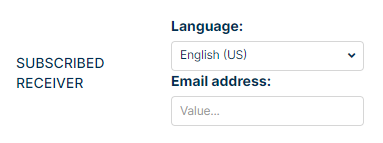
In the former field, you select which language you want the notification to be sent in and in the latter field you enter the subscriber’s email so that he/she will receive the notification.
Remember that for the field to work you must add the ticket.subscribed.reciever field to the selected notification in the Receivers field.
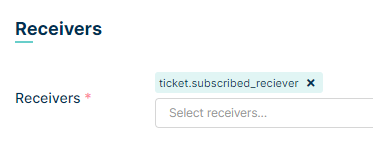
REGEX
With this type, you can choose one of the regexes defined, and then while filling the value it has to match the regular expression defined in the selected regex.

For example, if you choose ‘email’ Regex, a user (Client or agent) will have to type the correct email address.
DICTIONARY
This option refers to the dictionaries which can be added and configured in the “Dictionaries’ section. It takes a value from a predefined list of elements like a list to show in a dropdown field.

In the following example, we have chosen a custom-made ‘Software types’ Dictionary.
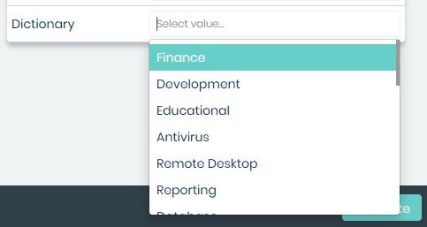
Now the user (Agent, Client) has to choose the desired position from the list. He is able to do this either while creating a Ticket in ‘Create new ticket’ view (if he chooses a ticket type that has a ‘Dictionary’ type attribute) or (if he has the appropriate rights given by the admin) in ‘Ticket Details’ view. Also, you can do this as well when creating (or editing) an asset if the Dictionary type attribute is attached to the selected Asset category.
If you want to allow the agents to add new dictionary values while creating or editing a ticket, click the
button, and then check the checkbox Adding dictionary values.
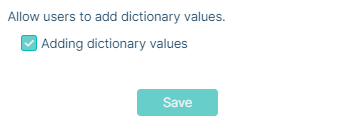
Remember that agent role should have enabled “Expanding dictionary values” option by Admin in Users -> Roles
From now on, the agent has the ability to add new values to the selected dictionary.
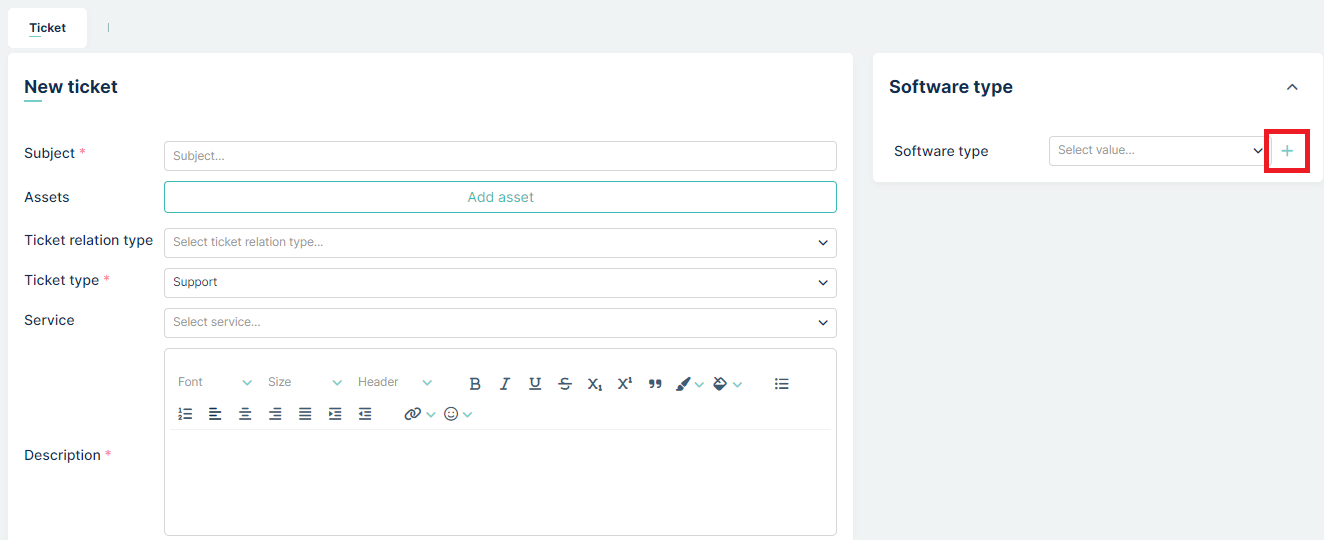
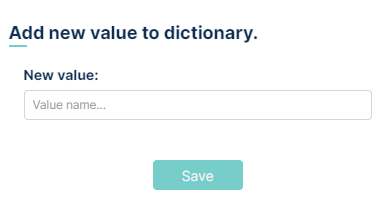
RELATION ASSET
This field is used to determine the relation to the asset. After selecting this field as in the case of a regular relation, it is possible to choose between two:
One to many
Many to many
Then, in the Pattern field, you select what you want the relation to be for.
RELATION CONTRACT
This field is used to determine the relation to the contract. After selecting this field as in the case of a regular relation, it is possible to choose between two:
One to many
Many to many
Then, in the Pattern field, you select what you want the relation to be for.
RELATION COMPANY
This field is used to determine the relation to the company. After selecting this field as in the case of a regular relation, it is possible to choose between two:
One to many
Many to many
Then, in the Pattern field, you select what you want the relation to be for.
RELATION USER
This field is used to determine the relation to the user. After selecting this field as in the case of a regular relation, it is possible to choose between two:
One to many
Many to many
Then, in the Pattern field, you select what you want the relation to be for.
TICKET PERMISSIONS
The second tab is the place where you manage rights for viewing or editing Ticket information. You can do this separately for each Ticket Type you currently have.
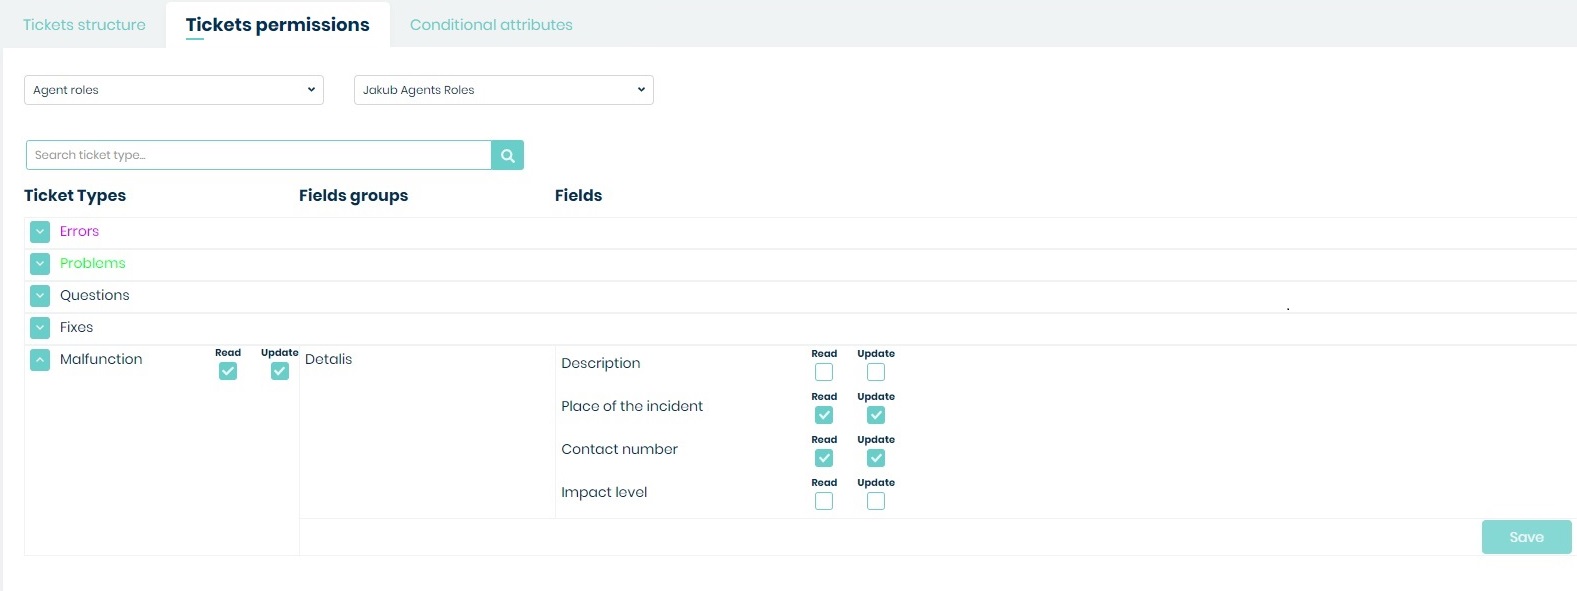
If you want to change rights, first you need to select one position from the list of available General types of roles.
They can be e.g., ‘Agent Roles’ (if you have more than one created in Admin > Agents > Roles section) or ‘Company Roles’ (located in Admin > Companies > Company Manager section.
After you do that, from the second list you need to select a particular type of Role for which you want to change the rights.
The screen below shows the situation when we’ve decided to select ‘Agent roles’ and then one particular role: ‘Service Desk Agent’, which means that we will be able to change the rights for this particular role.
Now we can change the rights by selecting some check-boxes located on the right side of each Ticket type. Please notice that you can also select/remove right for each Attribute as well.
There are two types of rights in the Mint Service Desk:
Read – allows the user only to view the content of the Tickets
Update – allows the user to make changes in the content of a Ticket. For example, Agent will be allowed to answer the client (to create a message in the communication section)
Please notice that when you select the ‘Read’ it will be selected, but the ‘Update’ will not be selected.
However, when you select ‘update’ it will also select ‘Read’. Update means that you can view and change the content of a Ticket.
Once you finish making the changes, you need to click button,
otherwise, when you try to leave this part of the system it will inform
you that you have some unsaved changes.
CONDITIONAL ATTRIBUTES
In this part of the system, you can configure conditional attributes.
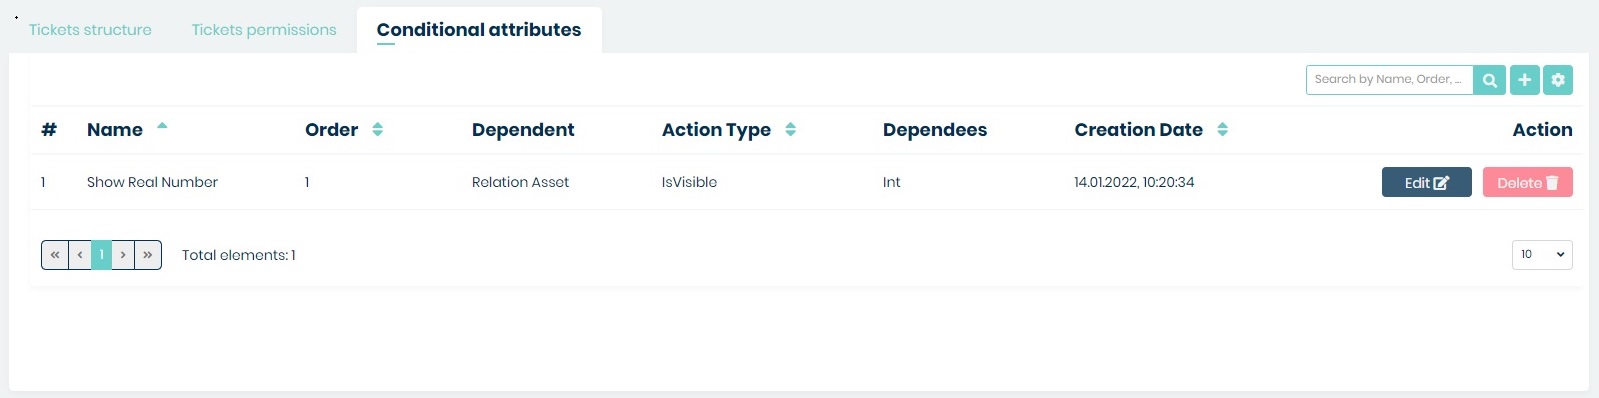
To add a new conditional attribute, you must press button. When the button
is pressed, the user will be taken to the conditional attribute configuration form.
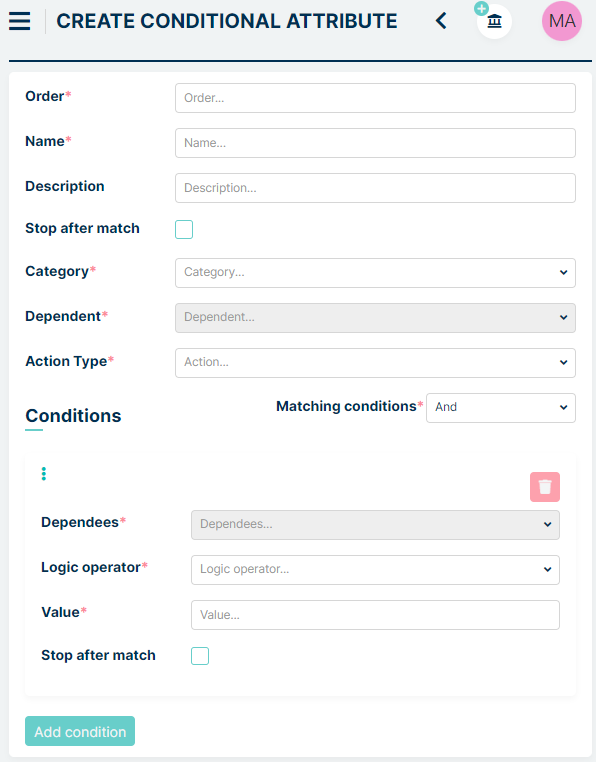
Order - This field specifies the order in which actions should be performed. The conditional attribute with the smaller number will be executed first. This field takes integer values.
Name - This is where the user enters what their configuration should be called.
Description - Here the user can enter a description of the configuration.
Stop after match - When the user checks this box then if the conditional attribute is satisfied then the system will stop there and will not search further.
Category - This is where you select your ticket type.
Dependent - Here you select a dependent field that will appear or disappear depending on the choice made in ‘Action Type’
Action Type - This is where you specify what should happen after matching. There are two options to choose from ‘Visible’ and ‘Hidden’. If the user selects ‘Visible’ then initially the field selected in ‘Dependent’ will be hidden until the conditions specified below are met. The ‘Hidden’ option works exactly the opposite.
Matching conditions - At this point you have a choice of two options ‘And’ and ‘Or’. If you choose the ‘And’ option, all conditions must be met. If you choose the ‘Or’ option, only one condition needs to be met.
Dependees - In this field, you choose which field to take into account when appearing or hiding the field selected in ‘Dependent’.
Logic operator - In this field, you have four options to choose from: ‘Equals’, ‘NotEquals’, ‘Contains’ and ‘NotContains’.
Selecting the ‘Equals’ field means that it must equal ‘Value’.
Selecting the ‘NotEquals’ field means that it must be different from ‘Value’.
Selecting the ‘Contains’ field means it must contain ‘Value’.
Selecting the ‘NotContains’ field means it must not contain ‘Value’.
Value - Here you enter the value that must be met.
Stop after match - If this box is checked and there is more than one condition the system will not search further once one condition is met.
Example
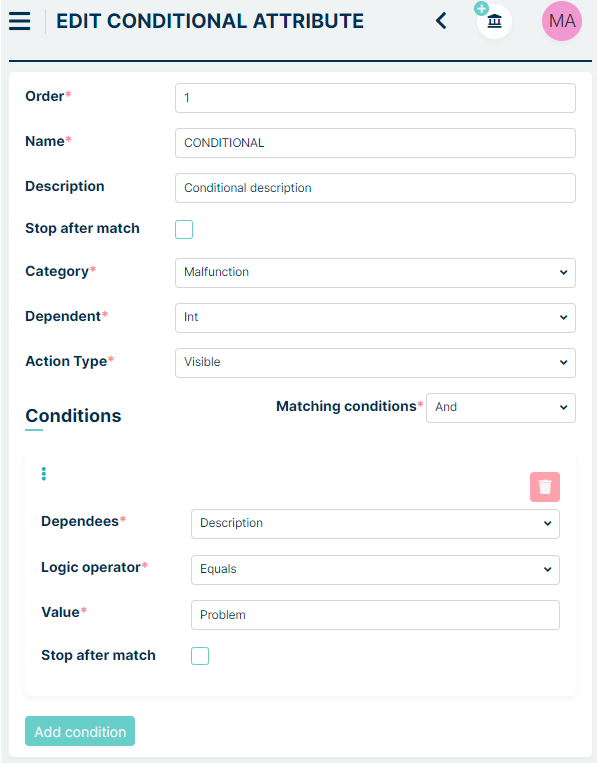
In this setting, initially the ‘Int’ field is hidden but will appear if the ‘Description’ field is equal to ‘Problem’.
If you want to add another condition, you can press  button.
To complete the configuration process, press button.
At the top of ‘Custom Fields’ tab you have an option to export settings.

This function allows you to save your settings to a file csv or xlsx file.
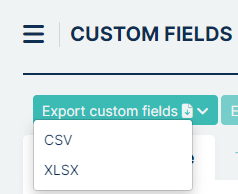
It is useful if you want for example to verify, if someone suddenly deleted part of settings (or whole structure) by mistake. Other fuction is to verify, if any major updates of Mint system or your database did not affected to ticket type structure.
You can easily export settings by clicking  button to export basic
structure, or by clicking
button to export basic
structure, or by clicking  button to export Ticket Type Permissions
TEMPLATES
In this section, you can view, create, edit, or delete all of the Templates available in the system. As mentioned before, a template is built from components (created in ‘Components’ sections).
Templates can be used for many cases: emails (e.g., confirmation of new account), auto-responses (e.g. inside Ticket communication section), or even predefined messages which can be used by an Agent to speed up his work.
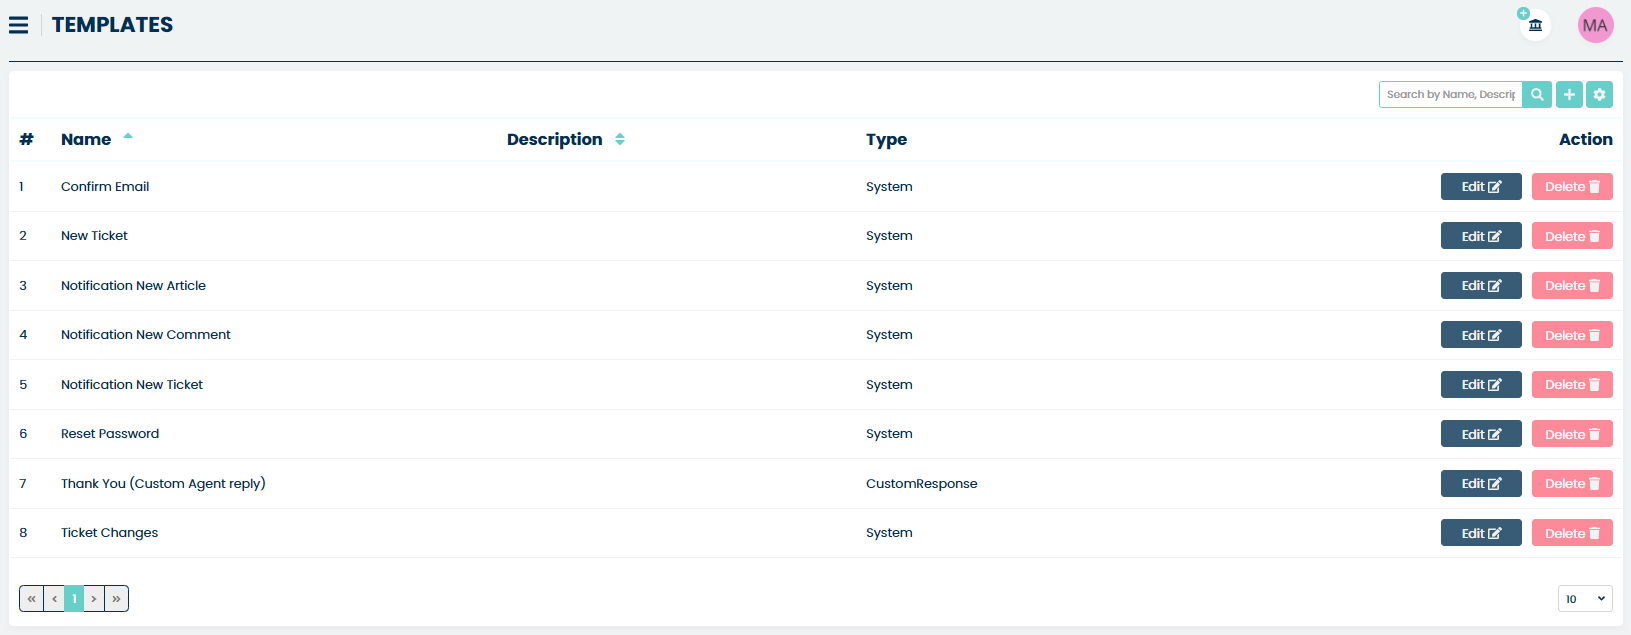
You can add as many templates as you like, along with all of your common answers and replies that you always use with your customers, etc.
Mint Service Desk has some already pre-defined templates for you to choose from.
If you want to create a new one, just click on the button and
you will be moved to the “Create template’ form. Always remember that
before moving to create a new template you need to create the needed
components (in ‘Components’ section).

In the “Create Template” view you need to fill the “Name” (required) and add some “Description” if you like.
Once you do that you need to select components from which your Template will be built. You can select four components: ‘Subject’, ‘Header’, ‘Body’, and ‘Footer’. ‘Body’ is required, the others are optional.
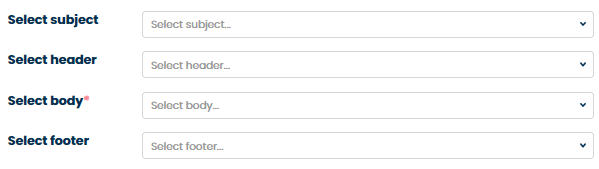
Sometimes you should use more than just the ‘Body’ component while building your Template. For example, when you’re creating an email template (e.g., for Email confirmation message) you should use the ‘Subject’ component in addition to ‘Body’. ‘Header’ and ‘Footer’ would also be great.
After selecting the components, you need to choose one of two available ‘Template types’. Those are ‘System’ and ‘Custom Response’.

Select “System” for templates which the system will send automatically based on some activity.
If, on the other hand, you want to have a predefined template that your agents will use to manually answer your customers choose the “Custom Response” type.
Once you finish save your changes by clicking button.
After creating a new template, you can always either change anything in
it ( button) or even delete it from the system (
button). Deleting the template does not delete any components which were
used in that template.
COMPONENTS
In this section, you can create template components from which you will later build whole templates e.g., ‘Thank you’ message sent by the system right after creating a Ticket.
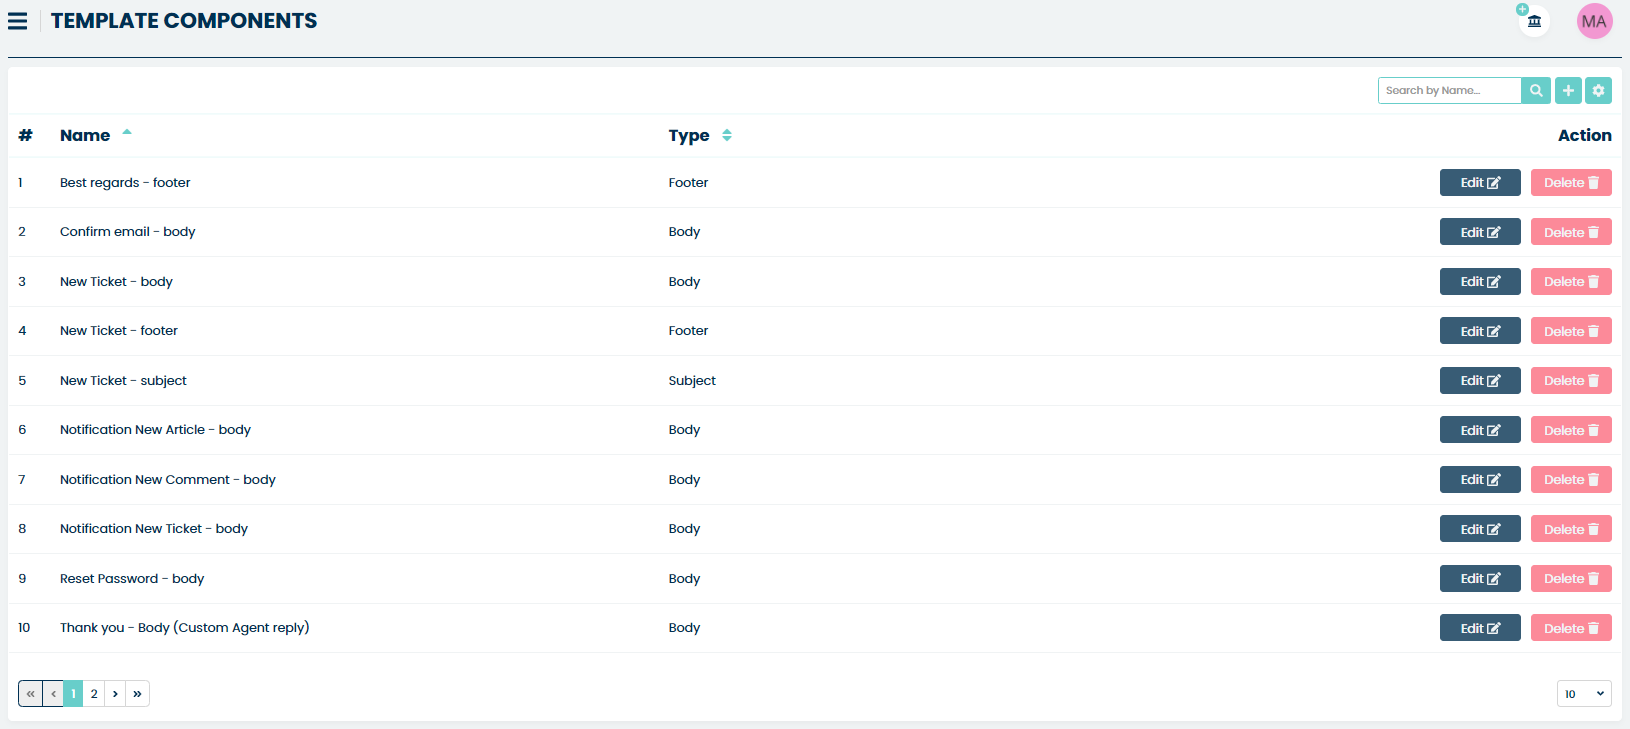
Each template is built from a couple of types of components. In this section, you can predefine those components that you will later use in the next section.
MINT Service Desk has four types of components: “Subject”, “Header”, “Body” and “Footer”.
To create a new component, you need to click on the “Add new value” button.

Now, in the ‘Create template component’ view you need to name your new component (‘Component name’) and choose a type (“Subject”, “Header”, “Body” or “Footer”).
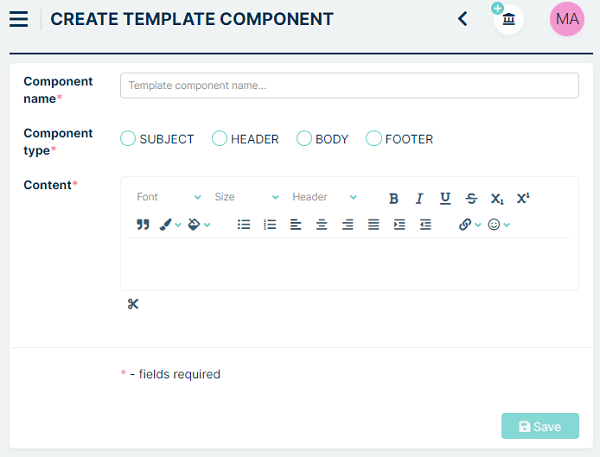
In the ‘Content’ section you can build the content of your component. You can use the Rich Text editor to give the desired format to your content. Also, you can add additional dynamic fields, which will automatically be filled with data from the system the moment the template (with this particular template component) will be used.
To do so, click the scissor button located right below the ‘Content’ section and from the dropdown menu select and add the dynamic fields you need.
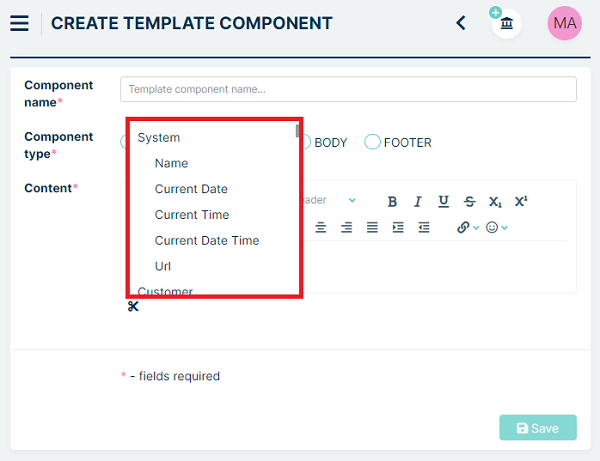
Once you finish just click the button.
Remember that after creating a new component you can always either
change anything inside it () or even delete it from the
system ().
By creating a set of components and later templates you can automate a lot of your work. That’s why you should always remember to use the right names to easily manage and handle many components.
DOCUMENT TEMPLATES
In this place, you can add Document templates in the form of external files to the MINT Service Desk system. Later, as an Agent user, you will be able to add those templates in the ‘Ticket Details’ view.
The default view shows the list of already uploaded Document templates.
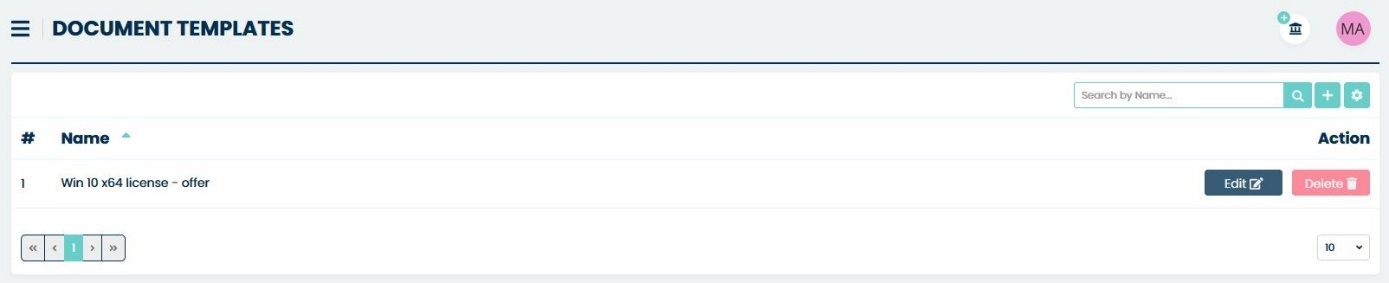
To add a new Document template simply click the button.

Now, in the ‘Create document template’ put some name (‘Name’) for your template then select the Queues. Depending on your choice your template will be available to use only for tickets created in or moved to those Queues. If you want, you can also add some description (‘Description’).
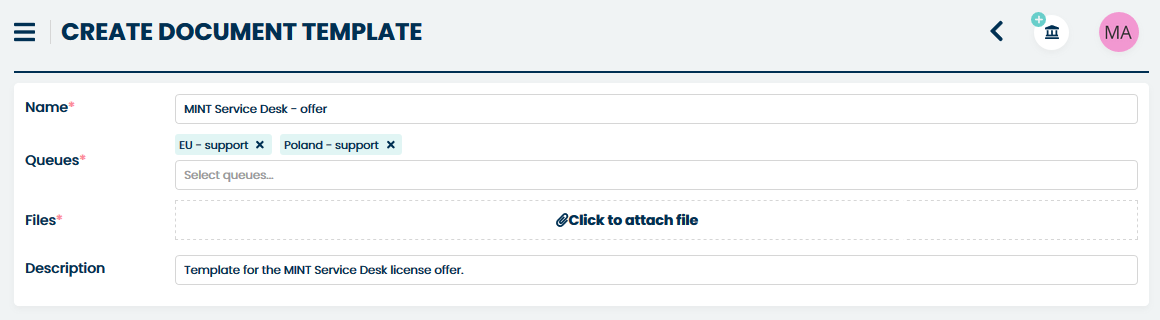
Now you need to add an external file which contains the prepared Document template. MINT Service Desk only supports one file format: .docx.
To create such a Document template, you need to use external software e.g., Microsoft Word or any other which can save the file in .docx format.

While creating a template you can (and you should) use special placeholders. For example, if you use “{{Company}}” later in the system, when an Agent use such template the “{{Company}}” will be replaced with the Client’s Company Name.
For the purpose of creating a Document template, you can add the fields below.
Placeholder |
Location/used in |
Description |
|---|---|---|
{{PrintDate}} |
Ticket Details |
Date of creating a ticket .pdf preview. |
{{TicketName}} |
Ticket Details > Details |
Ticket name/title. |
{{TicketNumber}} |
Ticket Details > Details |
Ticket number. |
{{Customer}} |
Ticket Details > Details |
Ticket owner’s name – a person who created the ticket. |
{{Company}} |
Ticket Details > Details |
Company name of the ticket owner. |
{{Status}} |
Ticket Details > Details |
Ticket current status. |
{{Assignee}} |
Ticket Details > Details |
A person (Agent) assigned to the ticket. |
{{Queue}} |
Ticket Details > Details |
Ticket Queue name. |
{{TicketType}} |
Ticket Details > Details |
Ticket type name. |
{{Priority}} |
Ticket Details > Details |
Ticket priority. |
{{Service}} |
Ticket Details > Details |
Name of the chosen Service for the ticket. |
{{Age}} |
Ticket Details > Details |
Ticket age (in hours or days). |
{{TicketCreationDate}} |
Agent/Client Dashboard |
The exact date when the ticket was created. |

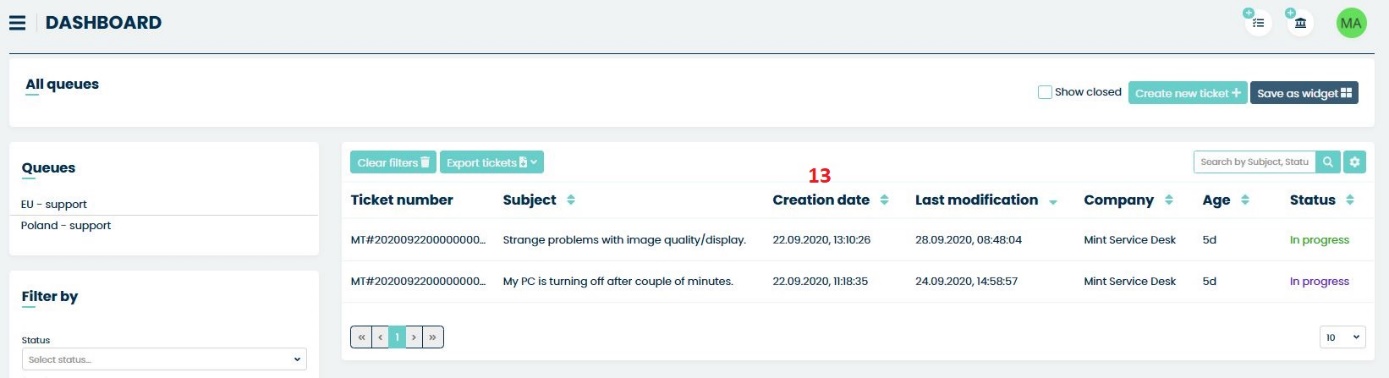
You can also use Custom Field template snippet from Tickets and Users section. Schema for creating this snippet looks like below:
{{GroupName:AttributeName}}
Example:
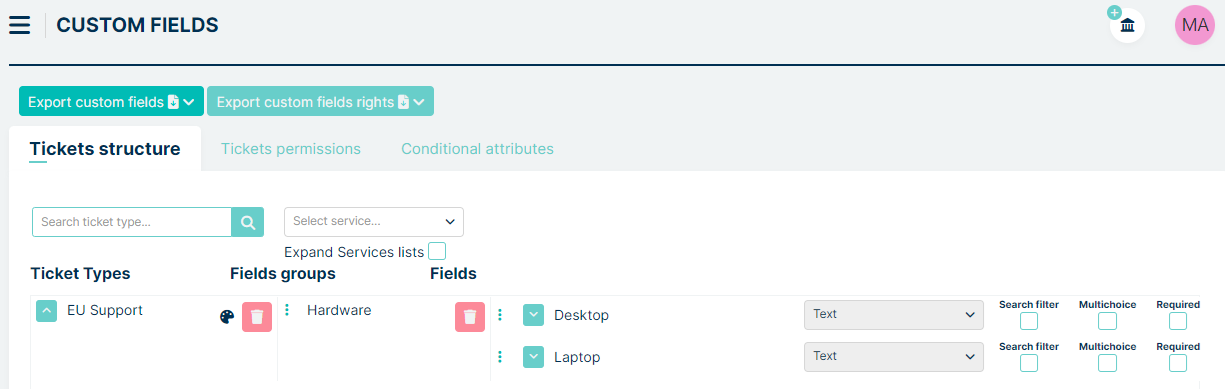
To create snippet for “Desktop” and “Laptop” attribute, You need to write it like that: {{Hardware:Desktop}}, {{Hardware:Laptop}}.
Remember that if You have the same group name and atrribute name in Users and Tickets, MINT will use value from Tickets Custom Field in snippet.
Below you can see how a prepared template document should look like.

Placeholders are written in blue.
Now, when you have such a Document template ready you can upload it to the MINT Service Desk. In the ‘Files’ part click on the ‘Click to attach file’ field.

In your system’s file explorer find, select and add your custom-made Document template. Once you do that you will see a file miniature in the ‘Files’ part.
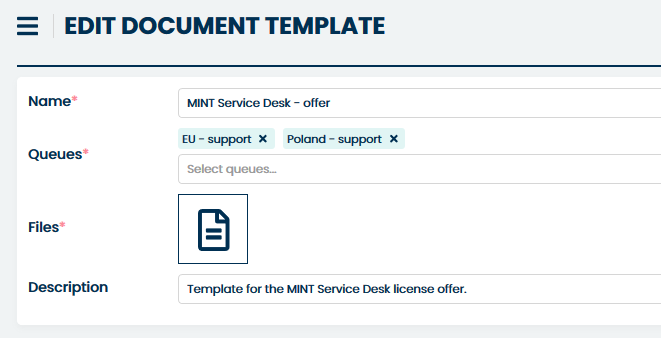
If you want to delete the file and add a new one you can do that by clicking the X button located at the top right corner of the file’s miniature the moment you move your mouse cursor over it.

Once you decide that everything is in order click button.
After that, you will notice a new position on the list of available
Document templates.
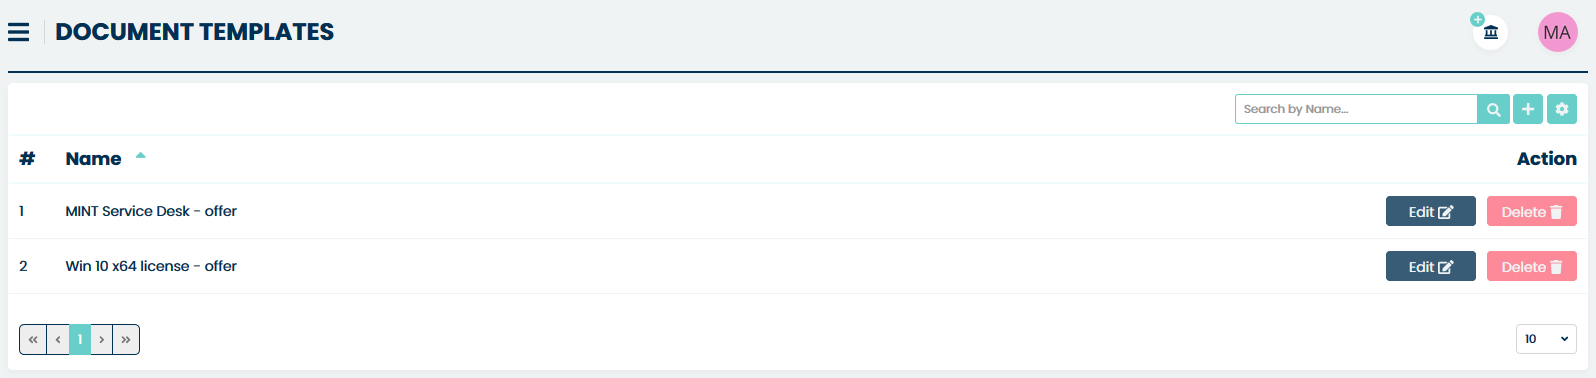
Now Agent can use it while communicating with a Client, inside the ‘Ticket details’ view. It was already described in the Agent > Ticket Details part of this guide.
SIGNATURES
This is where all the signatures created are located. To create a new signature, press the button.
The user will be taken to the signature creation form.

Two fields must be completed at this point:
Signature name - In this space, enter what you want the signature to be called.
Content - Enter the content of the signature in this space.
Remember that you can enhance your captions with custom fields, bold, underline, etc.
After completing the fields, press the button.
CONFIGURATION
Here you can configure what setting the queue or ticket type should have.
For example, if you want a ticket with a specific queue to reopen after receiving a new article when there is a ticket closed, you can do it here.
After entering this tab, a list of all available configurations will be displayed.

To start the process of creating a new configuration, press the button.
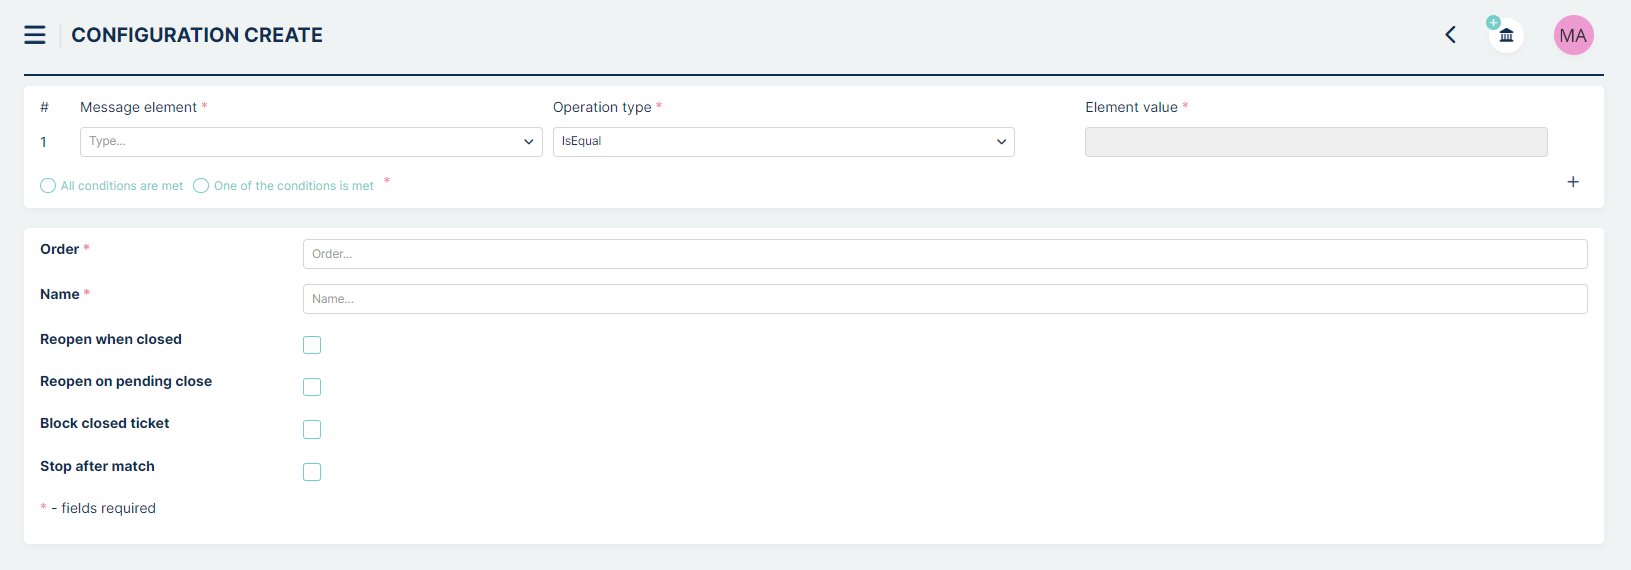
The configuration is divided into two segments. In the first segment, complete these fields:
Message element - Here you choose whether you want the configuration to apply to the Queue or Ticket Type.
Operation type - Here you select the type of operation.
Element value - Here you choose which value you want the configuration to apply to. The list depends on the selection in the Email element.
Below this configuration, there are two options to choose from:
All conditions are met - This option means that the configuration will work when ALL conditions are met.
One of the conditions is met - This option means that the configuration will work when AT LEAST one condition is met.
There is a button in the lower right corner of this segment. Pressing it allows you to create another configuration condition.

This setting means that the configuration will work when the queue is “Q1” OR Ticket Type is “T1”.
The second section includes such fields:
Order - Here you enter a number. This value indicates in what order the configurations will be executed. The configuration with the smaller number will execute first.
Name - Here you enter the name that the configuration should carry.
Reopen when closed - Checking this option will cause that when the ticket is closed and a new article falls in then the ticket will change its status to ReOpened.
Reopen on pending close - Checking this option will cause that when the ticket is on Pending Autoclose and a new article drops in, the ticket will be reopened. When the time is up and the ticket is closed then the ticket will not reopen.
Block closed ticket - Checking this option will block the closing of the ticket.
Stop after match - If this box is checked and there is more than one condition the system will not search further once one condition is met.
This is what a simple configuration looks like:
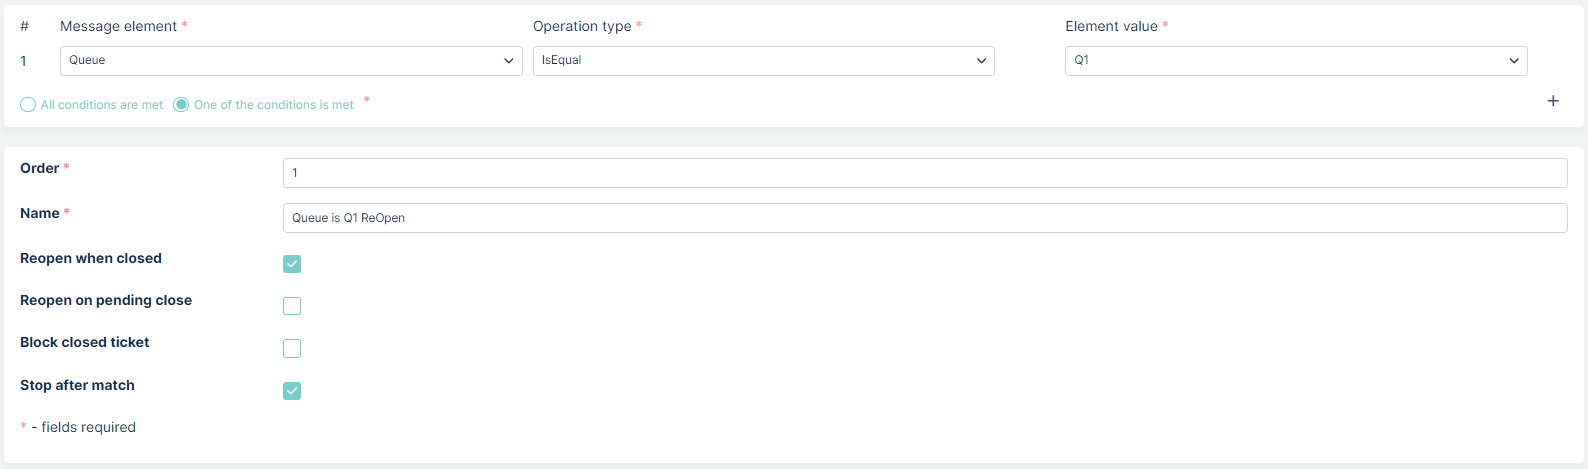
STRIKE RULES
In this part of the system, the administrator can configure notification rules for Pending Autoclose statuses. In the mentioned status, there is an option to configure notifications that will appear as the Pending Autoclose time elapses. The duration of the status is set in the Tickets → Statuses section.
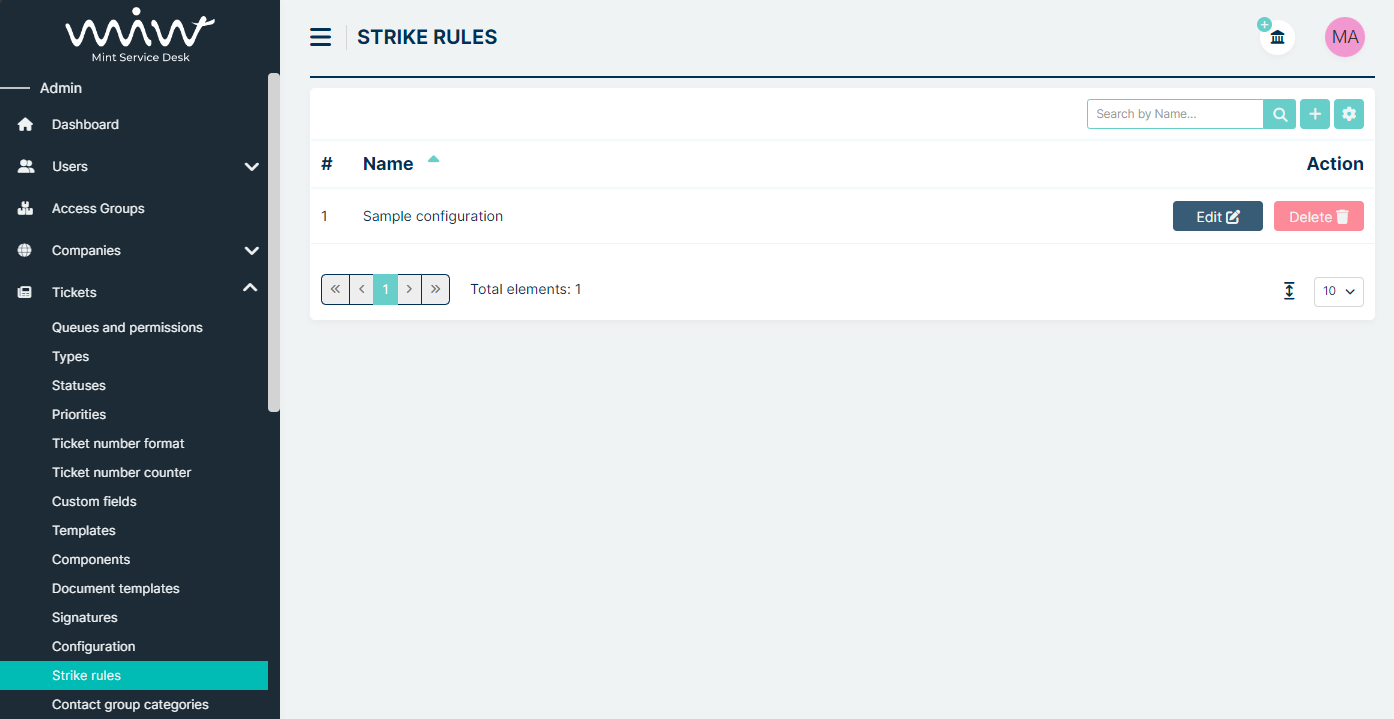
To add a new configuration, click the button. Then, in the Name field, enter the configuration name and click New Row.

A row will appear where you fill in the name of the item and the percentage of time after which the notification should trigger. If you need additional notifications as the
Pending Autoclose status time elapses, press the New Row button again, and another row will appear for completion. You can always modify the saved
configuration or even delete unnecessary rows with button.
When you fill all fields press the buton. New configuration will be added to Strike rules list.
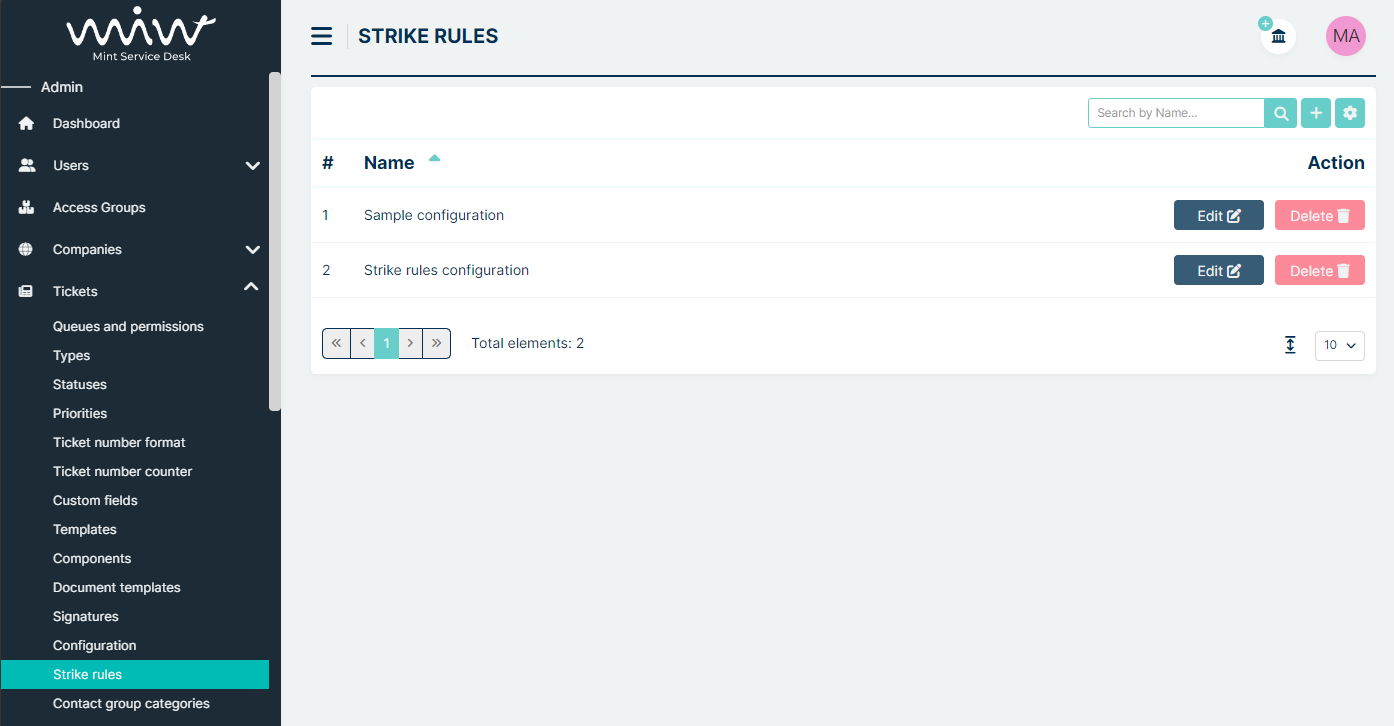
Assigning the configuration to the Pending Autoclose status is described in the Tickets → Statuses section (click here to visit), while the notification configuration is described in Notifications section (click here to visit).
CONTACT GROUP CATEGORIES
At this point, the Admin can configure the categories of contact groups that will be available in the Contact Groups section of Agents’ profiles:
When you enter the tab ‘Contact group categories’, the main configuration page appears.
To add a new category, click the button in the upper right corner of the screen. Then enter the name of the new category and click the button in the lower right corner.
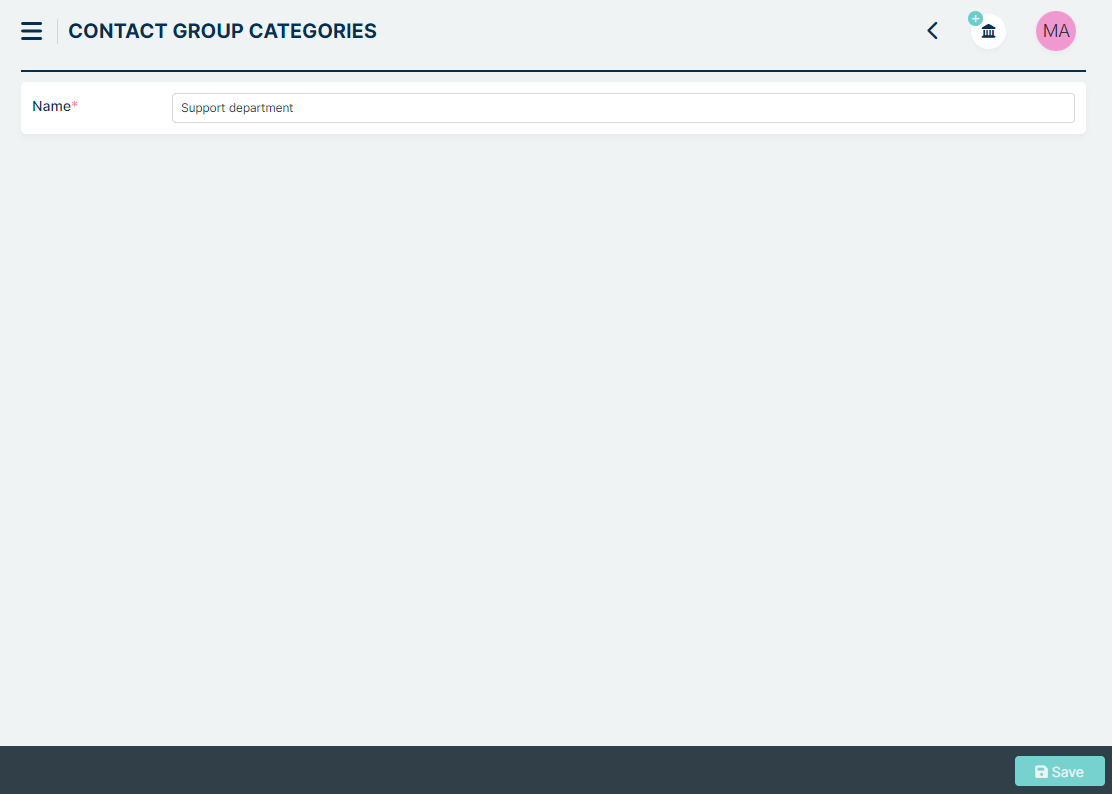
After saving, the new category will appear on the list.
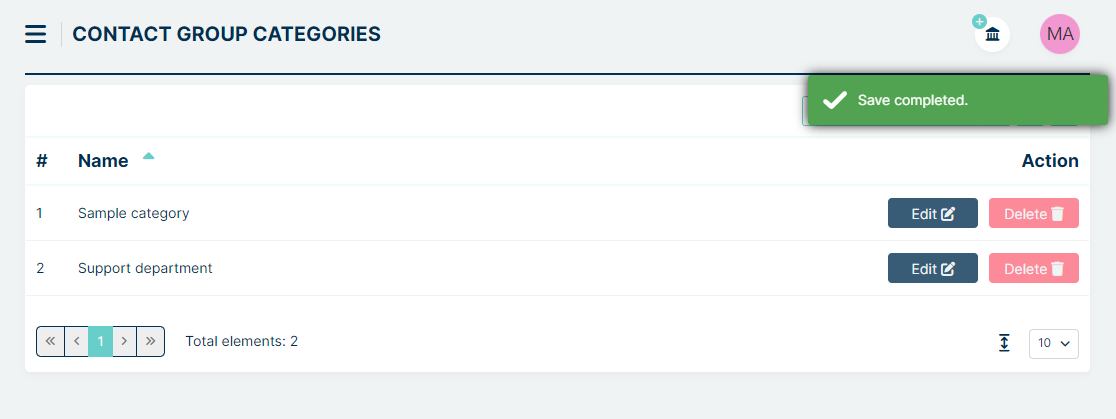
From that moment on, Agents can select the newly added category in the Contact Group section of their profile (CLICK HERE to proceed to Contact Group section in Agent profile).
SERVICES
The next section of the Admin Portal is “Services” where you can create and manage your Contracts, Contracts Types, Services, Calendars, SLA parameters.
CONTRACTS
In this part of a system, you can add and manage all of Contracts, including parameters, calendars, and priorities.

In order to start adding a new Contract, you need to click on the
button, located on the right side, next to the search field. You will
see that a new section has been opened.
At first you can choose “Enable contact” to set it as acvite contract and making the possibility to assign it to the specific ticket. Now you need to type a name for your Contract (‘Contract name’). You can now complete the description, select the company (Mint Service Desk has one company pre-defined) and service. Then you must select at least one Contract types.
Checking the ‘Enable without company’ checkbox will allow you to activate the contract without specifying a company.
Checking the ‘Enable for all company’ checkbox will make the company selection box disappear because the contract will be available for all companies.

You can also add a new one by clicking on the button on the
right side. It will open the same window that is presented in the
previously described ‘Services’ section while creating a new Service.
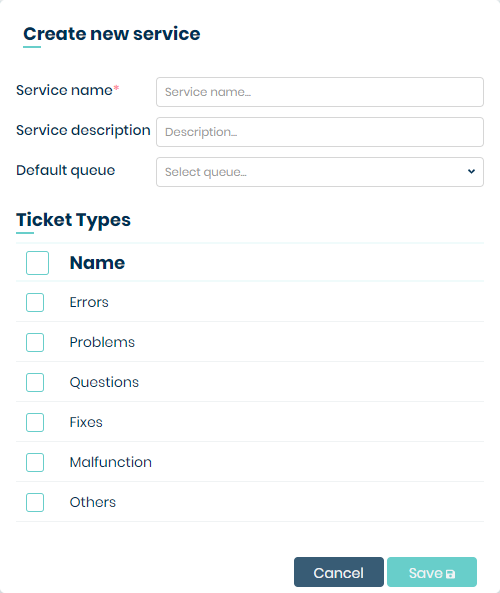
If you want the service to be required when creating the ticket, select ‘Service is required’ checkbox.
Once you selected or created a service you can add some ‘Priorities’ that will be available for the tickets related to this Contract. Those priorities will be available to choose from on the ‘Create new ticket’ screen. Also, priorities can be created and managed in the ‘Priorities’ section of the system, which will be described soon in one of the chapters.
The last thing you can add to your Contract is ‘Parameters’. You can either
select one available from the list (if you already created any in the
‘SLA parameters’ section of the system) or click on the
button on the right side. It will open a new window where you can create
your new parameters for the SLA.
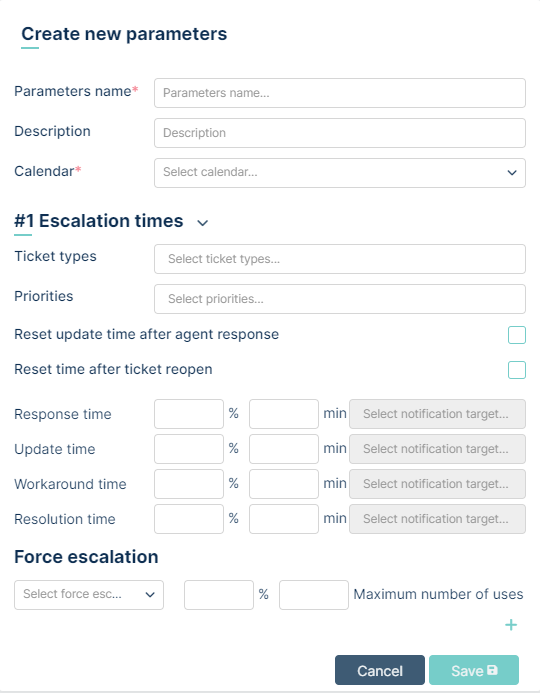
The detailed process of creating Parameters will be explained in the ‘SLA parameters’ section of this guide.
When you finish, just click on button.
CONTRACTS TYPES
The process of configuring ‘Contracts Types’ is identical to configuring, for example, Users/Custom Fields or Ticket/Custom fields (but without the section related to permissions).
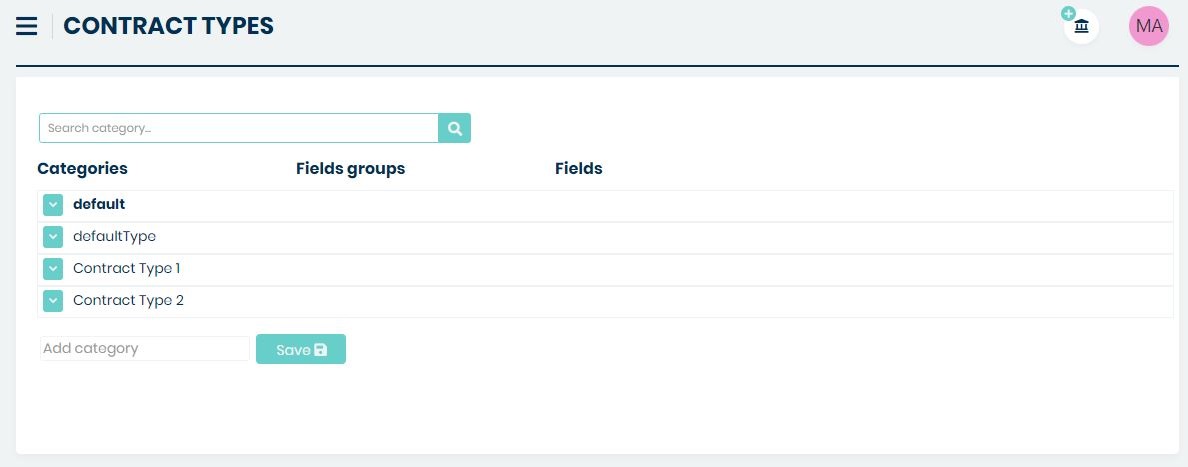
If you select a preconfigured Contract Type when configuring a contract, new fields will appear on the right side.
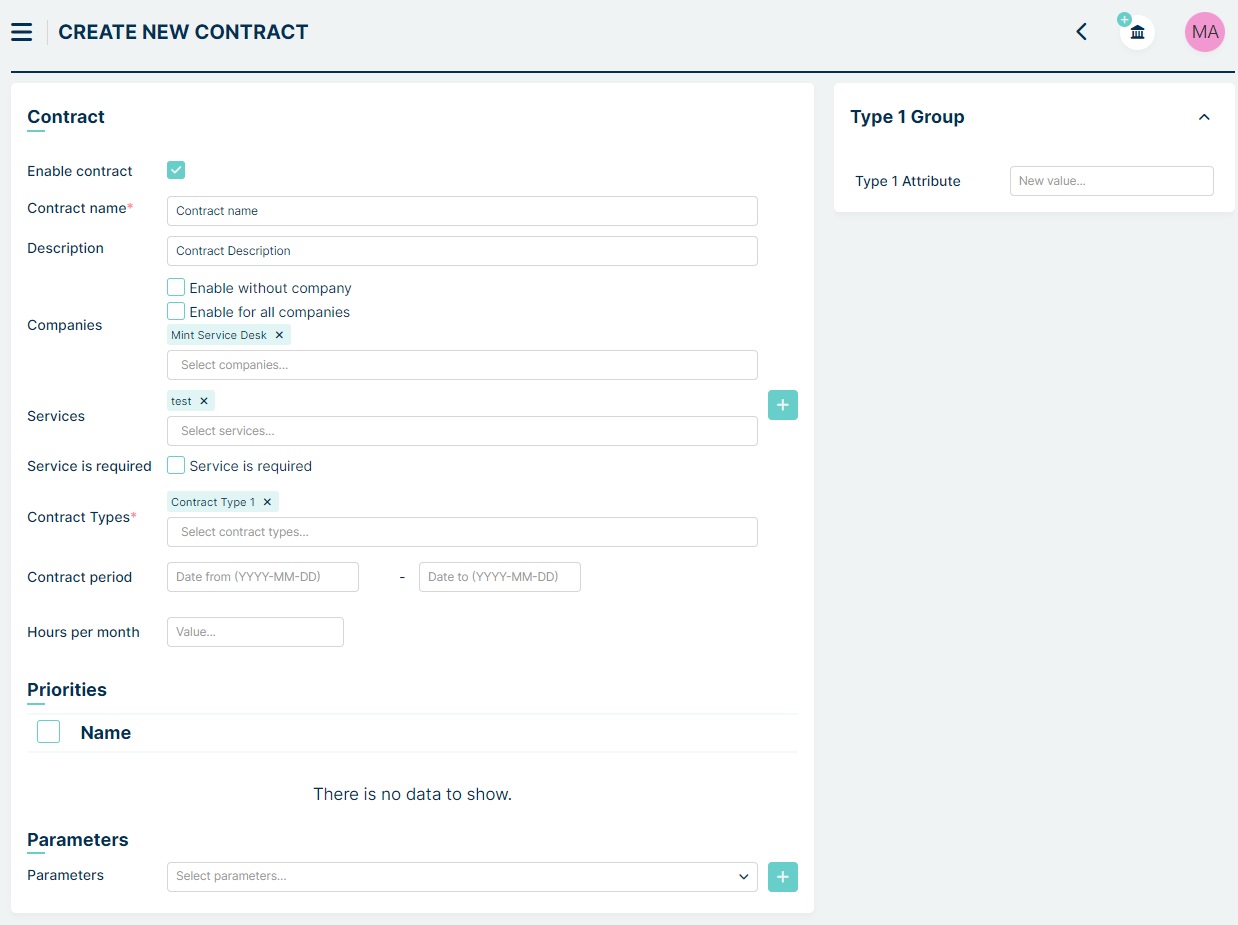
Contract Period
You can set the period of time that contract will be available to choose in ticket details.
Hours per month
You can set here, how much time per month can be reported in contract. This field is related with “Spent time” field in ticket details. When you set the time in “Hours per month” and save, you will see additional information about time
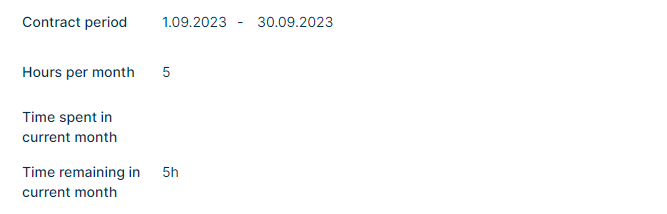
SERVICES
In this part of a system, you can add and manage all of your Services.

In order to start adding a new Service, you need to click on the
 button. You will see that a new section has been opened.
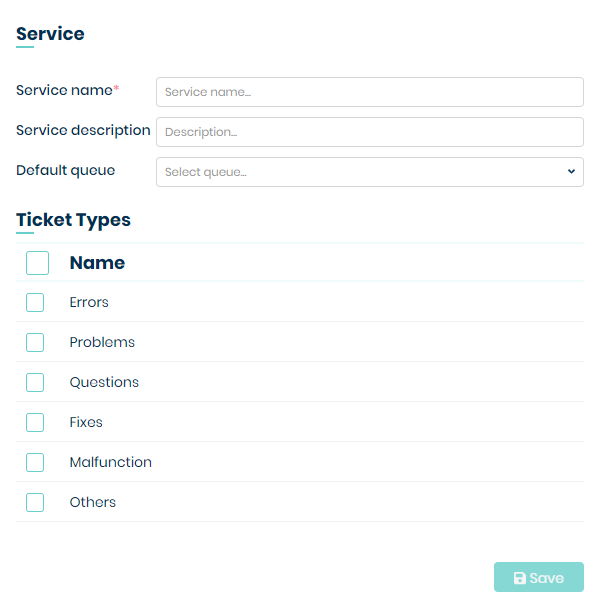
Now you need to type a name for your Service (‘Service name’). It is required (field is marked with *). If you want you can add some additional description (optional).
You can also select Ticket Types and Default queue for which this new service will
be available for choosing. When you finish, just click on the button.
If you want to make some changes in already existing Service, you can do
it by clicking on the button. If you want to delete any of
the services, just click on the button.
If you want to add a new ‘child’ service to the main service you need to use button.
Once you click on this button a new position will appear right below the main service.
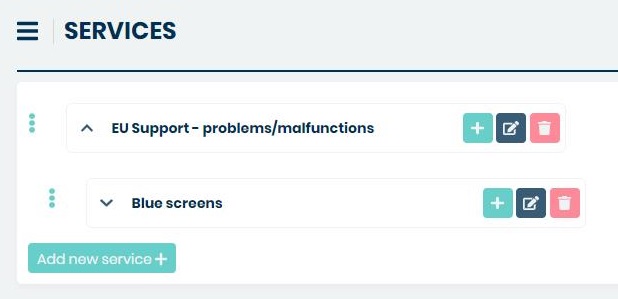
CALENDARS
In this part of the system, you can create ‘Calendars’ – a weekly period definitions for e.g., support windows for your customer. Those calendars can be later added for each SLA parameter set. Please check the Services > SLA parameters part of this guide for more info.
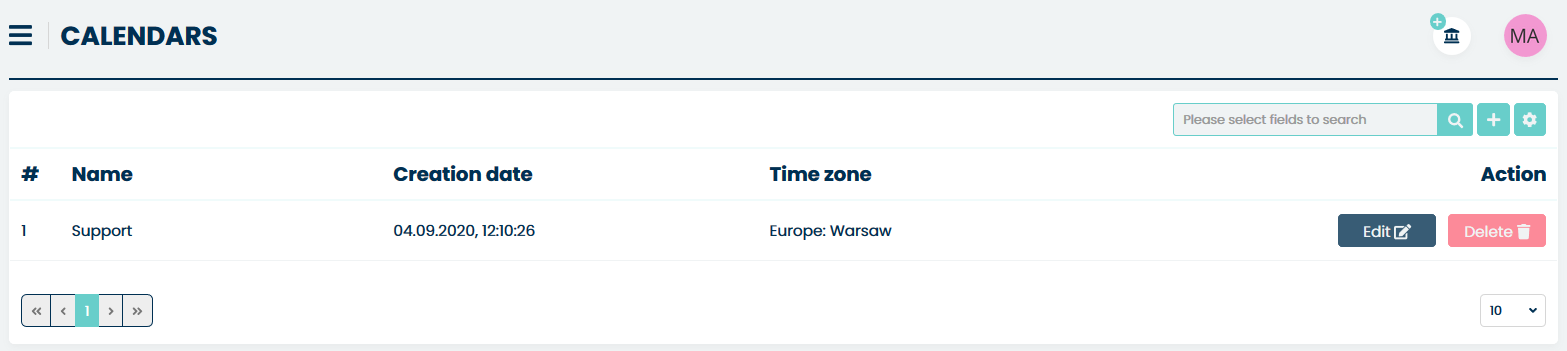
In order to add a new calendar, you need to click button and
you will go to the ‘Week definition’ screen along with the ‘Details’
section on the right side.
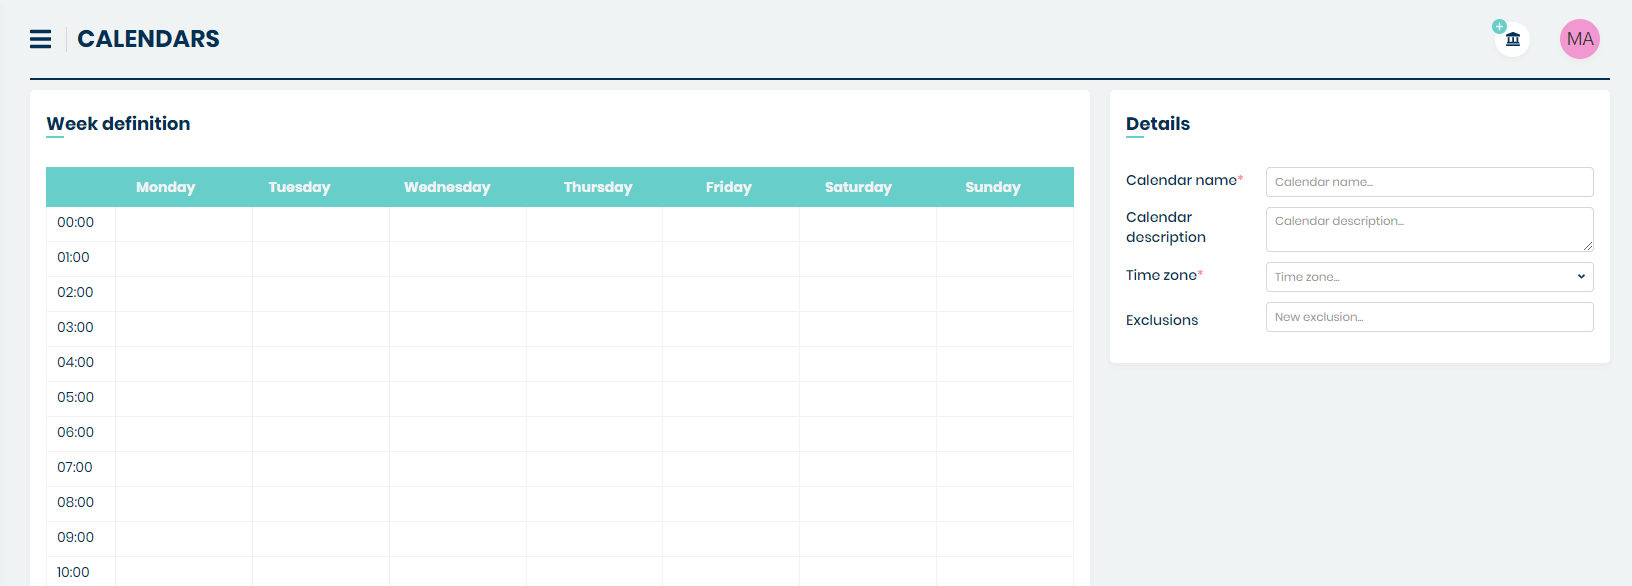
Let’s start with the ‘Details’ part. Right here you need to type the name for your calendar (‘Calendar name’) and choose a ‘Time zone’ – the one that is correct for your location. You can also include some ‘Exclusions’ (more than one) in case of Holidays/National days etc. when your support windows might not be available for your customers.

Now, in the main section ‘Week definition’ you can start adding support windows for each day of the week.
You can select a single one-hour slot just by clicking on the chosen slot. It will open a small window where you can change the starting and ending hours, or even the starting and ending day.
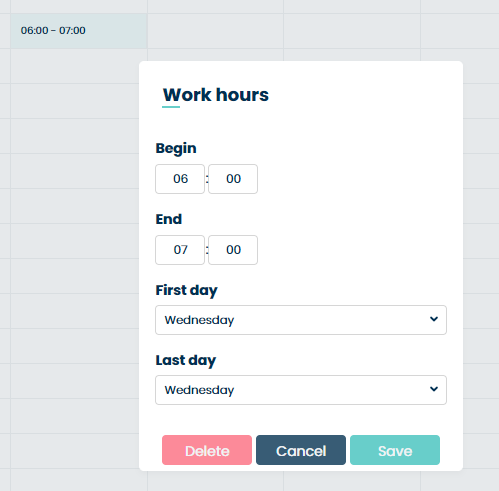
If you’ve changed your mind and want to delete this time slot, just use
button. If you want to cancel the changes you made (before
saving them), hit the  button.
Once you finish you need to click the button.
You can also select a bigger time slot than just one-hour. Just click on one place and, while holding the Left Mouse Button drag the mouse cursor in any direction (vertically and horizontally).
Once you release the Left Mouse Button, the selected area will be marked, and you will see the beforementioned window. By doing that you can, in one move, select for example 5 days (Monday – Friday) support window within the same hours.
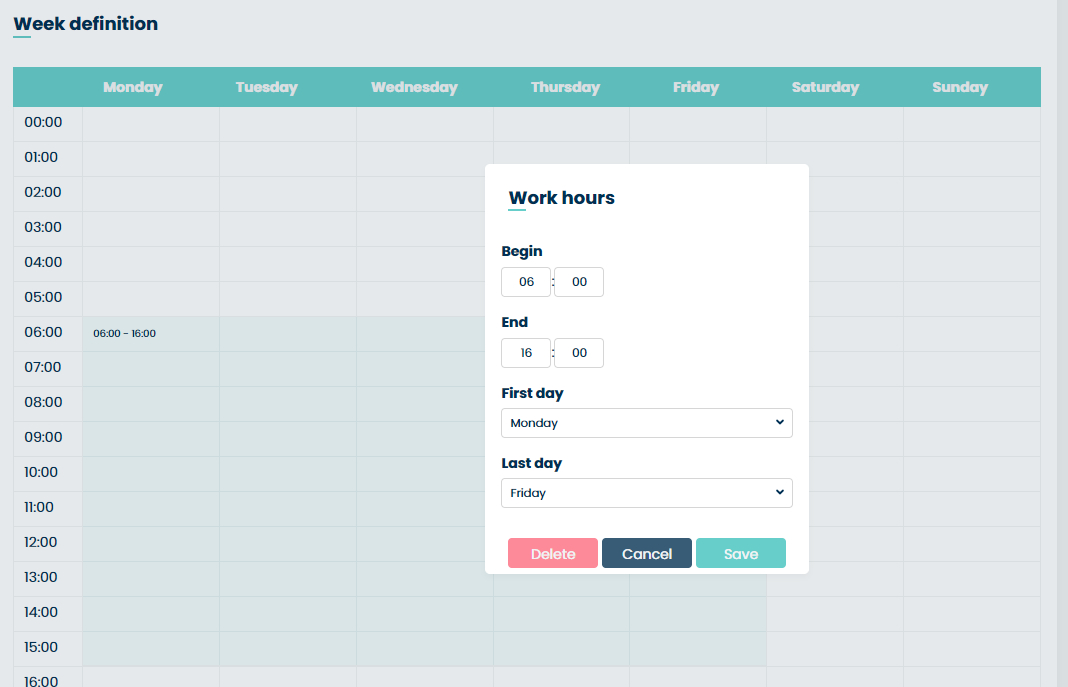
If, while being in this newly opened window, you change Starting/ending
hour or Starting/ending day and hit button, the window will
be closed, and the previously selected area will be updated according to
the changes you made.
If you want to make some changes in already created and saved time area you can do in two ways.
The first one is that you can click on the  icon located in
the bottom right corner of each separate time area and while holding the
Left Mouse Button change the size of that time area.
icon located in
the bottom right corner of each separate time area and while holding the
Left Mouse Button change the size of that time area.
The second one is that you can always click on any of the time areas and the previously mentioned window will be opened allowing you to choose time ad day range.
When you decide that everything is as it should be (‘Details’ data and
support windows on ‘Week definition’ section) you can click on the
 button. A new calendar will appear now on the calendars list.

If now you will decide you need to make some adjustments to the time
slots, click on the button and you will be moved to the
calendar edition view.
If you decide that any of the calendars is not needed anymore, you can
get rid of it by clicking the button and confirming your
choice by clicking YES in the confirmation windows.
SLA PARAMETERS
In this part of a system, you can add and manage all of the SLA parameters which can be added to any of the SLA (in the SLA section, while creating or editing an SLA).
ACTIVATION SCHEME
The SLA activation process in a ticket follows the scheme below.
1. New Ticket
The process begins with a new ticket.
2. Checking if the Ticket Has an Assigned Contract
Yes: The system verifies whether the contract is appropriate based on the ticket type and SLA priority:
If the contract is appropriate: The system assigns the contract to the ticket. The algorithm terminates.
3. Checking if the Ticket Has Both a Company and a Service
Yes: The system retrieves contracts that are suitable for both the company and the service associated with the ticket. Then system verifies whether the contract is appropriate based on the ticket type and SLA priority:
If the contract is appropriate: The system assigns the contract to the ticket. The algorithm terminates.
If the contract is not appropriate: The system checks if the ticket has a company:
Yes: The system retrieves contracts for all companies.
No: The system retrieves contracts for tickets without assigned companies. The system then verifies whether the retrieved contracts are appropriate based on the ticket type and SLA priority:
If the contract is appropriate: The system assigns the contract to the ticket. The algorithm terminates.
4. Checking if the Ticket Has an Assigned Company OR Service
If it has a company or a service: The system retrieves contracts assigned to the company or service associated with the ticket. Then system verifies whether the contract is appropriate based on the ticket type and SLA priority:
If the contract is appropriate: The system assigns the contract to the ticket. The algorithm terminates.
If it has neither a company nor a service: The system retrieves contracts for tickets without assigned companies. It then verifies whether the contract is appropriate based on the ticket type and SLA priority:
If the contract is appropriate: The system assigns the contract to the ticket. The algorithm terminates.
5. If No Suitable Contracts Are Found
If previously found contracts are not appropriate, the system attempts to determine SLA parameters based on the ticket queue. If the system does not find suitable parameters, the process ends without assigning an SLA.
CONFIGURATION
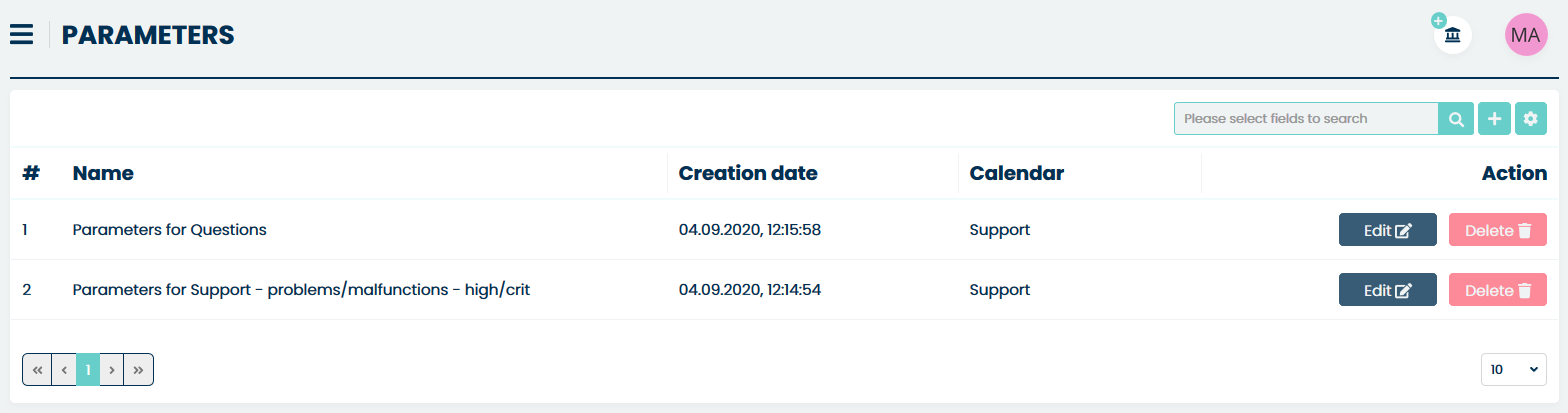
In order to add a new set of parameters, you need to click on the
button, located on the right side, next to the search field.
You will see that a new section has been opened.
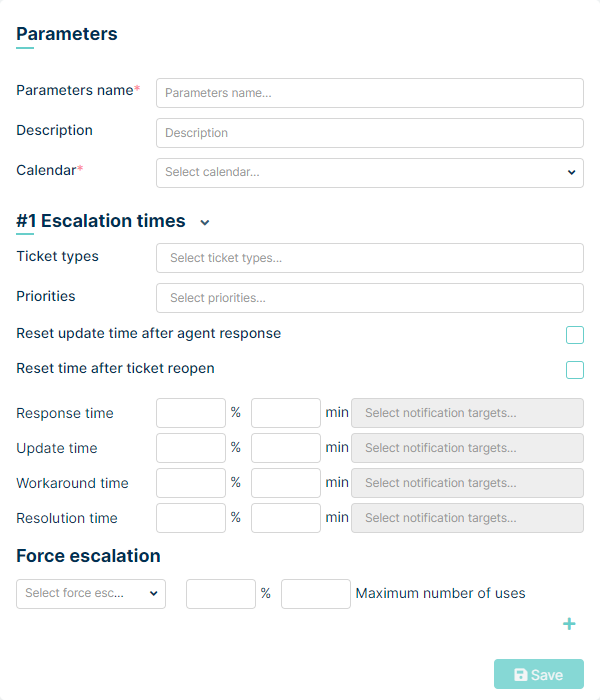
In this place, you need to type the name for your set of parameters (‘Parameters name’) and select a ‘Calendar’ from the list. If you don’t see any Calendars available, you need to create at least one in the Calendars section.
The second, very important thing, that needs to be done here is setting an ‘Escalation times’. You can add more than one Ticket Type and Priority for which Escalation times will be used.
For each Escalation time you need to specify 4 levels of reminders:
Response time: the time during which the Agent must respond to the new ticket. Time stop when Agent respond to ticket or when Agent has been automatically assigned after status change
Update time: the time within which the Agent must answer to any new message after the communication has been started. Time is counted separately for each message and is reset by Agent or Customer article, depending on checkbox setting: “Reset update time after agent response””
Workaround time: the time used to determine the workaround time (the time within which the Agent must find workaround solution for issue that Customer reported in ticket). Workaround time stop when ticket status change to “Workaround”
Resolution time: the time (counting from the moment that ticket has been created) within which Agent must resolve the Ticket.
You can also add more Escalation times by clicking the  button.
In every of those 3 abovementioned escalation times, you must specify the moment when the Agent (or any other person you choose) receives a notification that “time is running out” for an Agent to make an action.
For example, 10 % 240 min means that 24 minutes from time start (10% of 240 minutes) an Agent will receive a notification.
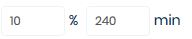
The first field (10 %) means a percentage of the whole time available for the agent. The second field (240 min) specifies the whole time an agent must make a specific action before the timer ends and SLA conditions will not be fulfilled.
If you want to send the notification for more than one person you can also add more positions in the ‘Select notification targets…’ field. You can also set the system to send up a notification for people with specific Role or even send a notification to everyone assigned to the chosen queue.

Please note that if you want the above notifications to work, when configuring notifications in the Notifications tab in the Admin, you need to select the following as Receivers respectively: ticket.mentioned_user, ticket.mentioned_role, ticket.mentioned_queue
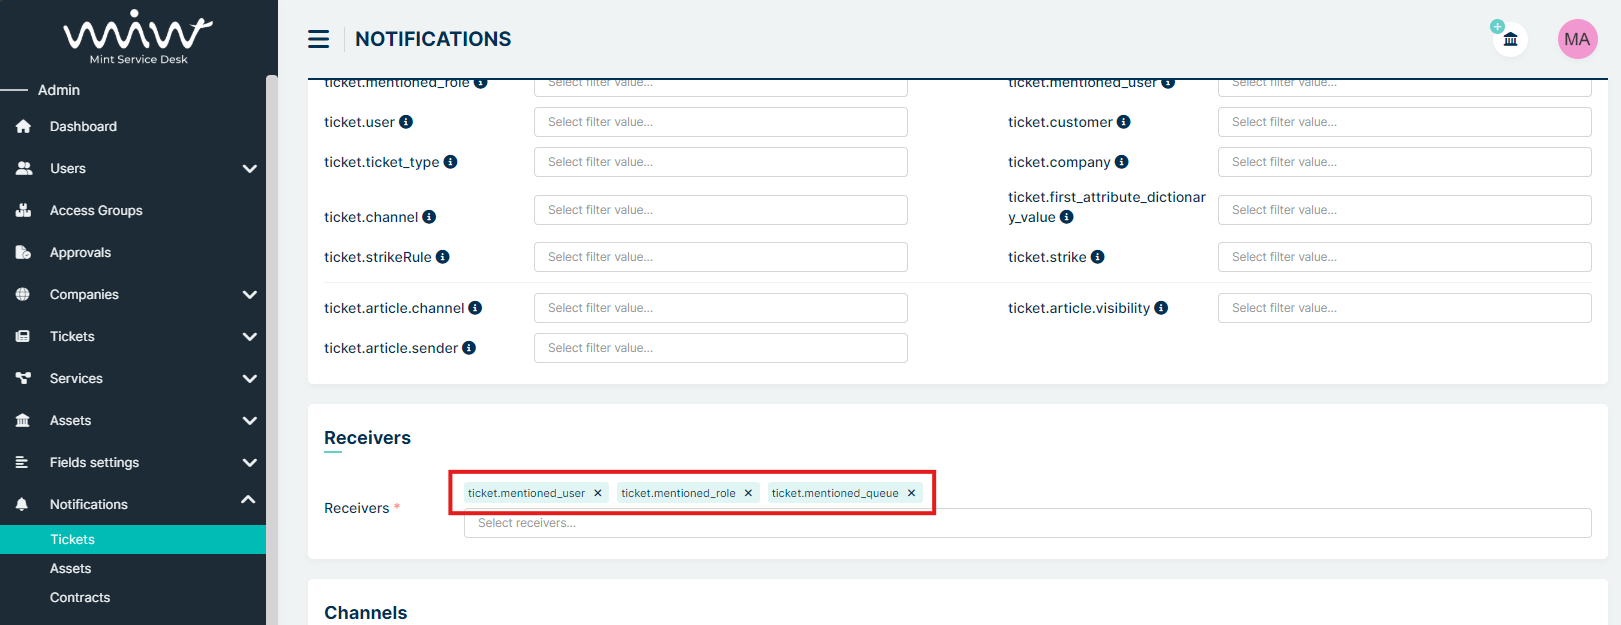
At the very bottom, the Force Escalation option is available.
In the first field, select the type of escalation. There are four options to choose from:
Response time
Update time
Resolution time
Workaround time
In the next field, enter a number from 0 to 100, which indicates after what percentage of time you want force escalation to activate.
In the third field, specify how many times the customer will be able to escalate the ticket.
Example configuration:
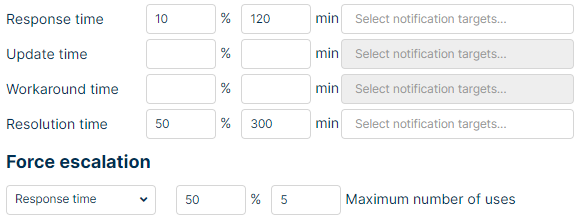
This example shows that the user will be able to escalate the request five times after 50% of the response time has elapsed. (50% of 120 is 60, so after one hour the customer will have this option available.)
When you finish, just click on the button to complete the
process of creating SLA parameters.
ASSETS
CREATING NEW ASSET
On the top right side of the Agent portal, on the bar menu, you will find ‘Create Asset’ that allows you to create new assets.
Once you click on this button, you will be moved to the ‘Create asset’ view.
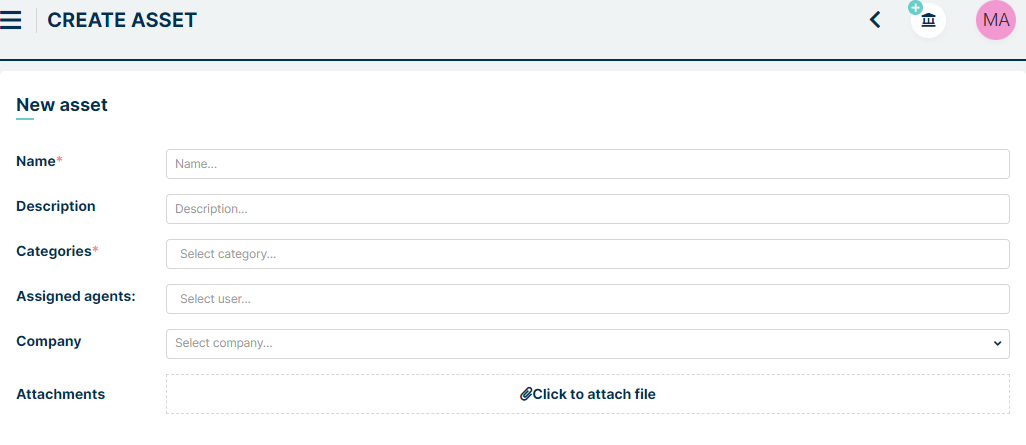
Now, you need to put in the required information (marked with *): “Name” and select the right “Category”. If you want you can also add a detailed “Description” or even some attachments (pictured, .pdf files, etc.).
As an Admin, you can assign the asset to a particular agent or company user. For example, a mobile device used by one of your agents.

Once you fill up all the information, click on the button.
The ‘Create asset’ view will be refreshed, and you will see that some additional fields have been created on the right side. Those are additional attributes available for the chosen Category of Assets. They can be created and managed by you in Assets > Assets definition part of the system.
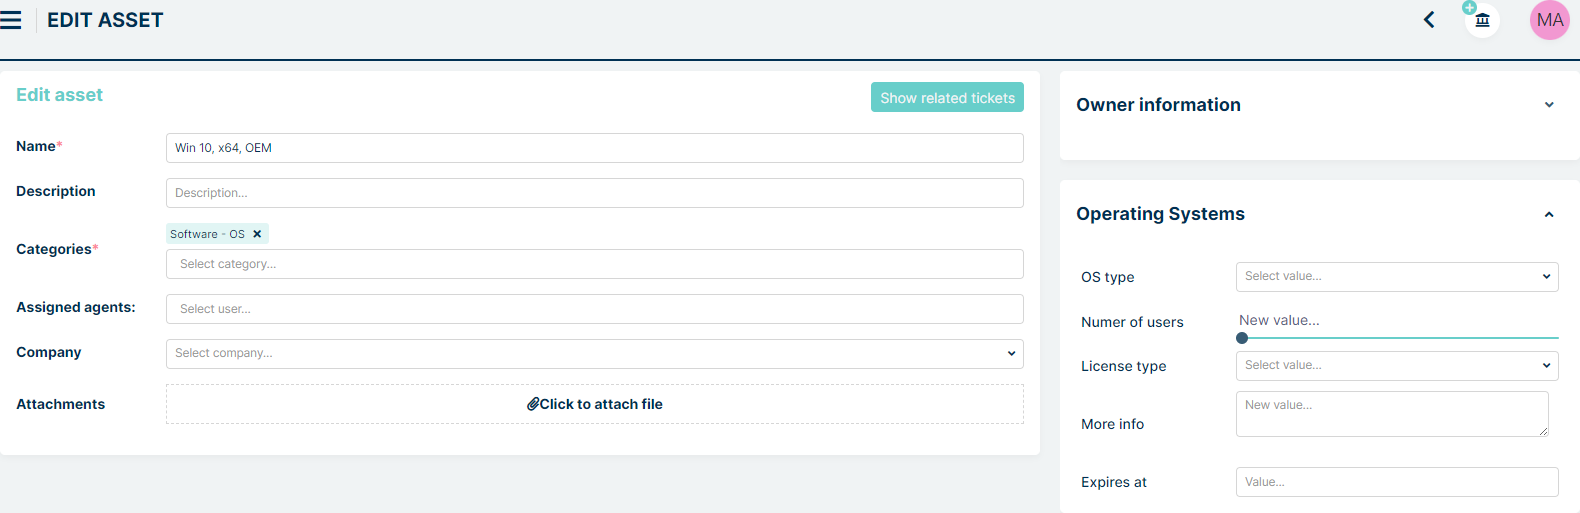
Once you add that additional information, you can update the asset by
clicking on button.
ASSETS MANAGEMENT
This is the place, where all of the assets in the system are managed. Right here, you will find the list of all your assets, as well as the possibility to make any changes in any of them.
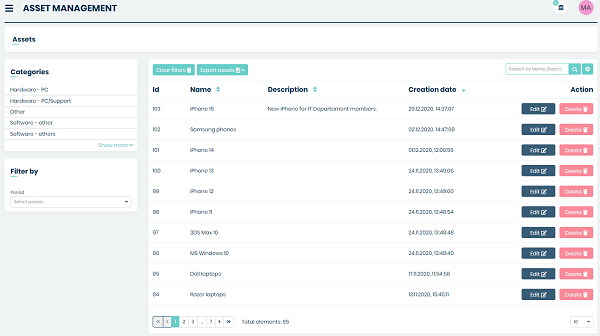
Right here you can filter those assets by ‘Categories’ or by ‘Period’
(time period when assets have been added). If you want to reset active
filters, just click on the  button. You can also remove any
selections (Categories, Filters, Attributes chose values) by clicking on
button. You can also remove any
selections (Categories, Filters, Attributes chose values) by clicking on
 or
or  button right next to each position.
You can also use some more advanced filters. In the lower part of the view, you will find (depending on chosen ‘Categories’) additional sections. Those filters will be visible only if you check the option ‘Search filter’ while creating Asset structure (Assets > Assets definition > Assets structure).
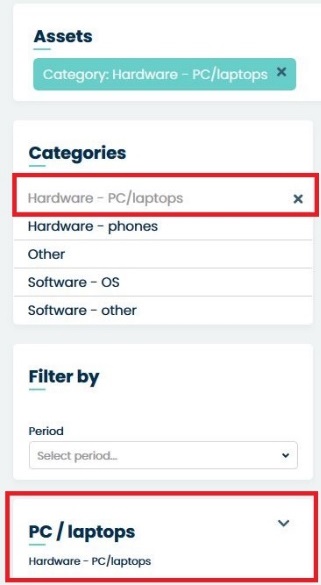
Click on the  button in order to see the whole list of
available filters.
button in order to see the whole list of
available filters.
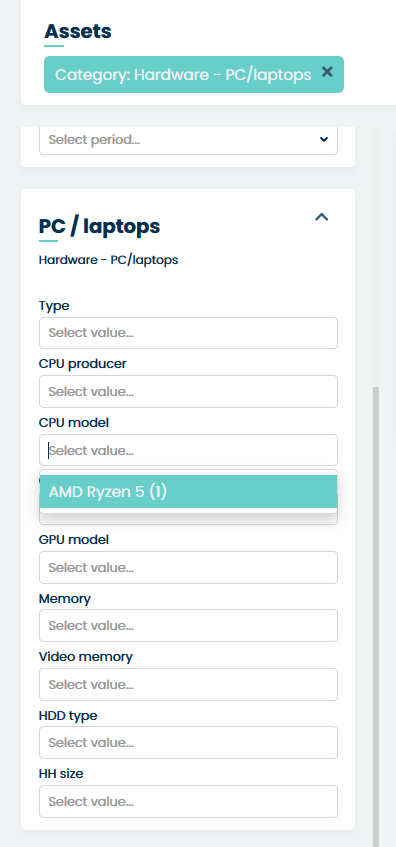
Now you can select one or more filters, for example CPU Model. If you do this the list of results will be refreshed.
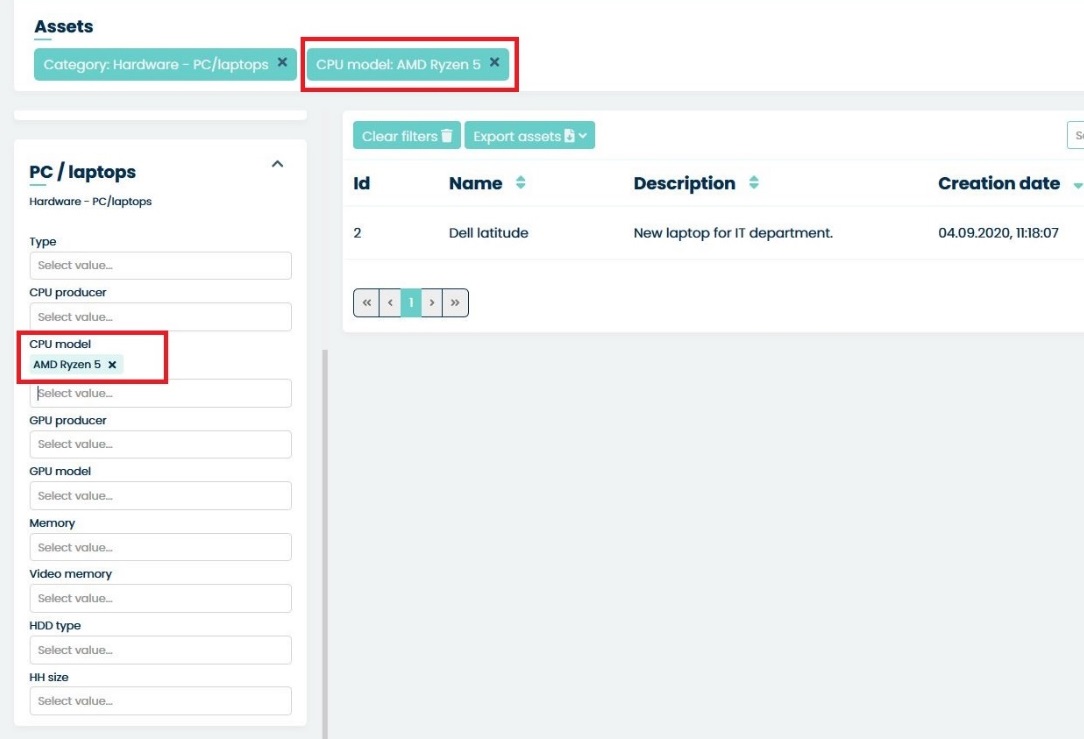
Those filters are basically for attributes of the assets from selected categories. You can select more than just one of them and each time you select another one the result will be refreshed.
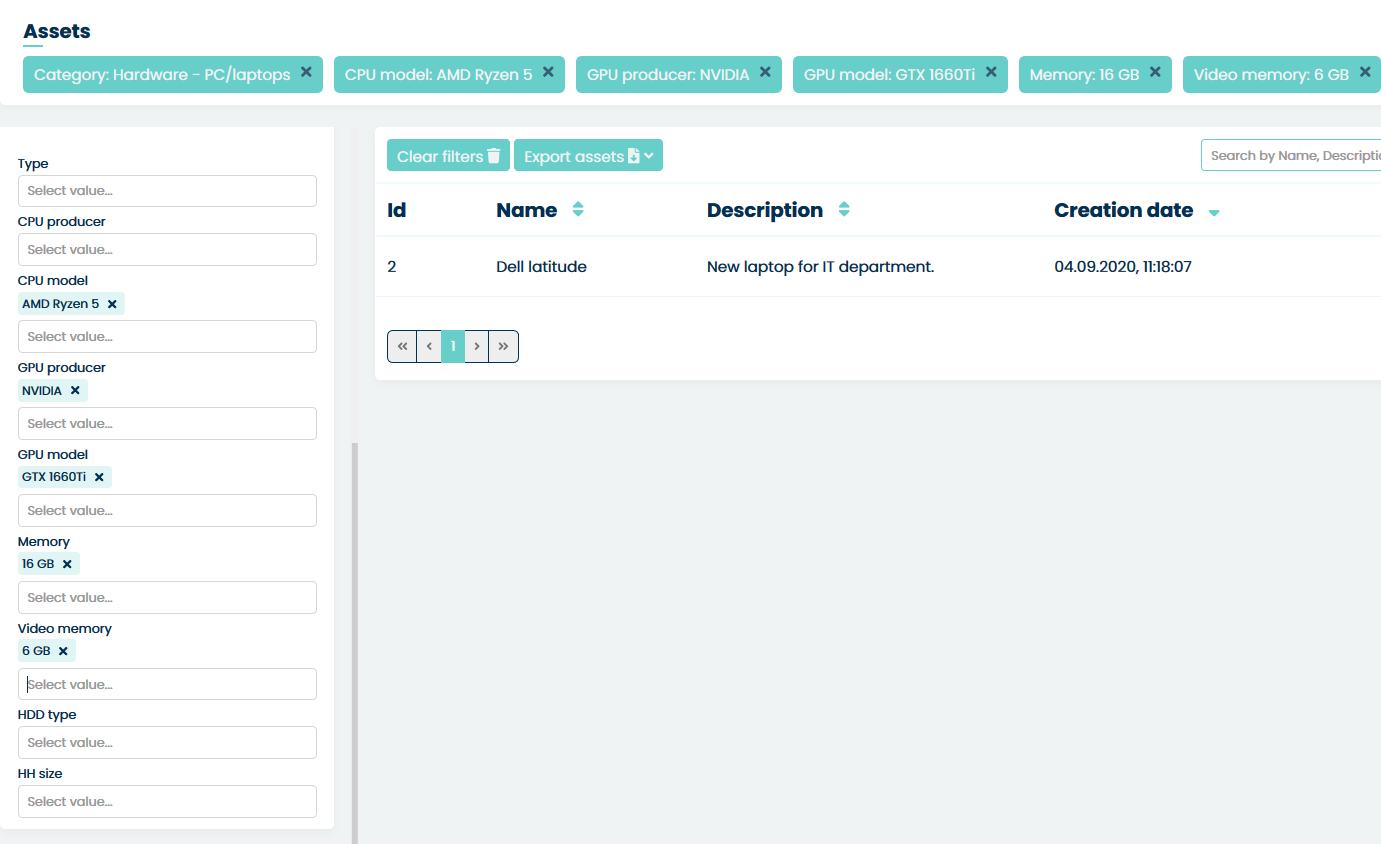
If you want to see some more information on the list of assets (more
columns) just use the ‘Set column properties’ button. It was
already described in the earlier parts of this guide.
Also, if you want, you can look for specific assets (for example by asset’s name) by using the section “Search” field. Whatever you type here will be searched for, depending on the things you marked in the ‘Search by’ section of the ‘Set column properties’ window.

In order to see the Asset information just click on its name. You will be moved to Asset details view.
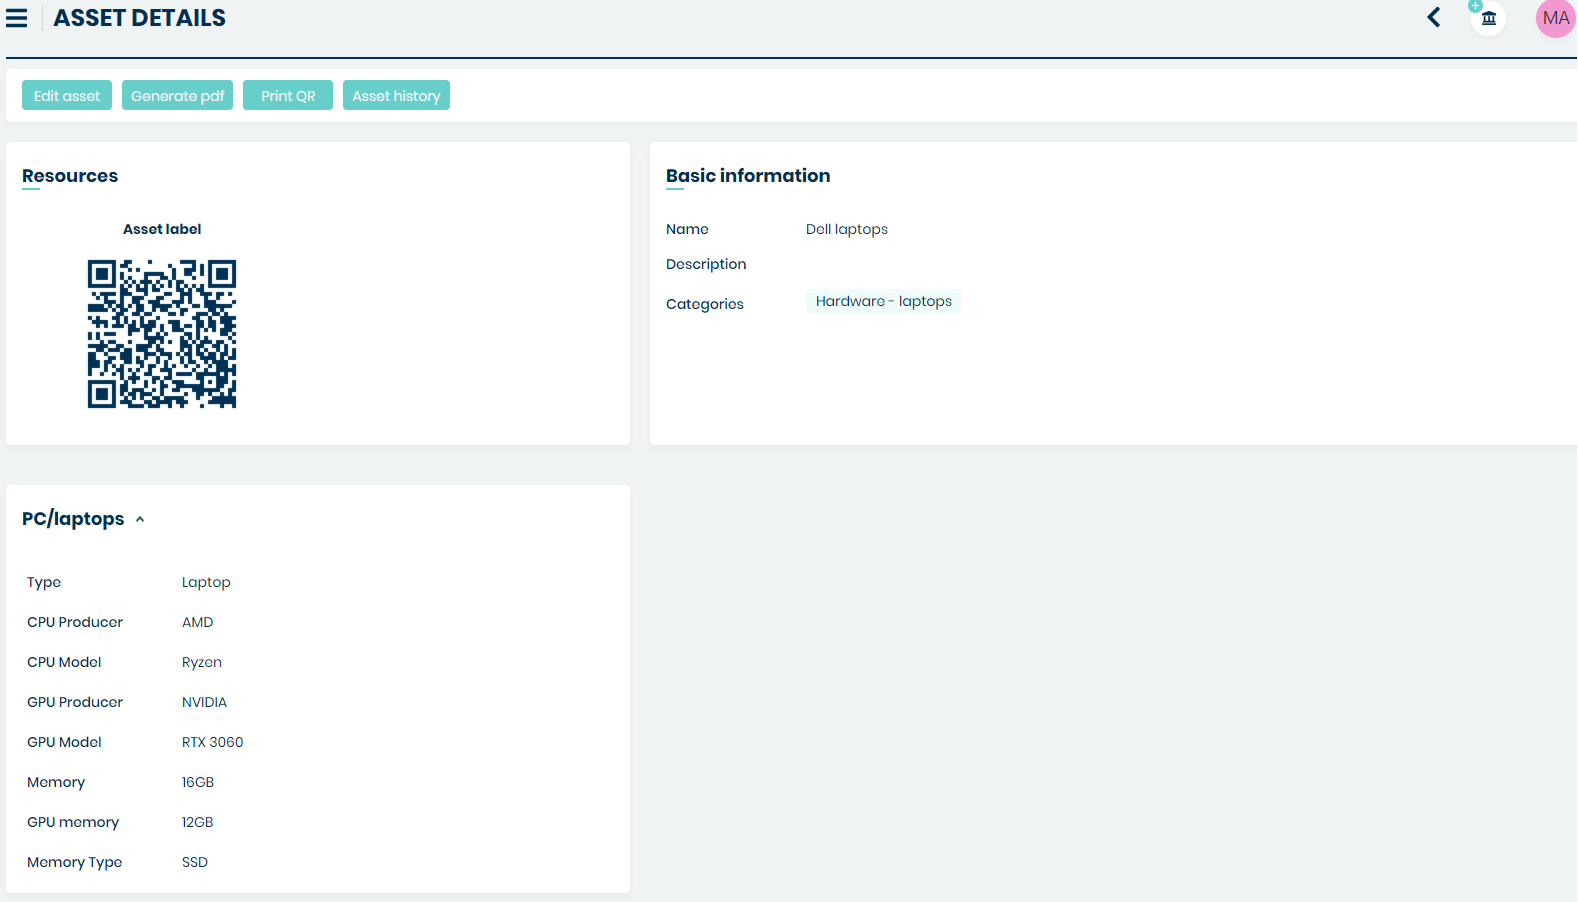
From this view, you can move to ‘Edit asset’ view. Just click on the
 button.
If you want to export asset into pdf file press  button.
To print the QR code, press  button. After pressing this button,
you will be transferred to the print view. In the file will be the QR code and the information configured in Settings > General > Assets.
button. After pressing this button,
you will be transferred to the print view. In the file will be the QR code and the information configured in Settings > General > Assets.
If you are curious what the history of the selected asset is, press  button. After pressing this button, the user will be taken to a table with a list of changes.
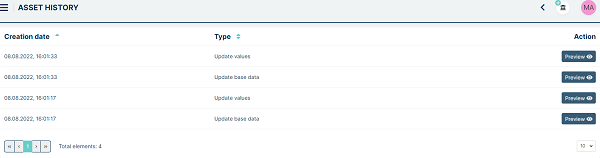
If this information is not enough, there is a button  next to each change that, when pressed, will display more details below the changes.

If, on the other hand, you need to access ‘Edit asset’ right from the
‘Asset management’ list simply use the button on the right side.

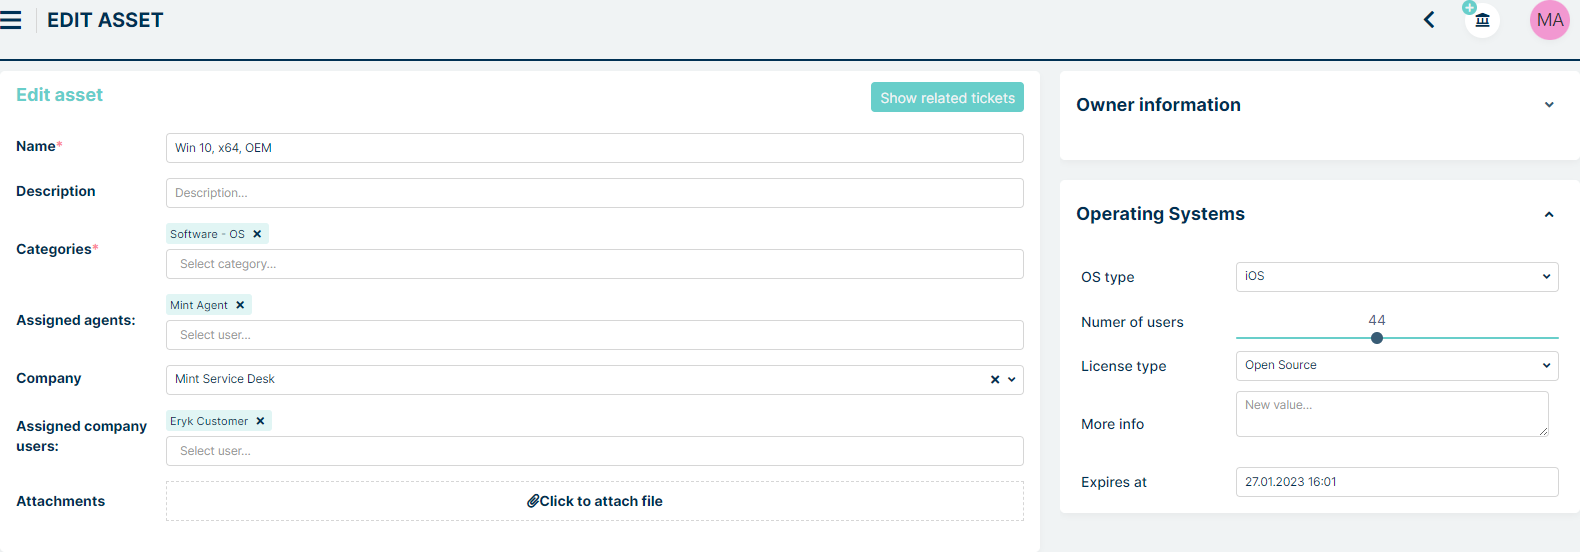
To delete asset, while being on the main ‘Asset management’ view press
button located on the right side (right next to ‘Edit’ button. Then confirm the
operation by clicking the ‘yes’ button.
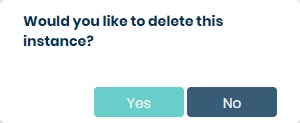
If the asset is related to any of the Tickets in the system you will find it on
the list once you click the  button while being inside ‘Edit asset’
view.
button while being inside ‘Edit asset’
view.
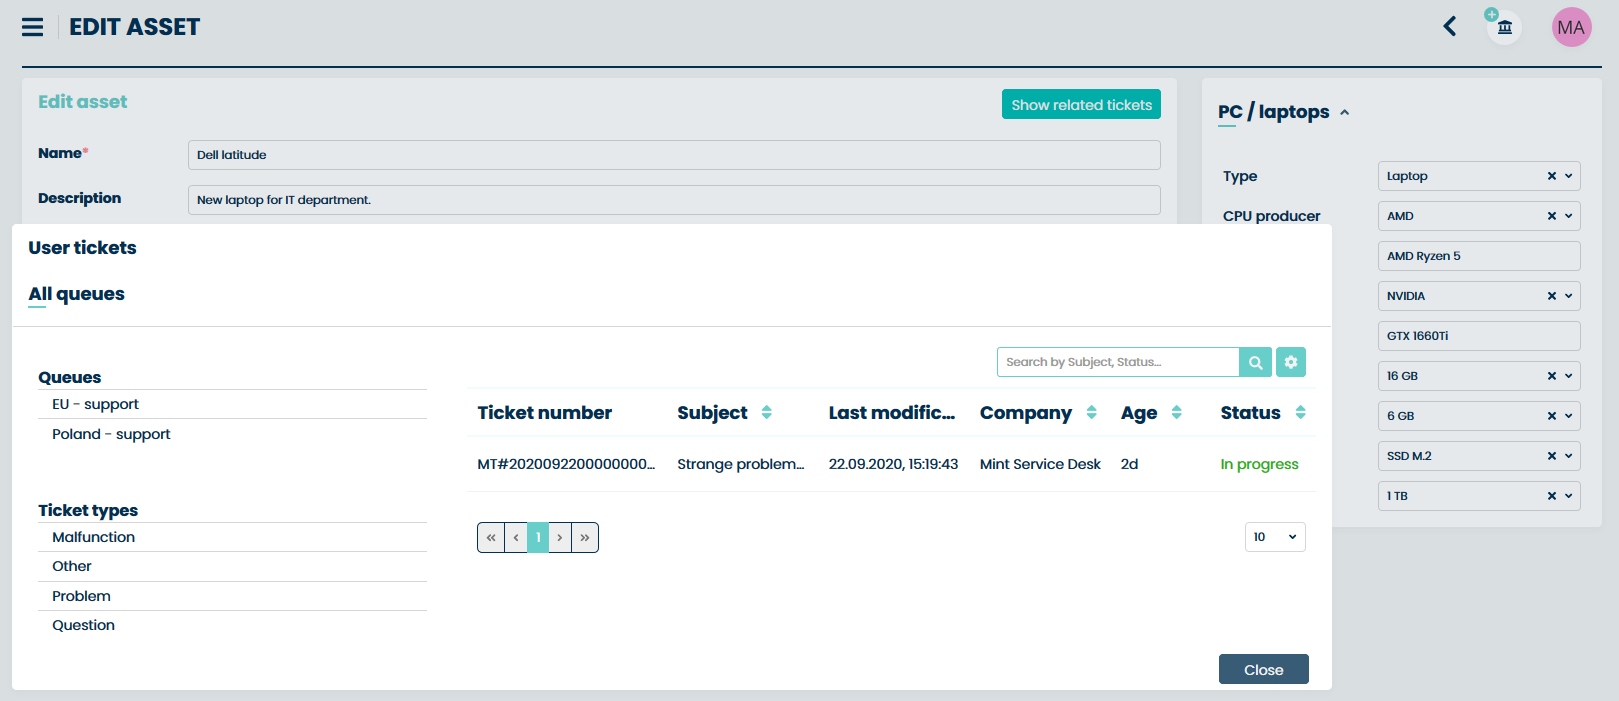
As an Admin you can change all of the attributes and information including the asset ‘Categories’. What’s most important you can add or remove a user in the ‘Assigned users’ part. If you remove a user from this place, the moment he tries to view the Asset he will receive the information that his access right has been changed.

ASSETS DEFINITION
In this part of the system, you can customize the structure for Asset Categories, Groups of attributes, and single attributes with their values. Also, you will change the rights for viewing or making any changes to the aforementioned.
ASSETS STRUCTURE
First is the ‘Assets Structure’ tab, where you can customize the whole structure for Asset categories along with their groups of Attributes, single attributes, and their values.
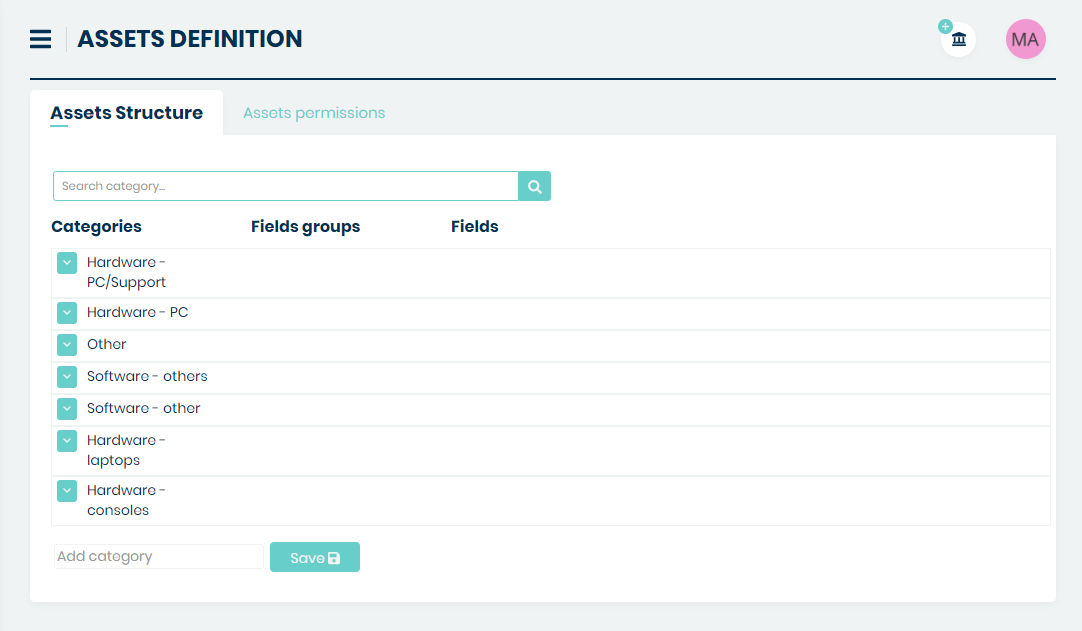
By default, the content of each Ticket Type is hidden, and you only see the Ticket type name.

If you want to see the full content of a Ticket Type you need to click
button, located right on the left side of the ticket type
name.
CATEGORIES
You can create different Asset Categories like “Hardware-phones” or simple “Software”. To add a new category just click on the empty field ‘Add category’, type the desired name, hit ‘Enter’ on your keyboard, or press the ‘Save’ button.

If you want to rename already existing Category just click on its name, make some changes and click Enter.
If you want to remove it just click on a trashcan icon located
on the right side. In the new window, you will be asked to confirm this
action.
Click ‘Yes’ and Category will be removed. Remember that deleting a Category means also deleting all custom Groups of attributes and single attributes that you have added to this particular Category.
GROUPS
Creating and editing groups works almost the same as it is for categories.
In order to create a new group, click on an empty field ‘Add group’ and type the desired name.

Now click enter on your keyboard. Try to save the changes by clicking
on the right side of the screen. You will see information
saying, “Group must have at least one attribute”. Before you’ll be
able to save a group, you need to create at least one attribute.

To change the name of the group just click on it, type a new one, and accept the change by clicking enter.
To remove the group, use the trashcan icon on the right side.
Please notice that along with a group you will delete attributes that
are inside this group.
ATTRIBUTES
Attributes are the fields that you will use to add detailed information for your assets. Each group must have at least one attribute. Without it, you won’t be able to save a new, fresh group.
Adding and editing attribute name as well as removing the whole attribute works the same way as for categories and groups.
However, after typing and accepting a name for the attribute you will have to choose attribute type, decide if you want to be able to search by this attribute in the list of assets (‘Search filter’ check-box) or be able to select more than one value of the attribute (‘Multichoice’ check-box).

MINT Service Desk includes a lot of different types of attributes. While selecting ‘Attribute type’ you can choose it from the long list.
The available types are “Pool”, “Integer”, “Date”, “Real Number”, “Text”, “Relation”, “Date Scope”, “Num Scope”, “Geolocation”, “Text area”, “Alert Date”, “Attachment”, “Radio”, “Checkbox”, “Label”, “Regex”, “Dictionary”, “Relation Asset”, “Relation Ticket”, “Relation Contract”, “Relation Company”, “Relation User” and “SubscribedReceiver”
Those types of attributes have already been described in the Tickets > Custom fields > tickets structure part of this guide.
ASSETS PERMISSIONS
If you change the default tab and switch it to second one: “Assets Permissions“ you will be able to select a specific user and grant him or remove his rights to Read (View) or Update (which means not only Update but Read as well – it will also be selected) any of the Asset categories, Assets themselves and their Attributes.
In the first field, you need to select one position from the list of available General types of roles. They can be e.g., ‘Agent Roles’ (if you have more than one created in Agents > Roles section) or ‘Company Roles’ (located in Companies > Company Manager section, separately for each company in ‘Role’ part of the company’s details).
After you do that, from the second list you need to select a particular type of Role for which you want to change the rights.

Below you will also find a ‘Search category…’ search box, where you can type the name of the category that you are looking for, without the need to scroll the whole list.

There are two types of rights in the Mint Service Desk:
Read – allows the user only to view the list of assets from a particular category and their details
Update – it gives the same rights as ‘Read’ but also allows the user to make changes in the content of an Asset in a category. For example, Agent will be allowed to change the name of the asset or change its attribute’s values.
Please notice that when you select the ‘Read’ it will be selected, but the ‘Update’ will not be selected.
However, when you select ‘Update’ it will also select ‘Read’. Update means that you can view and change the content of an Asset.
If you want to change the rights for the whole Category you can select the ‘Read’ and/or ‘Update’ checkboxes located right next to the Category name.
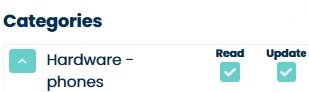
You can also change the rights for selected attributes. To do so, select checkboxes located right next to the attributes that you are interested in.
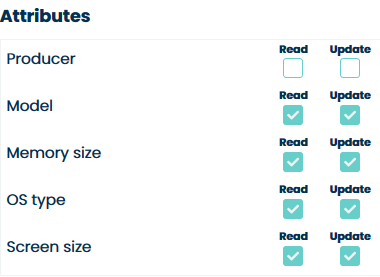
Once you finish making the changes, you need to click button
(located on the right side of the view), otherwise, when you try to
leave this part of the system it will inform you that you have some
unsaved changes.
ASSETS INTEGRATIONS
This section contains information about integrations by API or from CSV file.
API INTEGRATION
In this part of the system assets can be integrated with Lansweeper. To do this, press the button.

In the Name field, enter the name you want displayed on the list of all integrations. In the Definition field, select Lansweeper from the dropdown menu.
To complete the first configuration process, press the button.
Then return to the list with all available asset integrations and edit the configuration of interest.
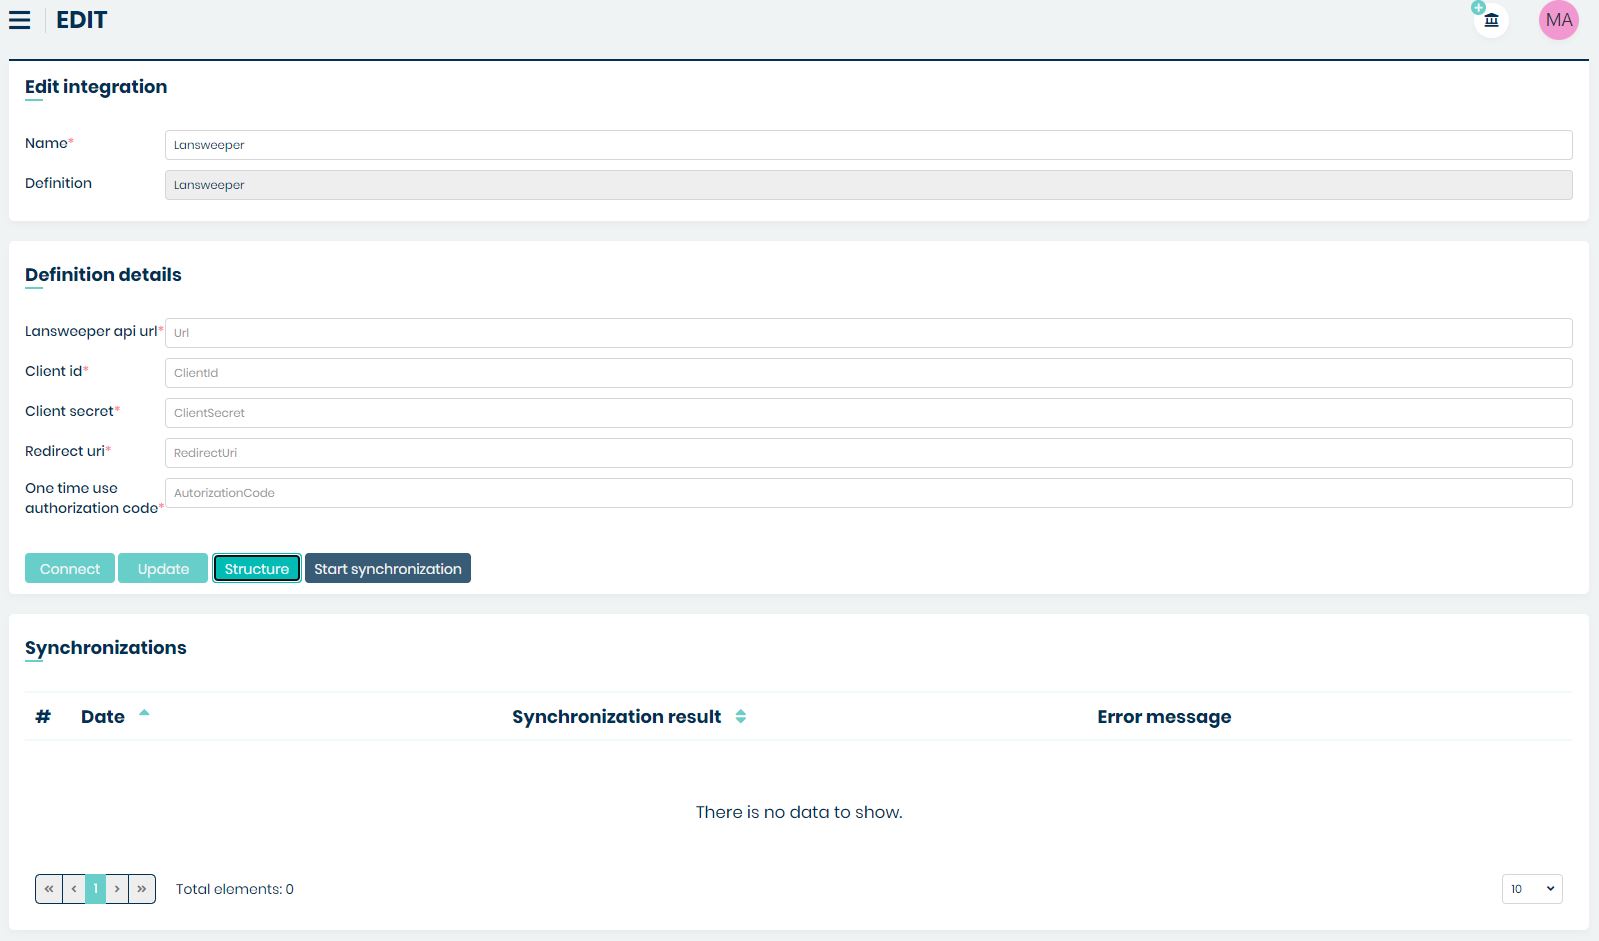
The configuration is similar to Users Integrations, which was described earlier under Users/Users Integrations.
CSV INTEGRATION
The asset import functionality from a CSV file allows adding new assets as well as updating existing ones in the Mint Service Desk system. This guide is divided into two sections – Configuration and Examples.
CONFIGURATION
Before configuring the integration, you must have an asset category created in the Admin Panel under Assets → Asset Definition. If it does not exist, create a new one and, if needed, define custom fields within that category. This documentation assumes that an asset category and two custom fields are already set up.
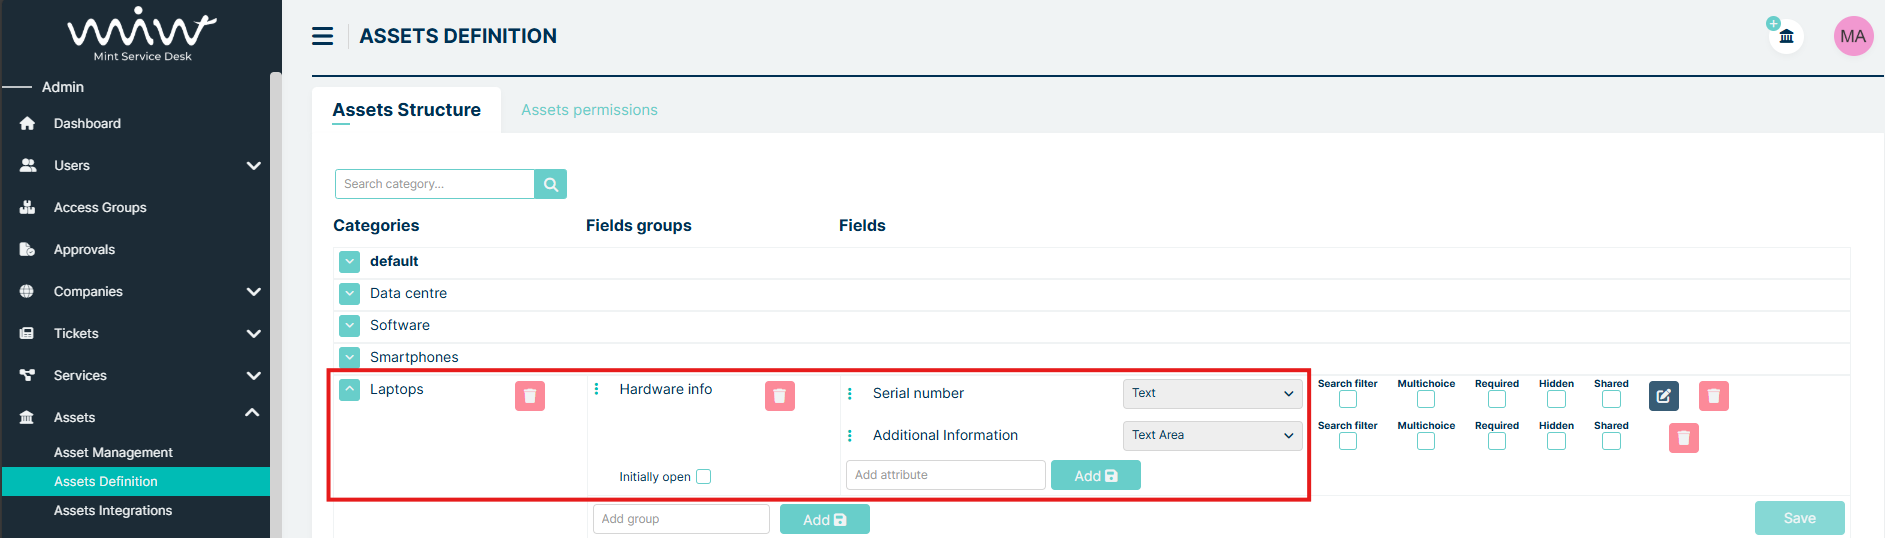
The integration process begins by navigating to the Assets tab and then to the Assets Integrations submenu. The main view presents a table of saved configurations with the following columns:
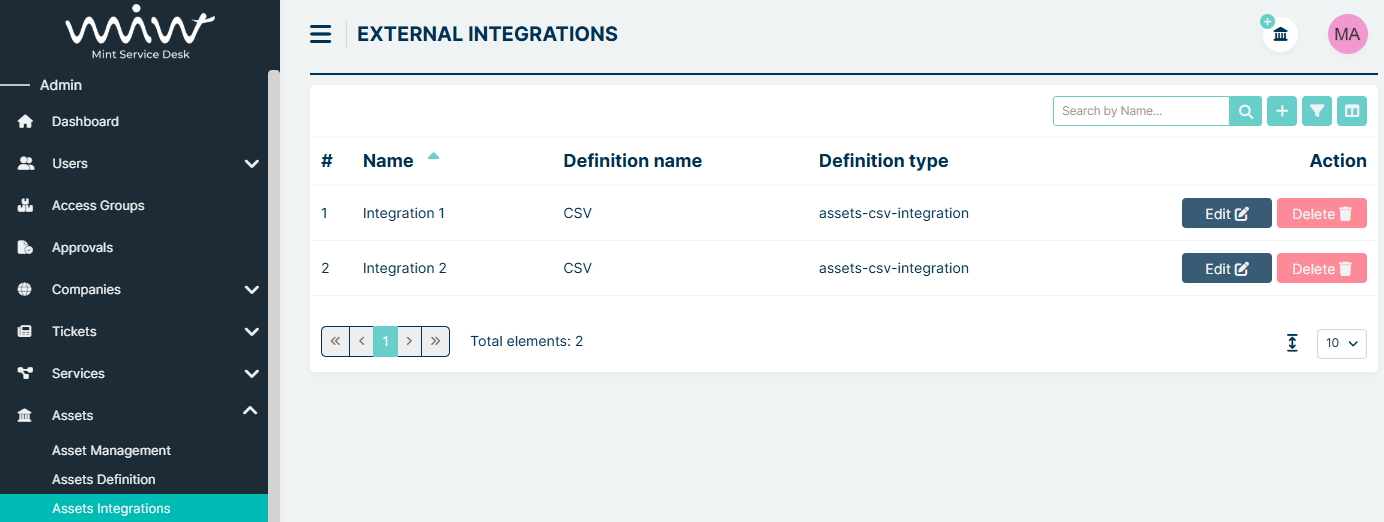
Name – Configuration name
Definition Name – Short name of the configuration type selected from the list during creation
Definition Type – Description of the selected configuration type
Action – Column with Edit and Delete buttons
To create a new configuration, click the “Plus” button in the upper-right corner of the page.
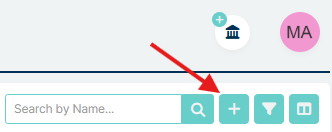
This opens the Create Integration page, where you enter a name in the Name field (any value) and select the Definition Type as CSV (CSV assets integration).
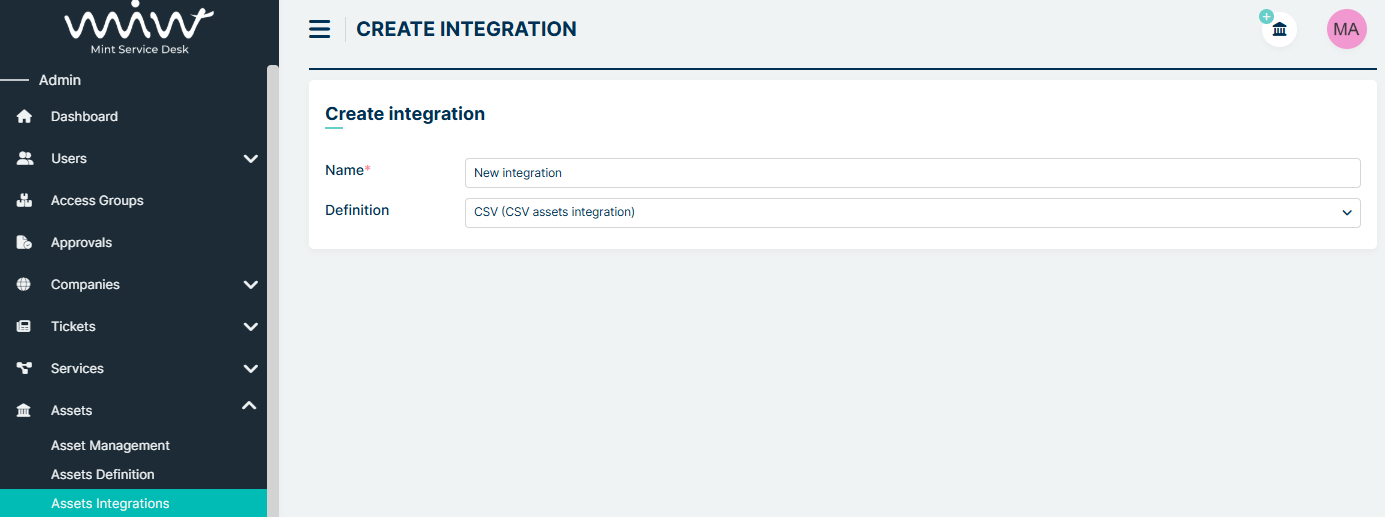
Once the details are filled in and saved, you are redirected to the configuration settings.
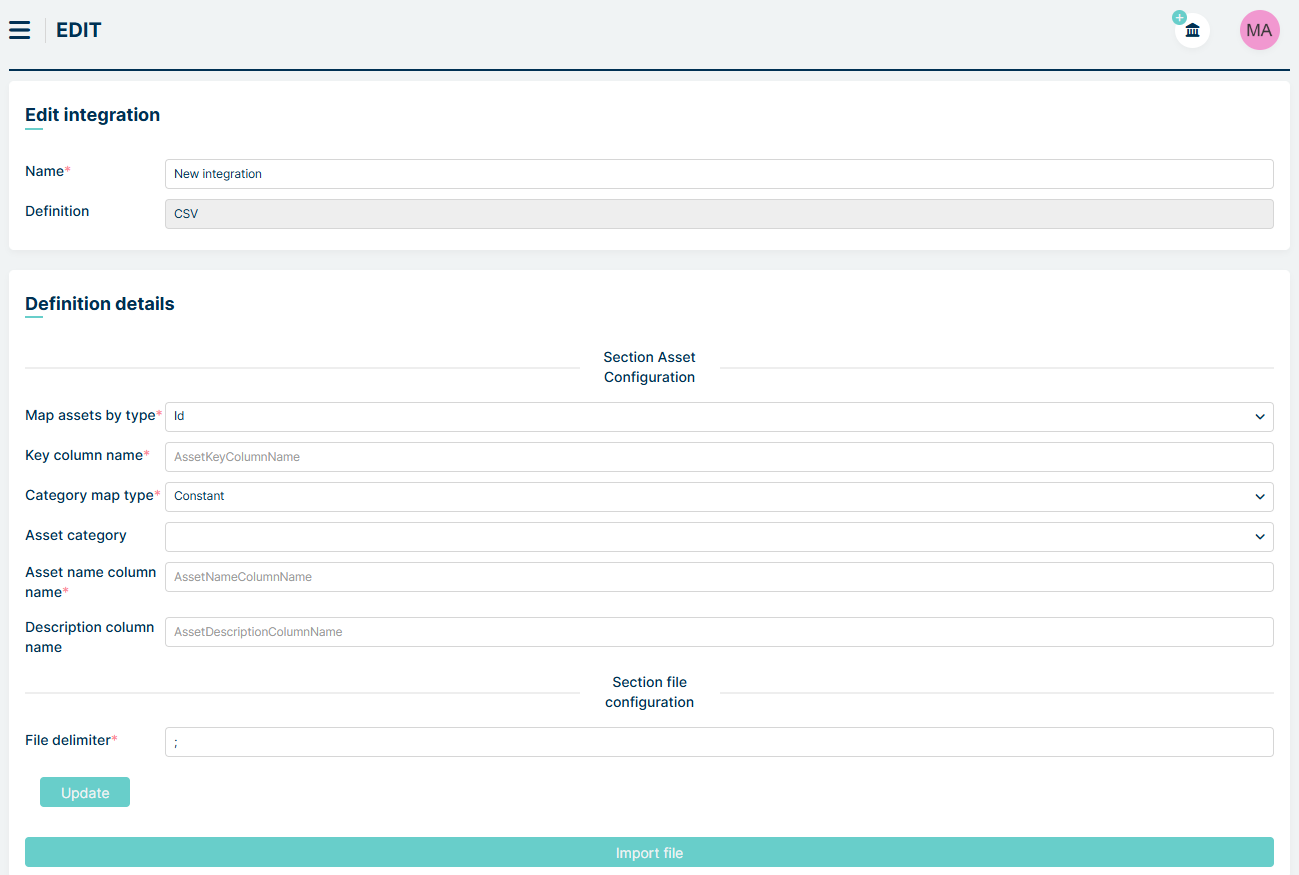
Now we can proceed to Set Asset Configuration Section. This section includes the following fields:
Map assets by type – This field determines which column or custom field the importer will use to recognize the uniqueness of assets in Mint Service Desk. If the value in the selected column exists, the importer will update the corresponding asset. If it does not exist, a new asset will be created. Available options:
Id – Corresponds to the asset’s unique system number in Mint Service Desk
Subject – Corresponds to the asset’s name
CustomField – Selecting this displays a new field: CustomField attributeID key column name.

In this field you can select an existing custom field and assign it as the primary key for the asset. First, choose the asset category from the dropdown, then select the associated custom field.
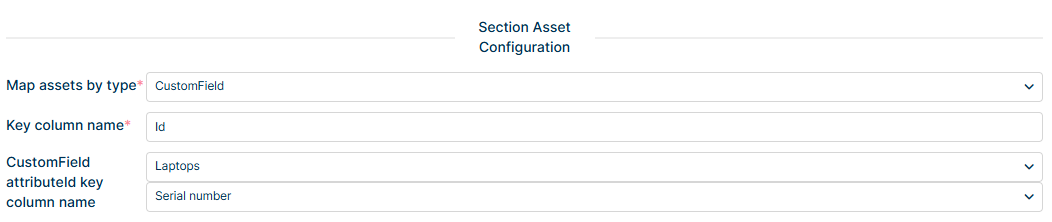
Once selected, this field becomes the primary key for the importer.
Key column name – Name of the column in the CSV file that corresponds to the key column selected in Map Assets by Type.
Category map type – Determines how the importer assigns an asset to a category:
Constant – You manually select an asset category from the Mint Service Desk system. The importer will only add or update assets in this specific category.
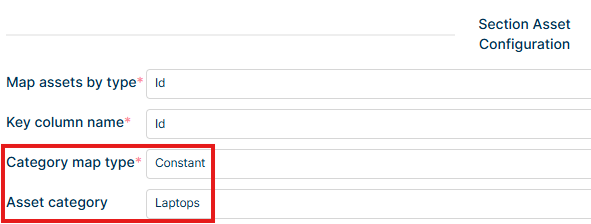
FieldsValue – You specify the column in the CSV file that contains category values. The category values must be in GUID format (e.g., a816f0ec-15d6-40fd-818a-fc9687c4c77c) and must match category IDs in the Mint Service Desk database.
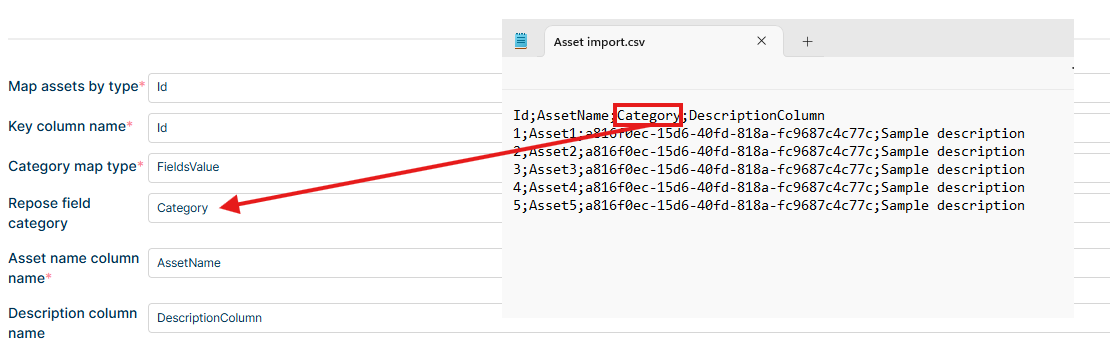
FieldsValueWithMapping – Allows mapping category names from the CSV file that may not exactly match those in Mint Service Desk. This configuration enables name mapping between the CSV and the system. After selecting this option, the Category field mapping section appears with Set external category value field and New row button.
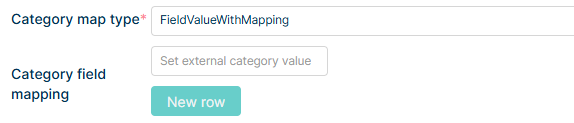
In the field with the placeholder Set external category value, we indicate which column in the CSV file corresponds to the asset category. After clicking New row, the first entry (#1) appears with the fields Set external category value, Asset category, and the Delete button.
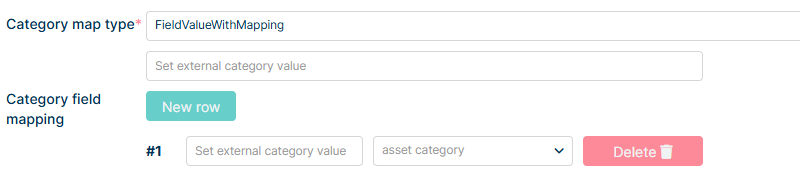
In entry #1, in the Set external category value field, we specify the first value from the CSV column, while in the Asset category dropdown list, we select the category to which this value will correspond. For example, in the CSV file, we have a column named IT Hardwares with the first value Computers. We want Computers to be treated as a category, but in Mint Service Desk, this category is named Laptops. Therefore, we configure it as follows:
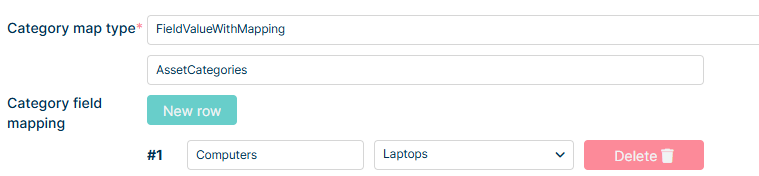
and the configuration with the CSV file:
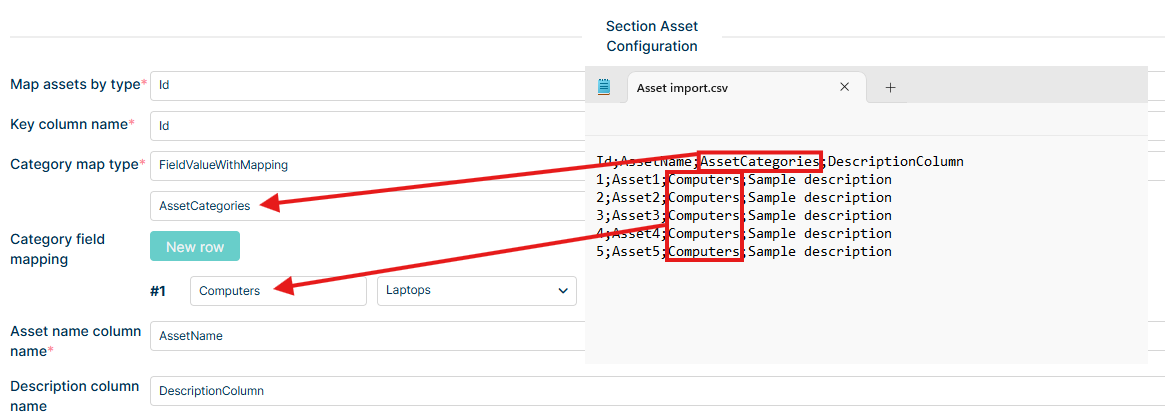
This means: Take the data from the “AssetCategories” column in the CSV file, and if a value in this column matches “Computers,” assign the asset from that row to the “Laptops” category in Mint Service Desk. In this way, we can assign multiple assets to multiple categories simultaneously.
Asset name column name – Name of the CSV column that corresponds to the Name field of the asset in Mint Service Desk.
Description column name – Name of the CSV column that corresponds to the Description field of the asset in Mint Service Desk.
Next section is Section File Configuration. Here we can define CSV file following settings:
Delimiter – Default is a semicolon (;).
Import File Button – Upload the CSV file for import.
The last section displays Synchronization history, including:
Start time
Result
Execution date
Errors (if any)
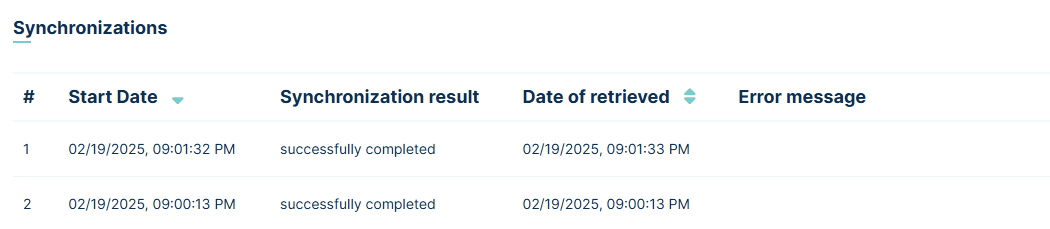
EXAMPLES
Below is an example of importing new assets and an example of updating assets.
Importing New Assets
In this example, an asset definition Laptops exist
The asset database is initially empty
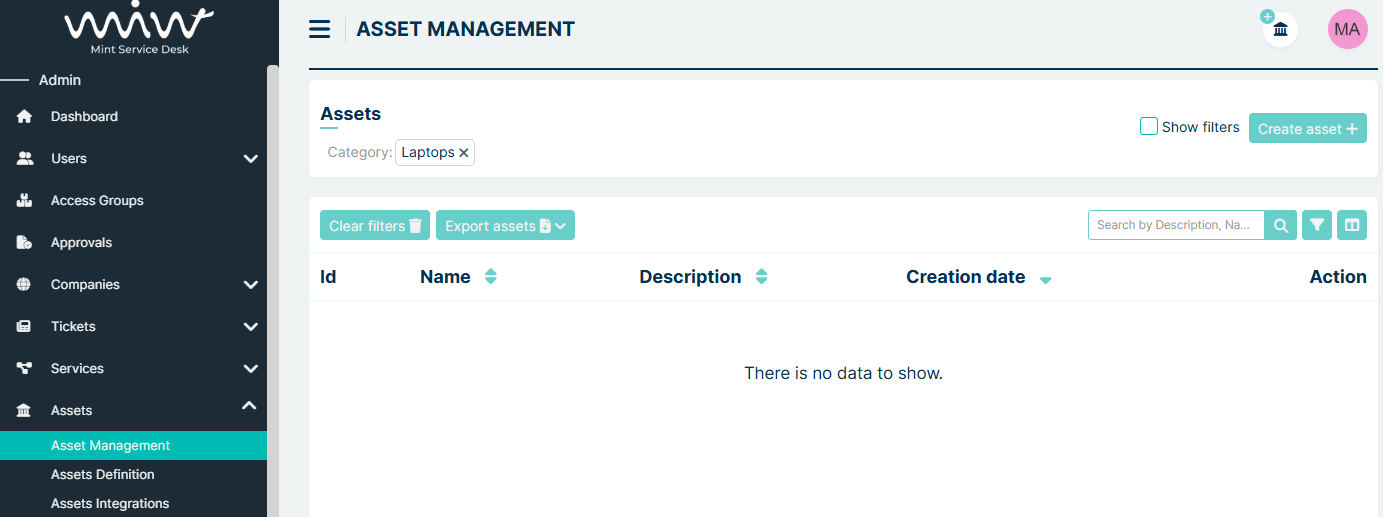
We want to import five assets with the following names: Asset1, Asset2, Asset3, Asset4, Asset5. Each asset should have text: Sample description in asset description field
Steps:
First we create a CSV file with the asset details
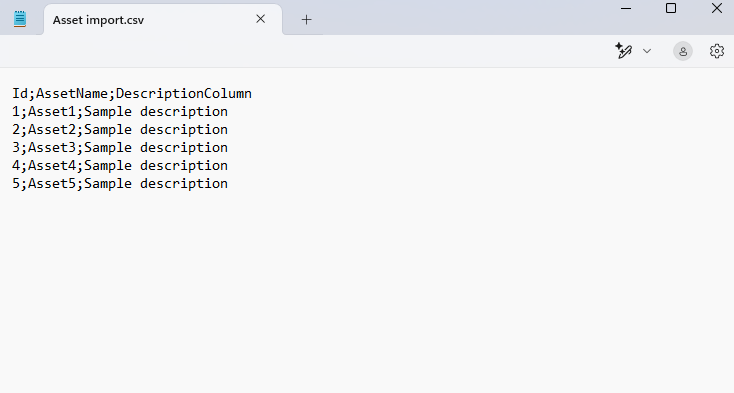
Next, we create a new import configuration in the Asset Integrations tab (as described in Configuration part) and fill in the Section Asset Configuration section.
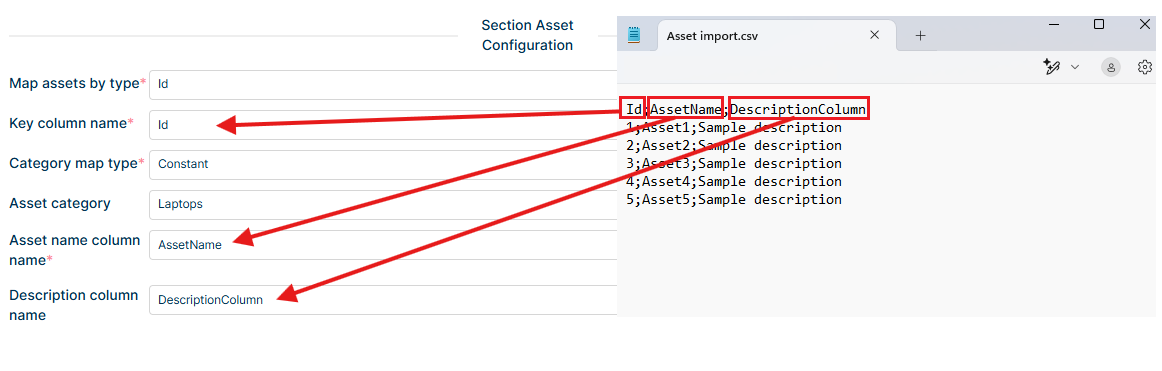
In Category map type, we select Constant and choose Laptops asset category
We leave the File delimiter field unchanged (semicolon) and then click Update – the data is saved.
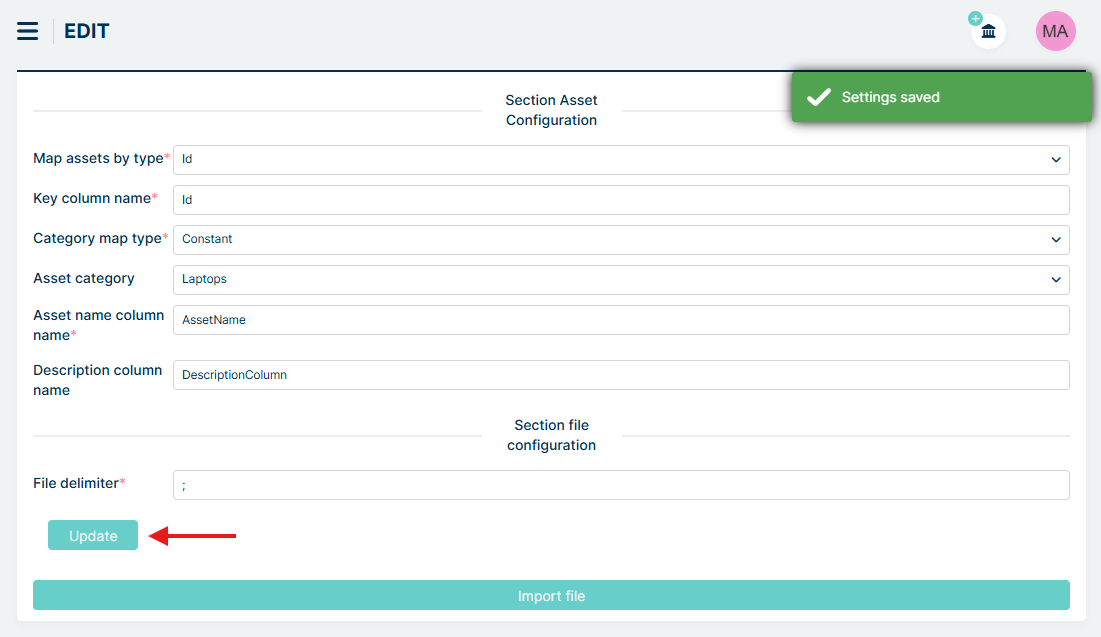
Now we import our file – click Import file and select the CSV file from the disk. As soon as it is uploaded, the following toast notifications appear in the top right corner, and the synchronization starts
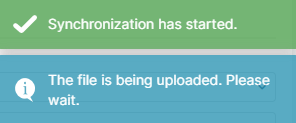
If another ongoing synchronization is already running in the background, we receive a notification:
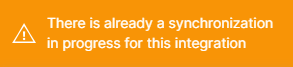
In the Synchronizations section, we can see our synchronization with the status In Progress.

We can click on it to enter its details and see progress:

Once completed, the status changes to Success, and the assets are created in the system.
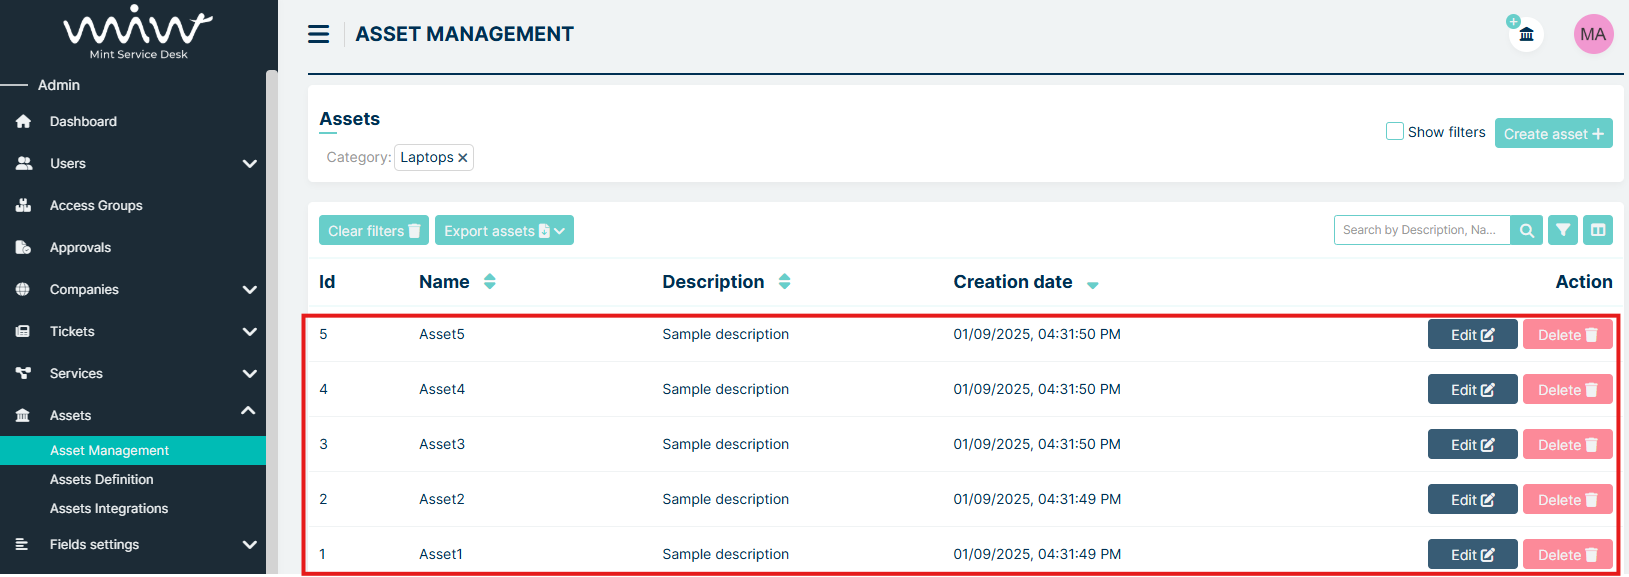
Modifying Existing Assets
After importing the assets, we want to update their names and descriptions. In the CSV file, before the update we have:
After the update we want:
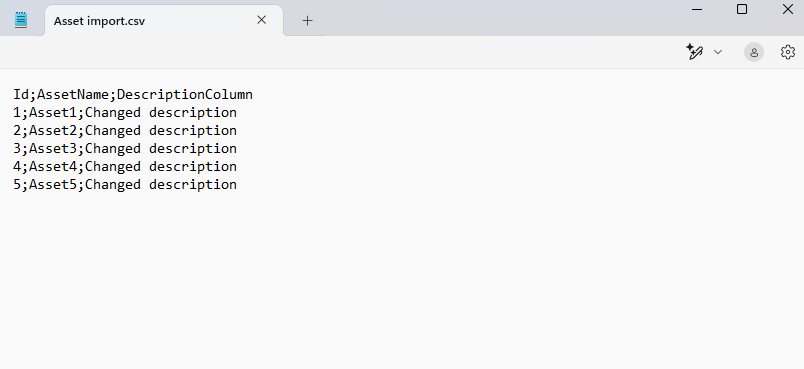
As the Primary key, we select the asset’s ID. It is important that the asset ID in CSV matches the ID in Mint Service Desk.
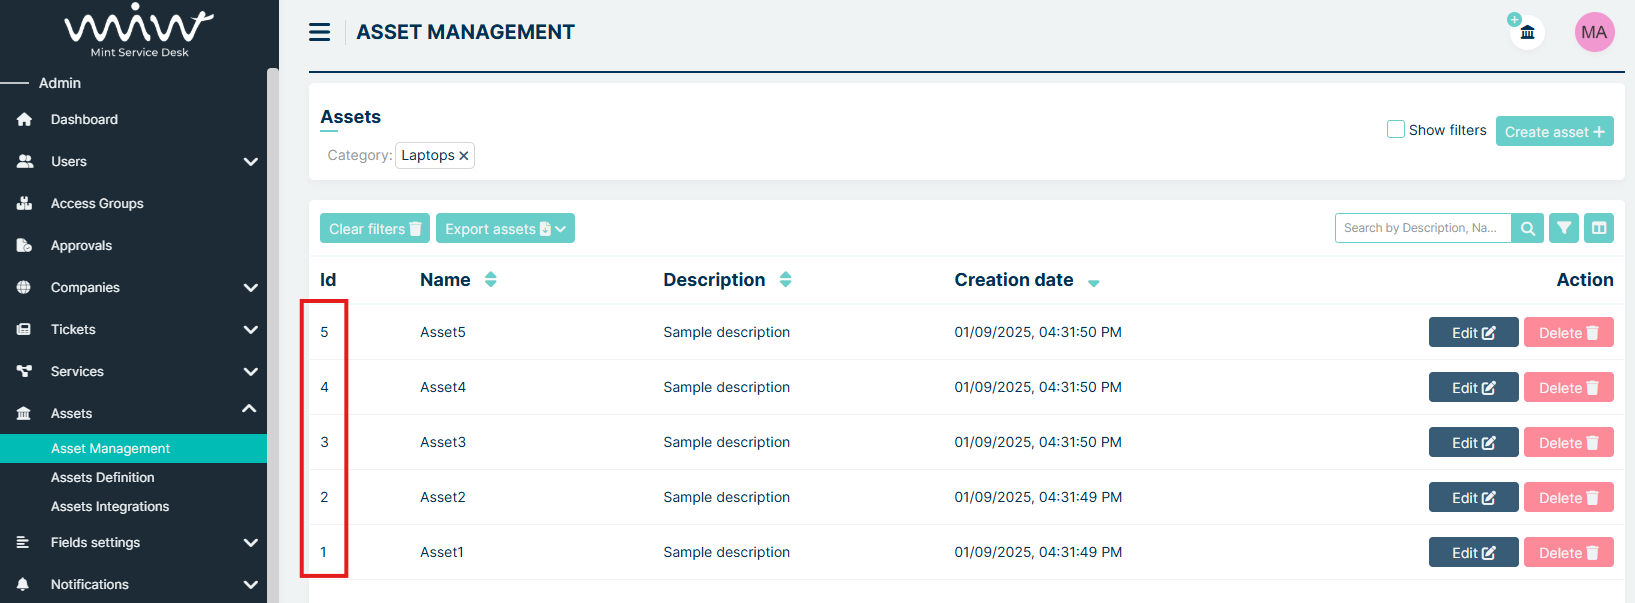
If incorrect IDs are used, new assets will be created instead of updating existing ones.
We import the updated file in the same way as described above in the instructions for importing new assets. After the import, we go to the Asset Management tab – the assets have been modified.
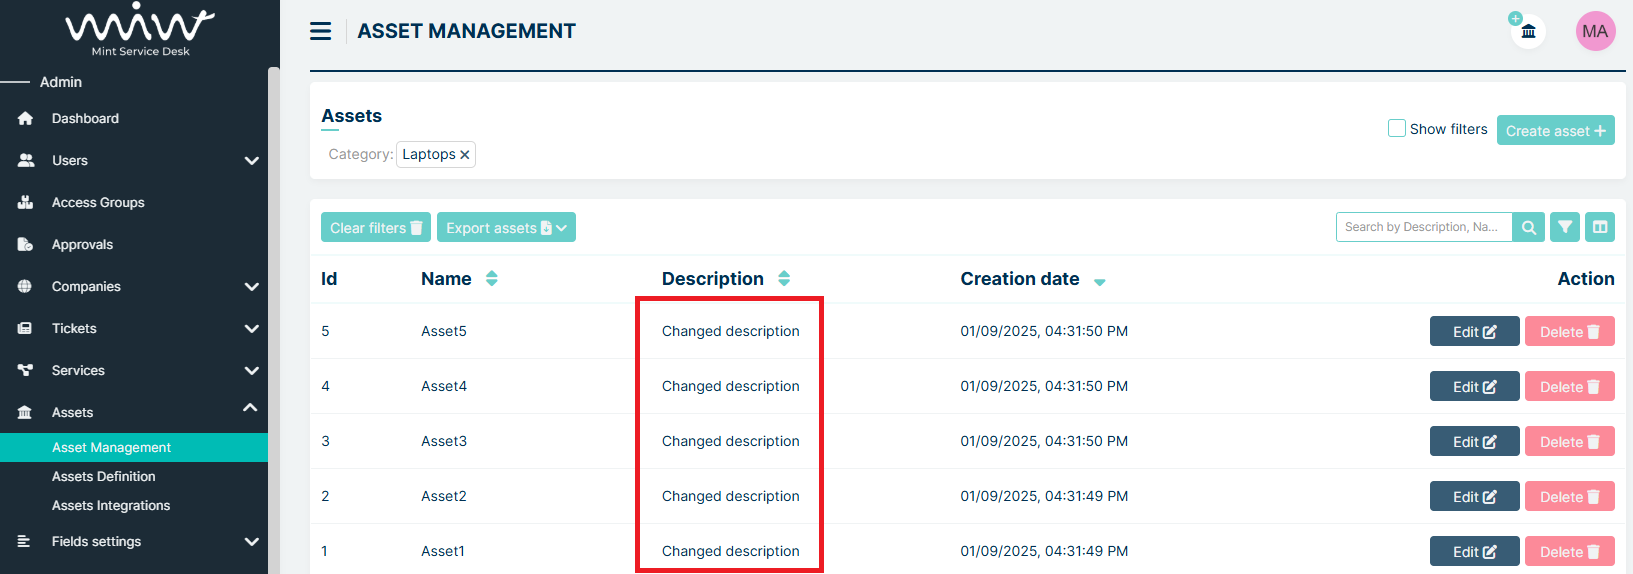
FIELDS SETTINGS
DICTIONARIES
As was mentioned before, the definition of each ‘Dictionary’ attribute type along with its values, can be done here.
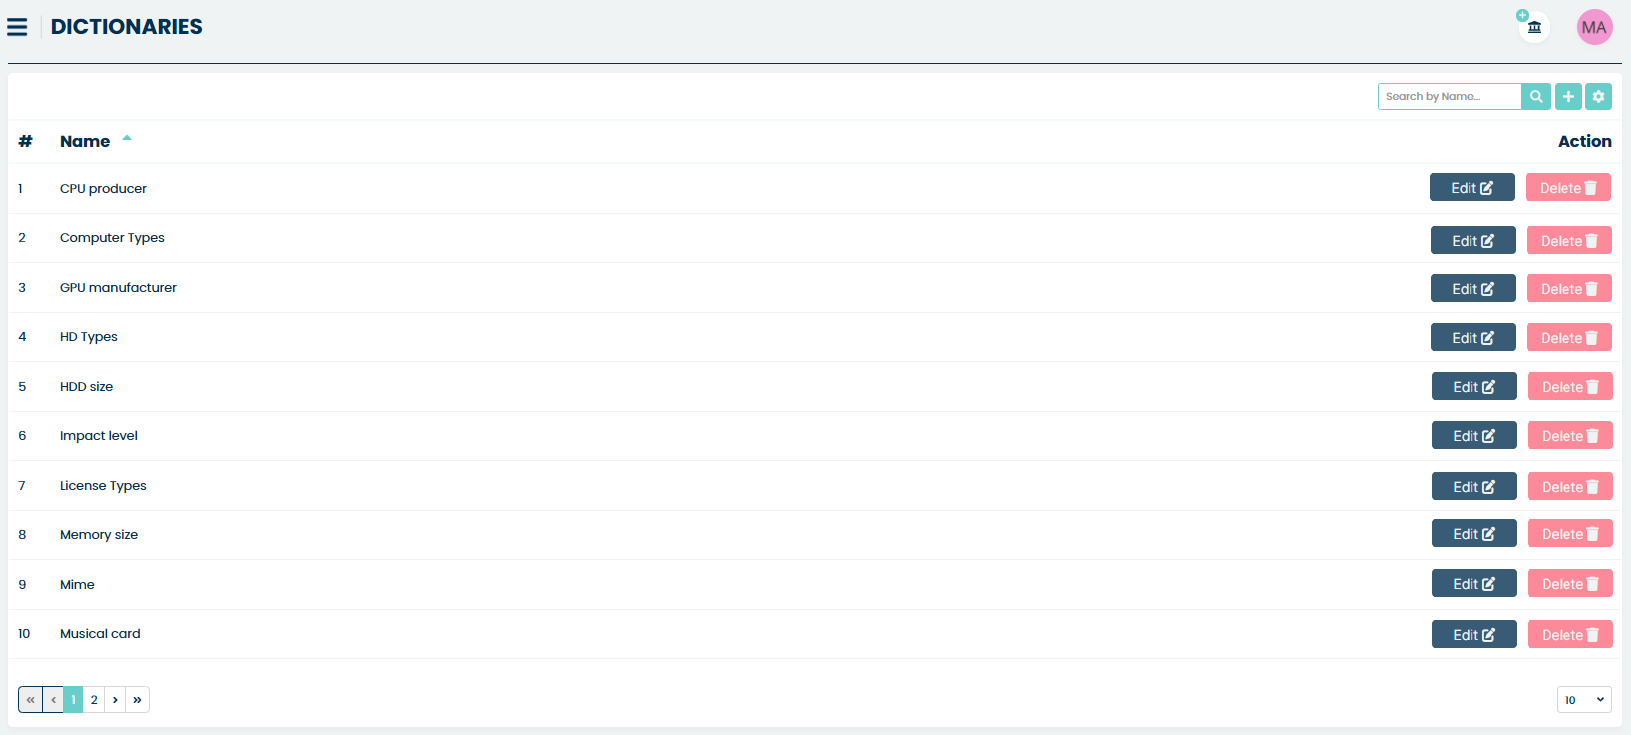
You can add/delete or modify Dictionaries and their values. Later such a dictionary will be presented for the users in the form of the dropdown list, where the user can select one (or more if ‘MultiChoice’ is selected in the attribute structure) value from that list.
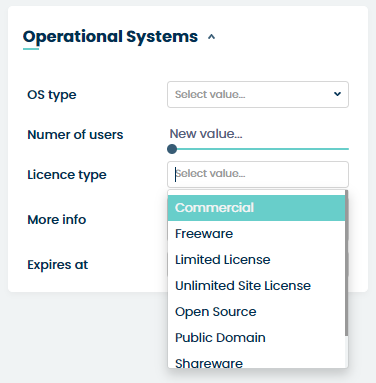
In order to create a new Dictionary, click the “Add new value”
button, located on the right side, and the creation screen
will be displayed.
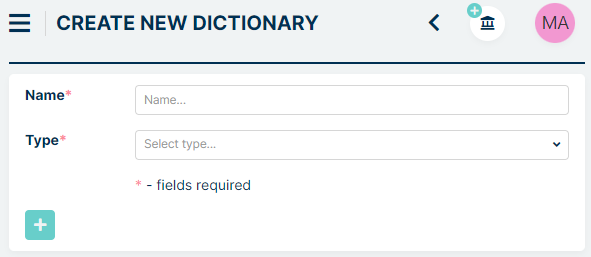
Now, type the name for your Dictionary e.g., “Computer Types” and then select one of the types available on the ‘Select type…’ dropdown list. In our example, we will choose the “Text” type.
There are more dictionaries types that you can use: “Char”, “Checkbox”, “Date”, “Decimal”, “Email”, “Integer”, “Phone number”, “Text” and “Time”.
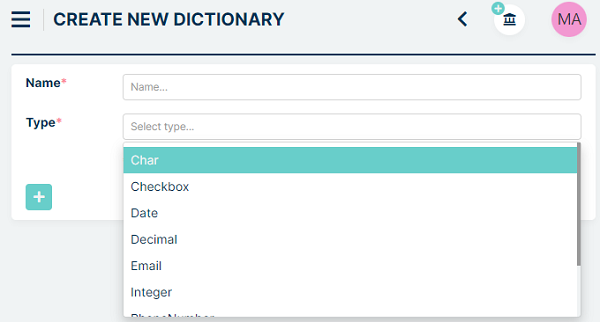
Remember that you can create your types under Fields settings > Regexes.
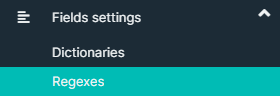
Once you to that, click on the button and you will see that a
view has been expanded and you can add the first value for your
Dictionary.
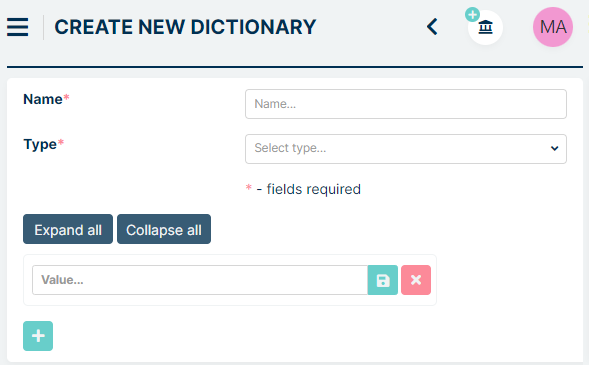
By pressing the button you can add as many positions for your
values as you want.
Type the name for each value in ‘Value…’ text field and press ‘Enter’ on
your keyboard. You can use a button for this as well.
If at any moment, while typing the name, you decide that you want to
remove the whole position just press the button.
After you saved the names for the values you can do a couple of things.
You can rename the Value by pressing the edit button or
delete the Value by pressing the button.
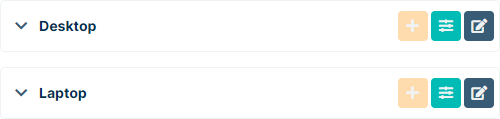
What’s more important is that you can create a ‘Child value’ for each
Value. To do that press the  button on the right side of
Value’s name. A new row will appear right below. You will notice that
its position is not equal to the “parent” Value and it is moved a little
bit to the right.
button on the right side of
Value’s name. A new row will appear right below. You will notice that
its position is not equal to the “parent” Value and it is moved a little
bit to the right.
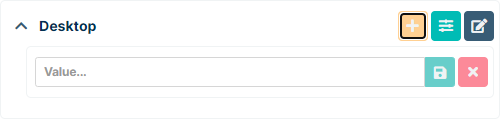
Here, as well, you can create as many ‘Child values’ as you want.
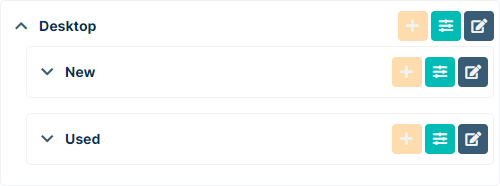
Once you’re done you can save your Dictionary by clicking on
button to create your new Dictionary.
Every time you have a dictionary with ‘child values’ you can use some additional options to help you display them. Once you’re either in ‘Create new dictionary’ or ‘Edit dictionary’ view you can use the Expand / Collapse buttons.

The first one will show everything, including ‘Child values’, while the second will hide them and you will only see ‘Values’.
If you don’t want to see ‘Child values” of every Value that has them,
you can expand and see ‘Child values’ of only one specific Value. Just
press the  button in order to expand the list or the
 button to hide it.
Let’s take a look at the remaining buttons. The  button allows adding
descriptions to each value in the dictionary depending on the configuration
under the
button allows adding
descriptions to each value in the dictionary depending on the configuration
under the 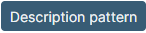 button. For example, we added a dictionary value
named Computer 1, but we want to assign a different label to the name. First we
configure settings under the button and save:
button. For example, we added a dictionary value
named Computer 1, but we want to assign a different label to the name. First we
configure settings under the button and save:
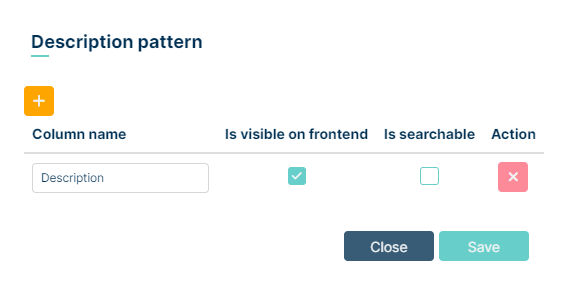
Next we click the button and enter the name that will be displayed in
the ticket for this dictionary entry.

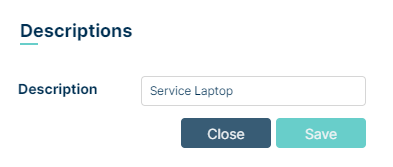
After saving the changes, the value is assigned. From now on, when selecting a value from the dictionary, the user (Agent and Client) will see the value with the label.
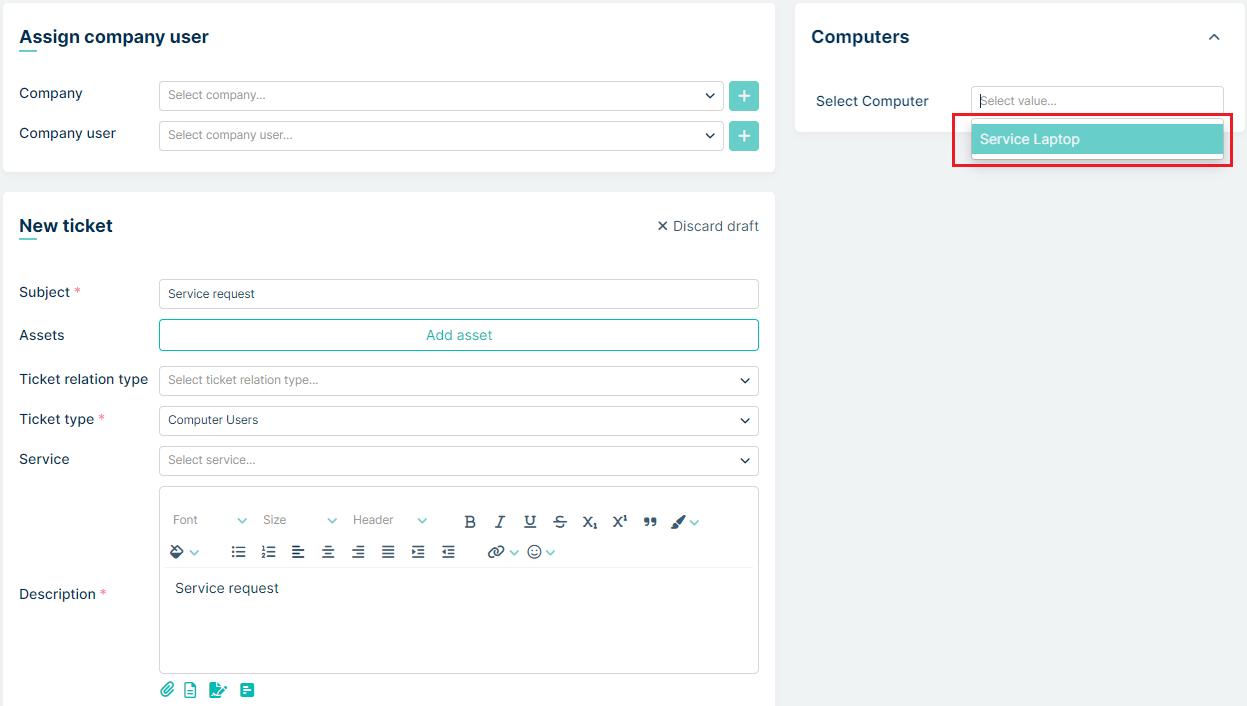
The  button allows specifying for which set parameters the dictionary
value should be visible in the ticket. After clicking it, a new window opens with
the possibility of adding values on the left, as well as Close and Save buttons on the right.
Click the button to add a new row.
button allows specifying for which set parameters the dictionary
value should be visible in the ticket. After clicking it, a new window opens with
the possibility of adding values on the left, as well as Close and Save buttons on the right.
Click the button to add a new row.
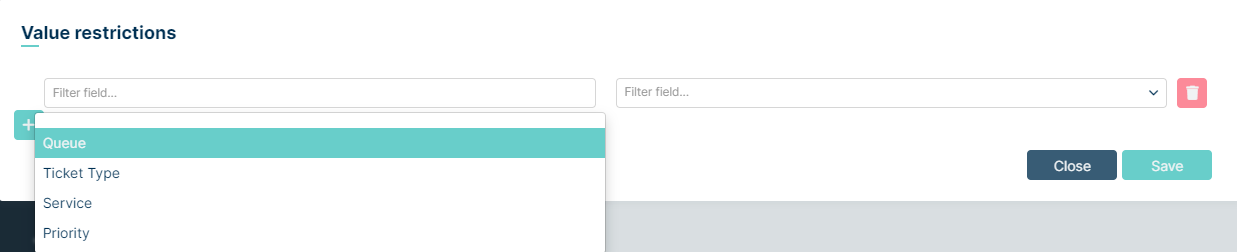
In the left part we choose from the available values:
Queue
Ticket Type
Service
Priority
Selecting one of the above options allows you to choose a specific value assigned to this option in the field on the right side of the row, such as a specific queue, ticket type, priority, or service.
For example, from Operating Systems dictionaryselect the value: Android
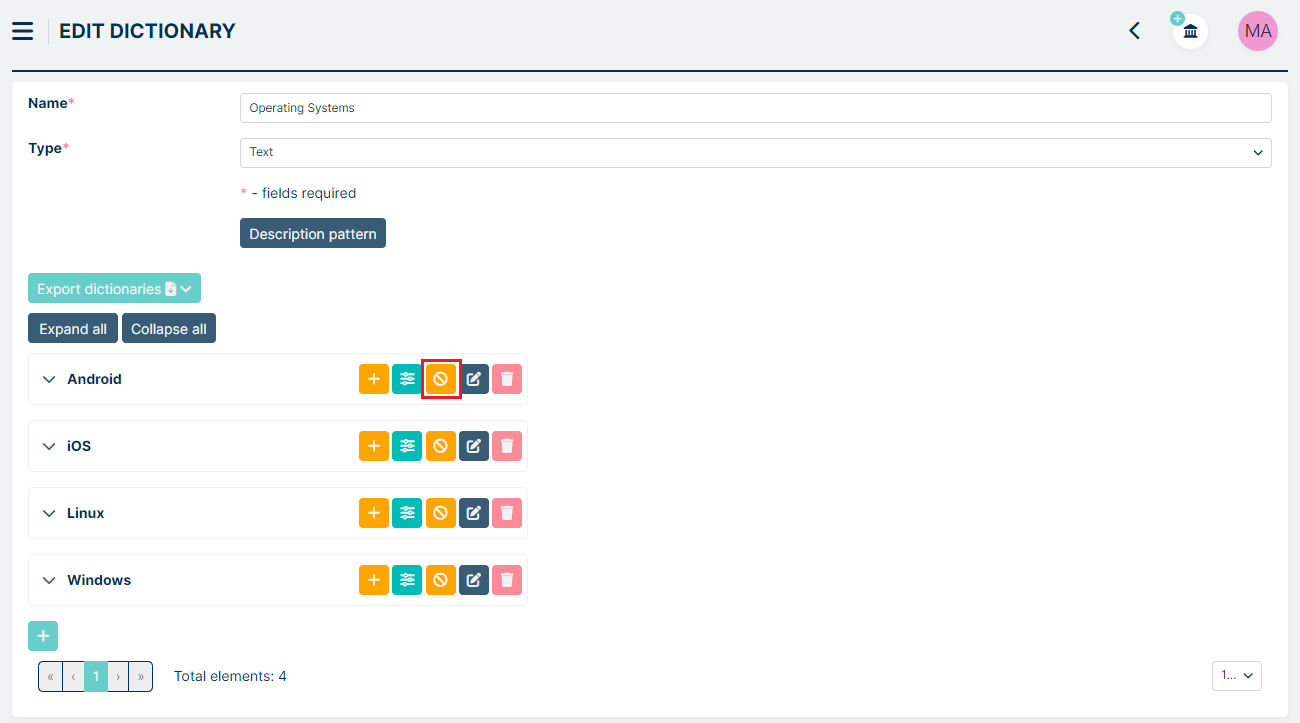
in button choose the ticket type: Smartphone Users and save.

This means that the given dictionary value will be visible only for the ticket type: Smartphone Users.
Let’s check this. In the image below, Agent creates a ticket with the ticket type: Computer Users and uses the dictionary: Operating Systems assigned to the custom field: Select Operating System. The value Android does not appear in the list of selectable values.
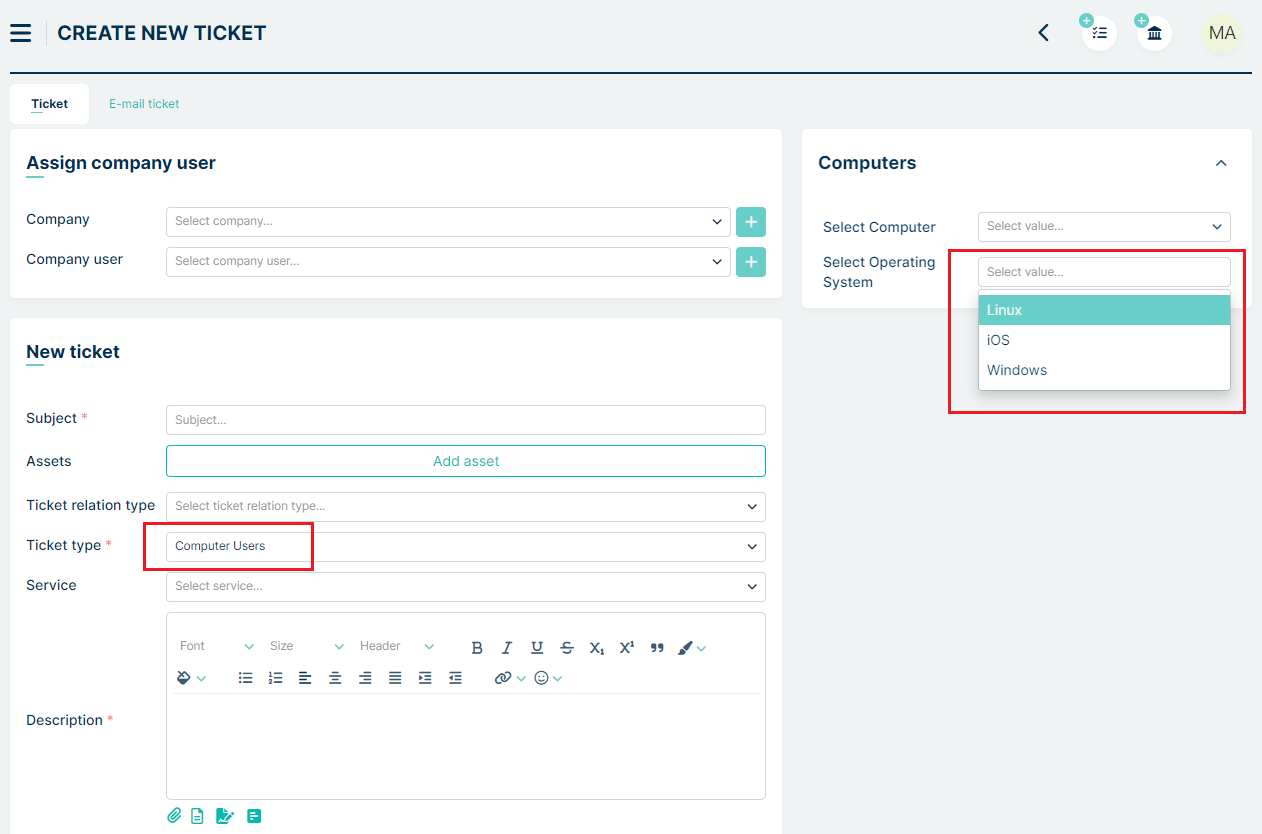
In the next image, Agent creates the same ticket but with the ticket type: Smartphone Users. This ticket type uses the same dictionary. As we can see, the value: Android appears in the list of selectable values.
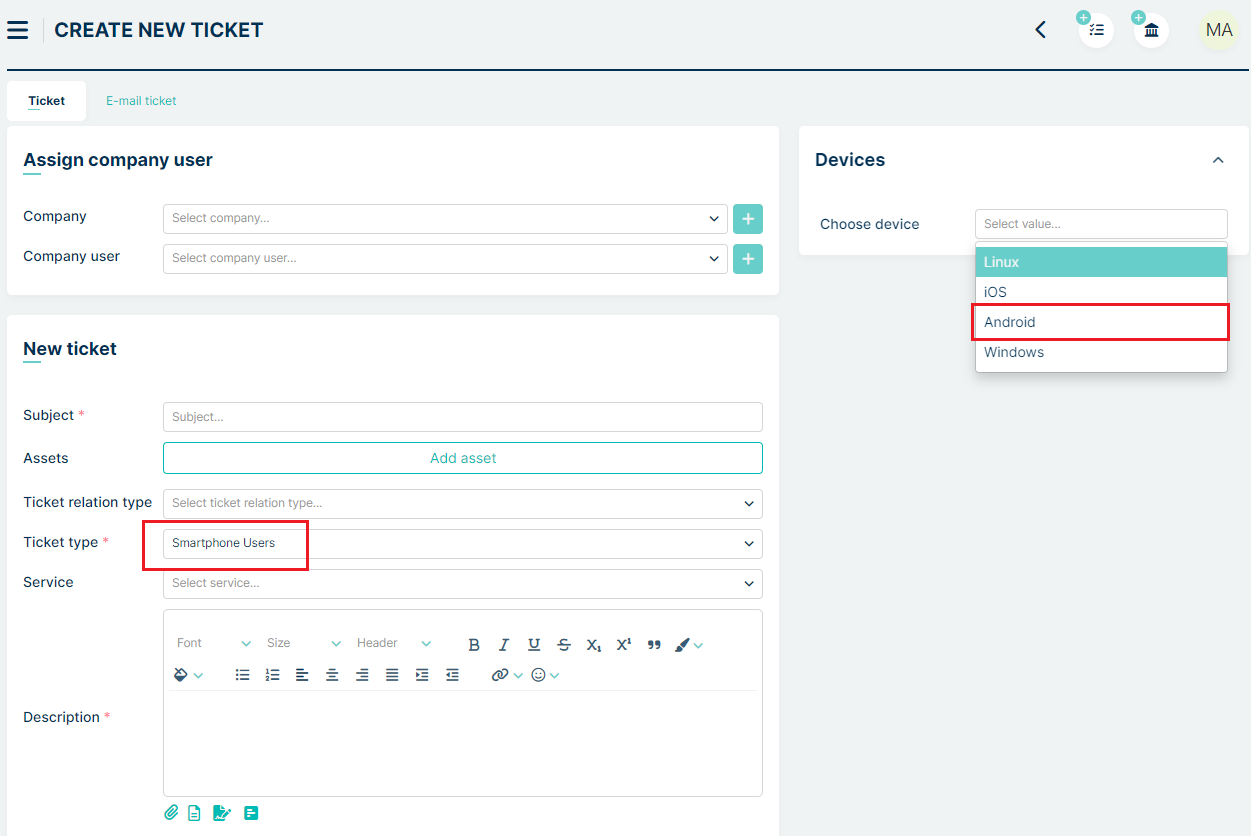
Remember, not selecting any parameters under the discussed functionality means that the values should always be visible (depending on the permissions assigned to the custom field).
We can add more parameters if needed.
Now, let’s go back to the main Dictionary list. Whenever you decide to
change anything in any of the dictionaries, just click the
button located on the right side (‘Action’ column) of each dictionary on
the list.
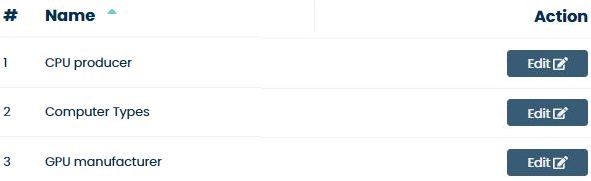
REGEXES
Regexes = Regular expressions. They are very useful if you want to limit the values stored in a field in a way that only some specific information can be added. For example, if you have an “Integer” attribute then only numbers can be stored, or an “Email” attribute can only store a proper email address account.
By default, MINT Service Desk has some “Regexes” already defined. However, if you like, you can always create new ones.
Click on the “Add new value” button, located on the right
side, next to the search field and you will be moved to the “Create New
Regex” screen.
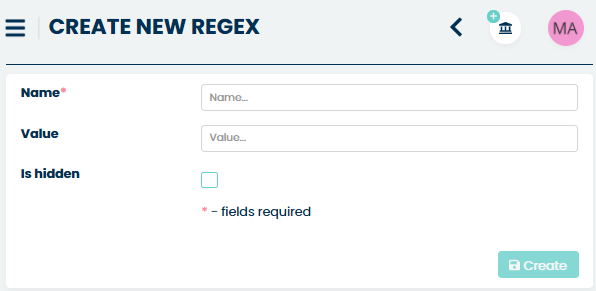
Now, just type the “Name” of your regex and the allowed set of “Values”.
You can also check the option “Is hidden” if needed. Press the
button and the new regex will appear on the list of available
ones.
If, on the other hand, you would like to make some changes in already
existing Regex, just click the button located on the right
side of the main view, in the ‘Action’ column.
DICTIONARIES INTEGRATIONS
Dictionaries integration facilitates the swift import of both simple and advanced dictionaries (with patterns) from a CSV file. This saves the user time that would otherwise be spent on manually entering similar data.
The process requires that a created dictionary exists in the system. To create a new dictionary, go to Field Settings -> Dictionaries.
The integration process starts by navigating to the Field Settings tab and then to the Dictionary Integration submenu. The main view presents a configuration table with the following columns:
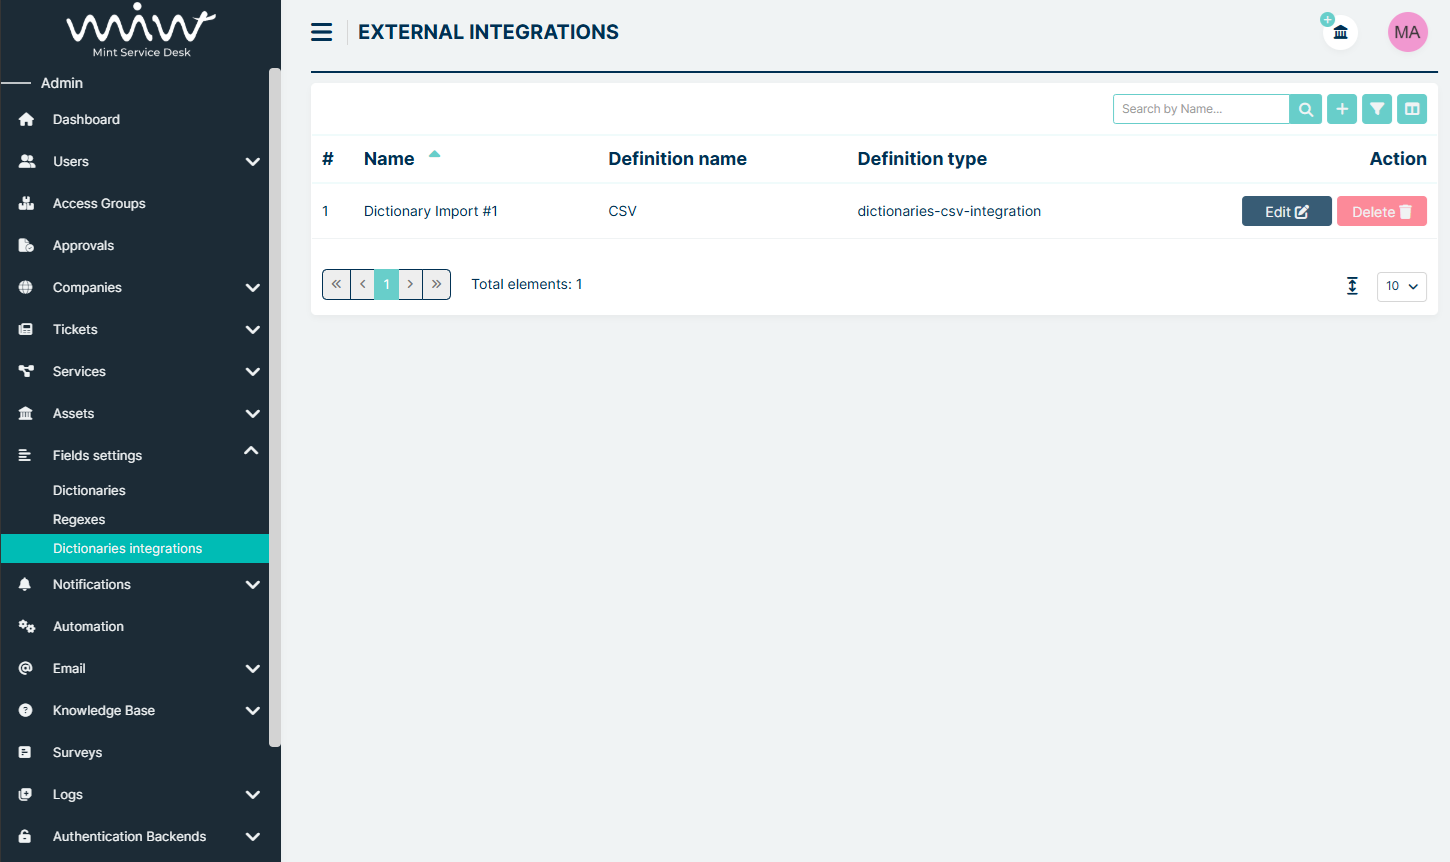
Name - the name of the configuration
Definition Name - a short name for the type of configuration selected from the list during creation
Definition Type - a description of the selected type of configuration
Action - a column with
and buttons
To create a new configuration, click the button in the upper right corner of the page.
This opens the Create Integration page, where we name our configuration in the Name field and select the type of configuration in the Definition field.
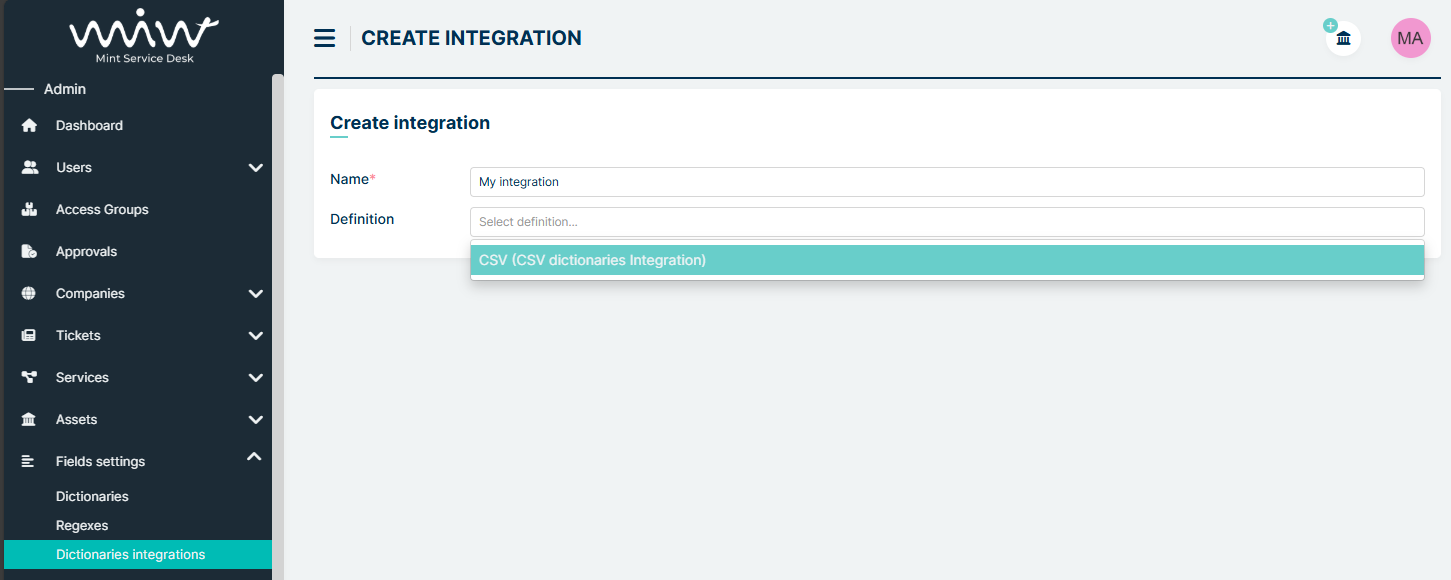
After completing and saving the data, we are redirected to the configuration settings.
We start with Section dictionary configuration.
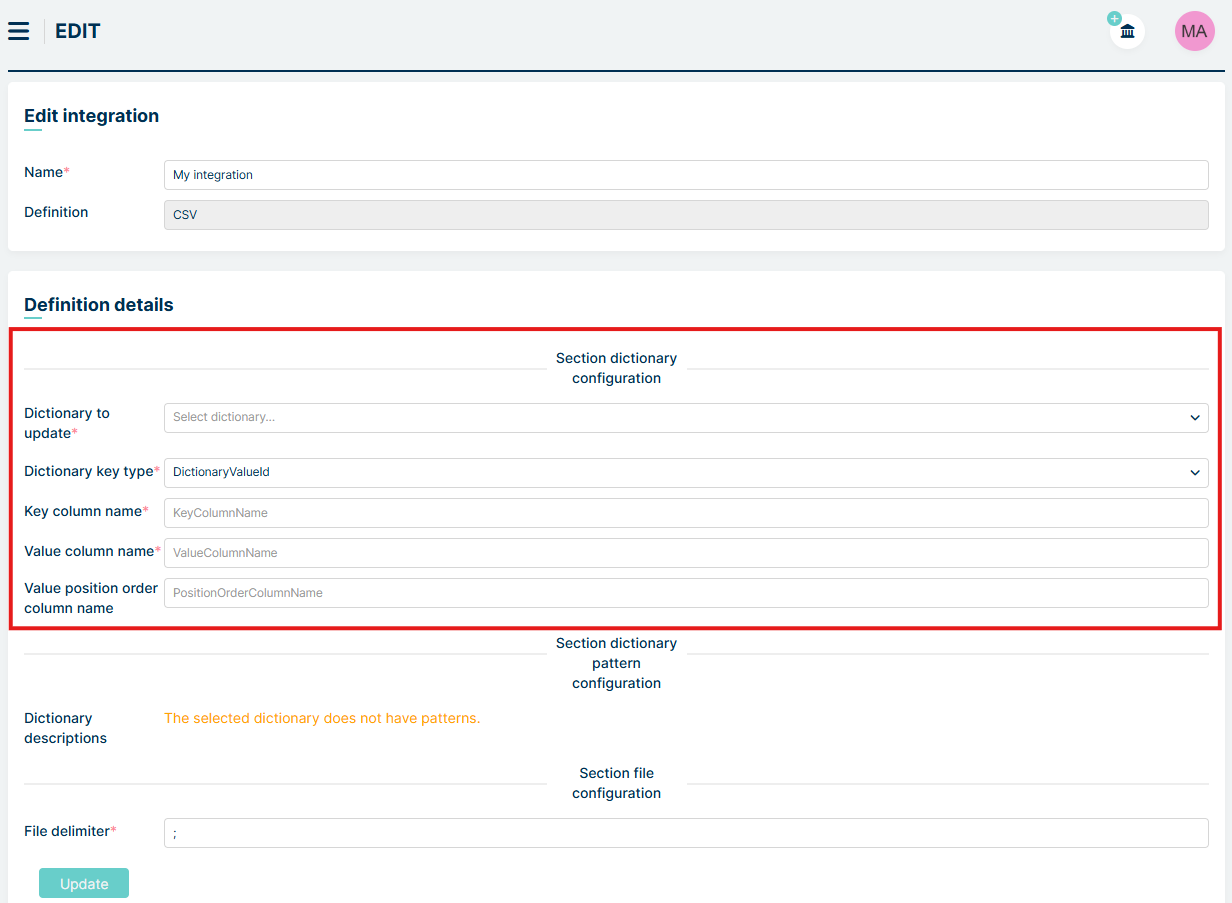
The first step is to select a dictionary - in the Dictionary to update field, we select an existing dictionary in the system that we want to update.
After selecting the dictionary, we proceed to the following fields:
Dictionary key type: Here, we select the database column that will be the primary key for the imported data (the database column used to identify whether values already exist). The available options are: DictionaryValueId, Value, or Pattern.
Key column name: Here, we enter the name of the key column from the file. The data from this column will correspond to the database column selected in the Dictionary key type field.
Value column name: Here, we enter the name of the column from the file whose data will correspond to the Value column in the database.
Value position order column name: Here, we enter the name of the column from the file whose data will correspond to the PositionOrder column in the database.
If the dictionary does not have patterns, the message ‘The selected dictionary does not have patterns’ will appear in the ‘Section Dictionary Pattern Configuration’.

Let’s try to configure parameters and make integration.
In Mint Service Desk there is a HARDWARE dictionary without any entries.
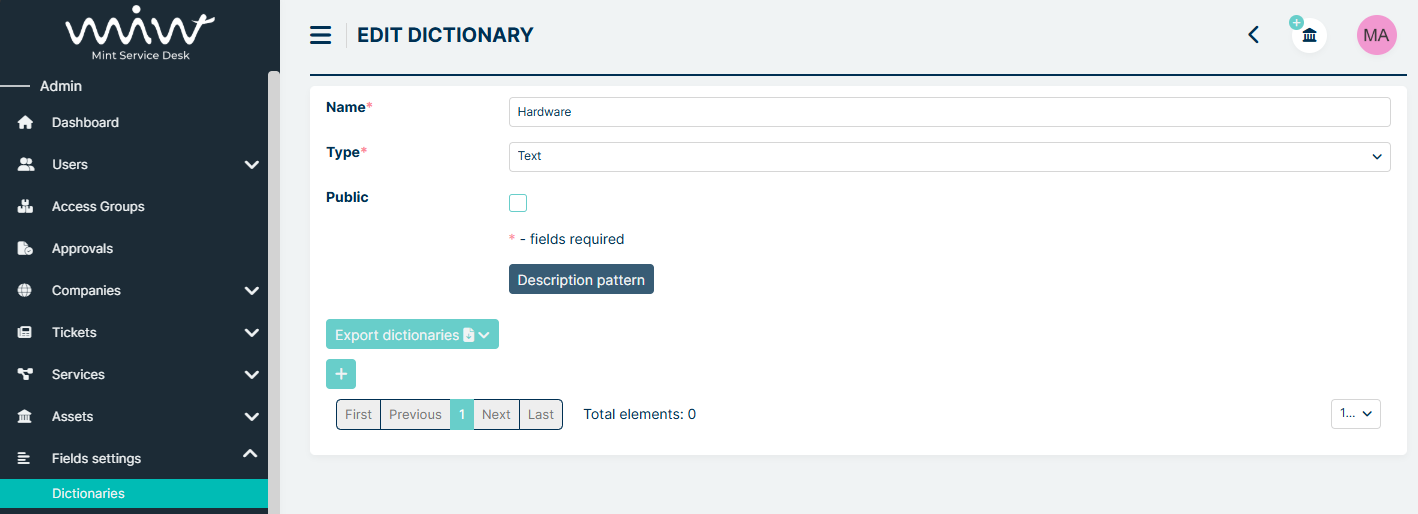
We would like to import three entries to our dictionary: computer, laptop, smartphone and we want to have them to be in this exact order. We know that the Value column is the key and that values in it will not be duplicated.
First we need to create an appropriate CSV file. In the first row, we define the names:
Key column name: the name of the key column. The data in this column will refer to the database column selected in the Dictionary key type field.
Value column name: the name of a column whose data will refer to the ‘value’ column in the database.
Value Position Order Column Name: the name of the column whose data will refer to the ‘PositionOrder’ column in the database.
The names must be separated by a defined delimiter. In this example, we use a semicolon.
A sample first row of the file would be:
key;value;positionOrder
In the second and subsequent rows, we enter the data that will be placed in the columns defined in the first line.
For the HARDWARE dictionary, the file would look as follows:
Row 1: key;value;positionOrder
Row 2: computer;computer;1
Row 3: laptop;laptop;2
Row 4: smartphone;smartphone;3
The sample file should look like below:
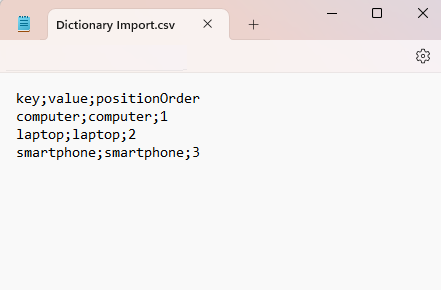
Once the file is prepared, we proceed to the dictionary configuration section and select:
Dictionary key type - the column serving as the key for our dictionary (we select Value because we know these values will be unique and not duplicated).

Then we fill in the names according to the first row:
Key column name: key
Value column name: value
Value position order column name: positionOrder
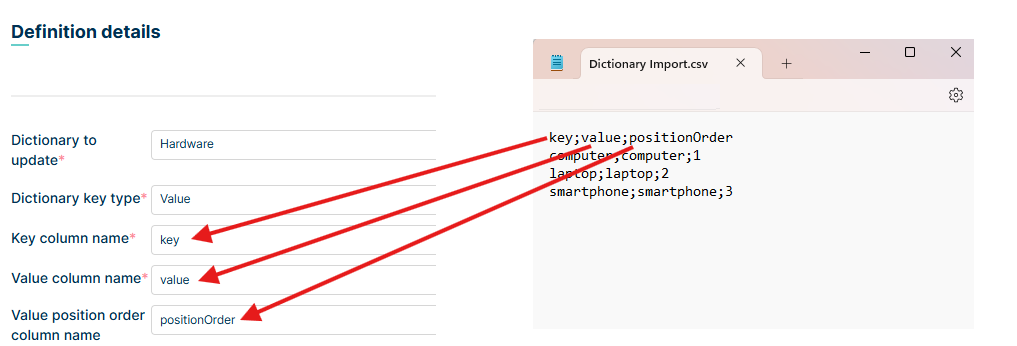
In the File delimiter section, we set the CSV data separator (by default, this is a semicolon).
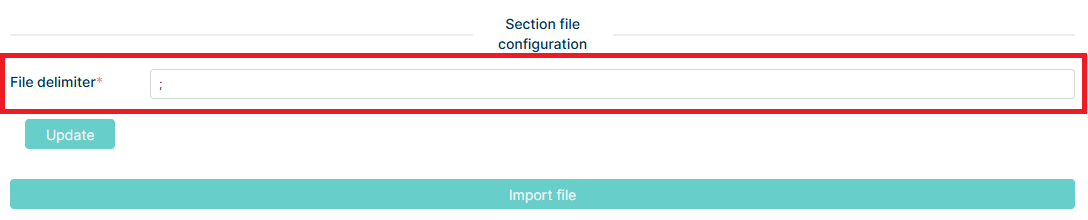
After completing the above steps, we click the Update button - the configuration data is updated.
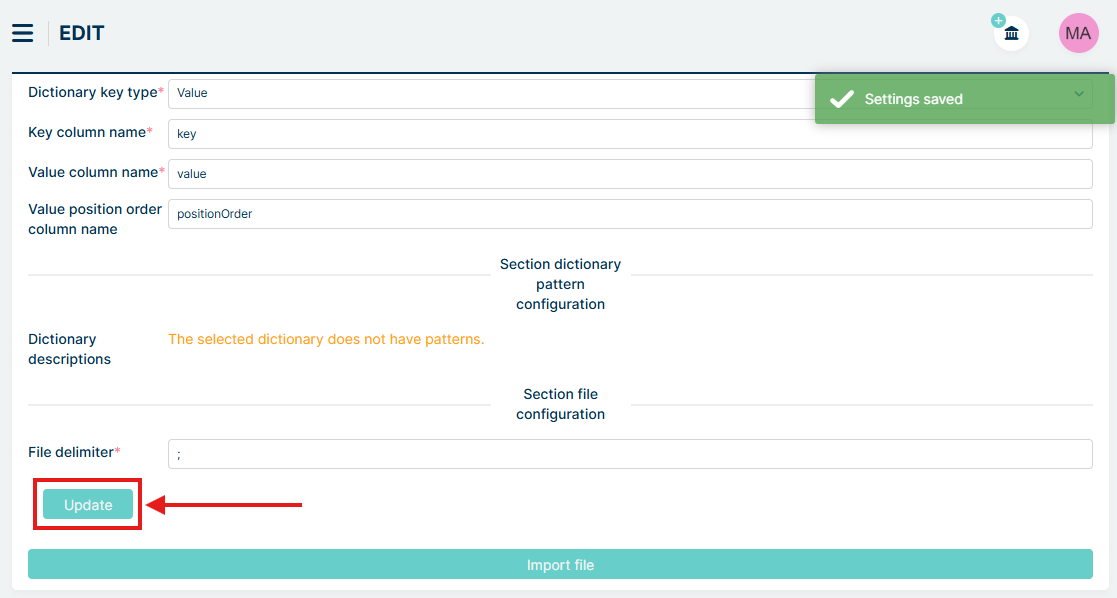
The next step in the process is to import data from the file. Click the ‘Select file’ button, attach the relevant file and the synchronization will start automatically.
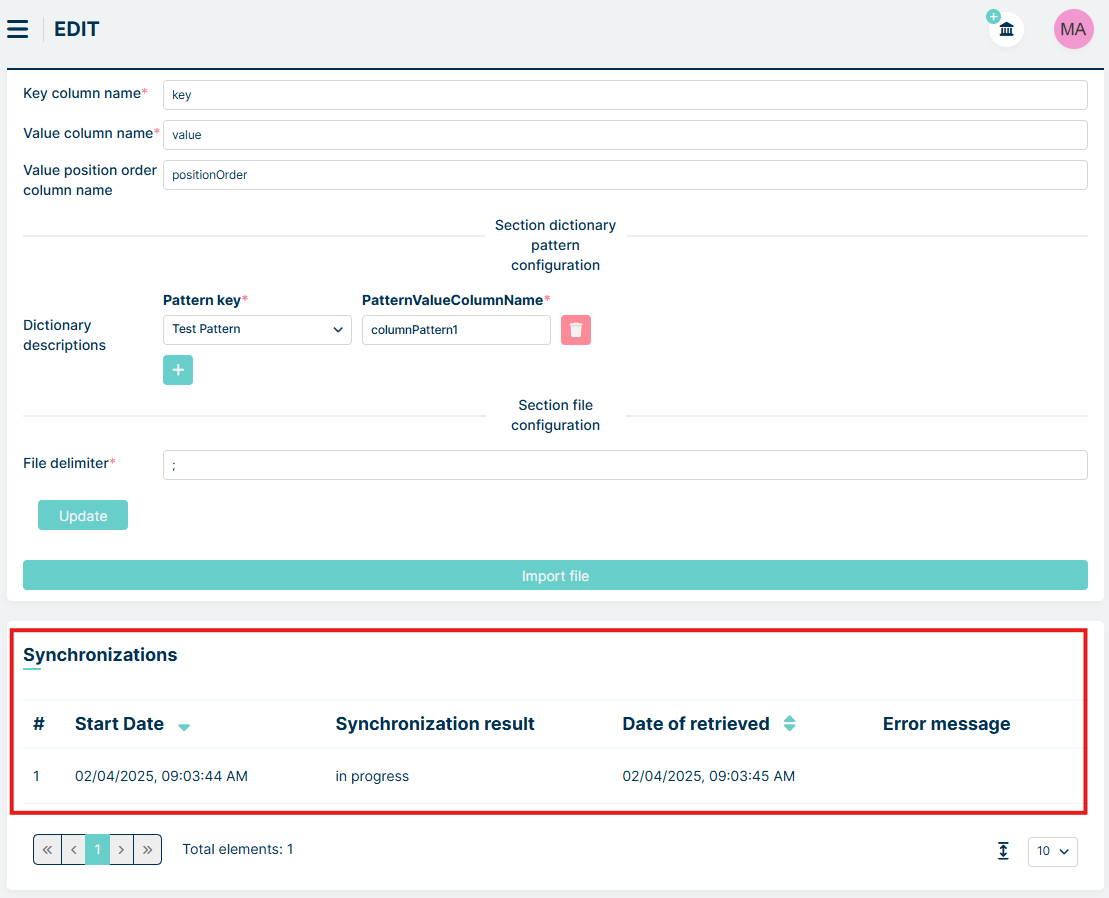
This action starts the process of retrieving dictionary values, which you can track in real time. Clicking on a selected synchronization takes you to the details, where you can also view the retrieval process and any potential errors.

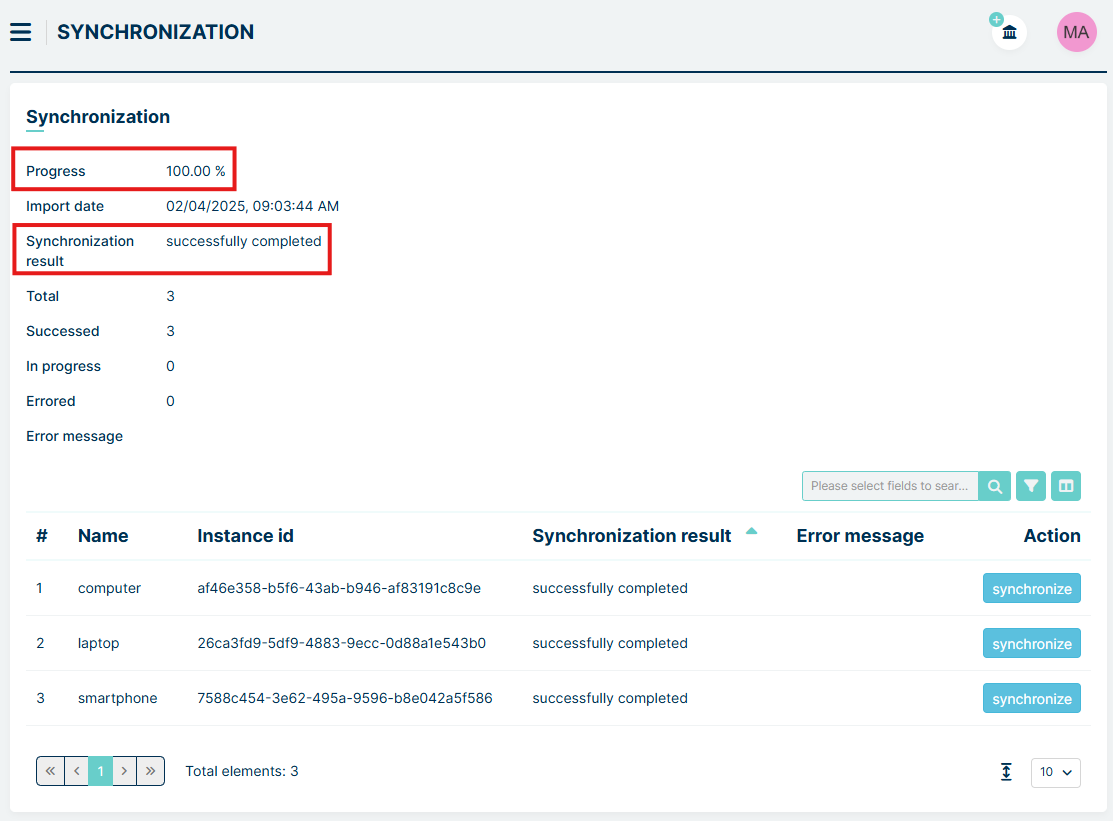
Once synchronization is successfully completed, our dictionary is updated with the values from the CSV file. Our dictionary has new entries.
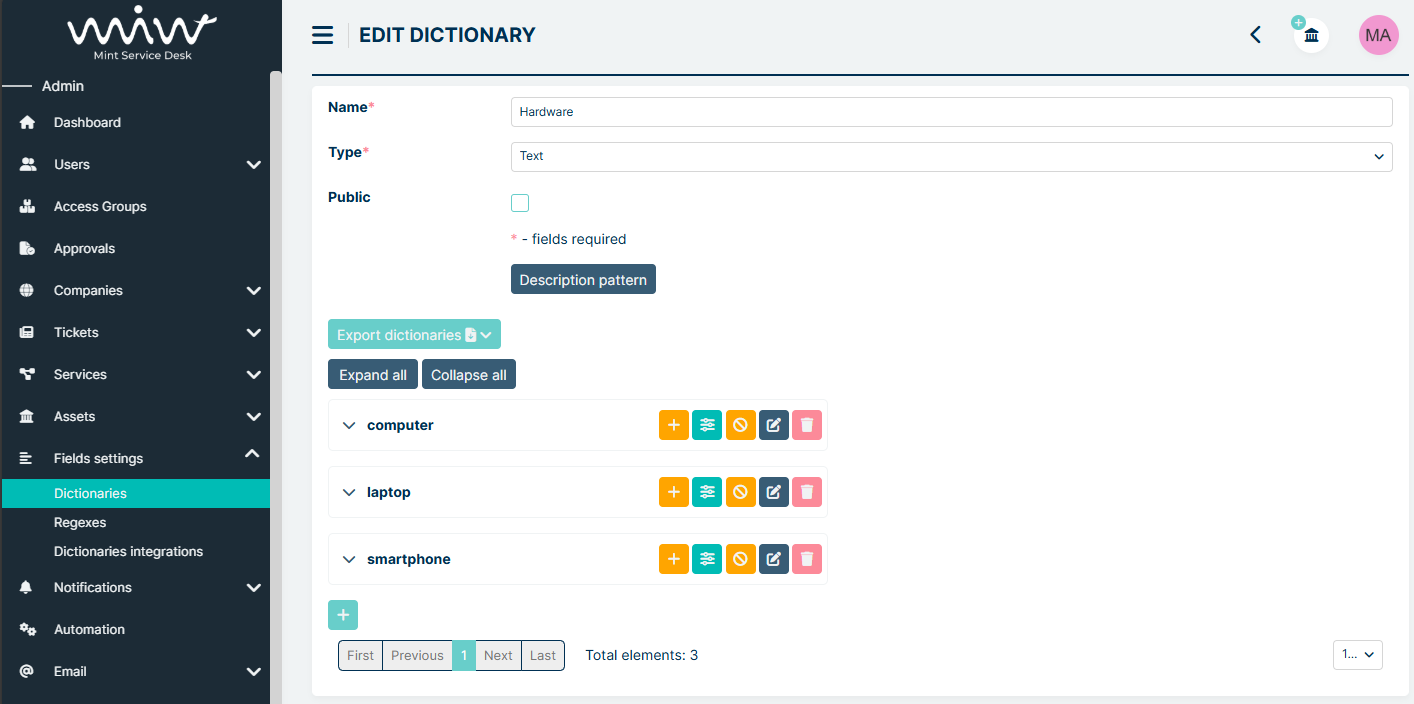
PATTERNS
If the dictionary contains patterns, the Section dictionary pattern configuration displays button.
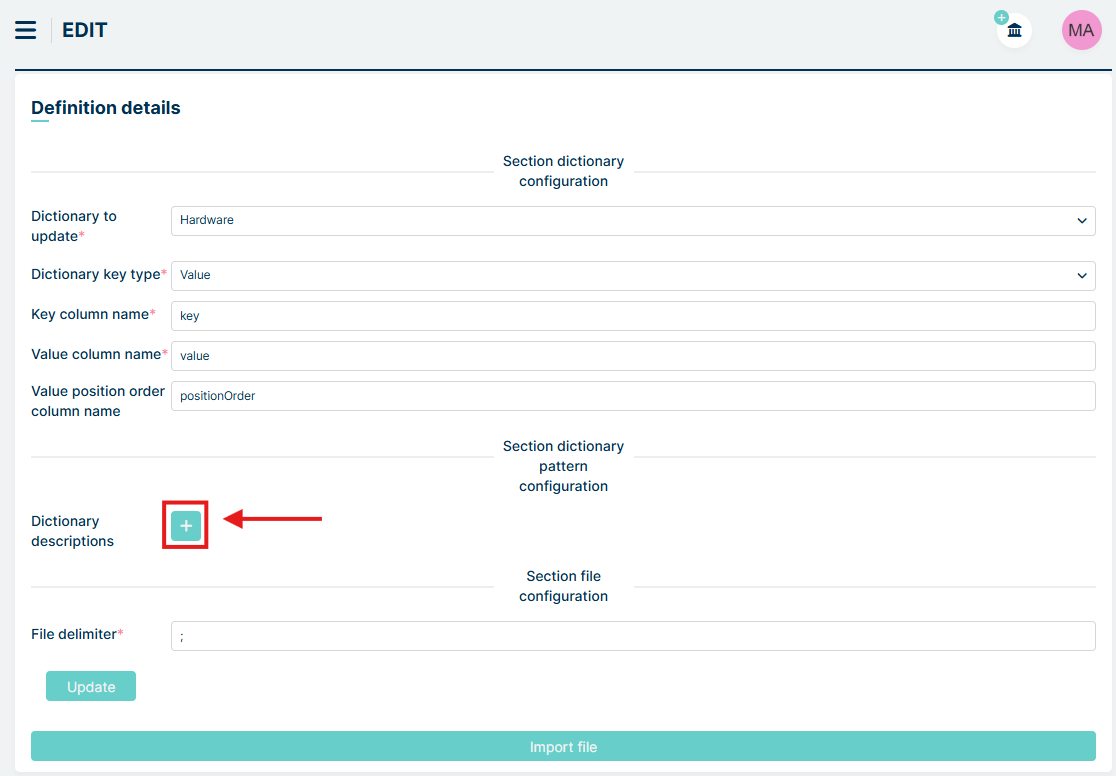
Clicking the button adds a row with Pattern key and PatternValueColumnName fields. In the Pattern key field, we select the pattern name from the dictionary, and in the PatternValueColumnName field, we enter the name of the column from the file that contains the values to be imported into the pattern.
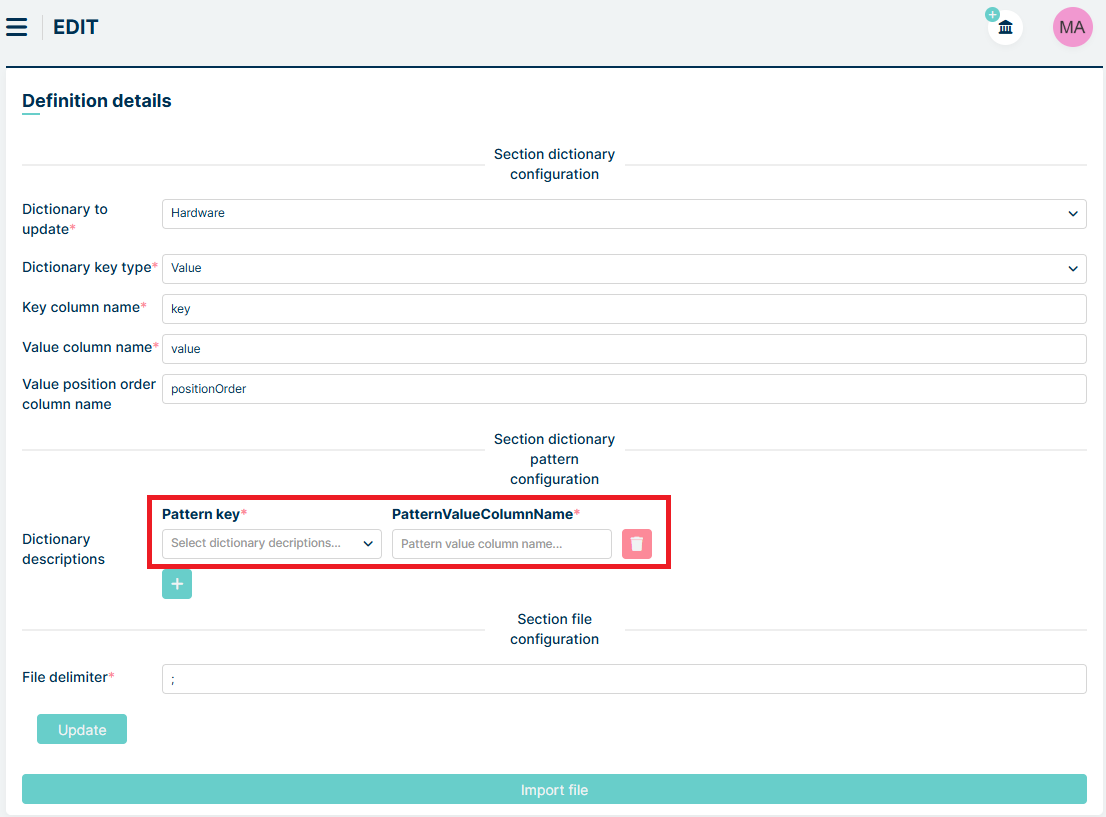
For example, we add a pattern named TEST PATTERN to our HARDWARE dictionary.
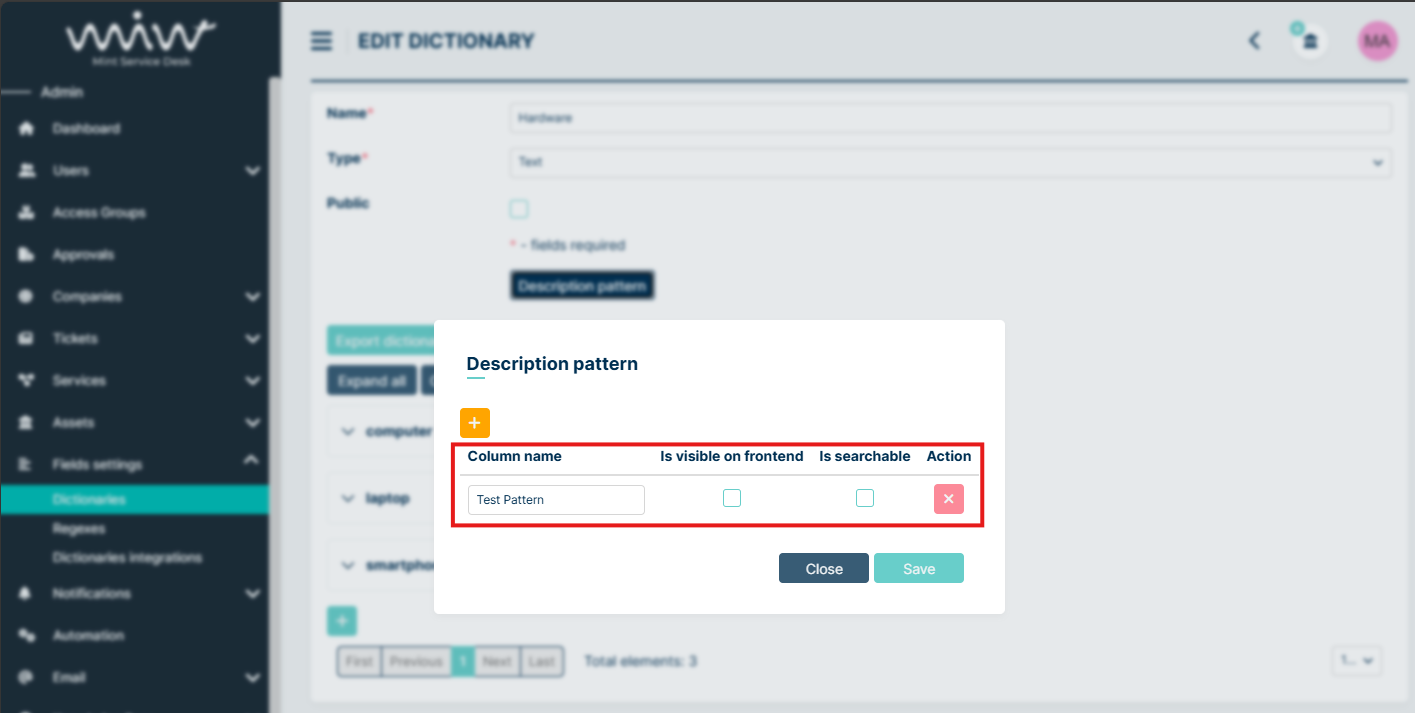
The CSV file must include this column so we need to update it. A sample first row of the file would be:
key;value;positionOrder;columnPattern1
In the second and subsequent rows, we enter data analogously to the previous example, with the addition of the columnPattern1 data. The file might look as follows:
Row 1: key;value;positionOrder;columnPattern1
Row 2: computer;computer;1;Pattern 1
Row 3: laptop;laptop;2;Pattern 2
Row 4: smartphone;smartphone;3;Pattern 3
The sample file should look like below:
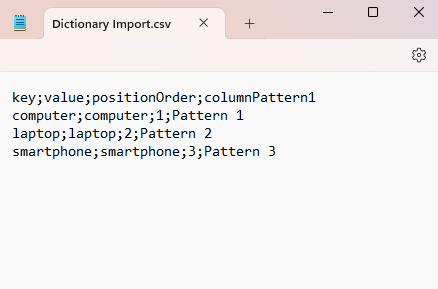
Configuration shoud look like below:
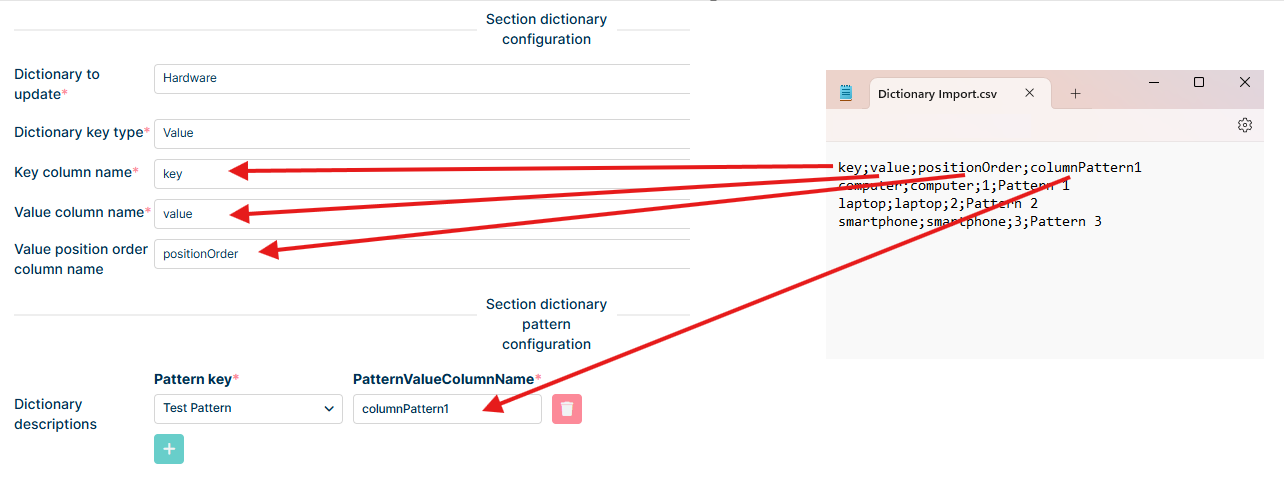
Now in the File delimiter section, we set the semicolon as data separator and click the Update button - the configuration data is updated.
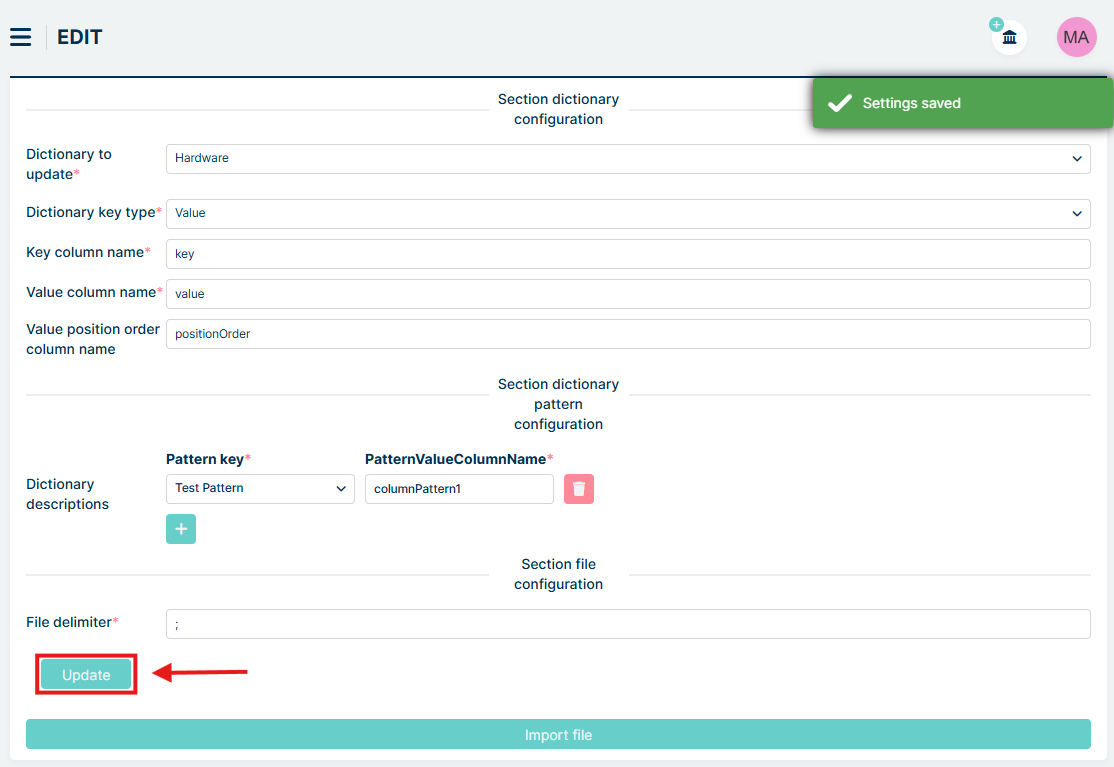
The next step in the process is to import data from the file. Click the ‘Select file’ button, attach the relevant file and the synchronization will start automatically.
This action starts the process of retrieving dictionary values, which you can track in real time. Clicking on a selected synchronization takes you to the details, where you can also view the retrieval process and any potential errors.
Once synchronization is successfully completed, our dictionary is updated with the values from the CSV file. Our dictionary has new data in patten fields.
NOTIFICATIONS
TICKETS
In this section, you will all types of notifications that are available in the MINT Service Desk system. Those are system, email, and push. The main view shows the list of 8 pre-defined notification, available to use the moment you start using MINT.
Let’s describe each of them.
New Article: notification will be sent to the user once there is a new message (Article) in the Ticket, for example, a new reply from the Agent or Customer.
New Comment: notification will be sent to the user when there is a internal message in the Ticket Details communication section. Those are small internal messages regarding a particular Article (‘Internal Discussion’).
New Ticket: notification will be sent to the user, whenever there is a new Ticket in a Queue.
Pending reminder: notification will be sent to the user if he earlier set up a ‘Reminder’ inside the Ticket Details view, in the ‘Details’ section.
Queue Change: a notification will be sent to the user when the queue is changed.
SLA Expiration: notification will be sent to the user when time runs out (timer reached 0) for SLA parameter: Response time / Update time / Resolution time, within the Ticket that has SLA/parameters.
SLA Notification: notification will be sent to the user when the SLA Parameter timer (Response / Update / Resolution) reached the Escalation point. The user will know that he has little time before time runs out (timer reaches 0) and he needs to take immediate action.
Ticket closed: a notification will be sent to the user when the ticket is closed.
Remember that the user needs to have the correct rights (given by the admin) for Queues, Tickets Types to receive some of the notifications.
If you like, you can always add some new notifications. To do so click
on the button located on the right side of the main view.

Now, in the new view, you can start the configuration of a new notification.
General settings
First, you need to name the notification. It is required and without it, you will not be able to save the notification. You can also put some unique description or customize your notification by setting up a unique color or even an icon.
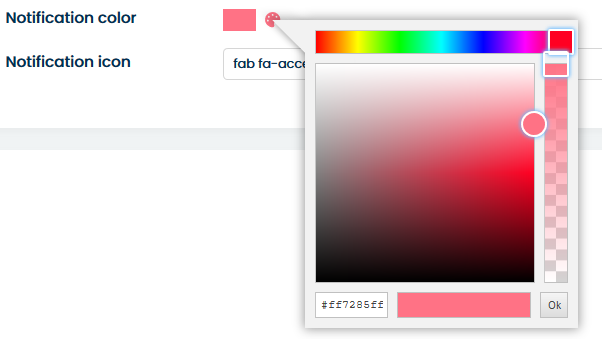
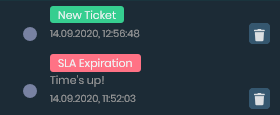
If you decide to give a notification a unique icon you need to type its name in the ‘Notification icon’ field.

MINT supports icons available in *https://fontawesome.com/icons?d=gallery*. Go there, find the desired icon and type its name in the ‘Notification icon’ field in the MINT Service Desk.
After you do that you will see an icon in two places, on the
‘Activities’ part of the Agent and/or Customer sidebar and in the
“Ticket Details” view when you click the  Notification icon.

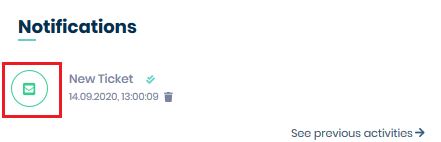
There are also two important things you can do. First, you can set the
notification status: on ( ) or off (
 ). Basically, it
means activating/deactivating this notification.
). Basically, it
means activating/deactivating this notification.

Secondly, you can choose which user will be able to see the list of his notifications and for example turn on/of some them. It was described in Web interface > Basics > Notification section of this guide.

Events
Here you can select one, or more, events for which the user will receive a notification.
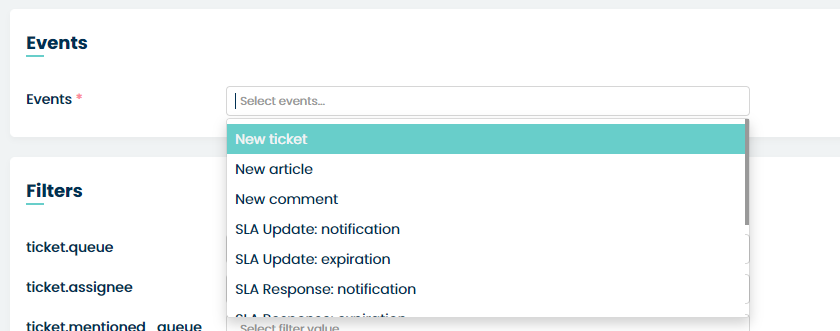
For example, if you want to notify the user when any of SLA timers (for Response, Update, Resolution) has run out you should select the following events.
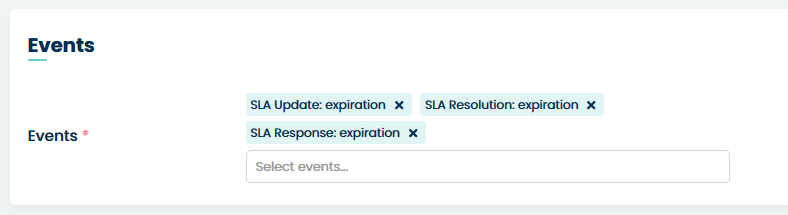
Filters
In this section, we can orchestrate which tickets are to be notified. By selecting a particular filter or filters, nofifications will only appear for those tickets that fit into the selected values.
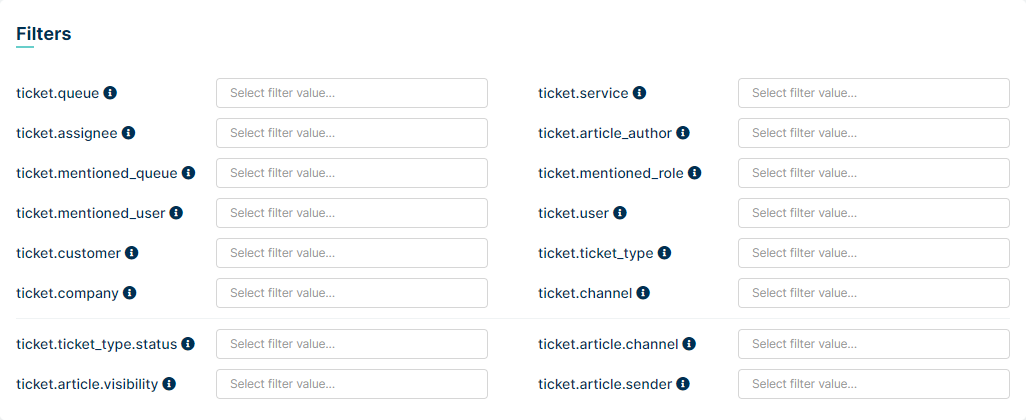
Below we have a list of filters and a description:
in column Filters - filter name
in column Notified tickets - conditions for the ticket that must be fulfilled
in column Related events - the supported event type for a specific filter
Filter |
Notified tickets |
Related events |
|---|---|---|
|
on selected queues |
|
|
with selected priorities |
|
|
with selected services |
|
|
with selected agents assigned to ticket |
|
|
with specific article author |
|
|
with an assigned SLA in which the selected queues are indicated in the configuration |
|
|
with an assigned SLA in which the selected queues are indicated in the configuration |
|
|
with selected role mentioned in article or assigned SLA in which the selected users are indicated in the configuration |
|
|
with events from the Events column triggered by the users selected in the filter |
|
|
with selected customer assigned to ticket |
|
|
on selected ticket types |
|
|
with selected companies assigned to ticket |
|
|
with article in Email channel or Customer Portal channel |
|
|
with the indicated selected value in custom field of dictionary type |
|
|
see Tickets → Strike rules in Admin profile |
|
|
see Tickets → Strike rules in Admin profile |
|
For example, if you want to send notification about a New article (‘Events’ = ‘New article’) to a person assigned to a Ticket (‘Receivers’ = ‘ticket.assignee’) you can leave it that way or put some filters.
If you want this notification to be sent only for ticket with specific Agent assigned, you have to choose him from the ‘ticket assignee’ filter list.

Now, if additionally, you want this notification to be sent only within the Tickets from one particular queue you can choose this queue from the ‘ticket.queue’ filter list.

Remember that you can add multiple values for each filter.
Receivers
Here you can select the main target recipient of notifications. That can be for example Customer who created the Ticket (‘ticket.customer’), Agent assigned to the ticket (‘ticket.assigne’), people who are subscribing to the Ticket (‘ticket.subscribers), and so on.
When you click on ‘Select receivers…’ field you will see the list of available receivers.
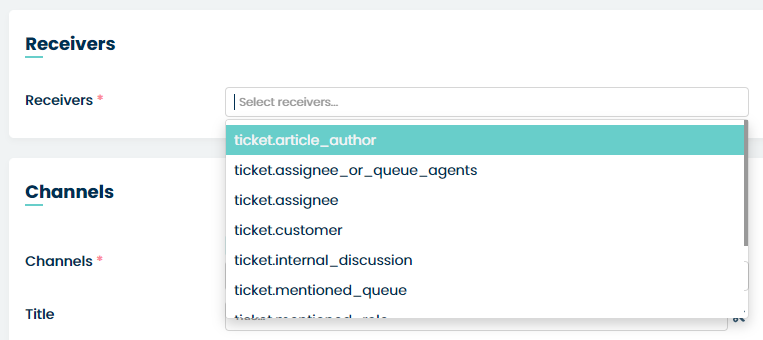
From that list, you can select and add one or more positions.
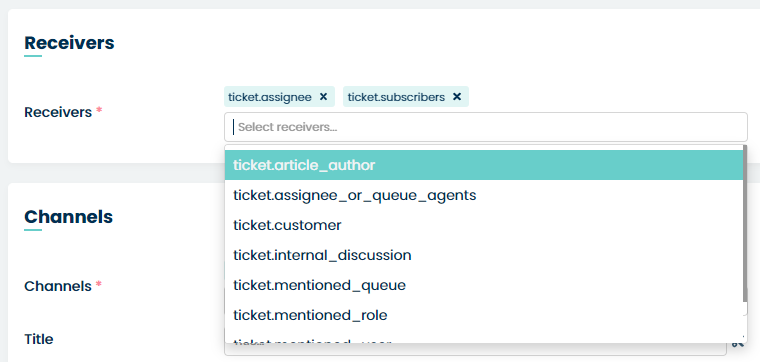
Last, but not least, you should be aware that when you choose the ‘ticket.customer’ system will apply some restrictions.
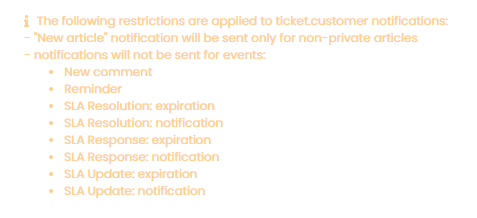
Channels
The last section of the process of creating a notification requires selecting a channel for which this particular notification will be used.

The next step will be to select the language from the dropdown list that you want to create a notification for.
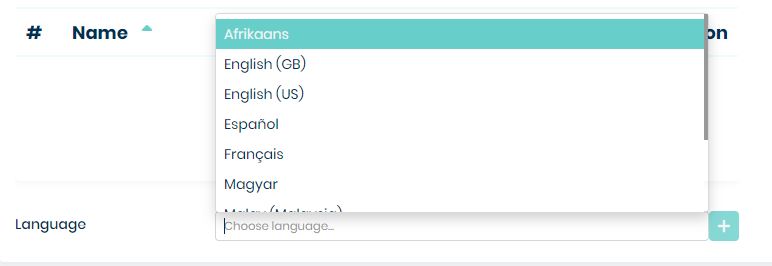
For each language, we can configure separate notification content. Agent receives a notification based on their own language setting in the MINT system. If the language the Agent works in is not defined in the notification, the default notification is sent in English (GB) or the first language on the list if we have not set up a notification in English (GB).
Example: In the Mint Service Desk system, there are two Agents - Agent 1 works in Italian and Agent 2 works in Spanish. Admin has set up a notification for both agents. During configuration, Admin saved a response template for English (GB) and Italian. If the notification is triggered, Agent 1 will receive the notification in Italian, while Agent 2 will receive it in English (GB), as the Admin did not configure a notification for Spanish.
When you have selected the channel and language, press the button.
MINT Service Desk system offers 3 channels:
System – notifications will be sent and visible within the system (‘Activities’ section on the Client/Agent sidebar),
Email – notifications will be sent on user email address available in the system,
Push – notification that is used specifically for the MINT Service Desk mobile application.
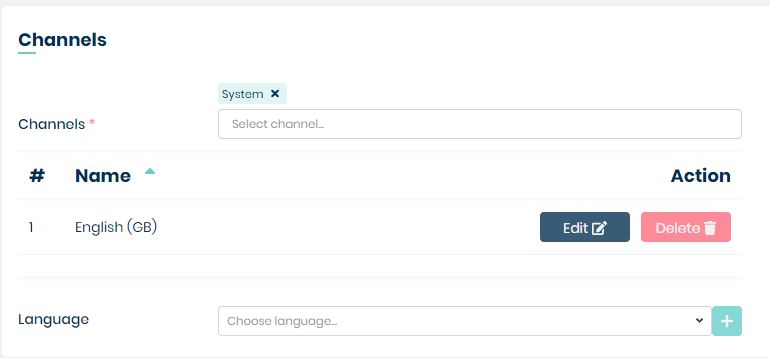
Now you can delete this notfication by clicking button or edit by clicking button.
When you press the edit button, apart from choosing the channel for notification, you can also create a name (‘Title’) and unique template for it (‘Template for:’).
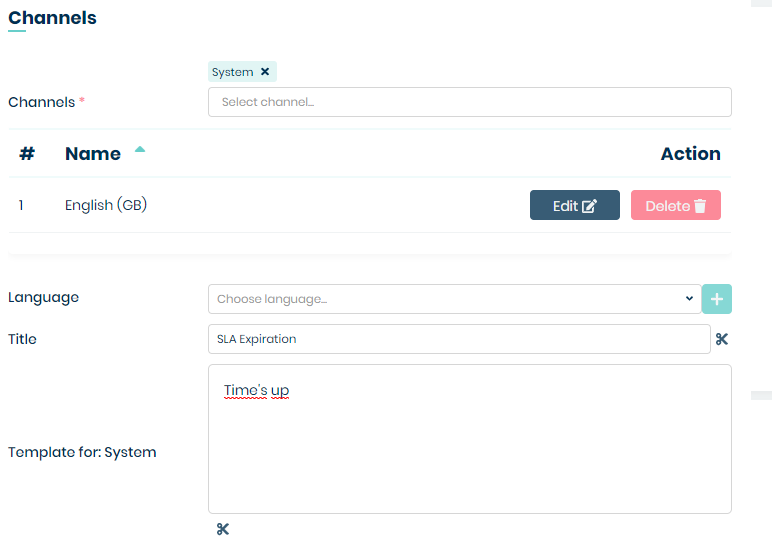
For example, when you’re creating a notification about the SLA clock expiration and inside the ‘Channels’ section you will add the title “SLA Expiration” and as a template, you put for example “Time’s out!” the final result will look like on the screen below.
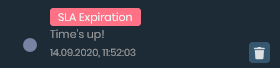
However, when you leave the ‘Title’ field empty, system will take the ‘Name’ (required field in ‘General setting’ part) and use it as notification title.
While creating a Title and Template you can use special Dynamic Fields. Once a notification is created and by the system, those fields will be replaced with correct data.
To add the Dynamic field, you need to click on the  scissors
icon next to ‘Title’ or below ‘Template for:’ field.
scissors
icon next to ‘Title’ or below ‘Template for:’ field.
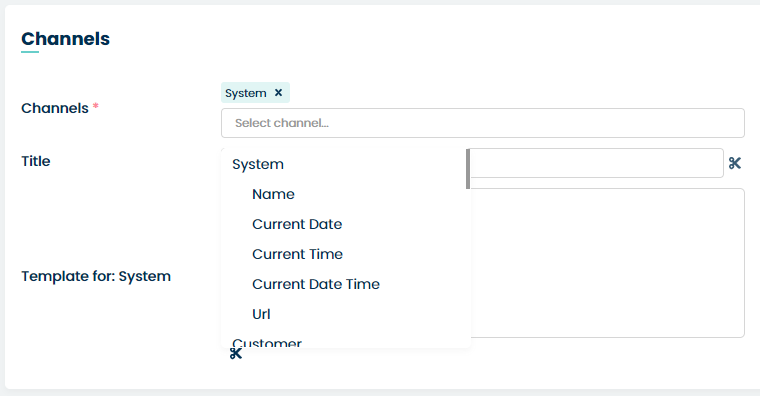
Strike rule Notification
To configure a reminder, you need to have set Strike rule configuration (click here to visit) and assign your configuration to Pending Autoclose status in selected ticket type (click here to visit). Then create a new notification (following the creation guidelines described above). In the Events section, select Ticket strike. In the Filters section, find the ticket.strike option. Clicking on this field will display all the options configured in Tickets → Strike rules. You can select one or multiple values from the list.
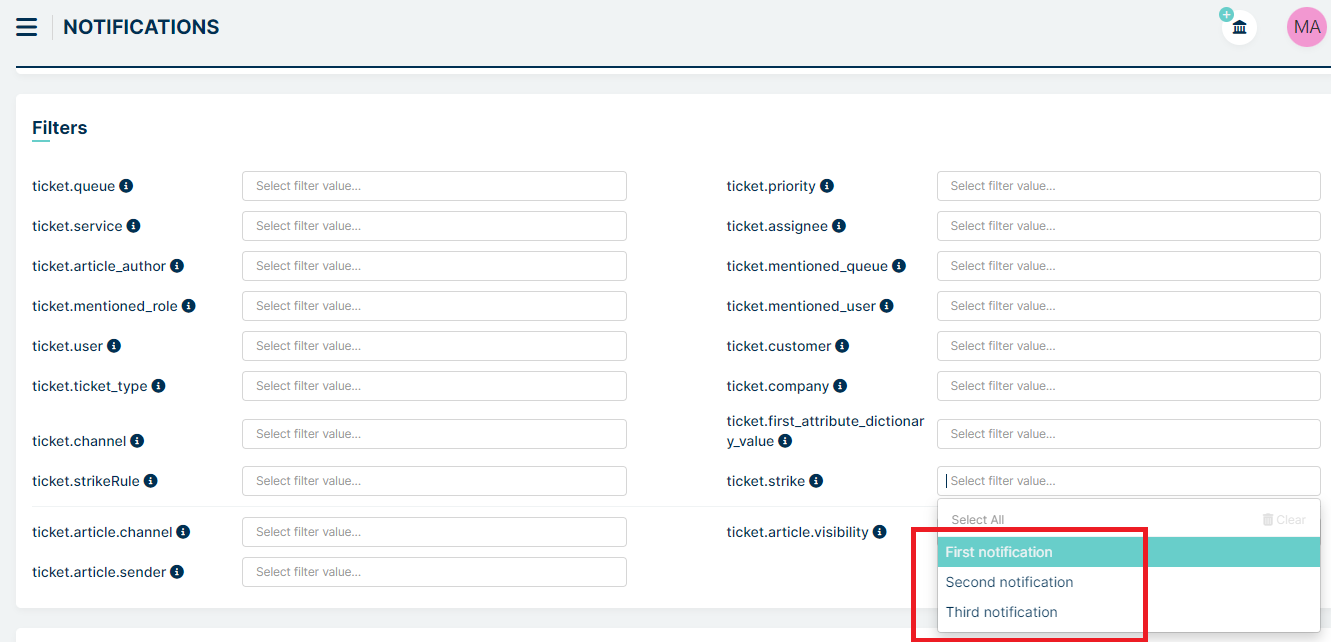
Let’s set up an example configuration for the First strike option, which triggers after 25% of the time allocated to close the ticket has elapsed. Create a new notification, fill in the Name field, Events, and the ticket.strike filter.
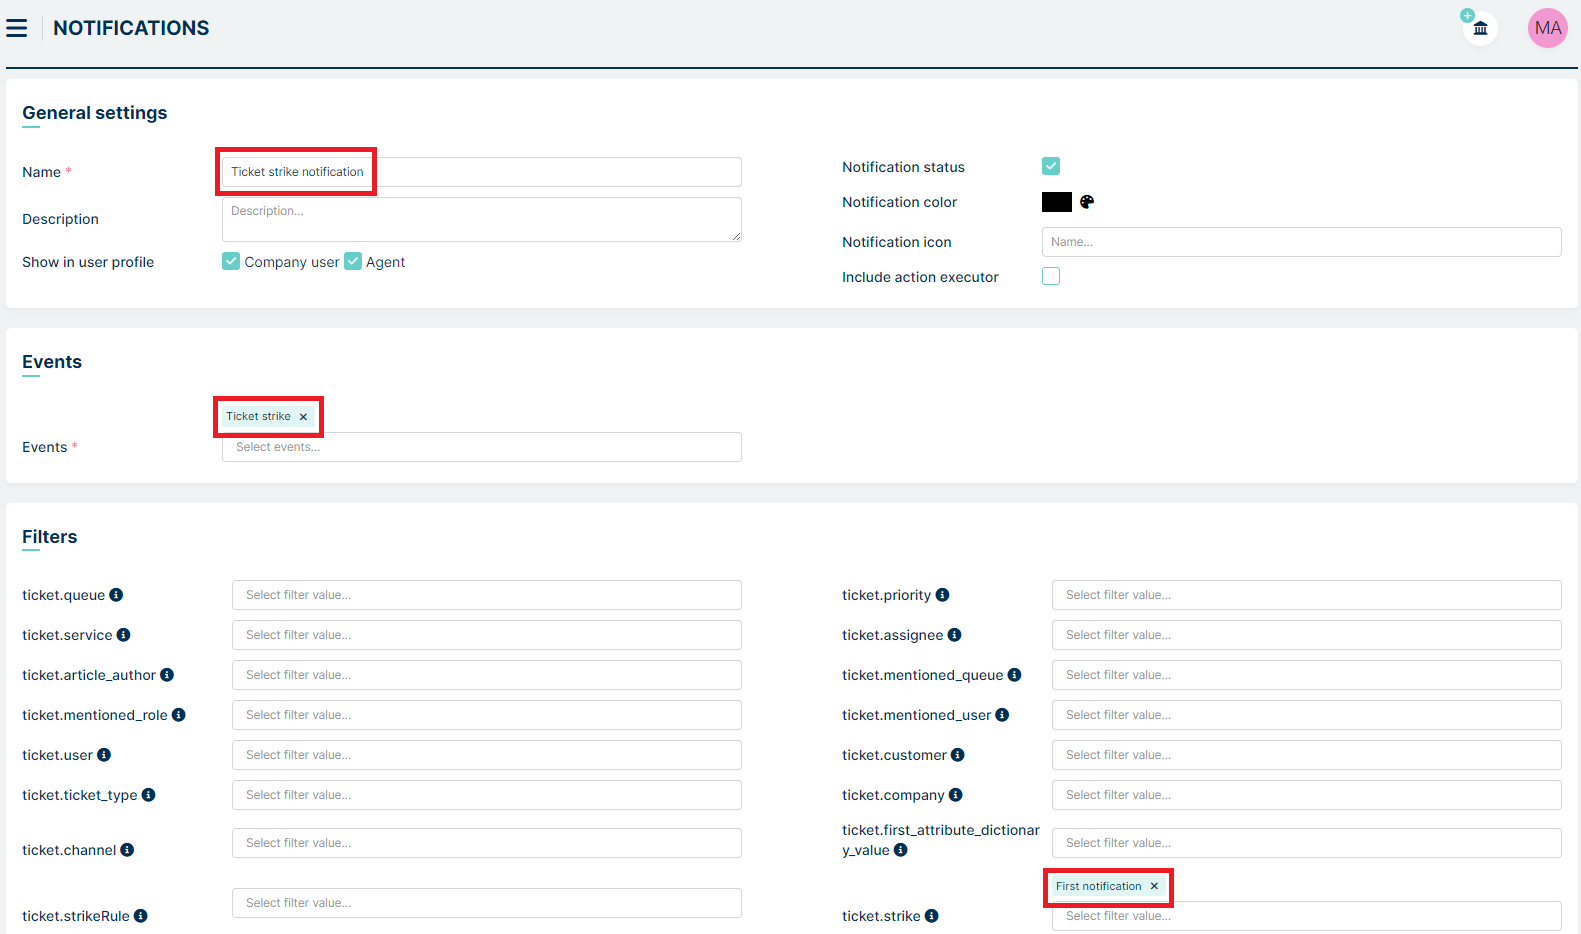
In the Receivers section, choose ticket.assignee so that the assigned agent receives the notification.
In the Channels section, select System and configure the notification content in the desired language. Fill in the notification title and template, then save it.
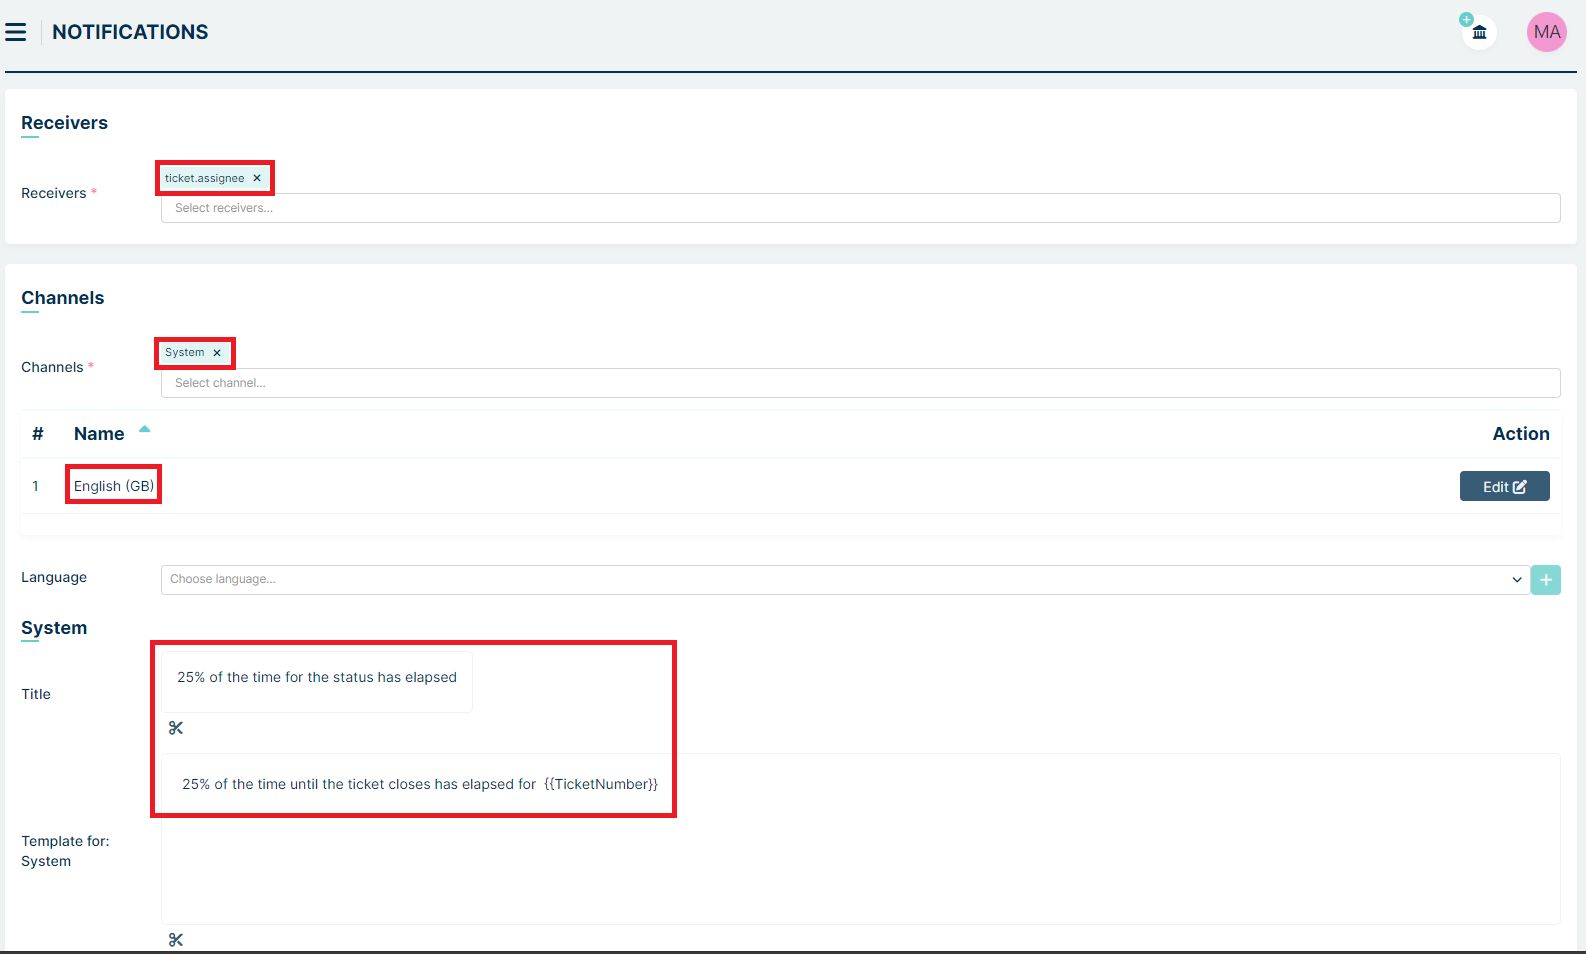
If our ticket status changes to Pending Autoclose:
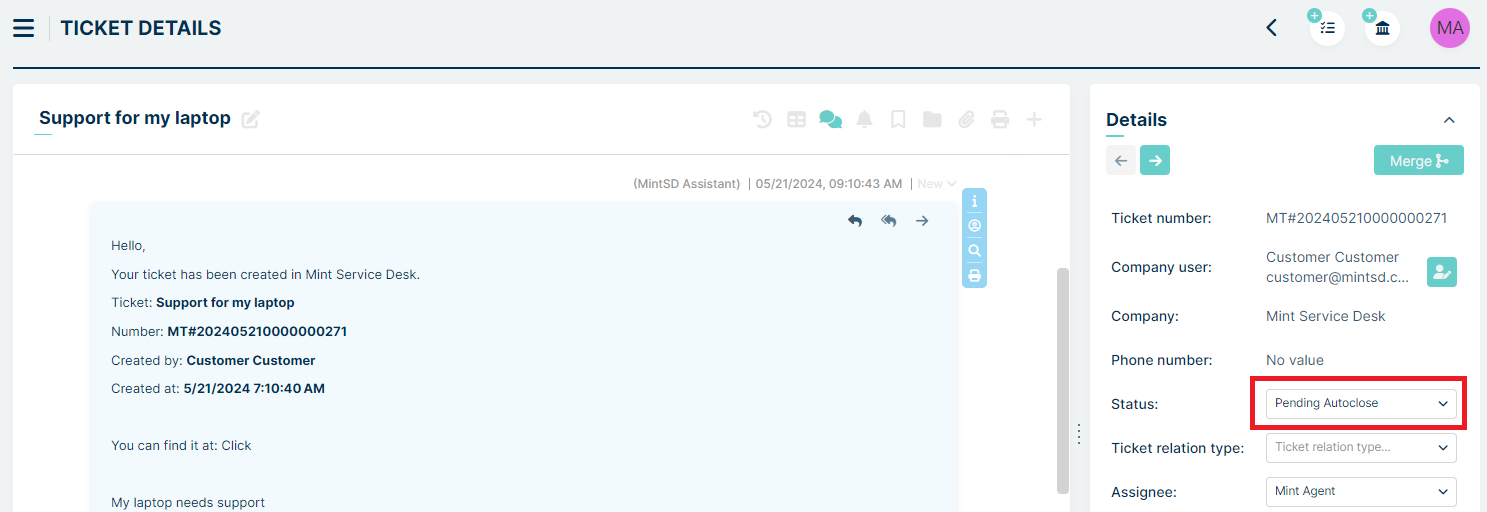
the notification will appear after 25% of the time set for the mentioned status has elapsed
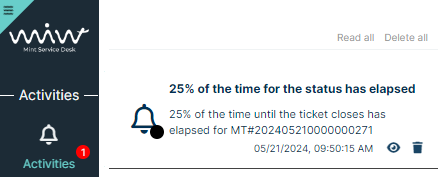
ASSETS
This section contains all the notifications for assets in the MINT Service Desk system. Those are system, email, and push. The main view shows the list of 3 pre-defined notifications, available to use the moment you start using MINT.
Let’s describe each of them.
Asset Alert - This is a notification that involves setting custom fields of the asset type ‘Alert’ and when the time comes the appropriate notification will be sent.
Asset Reminder - This is a notification that involves setting a custom field of type “Alert” in the custom asset fields and you can add a time option of how much before the original time you want the reminder to come. When the reminder time arrives, the appropriate notification will be sent.
Asset Alert & Reminder - This is a combination of the two notifications written above.
Example: The user sets the date alert to 31/05/2022 at 12:00 p.m. In addition, the user sets the reminder to 1h. This setting will cause the user to get an alert notification at 12:00 and a reminder notification an hour later.
Remember that the user needs to have the correct rights (given by the admin) for Assets to receive some of the notifications.
If you like, you can always add some new notifications. To do so click
on the button located on the right side of the main view.
Now, in the new view, you can start the configuration of a new notification.

General settings
First, you need to name the notification. It is required and without it, you will not be able to save the notification. You can also put some unique description or customize your notification by setting up a unique color or even an icon.
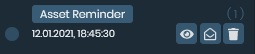
If you decide to give a notification a unique icon you need to type its name in the ‘Notification icon’ field.
MINT supports icons available in *https://fontawesome.com/icons?d=gallery*. Go there, find the desired icon and type its name in the ‘Notification icon’ field in the MINT Service Desk.
There are also two important things you can do. First, you can set the
notification status: on () or off ). Basically, it
means activating/deactivating this notification.
Secondly, you can choose which type of user will be able to see the notification.
Events
Here you can select one, or more, events for which the user will receive a notification.

For example, if you want to set Alert or Remind the user about assets use one of the options from the list (Alert or Reminder).

Filters
Here you can select some notification filters for assets.

For example, if you want to send notification (‘Events=’ Alert or Reminder) about an assets to a person assigned to an asset (‘Receivers’ = ‘asset.assigne’) you can leave it that way or put some filters.
However, if you want this notification to be sent only to one particular Agent you have to choose him from the ‘asset.assignee’ filter list.
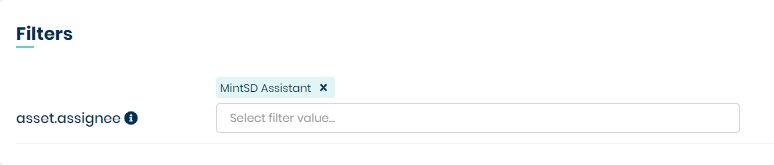
Now, if additionally, you want this notification to be sent only within the Assets from one particular category you can choose this category from the ‘assets.category’ filter list.
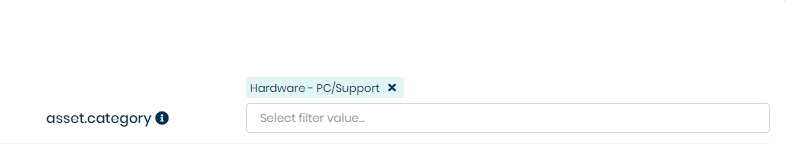
Remember that you can add multiple values for each filter.
Receivers
Here you can select the main target recipient of notifications. That can be for example user Assigned to asset or Category where the asset is located.
When you click on ‘Select receivers…’ field you will see the list of available receivers.

From that list, you can select and add one or more positions.
Channels
The last section of the process of creating a notification requires selecting a channel for which this particular notification will be used.
MINT Service Desk system offers 3 channels:
System – notifications will be sent and visible within the system (‘Activities’ section on the Client/Agent sidebar),
Email – notifications will be sent on user email address available in the system,
Push – notification that is used specifically for the MINT Service Desk mobile application.
Apart from choosing the channel for notification, you can also create a name (‘Title’) and unique template for it (‘Template for:’).
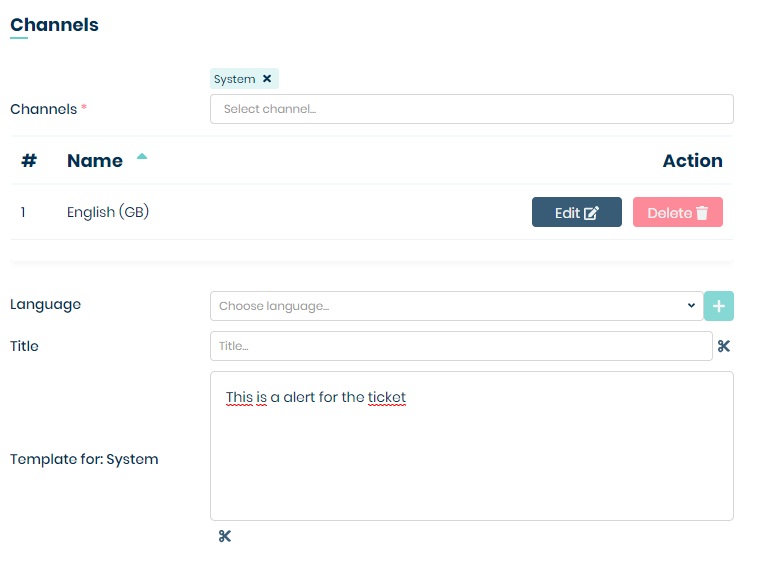
For example, when you’re creating a notification about the Assets reminder and inside the ‘Channels’ section you will add the title “Assets Reminder” and as a template, you put “Asset Reminder” the final result will look like on the screen below.
However, when you leave the ‘Title’ field empty, system will take the ‘Name’ (required field in ‘General setting’ part) and use it as notification title.
While creating a Title and Template you can use special Dynamic Fields. Once a notification is created by the system, those fields will be replaced with correct data.
To add the Dynamic field, you need to click on the scissors
icon next to ‘Title’ or below ‘Template for:’ field.
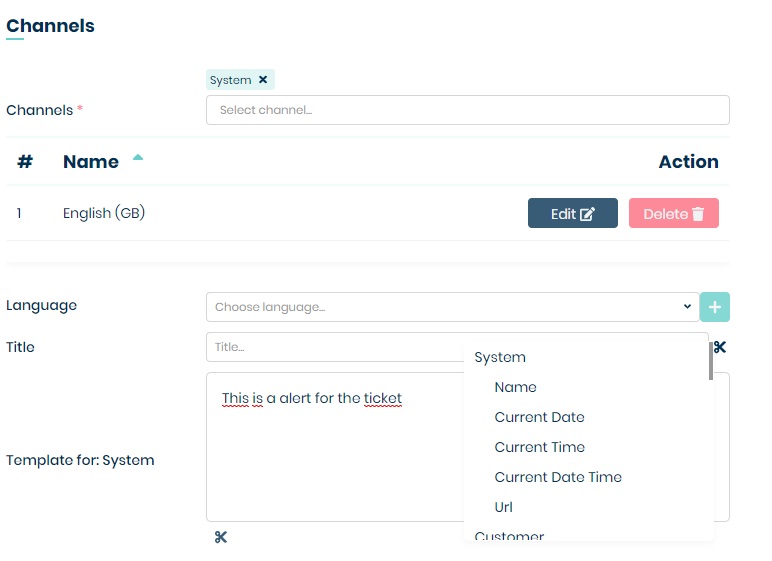
CONTRACTS
This section contains all the notifications for Contracts in MINT Service Desk - system, email, and push.
If you like to add some new notifications, click on the button located on the right side of the
main view. Now you can start the configuration of a new notification
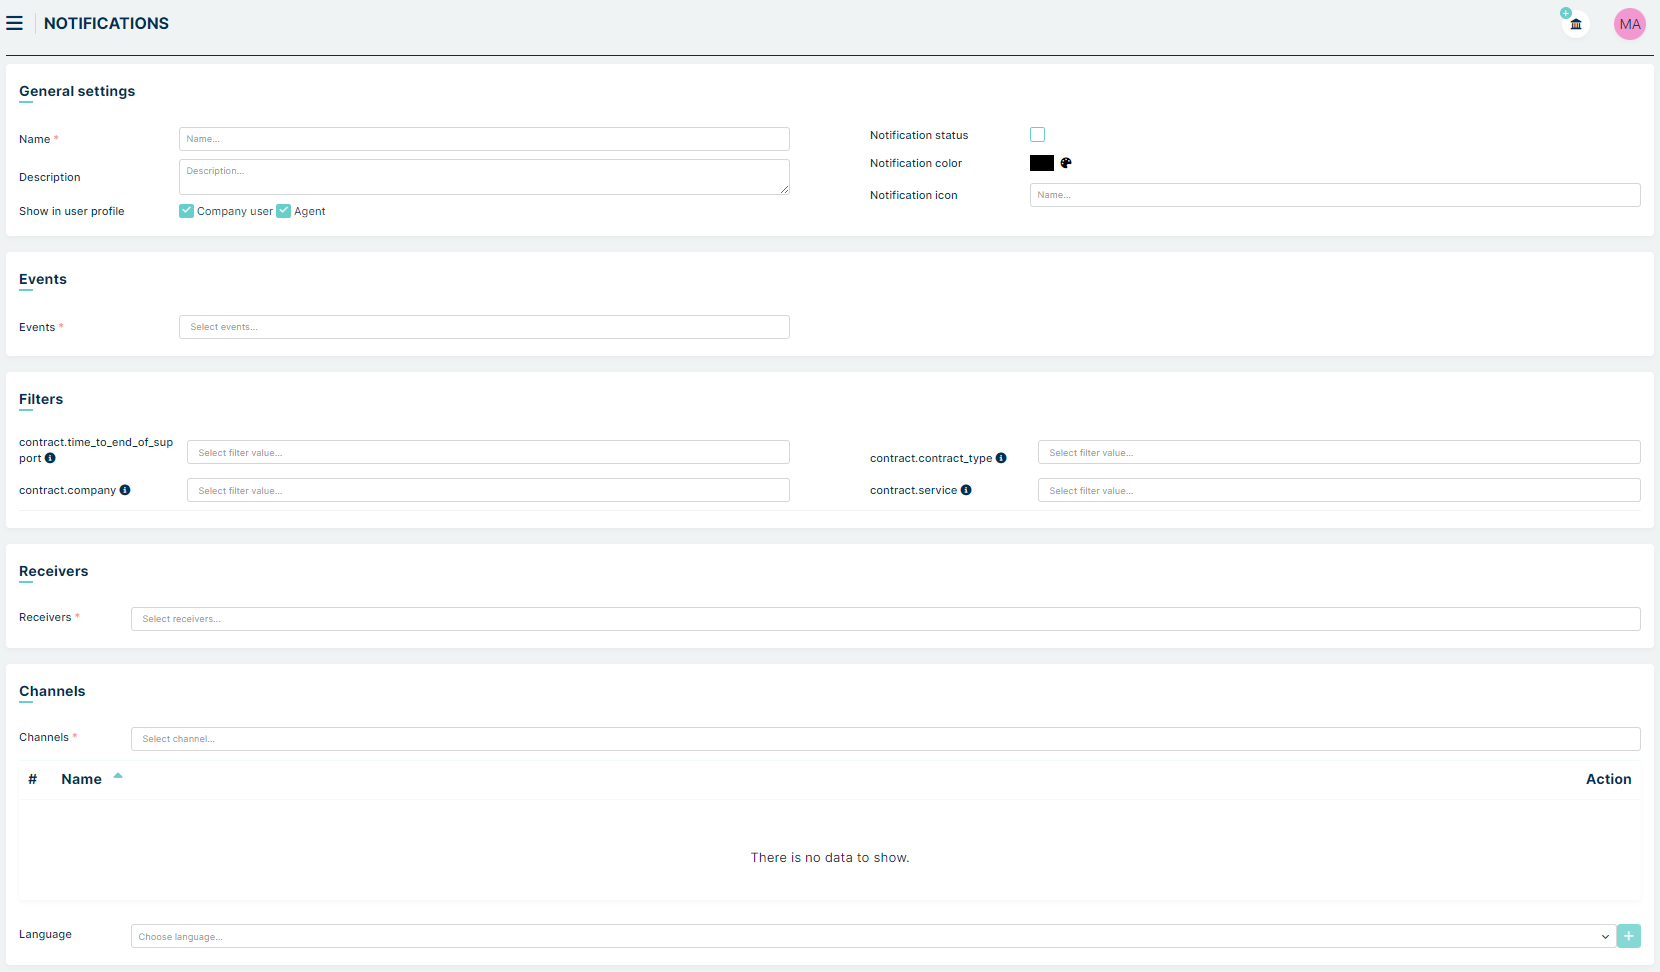
General settings
The first section is similar to that in the Ticket and Asset notifications and is described there.

Events
Here you can select one, or more, events for which the user will receive a notification.

For example, event “End of support” means a notification will be sent to recipients when the contract ends.
Filters
Here you can select some notification filters

Let’s describe them here
– contract.time_to_end_of_support - you can set here how long before contract ends the notification will be sent. You can choose “Day”, “Week” or “Month”
– contract.company - here you can select the companies that are assigned to the contracts
– contract.contract_type - you can limit your contracts report to specific Contract Type
– contract.service - you can filter your report by specific services linked to contracts
Receivers
This section is similar to that in the Ticket and Asset notifications and is described there.
Channels
This section is similar to that in the Ticket and Asset notifications and is described there.
AUTOMATION
The Automation section is used to perform actions automatically based on Events or Time Trigger.
In order to start adding a new Automation, you need to click on the
button, located on the right side, next to the search field. You will
see that a new section has been opened.
You are presented with a choice of either Events or Time Trigger. Both configurations will be described below.
EVENT
GENERAL SETTINGS
The first section when configuring automation of the Events type is General settings. Here you need to enter the name that the automation will have. You can also enter its signature and check the checkbox that says ‘Is active’ if you want the automation you create to be active at the start. If you don’t check it now, don’t worry, later you can edit the automation and enable it.
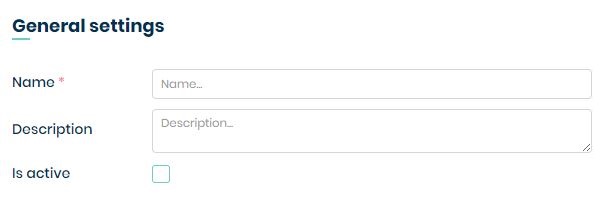
EVENTS
The second section is Events where you can configure what action the automation should react to. After clicking the ‘Event types’ dropdown menu there are two options to choose from:
ticket
article
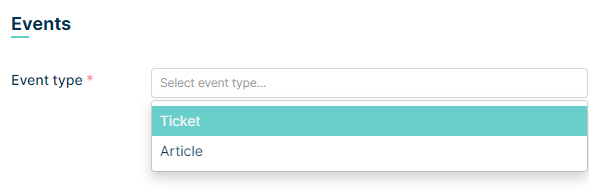
After selecting one option, another dropdown menu named ‘events‘ will appear. In this section you select what event the automation should respond to. For ticket and article these events are different. The second section is Events where you can configure what action the automation should react to. After clicking the ‘Event types’ dropdown menu there are two options to choose from:
ticket:
Assignee changed
New ticket
Queue changed
Status change
Value changed
Ticket type change
article:
New article
New comment
FILTERS
The next section in automation is Filters. This section differs for ticket and article. In this section, we can filter tickets or articles according to our preferences.
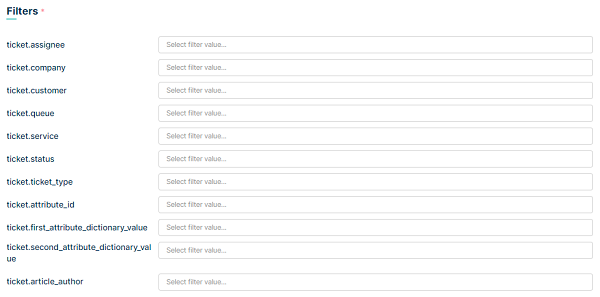
for ticket:
ticket.assignee - filters by the agents assigned to the ticket.
ticket.company - filters by the company assigned to the ticket.
ticket.customer - filters by customer.
ticket.queue - filters by the queue in which the ticket is created.
ticket.service - filters by the service in which the ticket is created.
ticket.status - filters by the status in which the ticket is created.
ticket.ticket_type - filters by ticket type in which the ticket is created.
ticket.attribute_id - filters by the attribute created in custom fields.
ticket.first_attribute_dictionary_value - filters by the attribute created in dictionary.
ticket.second_attribute_dictionary_value - filters by the attribute created in dictionary.
ticket.article_author - filters by article author.
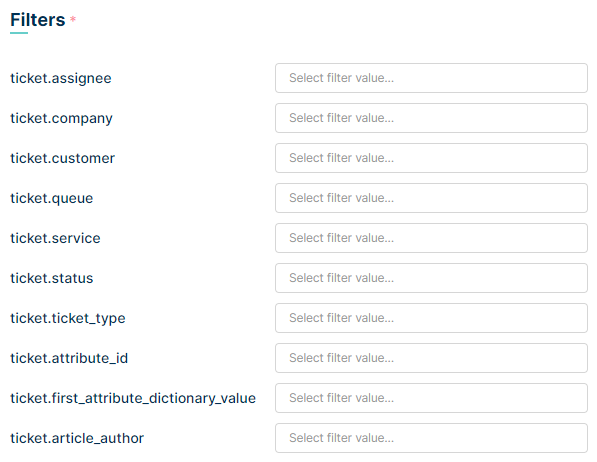
for article:
ticket.assignee - filters by the agents assigned to the ticket.
ticket.company - filters by the company assigned to the ticket.
ticket.customer - filters by customer.
ticket.queue - filters by the queue in which the ticket is created.
ticket.service - filters by the service in which the ticket is created.
ticket.status - filters by the status in which the ticket is created.
ticket.ticket_type - filters by ticket type in which the ticket is created.
ticket.attribute_id - filters by the custom field.
ticket.first_attribute_dictionary_value - filters by dictionary value.
ticket.article_author - filters by article author.
ACTIONS
The last section when configuring automation is Actions. Here you decide what will happen to the ticket or article when it passes the filter.
To start the configuration you need to press  button. Then a dropdown menu will appear from which you can select the option you are
interested in by pressing the button.
button. Then a dropdown menu will appear from which you can select the option you are
interested in by pressing the button.
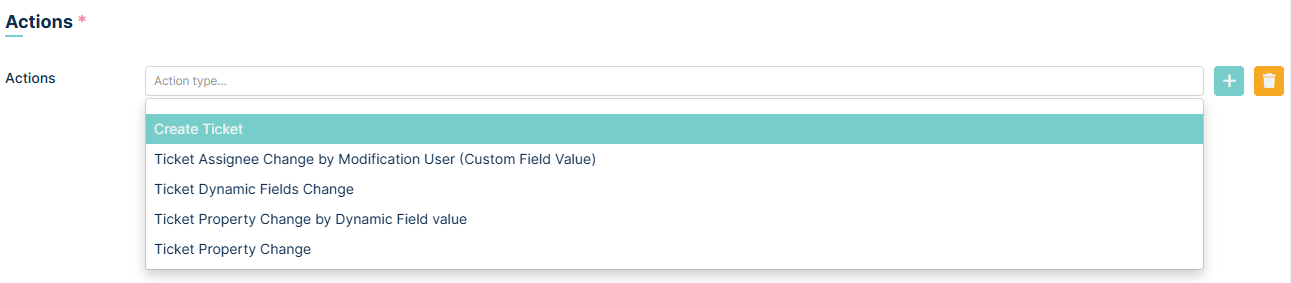
Let’s describe each position below.
CREATE TICKET
The Create Ticket action is available only when the selected Event type is Ticket. When the conditions defined in the Events and Filters sections are met, this action automatically creates a new ticket.
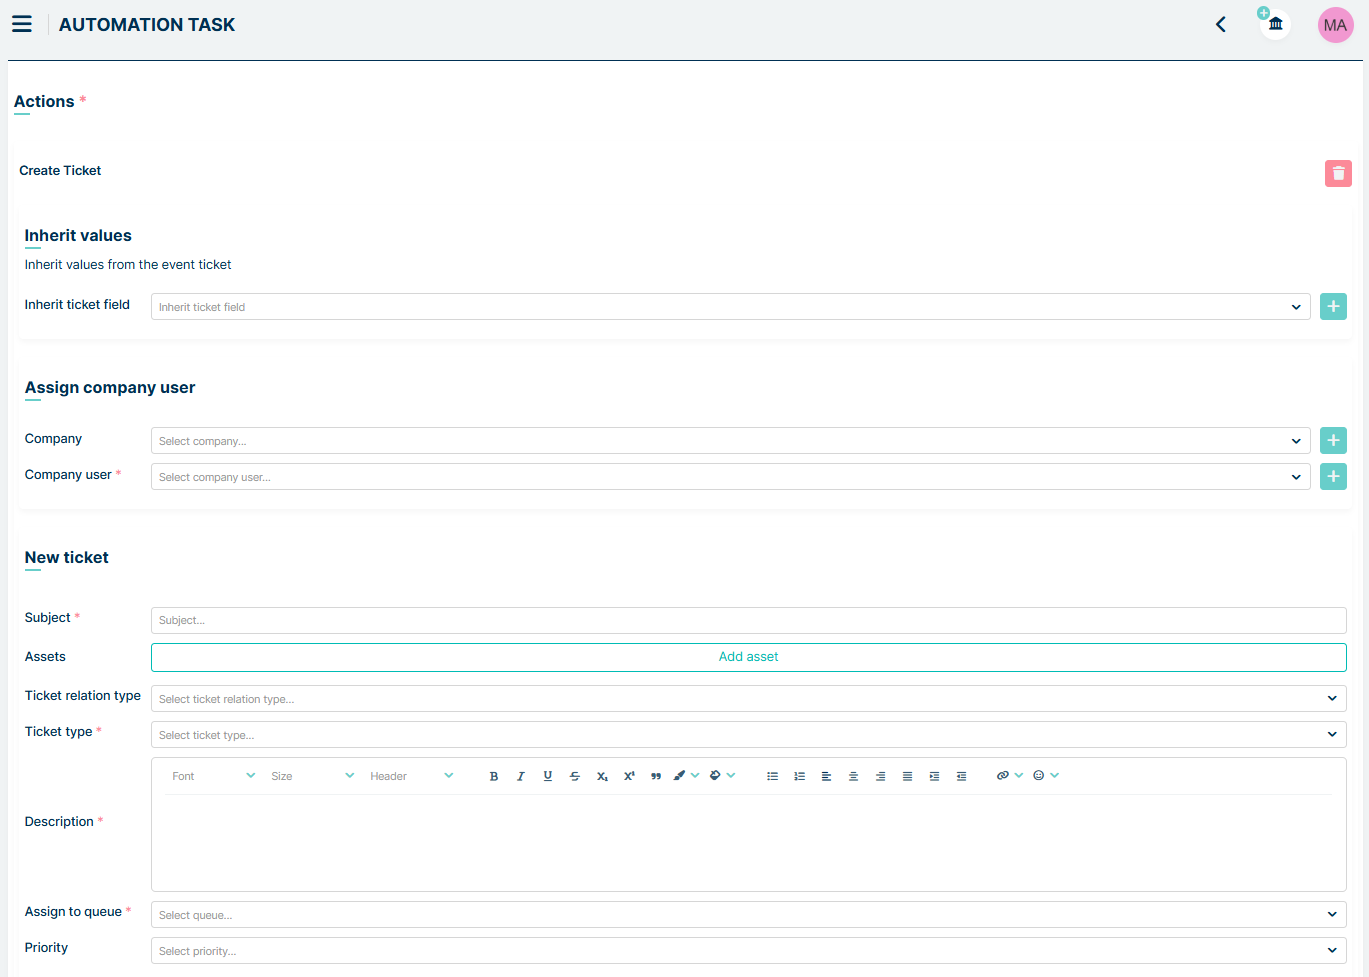
After selecting Create Ticket, you can configure the newly created ticket in two ways:
Manual Field Configuration
You can manually complete all fields available in the ticket creation form. All fields configured in this section will define the values of the newly created ticket.
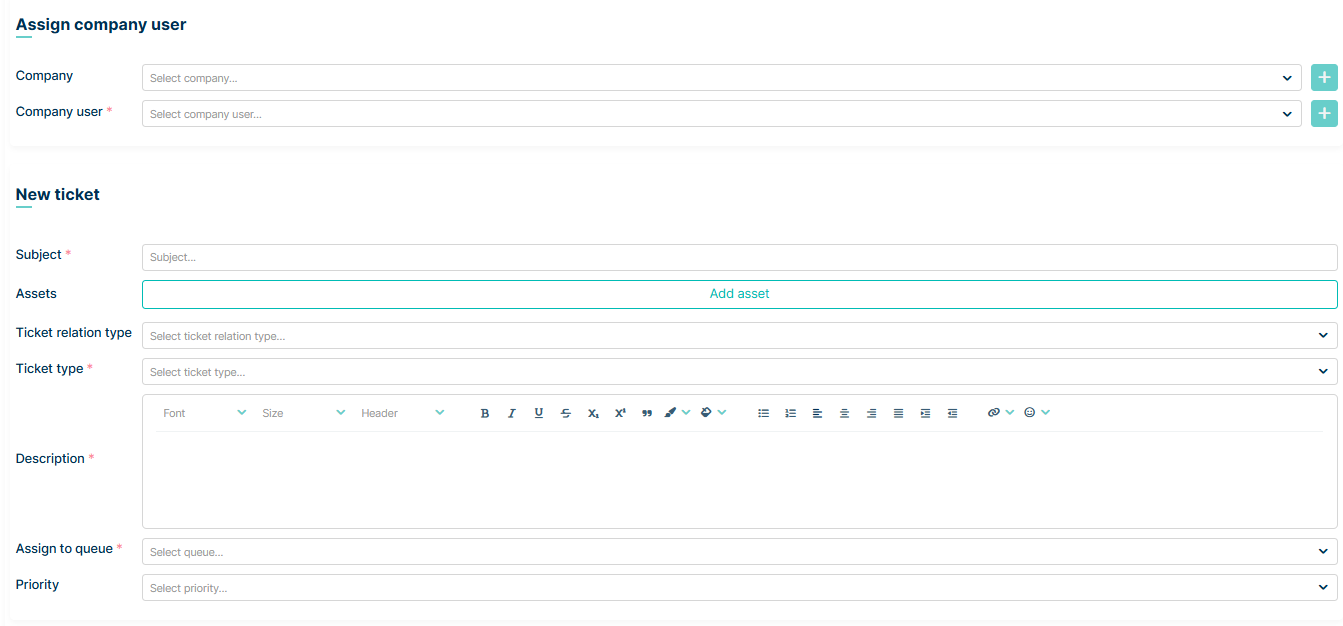
Inherit Values
The Inherit values section allows the new ticket to inherit selected values from the ticket that triggered the automation.

You can configure inheritance for the following fields:
Subject
Assignee
Queue
Service
Contract
Ticket type
Company user
Company
Priority
Pinned Assets
Pinned Related Tickets
Custom Fields
A special type of inheritance applies to custom fields. You can map the values of custom fields from the ticket type of the triggering ticket to specific custom fields in the ticket type of the newly created ticket. This enables you to transfer values between different ticket types and map one custom field to another. Each mapping is configured individually, giving you full control over how data is transferred.
EXAMPLE OF USE:
We want the system to automatically create a new ticket of type “Complaint Step 2” when a ticket of type “Complaint Step 1” is closed.
The newly created ticket should:
Inherit the Company
Inherit the Company User
Inherit the Subject
Inherit the Queue
Copy the value from the custom text field “Text field from Step 1” (in the closed ticket) and map it to the custom text field “Text field from Step 2” in the newly created ticket
First we set Event type: Ticket and select Status change from Events field. Next in filters we choose status: Closed and Ticket type: Complaint Step 1.

Now select the Create ticket action from the Actions section and then select the following items from the “Inherit ticket field” field: Company, Company User,
Subject, Queue, adding each field individually with the button.
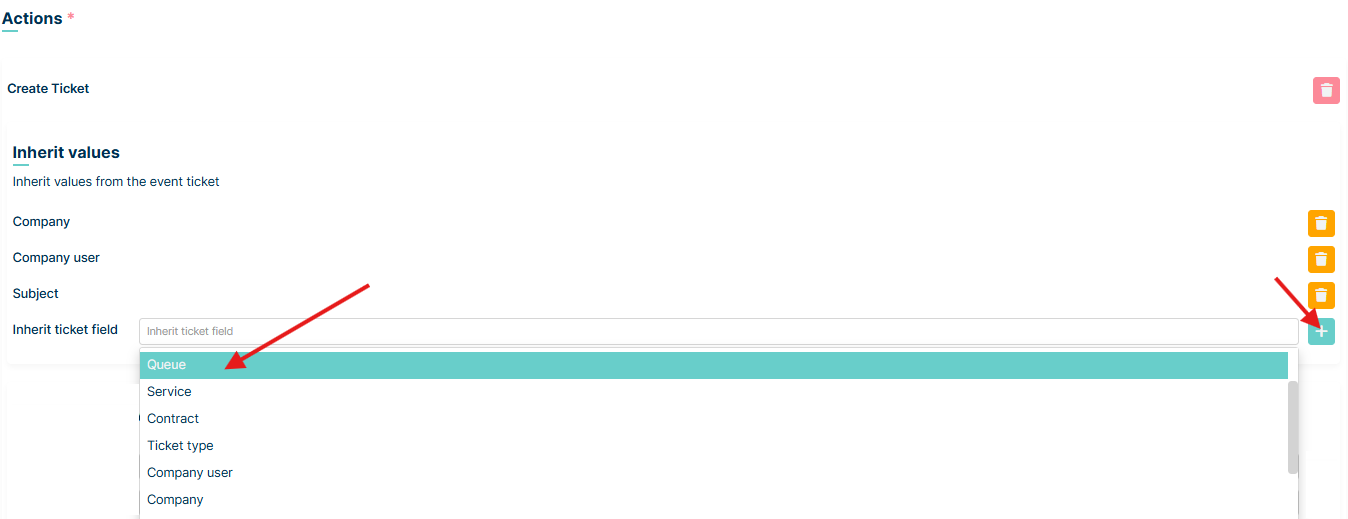
Next select and add the Custom fields item. A new New row button will appear. Click it to add a new row with two drop-down lists. In the list on the left, select the text field from the Complaint Step 1 ticket type, and in the list on the right, select the field from the Complaint Step 2 ticket type.
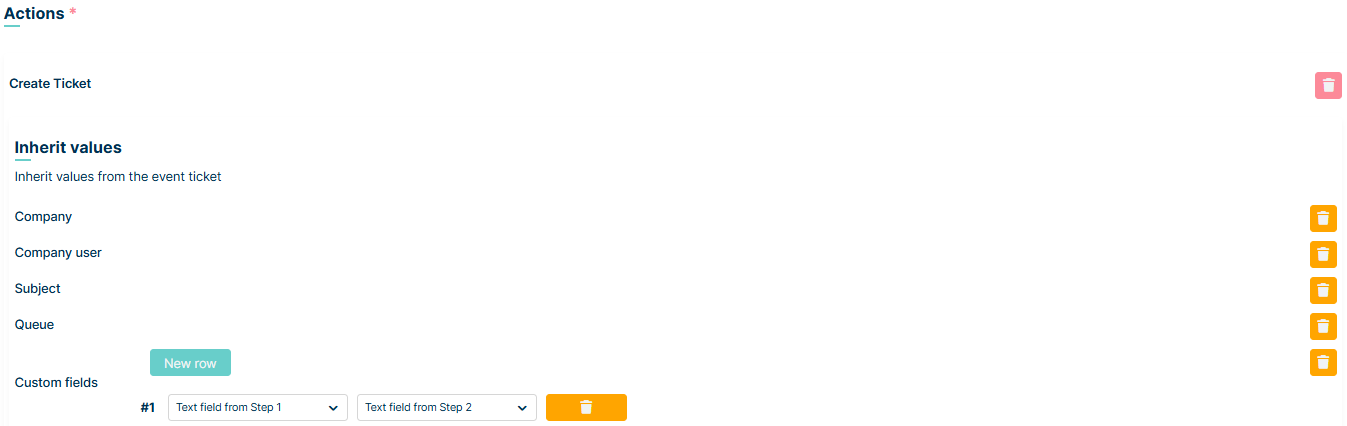
Finally, in the ticket form, fill in Ticket type: Complaint Stage 2 and Description, and save the configuration with the Save button.
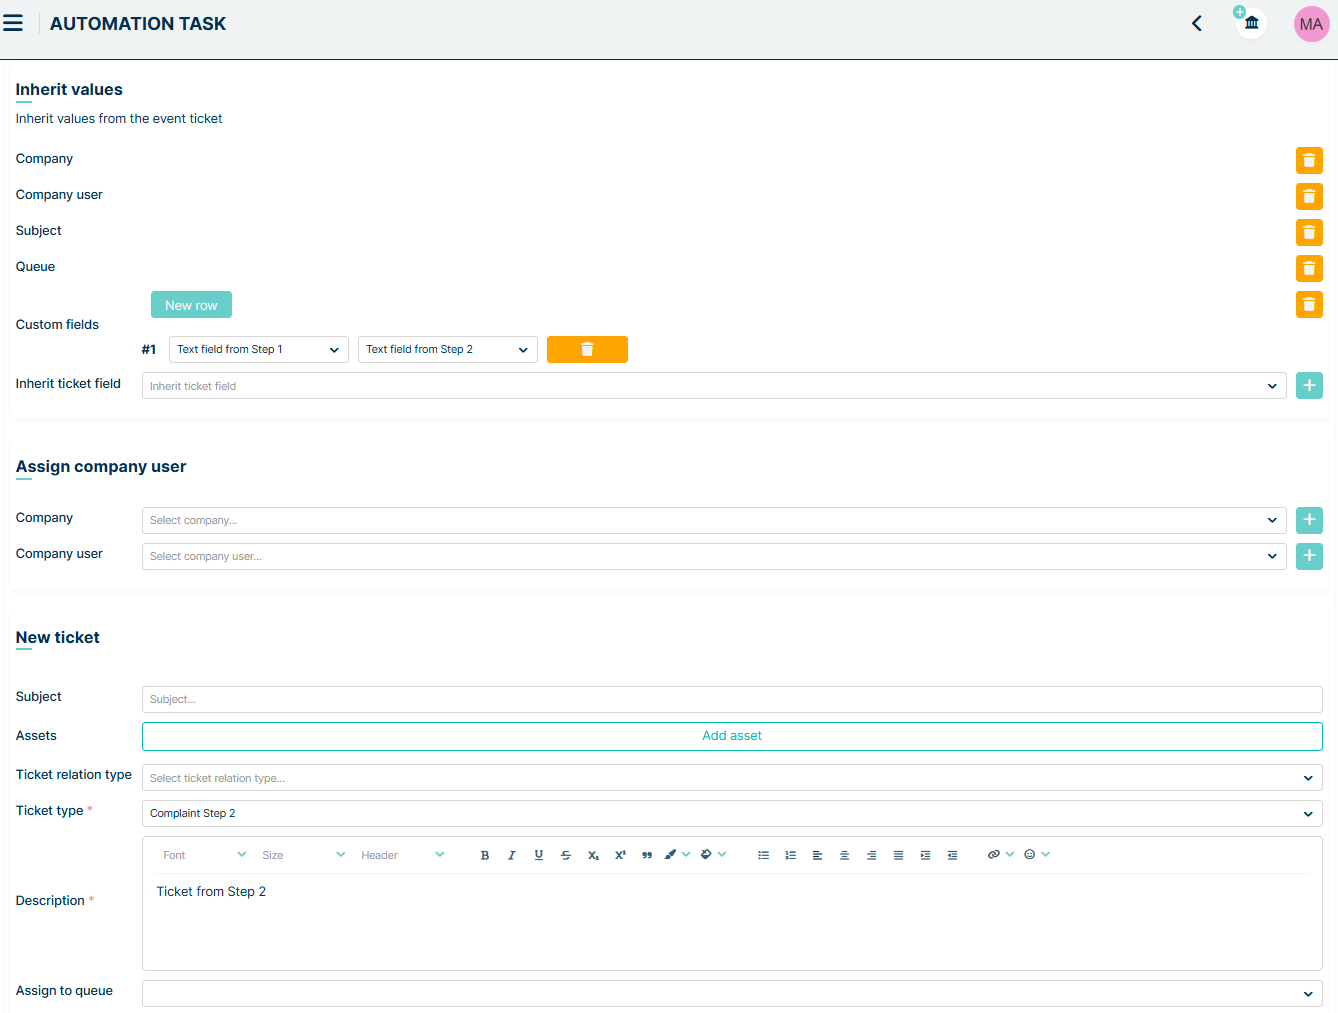
The configuration is ready to use. Log in to the Agent profile and close the ticket of the Complaint Stage 1 type.
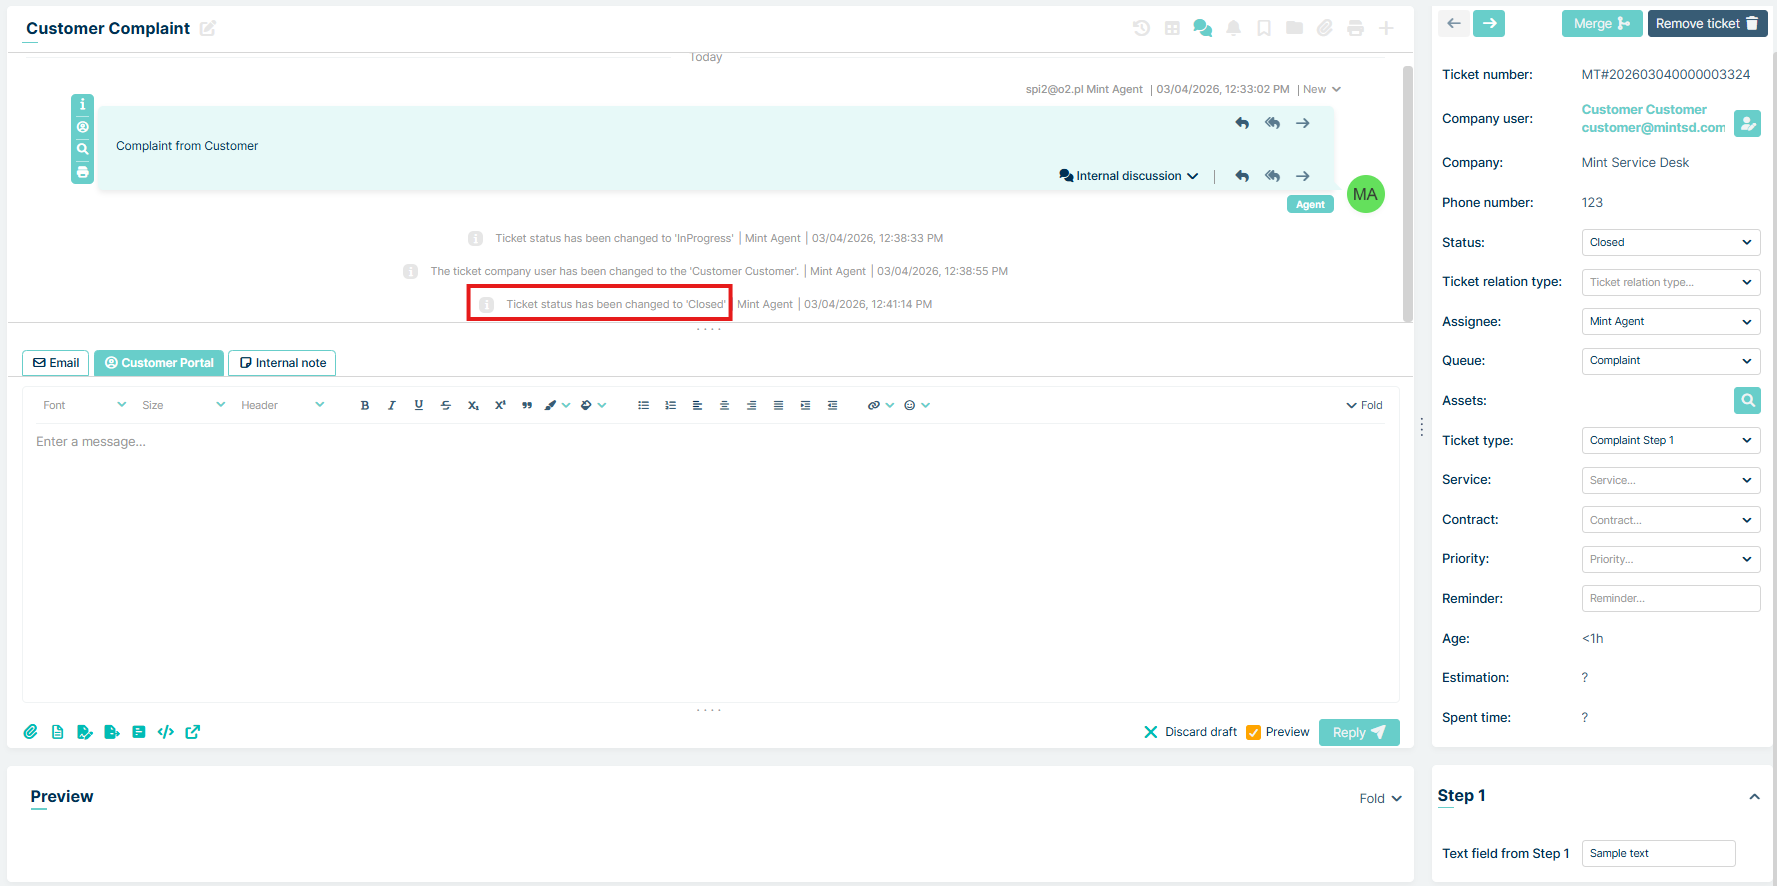
A new ticket will be created in the system after ticket closing action, according to the automatic action configuration, and the inherited values will be shown.

TICKET PROPERTY CHANGE
The Ticket Property Change action allows you to automatically modify selected properties of a ticket that triggered the automation. If the conditions defined in the Events and Filters sections are met, the system will update the selected fields in the same ticket that initiated the action.
Within this action, you can configure automatic changes to the following ticket parameters:
Company
Company User
Ticket Type
Status
Queue
Assignee
Priority
Service
Contract
Some fields become available only after selecting other related fields. This behavior ensures logical consistency within the ticket configuration.
When configuring the action, the following fields are available first:
Company
Company User
Ticket Type
Queue
Priority
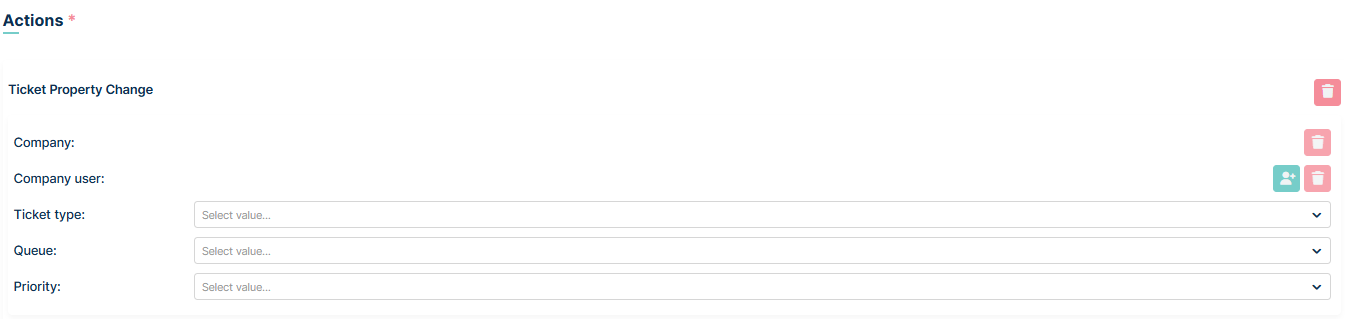
The following fields become visible only after selecting a Ticket Type:
Status
Service
Contract
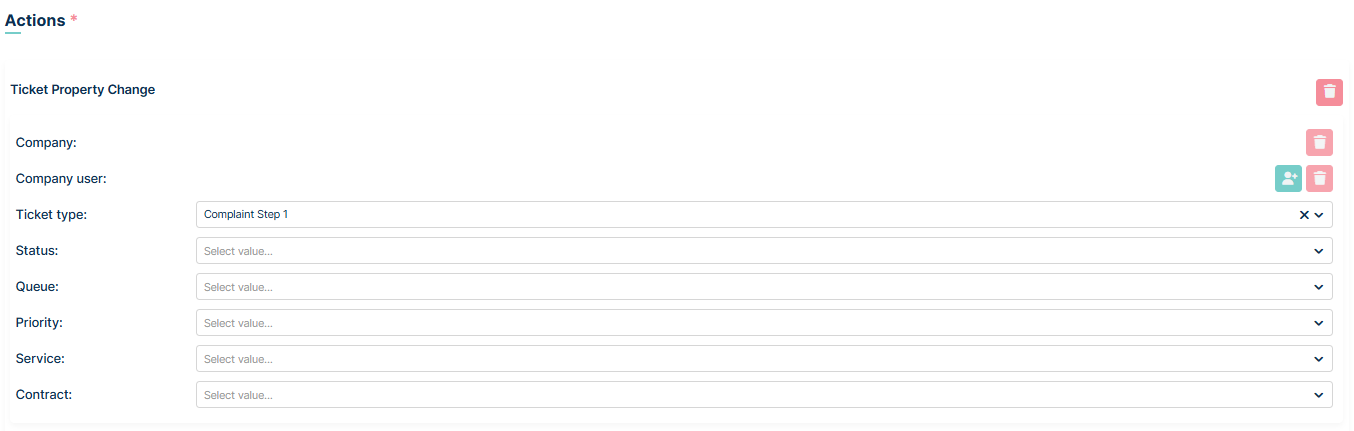
This dependency exists because available statuses, services, and contracts may vary depending on the selected ticket type.
The Assignee field becomes visible only after selecting a Queue. This ensures that only agents assigned to the selected queue can be chosen as the assignee.
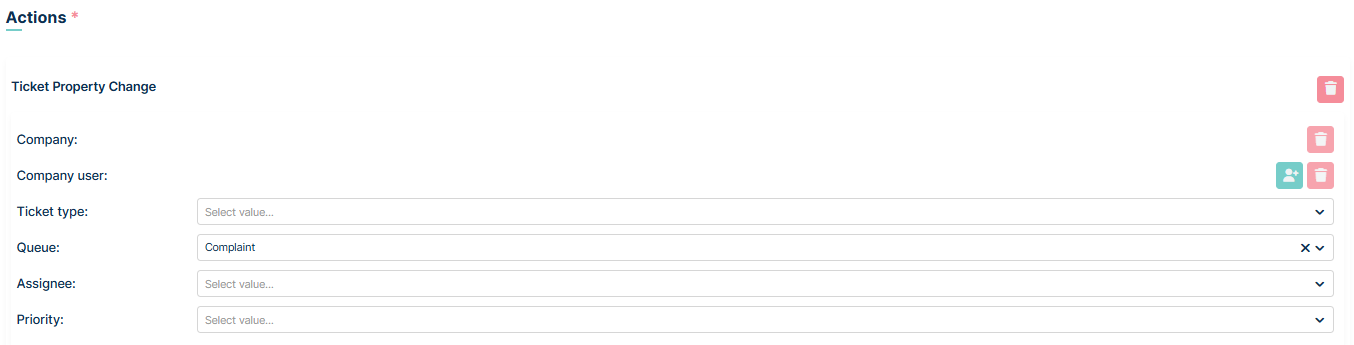
TICKET DYNAMIC FIELDS CHANGE
This option allows you to automatically change the custom fields in the selected Ticket Type.
TICKET PROPERTY CHANGE BY DYNAMIC FIELD VALUE
This option allows you to change ticket properties based on the value of a dynamic field.
TIME TRIGGER
Unlike Event automation, Time Trigger automation relies on a single date, day of week or period of time. The global setting configuration is identical to the events configuration.
The second section is Time Triggers where you configure when you want the automation to turn on.
To start the configuration, you need to press  button.
When this button is pressed, a dropdown menu will appear with three possible options:
Single date
Day of week
Period of time
After selecting the appropriate time trigger, press button.When you do this a new field will appear in
place of this dropdown menu depending on what you selected in the dropdown menu. Below is an example of a field after
selecting Period of time.

The next sections are Based on and Filters, which are related. In Based on, select an option from the dropdown menu (currently there is only a Ticket selection). Then the whole filter configuration will appear.
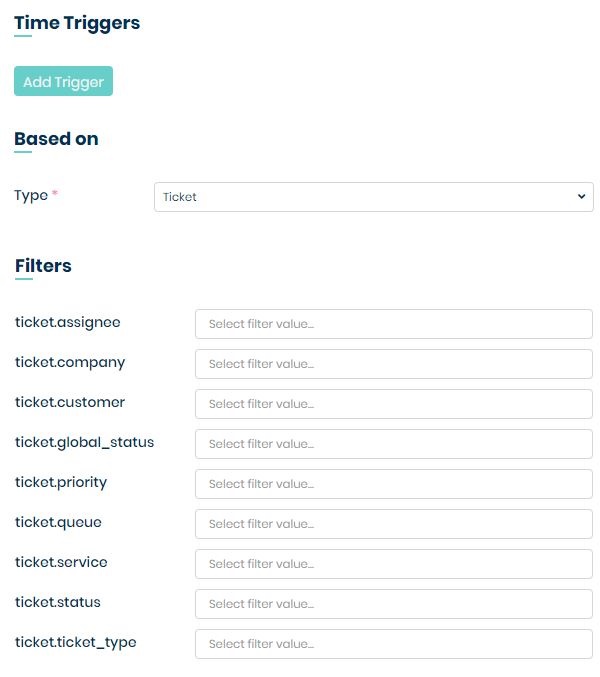
ticket.assignee - filters by the agents assigned to the ticket.
ticket.company - filters by the company assigned to the ticket.
ticket.customer - filters by customer.
ticket.global_status - filters by the global status.
ticket.priority - filters by the priority that was set on the ticket.
ticket.queue - filters by the queue in which the ticket is created.
ticket.service - filters by the service in which the ticket is created.
ticket.status - filters by the status that was set on the ticket.
ticket.ticket_type - filters by ticket type in which the ticket is created.
ticket.ticket.modificationDate - filters by modification date, all users are taken into account.
ticket.ticket.customer_modificationDate - filters by modification date, all customers are taken into account.
ticket.ticket.ticket.agent_modificationDate - filters by modification date, all agents are taken into account.
The last section when configuring automation is Actions. Here you decide what will happen to the ticket when it passes the filter.
To start the configuration you need to press button. Then a dropdown menu will appear from which you can select the option you are
interested in and then press button.
Selectable options for event type:
Close Tickets - This option allows you to automatically close tickets.
Create Ticket - This option allows you to create tickets automatically.

Press button to complete the automation setup process.
EMAIL
ACCOUNTS
The ‘Accounts’ section handles the different communication accounts in the system. Right here you will be able to configure all the email accounts you want to have in the system for incoming and outgoing emails.
All the accounts that have already been configured in the system are displayed on the list.
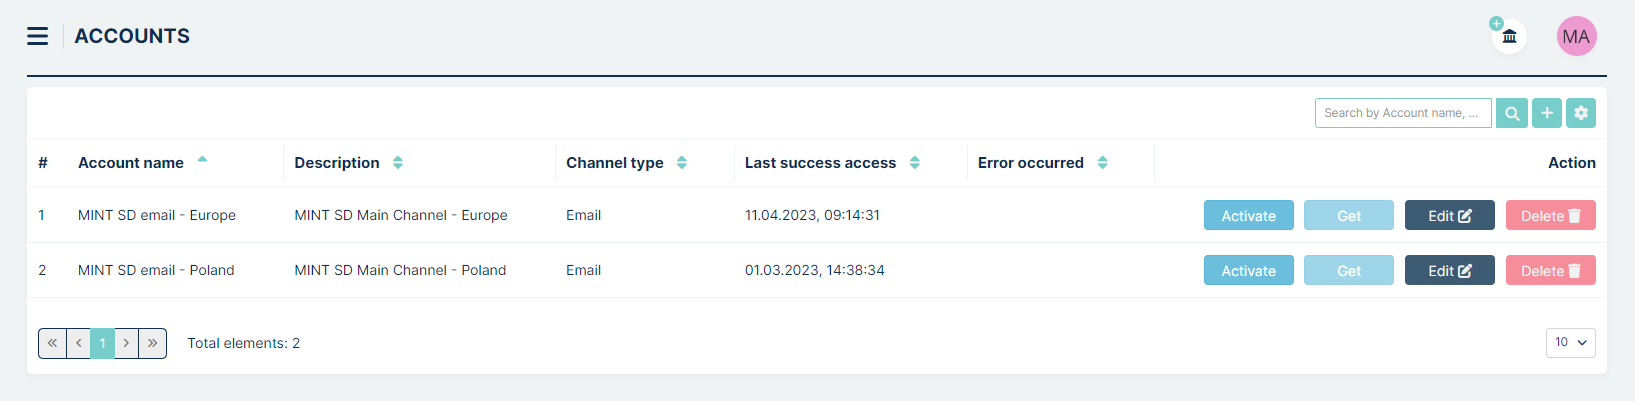
To add an email account, click the button located on the right side of
the search box.
In the ‘Create account’ view, fill in all required fields (those marked with an *).
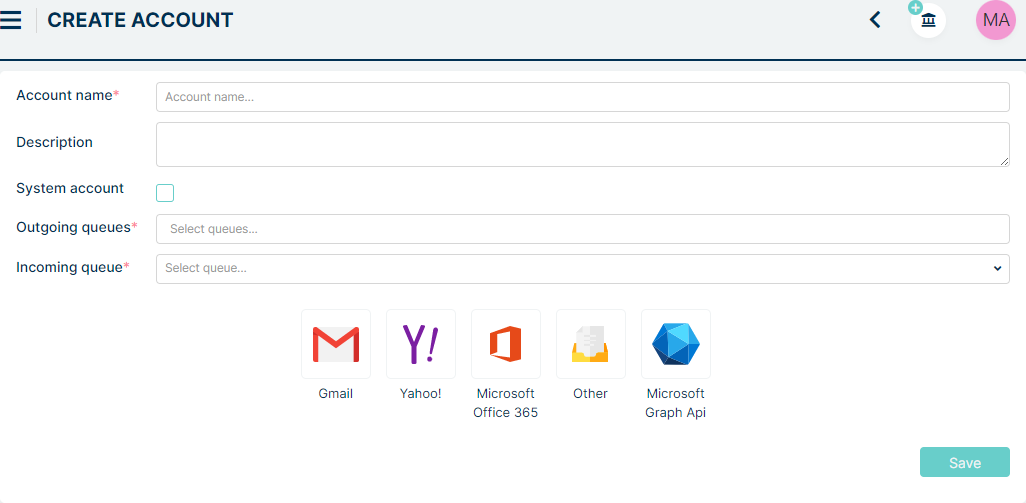
Select at least one queue in ‘Outgoing queues’. When an agent sends a message in a ticket that belongs to one of the selected outgoing queues, the message will be sent using this email account. If an agent sends a message in a ticket whose queue is not assigned to any mailbox, the message will be sent from the mailbox designated as the ‘System account’. If no mailbox is designated as the ‘System account’, the message will not be sent.
Once you have selected the outgoing queues, you need to choose one ‘Incoming queue’. This means that when a client sends an email to your configured email address, a ticket will be created in the selected incoming queue.
You can also mark a mailbox as the ‘System account’.
The system mailbox is used to send automatic notifications (e.g., new ticket creation, status updates) and will also handle tickets from queues that are not assigned to any other mailbox.
Next you will need to select which email you’re using.
You can choose:
Gmail
Yahoo!
Microsoft Office 365
Other
Microsoft Graph Api
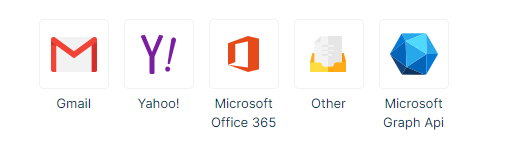
All mailboxes include predefined configuration settings specific to each email provider. The only exception is the Others section, where all parameters must be entered manually.
Connection configuration can be performed using authentication types like below:
Credentials
OAuth2
Each of these methods is described in detail below. Additionally, the final section of this chapter covers configuration for Microsoft Office 365 and Microsoft Graph API.
CREDENTIALS
The Credentials authentication method involves providing basic mailbox login information along with details of the servers responsible for handling incoming and outgoing email. During configuration, the user is required to enter the email address, password, and relevant protocol and security settings for server communication.
Requirements for successful mailbox configuration:
valid login credentials (email address and current password)
the address of the outgoing mail server (SMTP), including the correct port and security mechanism (e.g., SSL/TLS, STARTTLS)
the address of the incoming mail server (IMAP - recommended - or POP3), including the relevant port and security mechanism
enabled message retrieval and sending services within the mailbox settings (IMAP/POP3, SMTP)
awareness of whether Two-Factor Authentication (2FA) is enabled on the mailbox, as it may require an alternative login method (e.g., an application-specific password)
if necessary — confirmation that access to the above ports and protocols is not restricted by the network or firewall
The three tables below present the Credentials Authentication Support, SMTP server parameters, and IMAP server parameters for specific email providers.
Credentials Authentication Support
Mail Provider |
Credentials Support |
Notes |
|---|---|---|
Gmail |
Limited |
App password required and IMAP must be enabled. Standard account password does not work when 2FA is enabled. |
Yahoo |
Yes |
App password required after enabling 2FA. |
Microsoft Office 365 |
Limited |
Basic Auth over IMAP/SMTP may be disabled by the organization’s policy. Works only if Basic Auth is still enabled. |
Microsoft Graph API |
No |
Only OAuth2 authentication is supported. IMAP/SMTP with user password is not available. |
SMTP Server Parameters (Credentials)
Mail Provider |
SMTP Server |
SMTP Port |
SMTP Security |
|---|---|---|---|
Gmail |
|
|
SSL/TLS |
Yahoo |
|
|
SSL/TLS |
Microsoft Office 365 |
|
|
STARTTLS |
Microsoft Graph API |
— |
— |
— |
IMAP Server Parameters (Credentials)
Mail Provider |
IMAP Server |
IMAP Port |
IMAP Security |
|---|---|---|---|
Gmail |
|
|
SSL/TLS |
Yahoo |
|
|
SSL/TLS |
Microsoft Office 365 |
|
|
SSL/TLS |
Microsoft Graph API |
— |
— |
— |
Lets return to the configuration in Mint Service Desk — the screenshot below presents the fields required for the Credentials authentication type.
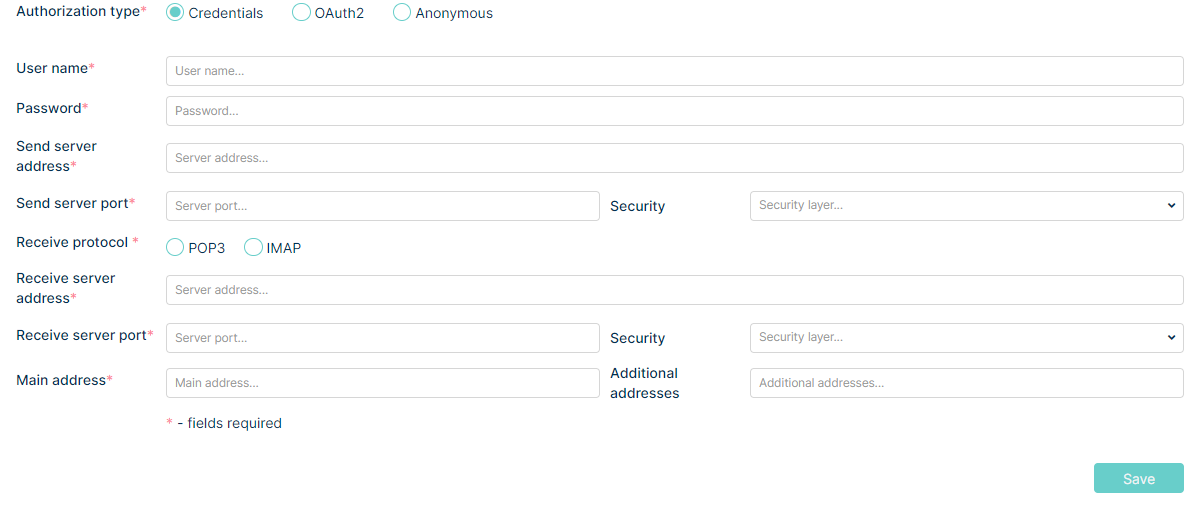
The descriptions of each field are provided below.
Field |
Description |
|---|---|
User name* |
The login username for the mailbox. In most cases this is the full email address, unless the provider requires a different format. |
Password* |
The mailbox account password associated with the User name. |
Send server address* |
The SMTP server address used for sending outgoing emails. |
Send server port* |
The port used for SMTP communication (typically 465 or 587 depending on the security method). |
Security (SMTP) |
The security protocol applied to the outgoing mail server connection (SSL/TLS or STARTTLS). |
Receive protocol* |
The protocol for receiving email: IMAP (recommended) or POP3. |
Receive server address* |
The mail server address for incoming email (IMAP or POP3 depending on the selected protocol). |
Receive server port* |
The communication port for the incoming mail server (e.g., IMAP: 993, POP3: 995). |
Security (IMAP/POP3) |
Encryption type for incoming communication (typically SSL/TLS). |
Email address* |
The mailbox address associated with this configuration. Must match credentials for most providers. |
Additional addresses |
Optional aliases or secondary addresses assigned to the same mailbox that should be handled in the system. |
After completing the fields, click button to finish the process
and save the new email account.
In case of connection issues, an error message will be displayed during the saving process, as shown below.

If the connection is saved successfully, you will be moved to the list of existing accounts, where you will see a new position with some information about your new email account.
If any connection issues occur while using the mailbox (for example, if the password for the external mailbox connected to Mint has been changed), a warning icon  will appear in the Error occurred column.
To activate your new account, press the  button. If for some
reason you want to deactivate it, you can easily do it, using
button. If for some
reason you want to deactivate it, you can easily do it, using  button.
Once you have a working email account added to the system you can use
the  button in order to manually force the retrieval of
messages from this email box.
button in order to manually force the retrieval of
messages from this email box.
Those messages will be placed in the ‘Messages’ section (placed in Logs tab) , where you will be able to browse through them.

If you want to edit an already existing email box, or just delete it,
use the or button, located in the ‘Action’ column
of the ‘Accounts’ view.
OAUTH2
The OAuth2 authentication method grants access to the mailbox without storing the user’s password in the application. Instead, secure access is achieved using authorization and access tokens issued by the provider’s authentication server. This method is recommended by leading email providers such as Gmail and Yahoo.
NOTE: It is recommended to perform the configuration in your browser’s incognito/private mode. For example, in Office 365 configuration the final step requires you to authorize your Microsoft account. Otherwise, if you are signed in to a Microsoft account in your browser with the “stay signed in” option enabled (for example, through Outlook or OneDrive in the browser), the system may incorrectly use those credentials to authorize the connection.
Requirements for a successful OAuth2 connection
To ensure correct configuration, the user or administrator must:
possess an active mailbox with one of the supported providers
register the Mint Service Desk application with the email provider
obtain the Client ID and Client Secret
configure a valid Redirect URI pointing to Mint Service Desk (visible in the upper right section of the OAuth2 tab, for example https://mintsd.opgksoftware.com/admin/channels/accounts/create)
enable necessary API services if required (e.g., Gmail API)
ensure IMAP is enabled in the mailbox (if used for email retrieval)
verify that firewall/network settings do not block email communication
ensure the user grants consent during authentication using a browser pop-up flow
Details on Credentials authentication support, as well as SMTP and IMAP server parameters for specific email providers, are provided in the Credentials section of the Email chapter in this documentation.
To connect to an email account using OAuth2, select ‘OAuth2’ in the ‘Authorization type’ section. Depending on the previously selected operator, the data will be filled in accordingly (if the ‘Other’ option is selected, the user must enter all the data himself).
Below is a table describing each field using the Others provider as an example.
Field |
Description |
|---|---|
Authorization type |
Selected authentication method – in this case OAuth2. |
Client ID* |
Unique identifier of the application assigned by the email provider (e.g., Google, Yahoo). |
Client Secret* |
Application secret — a confidential key used to authorize the application during token exchange. |
Authorization server* |
URL of the authorization server responsible for user login and issuing the authorization code. |
Access token server* |
URL of the token endpoint — where the Access Token and Refresh Token are obtained. |
Scopes* |
Permission scopes requested by the application — must allow mail access (send/read). |
Send server address* |
SMTP server address used to send outgoing messages. |
Send server port* |
SMTP port (typically 465 or 587). |
Security (SMTP) |
Connection security method for SMTP (SSL/TLS or STARTTLS). |
Receive protocol* |
Mail retrieval protocol: IMAP (recommended) or POP3. |
Receive server address* |
IMAP/POP3 server address used for incoming mail. |
Receive server port* |
Incoming mail server port (e.g., IMAP: 993). |
Security (IMAP/POP3) |
Security settings for the mail retrieval connection (SSL/TLS). |
Email address* |
Email address of the user whose mailbox is integrated with the system. |
Additional addresses |
Optional aliases for this account — if additional addresses should also receive mail. |
Please notice, that after saving your settings, the Redirect URL has changed from ‘create’ endpoint to ‘edit’ with specific UUID. It is nesessary to add this additional redirect URL to your settings in application portal you are using to configure OAUTH2 connection.
OFFICE 365
The example configuration will be performed below (It is recommended to use your browser’s incognito mode during configuration — see the Note in the OAuth2 section.).
To begin configuration, the user must register the application. To do this, go to ‘https://portal.azure.com/’ and then log in to your account. When the login process is successful, select ‘App registrations’ from the left menu. When the window opens click on ‘New registration’.
In order to configure your application correctly, you must first enter an application name. Then in the ‘Supported account types’ section select ‘Accounts in any organizational directory (Any Azure AD directory - Multitenant) and personal Microsoft accounts (e.g. Skype, Xbox)’ and in the ‘Redirect URI (optional)’ section select ‘Web’ and paste the Redirect Uri from the email account creation page.
Then you need to press the ‘Register’ button.
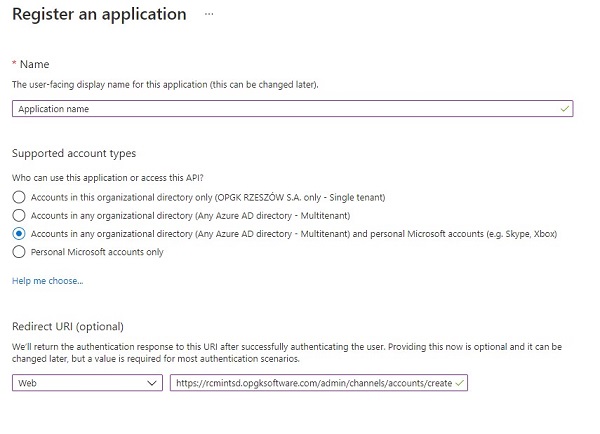
Once the button is pressed and the new application is successfully registered, the user will be taken to a summary page where he/she must copy the ‘Application (client) ID’
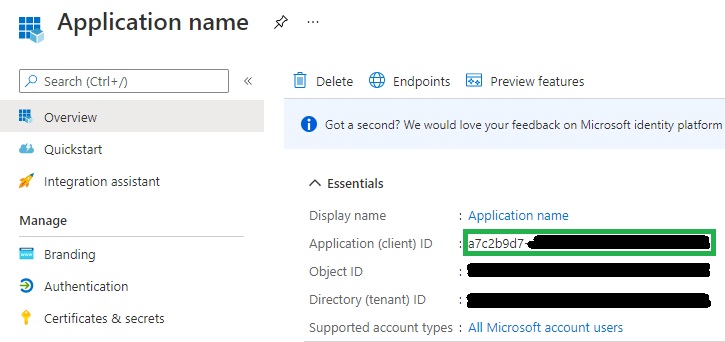
The copied code, the user must paste into the mint configuration in the ‘Client id’ field.
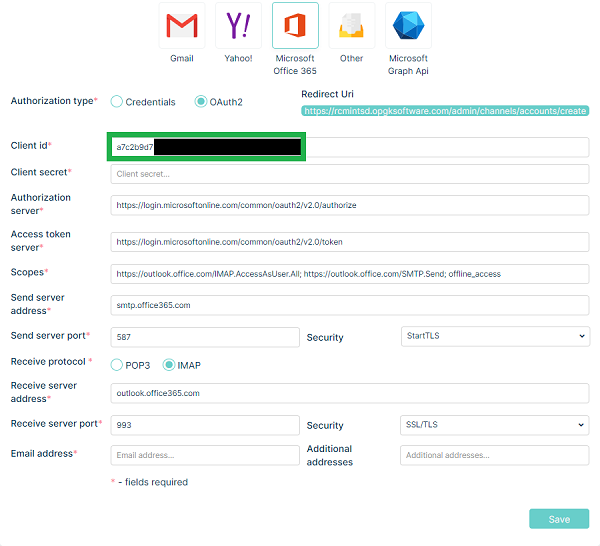
The next step is to add permissions. To do this, the user must press the ‘API permissions’ option on the sidebar and then select ‘Add a permission’ on this window.
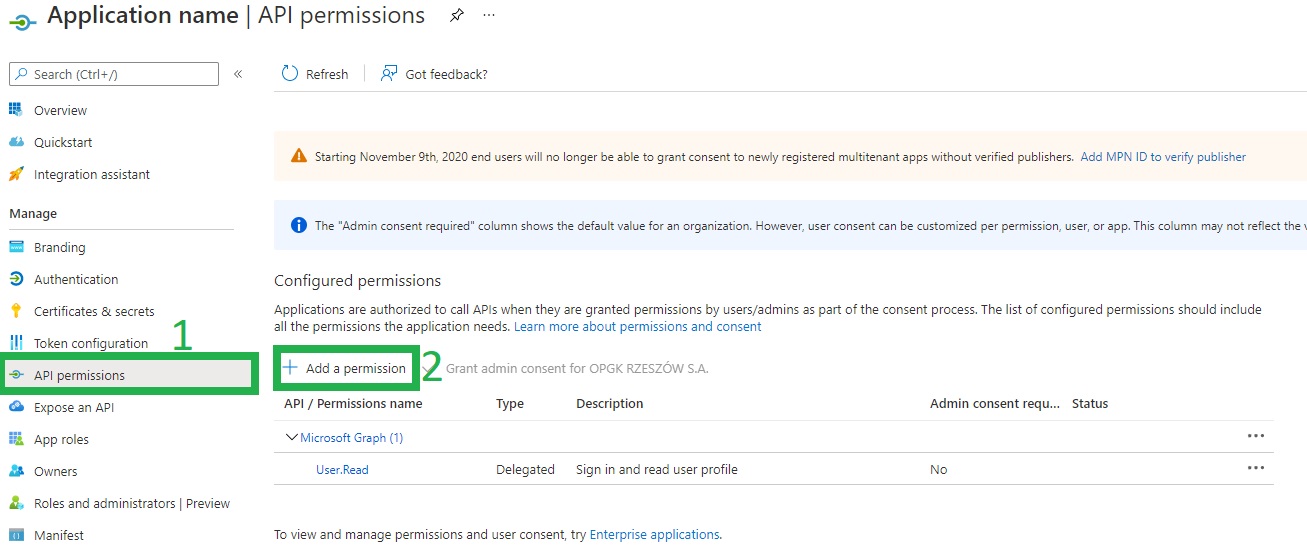
After pressing the button, press the ‘Microsoft Graph’ option.
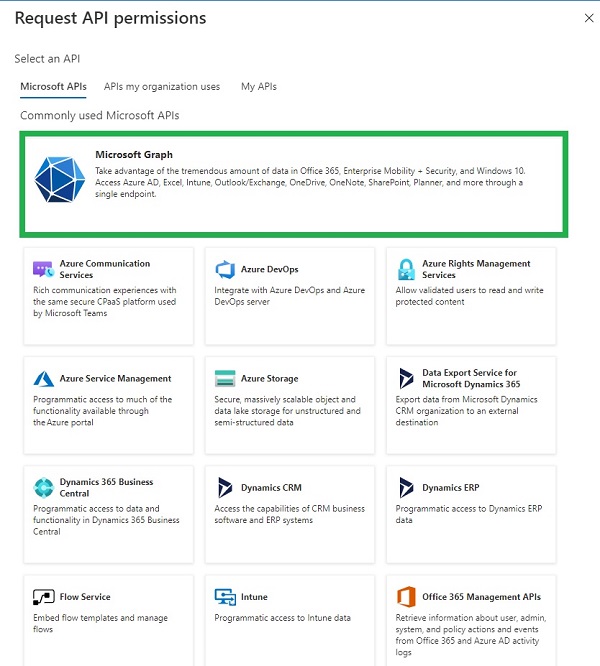
Select ‘Delegated permissions’ and check these options: - IMAP.AccessAsUser.All - SMTP.Send - offline_access
And then press the ‘Add permissions’ button.
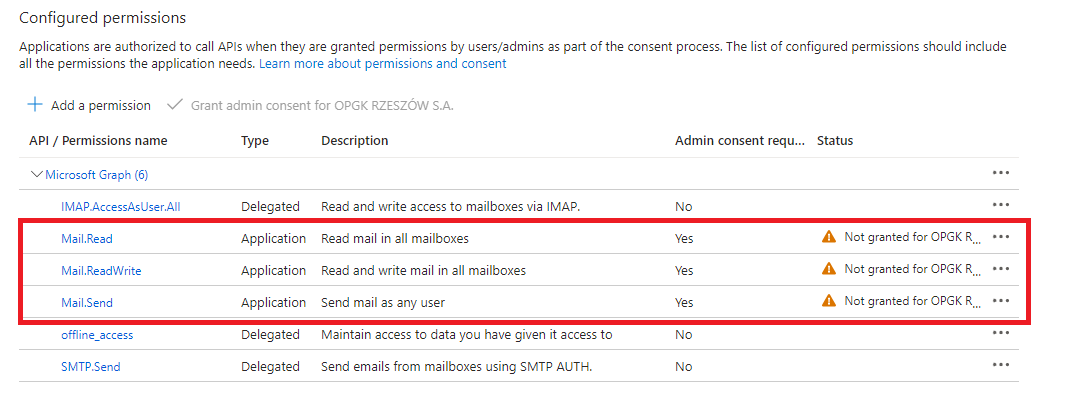
The next step is to go to ‘Certificates & secrets’ which is located on the left sidebar. Then you need to press the ‘New client secret’ button.
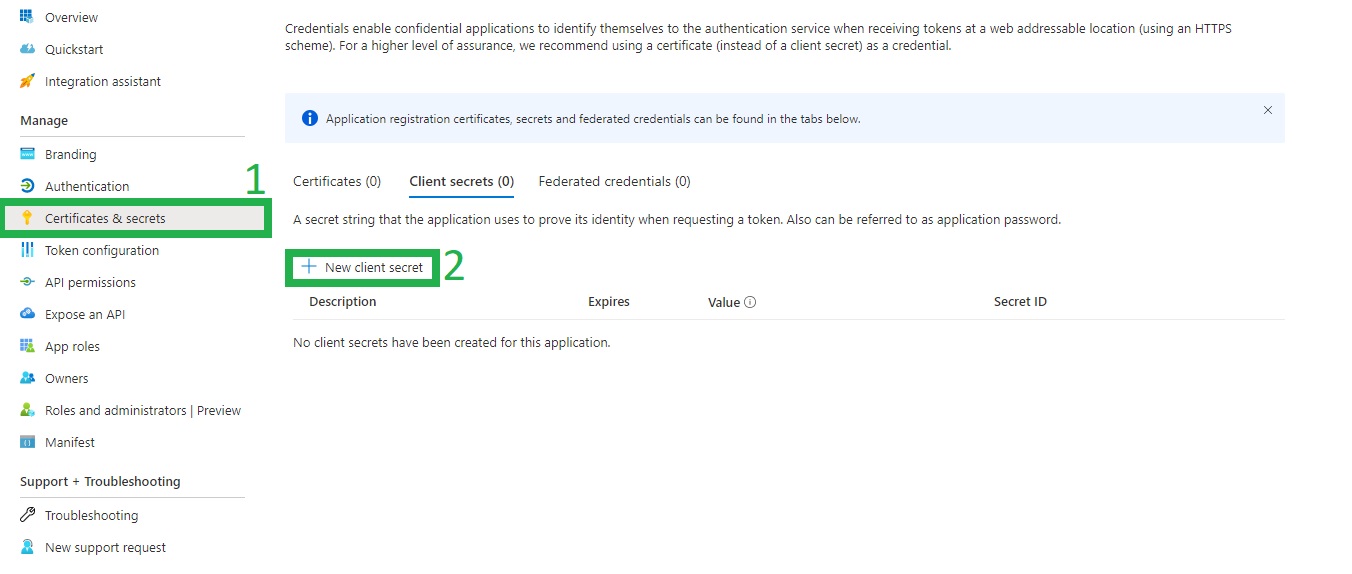
Add a description and press the ‘Add’ button.

Remember to enable SMTP Authentication. More information at this link: https://docs.microsoft.com/en-us/exchange/clients-and-mobile-in-exchange-online/authenticated-client-smtp-submission
The user will be taken to the summary. Remember to copy the ‘Value’ field because when you refresh the page, this field will be hidden.
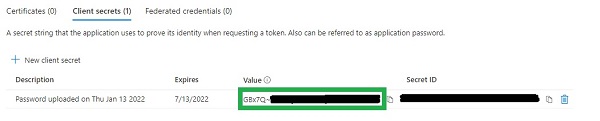
The copied value should be pasted into the MINT configuration in the ‘Client secret’ field.
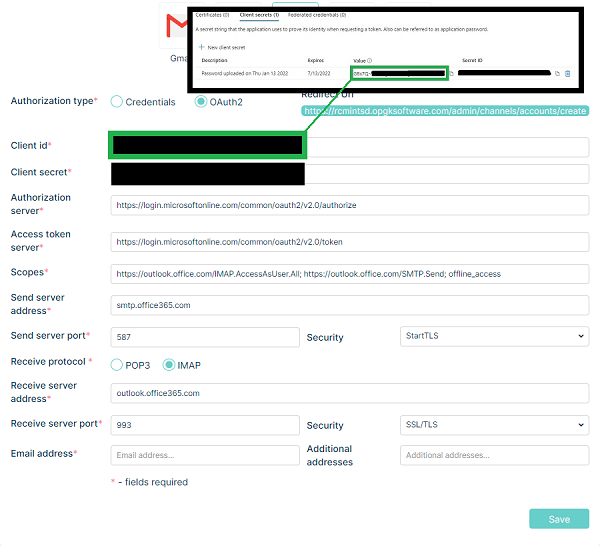
To complete the configuration of MINT, select ‘IMAP’ in ‘Receive protocol’ and in the ‘Email address’ field enter the Microsoft Office 365 address from which the configuration was performed.
To complete the configuration process, press the ‘Save’ button. After pressing it the user will be redirected to Outlook login form. If all the information is correct, the system should connect to Microsoft Office 365 via OAuth2.
Please notice, that after saving your settings, the Redirect URL has changed from ‘create’ endpoint to ‘edit’ with specific UUID. It is nesessary to add this additional redirect URL to your settings in Azure portal (or any other portal you are using to configure OAUTH2 connection)
The sample Redirect URL can look like this below:

Note: Keep in mind that some OAuth2 providers only allow you to generate one refresh token per config. Because of this restriction, you may get an error that you cannot connect to the mailbox. In this case, review the documentation of the provider you are using.
MICROSOFT GRAPH API
After pressing this button, a form will pop up:
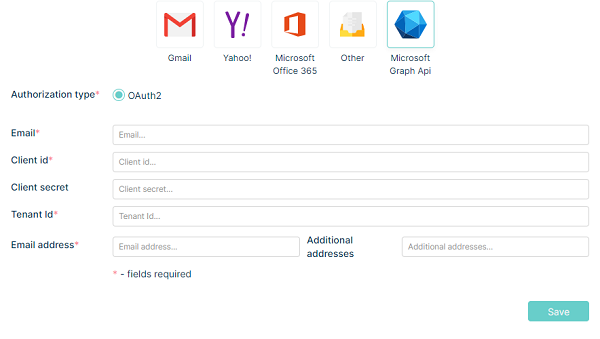
First go to https://portal.azure.com Sign in and go to Microsoft Entra ID services.

Go to “App” and ‘App registration’
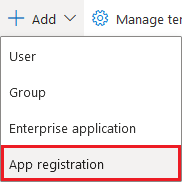
The following form will appear.
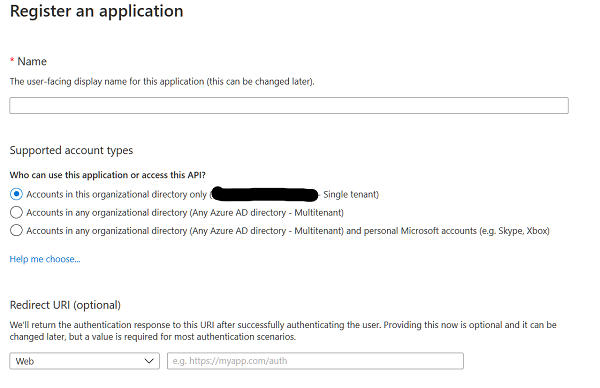
Now fill up the form:
in ‘Name’ field type your preferred name
‘Supported Account Types’: leave it as it is
‘Redirect URL’: Select “Web” option.
Copy Application (client) ID and Directory (tenant) ID
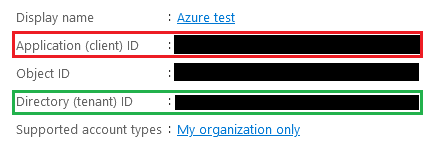
Paste them here:
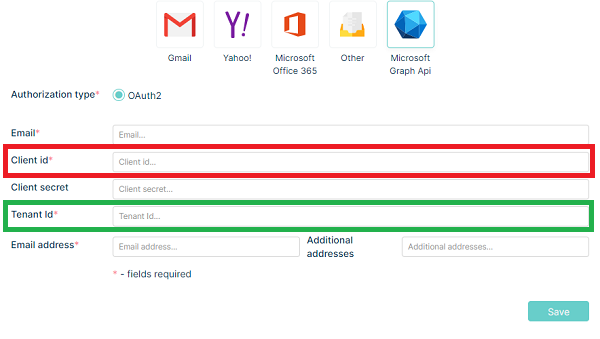
After the registration go to the Manage > API permissions located in the sidebar on the left.
Press the  button. Then, from the window that slides out on the right side of the screen, select the “Microsoft Graph” option.
From the two available options, select the one on the right - Application permissions
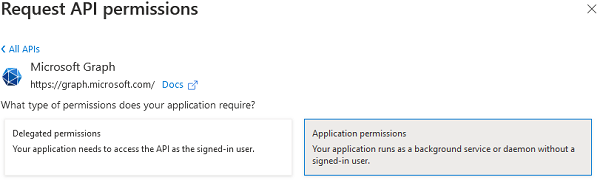
In the Mail section, select the following options:

To save the rights, press the  button.
There is a possibility that you will encounter such a situation:
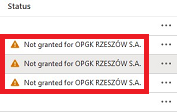
Domain administrator approval is required to grant permissions (read, write, send). It is recommended that domain administrators narrow Graph application access to only the required email addresses. By default, permissions will be granted to the entire domain (for each email address in the domain).
To configure an application access policy and limit the scope of application permissions:
Connect to Exchange Online PowerShell:
To require all PowerShell scripts that you download from the internet are signed by a trusted publisher, run the following command in an elevated Windows PowerShell window (a WindowsPowerShell window you open by selecting Run as administrator)
Set-ExecutionPolicy RemoteSigned
Install ‘ExchangeOnlineManagement’ tool for managing the Exchange Online Services
Install-Module -Name ExchangeOnlineManagement

Login to the Exchange Online Powershell (a login pop-up will prompt out)
Connect-ExchangeOnline -UserPrincipalName {your-admin-account@your-domain.com}
Identify the app’s client ID and a mail-enabled security group to restrict the app’s access to. Identify the app’s application (client) ID in the Azure app registration portal. Create a new mail-enabled security group or use an existing one and identify the email address for the group:
You must have Microsoft 365 admin permissions to access the Exchange admin center. For more information, see Permissions in Exchange Online.
sign in to Microsoft 365 or Office 365 using your work or school account, and then choose the Admin tile.
In the Microsoft 365 admin center, choose Admin centers > Exchange.
In the EAC, navigate to Recipients > Groups.
Click New > Security groups and fill all necessary fields.
Create an application access policy.
Run the following command, replacing the AppId, PolicyScopeGroupId, and Description arguments
New-ApplicationAccessPolicy -AppId e7e4dbfc-046f-4074-9b3b 2ae8f144f59b -PolicyScopeGroupId EvenUsers@contoso.com -AccessRight RestrictAccess -Description “Restrict this app to members of distribution group EvenUsers.”
Note: Changes to application access policies can take more than 1 hour to take effect in Microsoft Graph REST API calls.
Then go to the Certificates & secrets section.
Once you are in this section press the  button.
In the box that slides out on the left in the Description field, enter what value you once can easily find. In the Expires field, leave the default value (6 months) or change it to whatever you think.
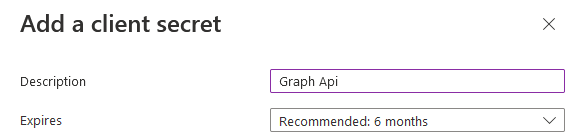
To approve the operation press the  button.
After saving, copy Value.

Client secret values cannot be viewed, except for immediately after creation. Be sure to save the secret when created before leaving the page.
Paste the copied value into MINT in the Client secret section
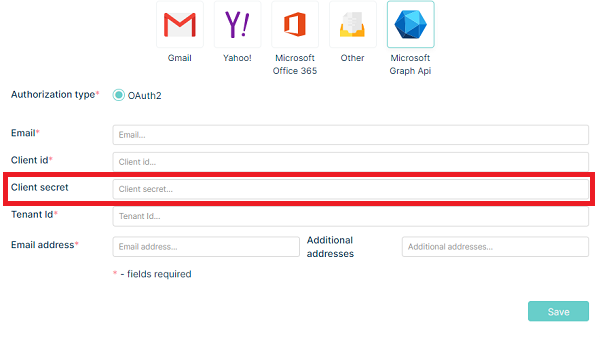
The configuration should look similar to this:

To save the mailbox configuration press the button.
EMAIL FILTERS
The main purpose of this section is to allow you to create a list of emails, from which you will not be receiving any messages. Those email addresses will be blocked.

Adding a new address to the list is very simple. Just click the + button located on the right side of the main view.

After you do that small pop-up window will appear asking you to type the address to be blocked.
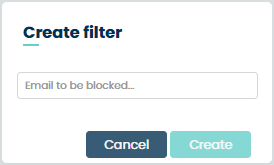
Type the address and click ‘Create’. You will see a new position with this address on the general list.
MESSAGE FILTERS
In this section, you can create as many filters for incoming messages as you need. They are needed to filter the incoming email text and e.g., create Tickets (from incoming email) in the right queue or to assign those Tickets a correct Ticket Type, once the specified conditions had been fulfilled.
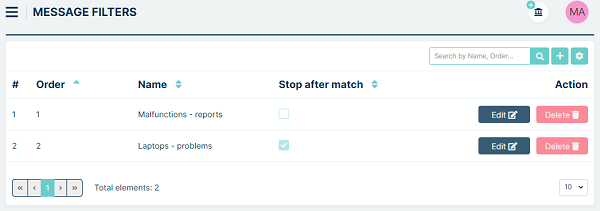
To create a new message filter, click the button located on
the right side, next to the search field. You will be moved to the
‘Create filter’ form.
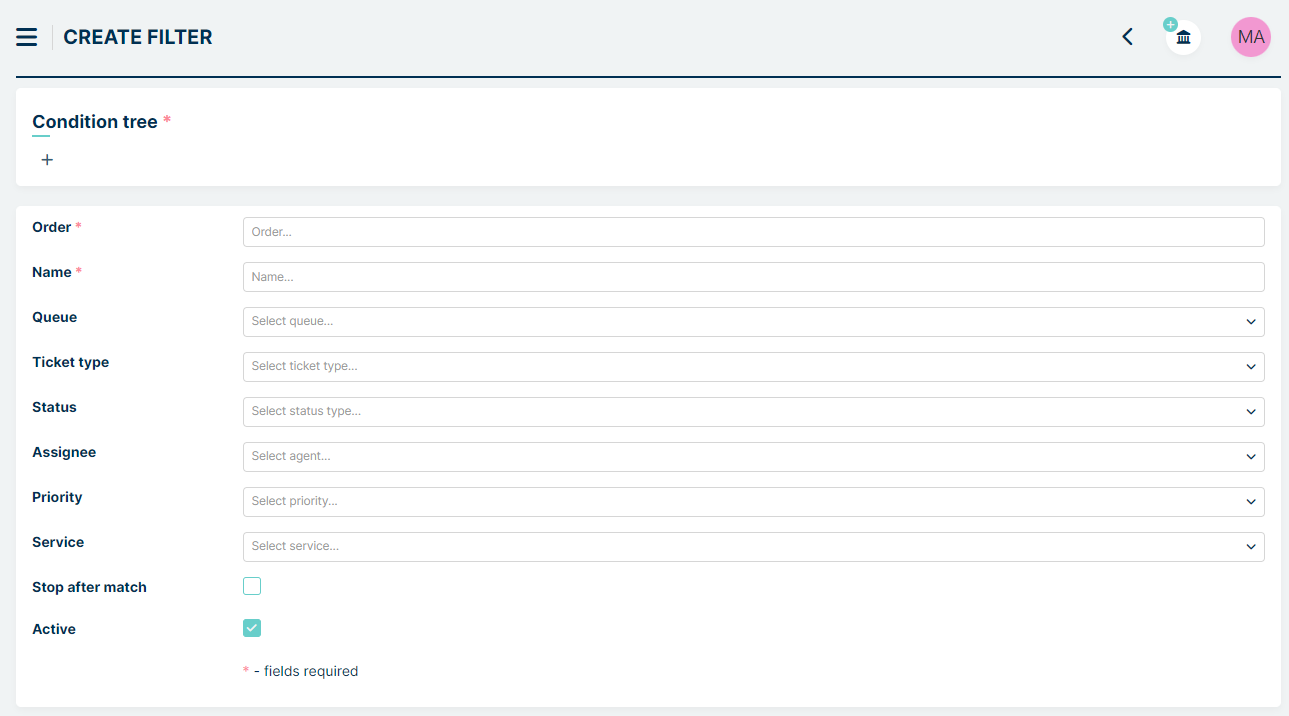
First, click on  button located below “Condition tree”.

In new modal window select type of condition you want to include.
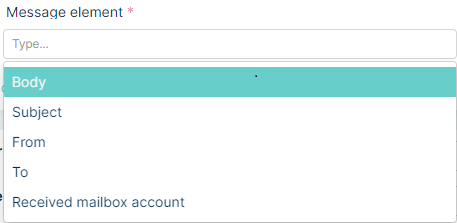
As first step you can choose only from “Logical condition” part (AND, OR) - choose option you need and press “Save”.

Now click on button once again and select another condition. Let’s select
“Message filters” and save.
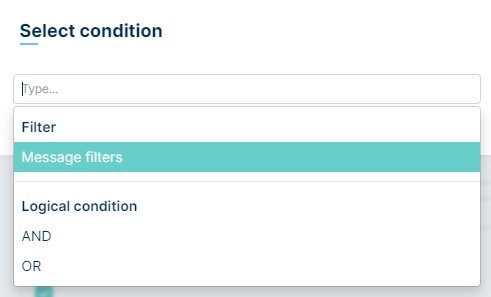
Now you can see fields: Type, Operation, Value

Select “Type” - it is the part of the email you want to filter. You can choose between ‘Body’, ‘Subject’, From’, ‘To’ and ‘Received mailbox account’.
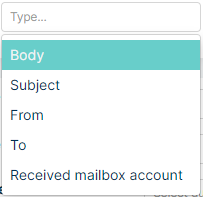
Now, choose one ‘Operation’ – it includes options to get the match and fit of your filters like: “Contains”, “StartsWith”, “EndsWith”, “IsEqual” and “MatchPattern”.
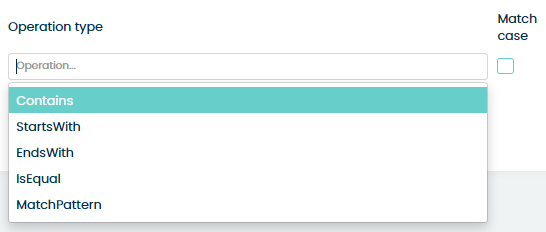
The “Value” is the field where you must put which value exactly you want to match. You can type anything you want here.
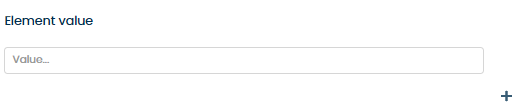
For each of the criteria, you can select the ‘Match case’ check-box. It is related to the ‘Stop after match’ option mentioned before.
If you want to add additional criteria you can use the button again. If you want to delete
any condition, just use the button.
Below this panel is a panel that responds to what should happen to the submission after matching.
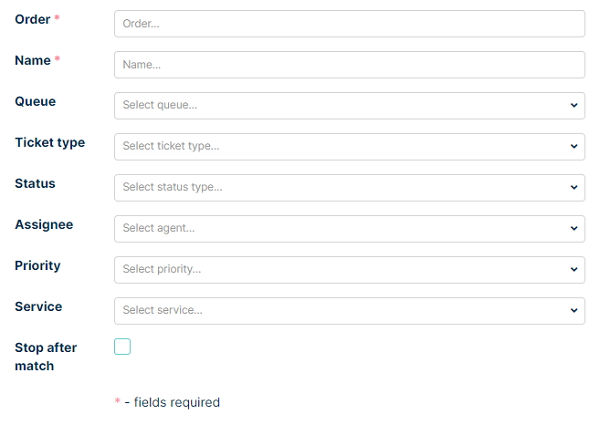
Right here you need to name your filter (‘Name’). You can select the ‘Queue’ in which a Ticket will be created (from the email message sent). You can also specify the ‘Ticket type’ which will be added to the created Ticket (from the email message). Other fields that can be configured are: ‘Status’, ‘Assignee’, ‘Priority’, ‘Service’. Configuring these fields will set the wanted fields after matching.
Next, you can select the check-box ‘Stop after match’. Check it if you want to match one (or more) of the criteria you are creating (those with additional ‘Match case’ check-box selected by you). If you want to match all the criteria, leave this option unchecked.
At the bottom there is ‘Active’ checkbox, where you can decide, if your filter should be active or not. You can always change it by edit message filter.
Once you finish click the button in order to save your new
message filter.
Let’s create an example configuration for filters. Let’s assume we want all tickets from the email customer1@mintsd.com AND with the subject Support to be redirected to the Support queue.
We create the following configuration with the AND condition:
This means that an incoming email must meet both conditions to be redirected to the Support queue.
Now, let’s create a configuration where all tickets from the email customer1@mintsd.com OR with the subject Support are redirected to the Support queue.
We create the following configuration with the OR condition:
This means that all emails meeting at least one of the above conditions will be redirected to the Support queue.
However, let’s say we want emails from the inbox customer1@mintsd.com or customer2@mintsd.com to be redirected to the Support queue, but each email must contain the word Support both in the subject and in the body of the email.
To achieve this, we create a more complex configuration as shown below:
In this way, you can create increasingly complex logical conditions depending on your needs.
Remember that after creating a new message filter you can always either
change anything inside ( button) or even delete it from the
system ( button). To make changes to a saved filter in the Condition tree section, you need
to click the Edit mode toggle:

and confirm the desire to edit the filter in the modal like below
CERTIFICATE
At the bottom of the form for creating and editing email form, there is a section labelled ‘Certificate’. This section allows the configuration of a client certificate that can be used during email communication for enhanced security or message signing, depending on the server requirements.
Below are the fields and their descriptions:
Add file - Upload a certificate file in ‘.pfx’ or ‘.p12’ format. These file types contain the private key and certificate chain required for secure authentication or message signing.
Certificate file password - The password used to decrypt and access the uploaded certificate file.
This configuration is optional and typically required when:
the mail server enforces certificate-based authentication, or
the user needs to enable SMIME signing/encryption of outgoing messages.
Most popular public email providers (e.g., Gmail, Yahoo, Office 365) do not require client certificates for authentication. This feature is intended primarily for enterprise or on-premises email servers where additional security policies are applied.
KNOWLEDGE BASE
CATEGORIES
In this section of the system, you can build the structure for Knowledge Base categories that later will be used while creating new Knowledge Base topics or changing the localization of already existing ones.
In the Knowledge Base section (available for Agent and Client on their sidebars) user will find the list of topics along with questions (and their answers) related to them.
If you want to add a new category, simply click on the  button
and a new empty field will appear.
button
and a new empty field will appear.

Type the name for the category and either click the button or
confirm the name by pressing ‘Enter’ on your keyboard.

Once a new category has been created, you can do several things with it.
The first one is that you can add a sub-category by clicking the
button and adding a sub-category in the same way as you did
it with the main one.
Each category that also has sub-categories will be displayed by default
with those sub-queues hidden. To see them, you must expand the
queue by clicking on button. Then you will see the queue
along with its sub-queues just like on the following screen.
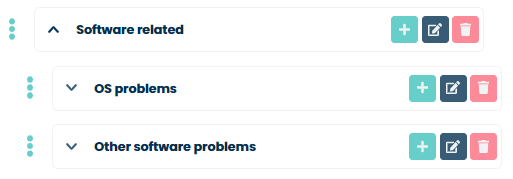
If you want to change the name of any category just click the
button, change the name, and hit ‘Enter’ or click the button.
In order to delete a category, click on the button, and in
the new window click ‘Yes’.
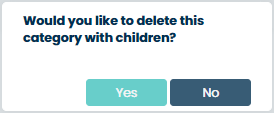
Remember that you can always change the position of each category and
sub-category in the structure. To do that just click the
button next to the position you want to move. Now, while holding the
Left Mouse Button just drag and drop this position to the plane you want
it to be. Releasing the Left Mouse button will put this position in the
newly chosen place.
SURVEYS
DESCRIPTION
This is the place, where all of the surveys in the system are managed. This module allows you to create and manage two types of survey.
Simple answer - classic survey with one question and answer options to choose
Rating - an evaluation survey
On the home screen you will find a list of all your surveys.
If you want to create a new survey, you need to click on
button, located on the right side of the search box.

Once you do that you will be moved to the ‘Survey Configuration’ form, where you need to put in some information: ‘Name’ and ‘Description’ of your survey, ‘Active’ button, ‘Expiration date’ and ‘Form type’.
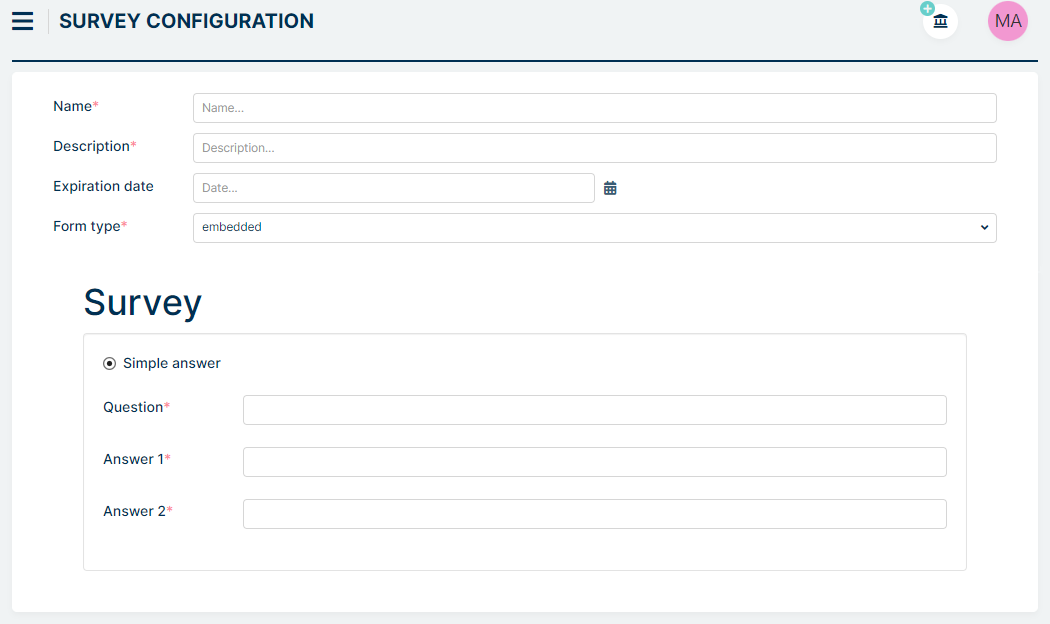
In the Surveys section, there are two options to choose from:
Simple answer - where we can set a question and two answers
Rating - where we can set the question and possible answers (steps). We can add a maximum of ten steps using the “Add step” button. In addition, we can provide a comment field, which becomes visible to the user after the administrator fills in the name of the Additional comment field (if the field name is not filled in, the comment field will not be displayed)
Once you finish, click on the button to create a new survey.
Now, with a newly created survey, as well as any other, you can do a couple of things.
You can the survey and chagne the saved data.
IMPORTANT! A survey can only be edited until it has been completed. If even one answer has been given, all fields on the form are blocked and further editing becomes impossible.
You can also the survey to remove it from the Mint Service Desk.
RESULTS
Users complete the survey and the results are recorded. To see results of the survey, click on  button
In Results view you can see a couple of columns:
Creation date - the date on which the report was created by the Admin
Submittion date - date when the user submitted the survey
Subject - subject of the ticket where the survey was submitted
Ticket number - number of the ticket where the survey was submitted
Submitted by - name of user completing the survey (it is always ther user from Company User field in ticket details), .
Column with answers - shows the answers given by the user
Column with comments (optional) - shows comment made by the user
You can easily export survey results pressing the  button and choosing CSV or XLSX file
ADDING TO THE TICKET
To add Survey to the ticket, log in to Agent profile, proceeed to the Ticked Details and choose “Select survey” buttom from section below text field
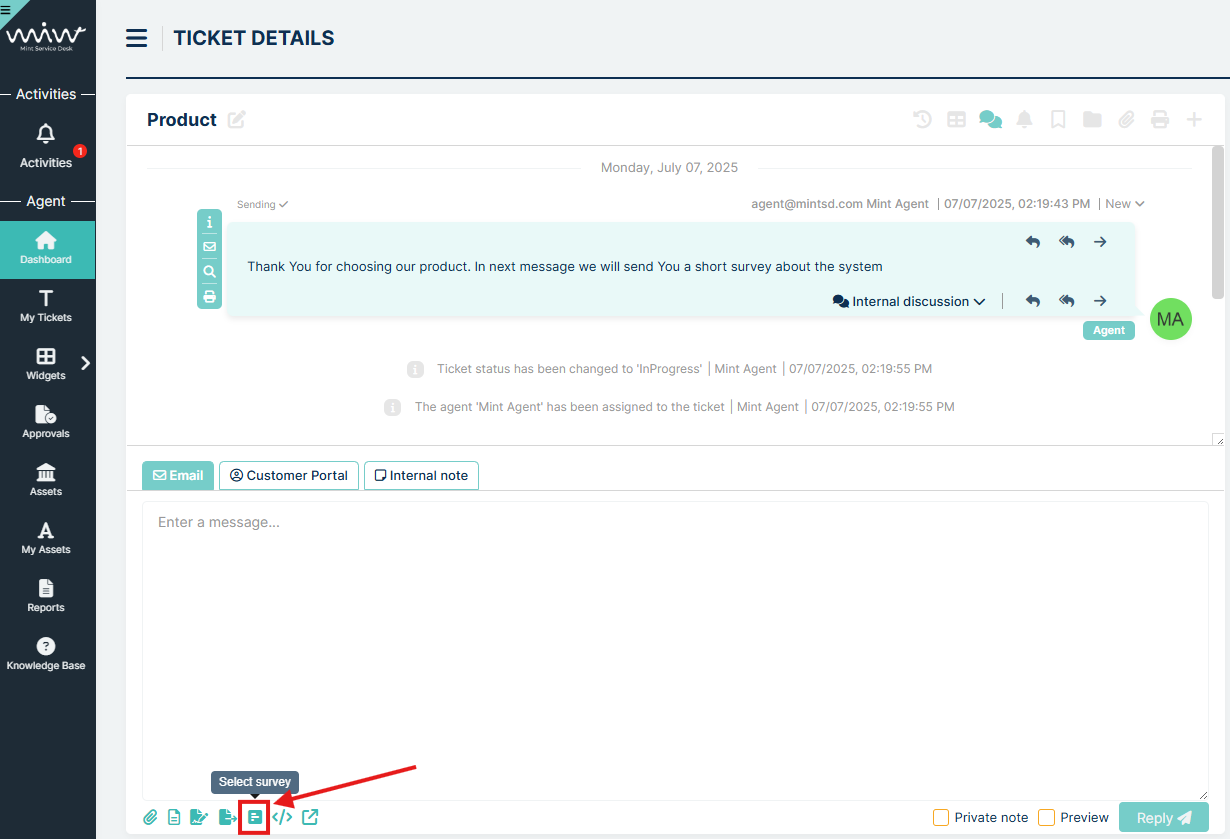
After clicking, a new window for selecting the survey will appear
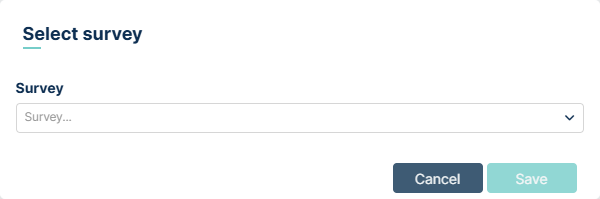
Click on the drop-down list, select the survey you are interested in and then save with the Save button.

The survey will be added to the created article as a hyperlink. You can only add one survey per article.
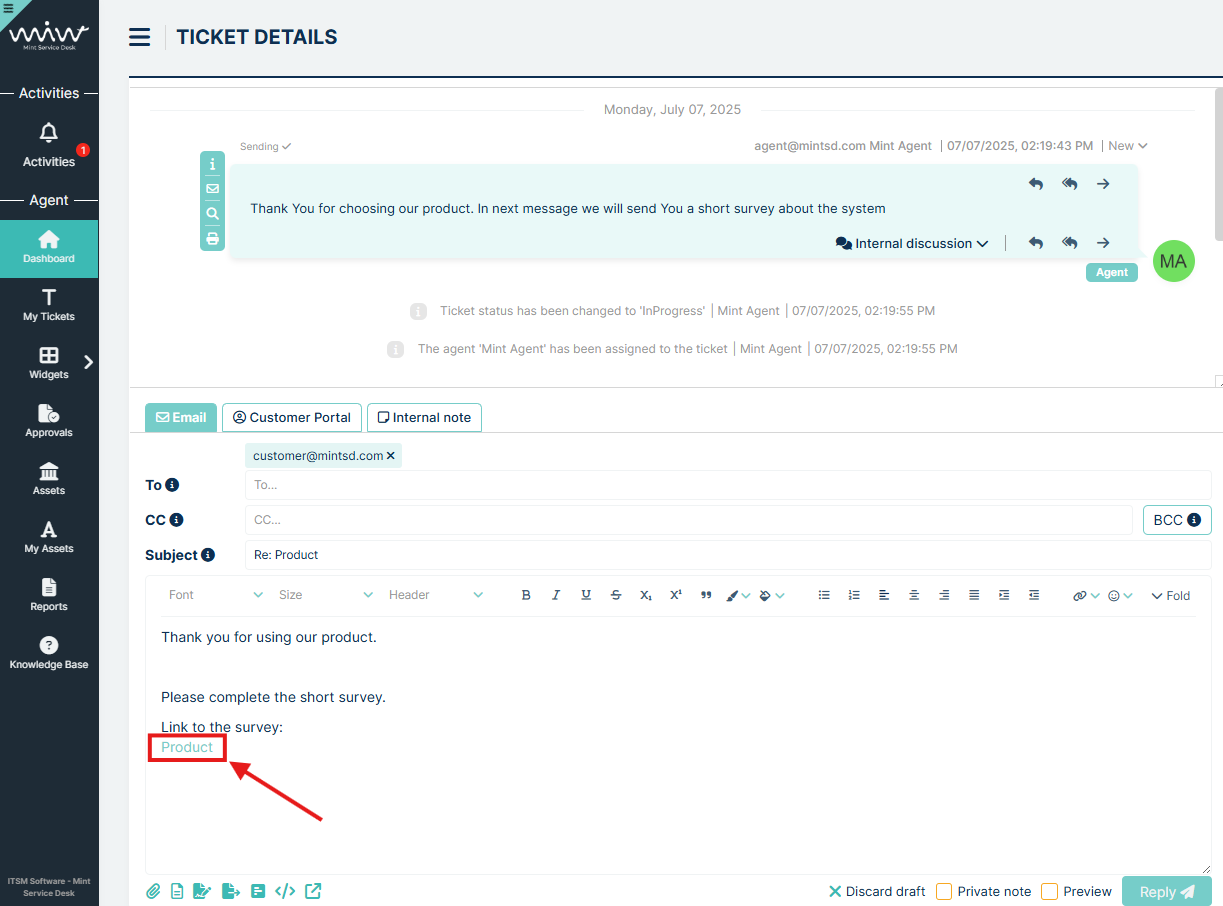
To send it, click on the Reply button. The article along with the survey will be sent to the customer.

SUBMIT BY USER
Once the Agent has submitted the survey, the customer can proceed to complete it. To complete the survey, the user clicks on the survey name, which opens a new window with the survey form.
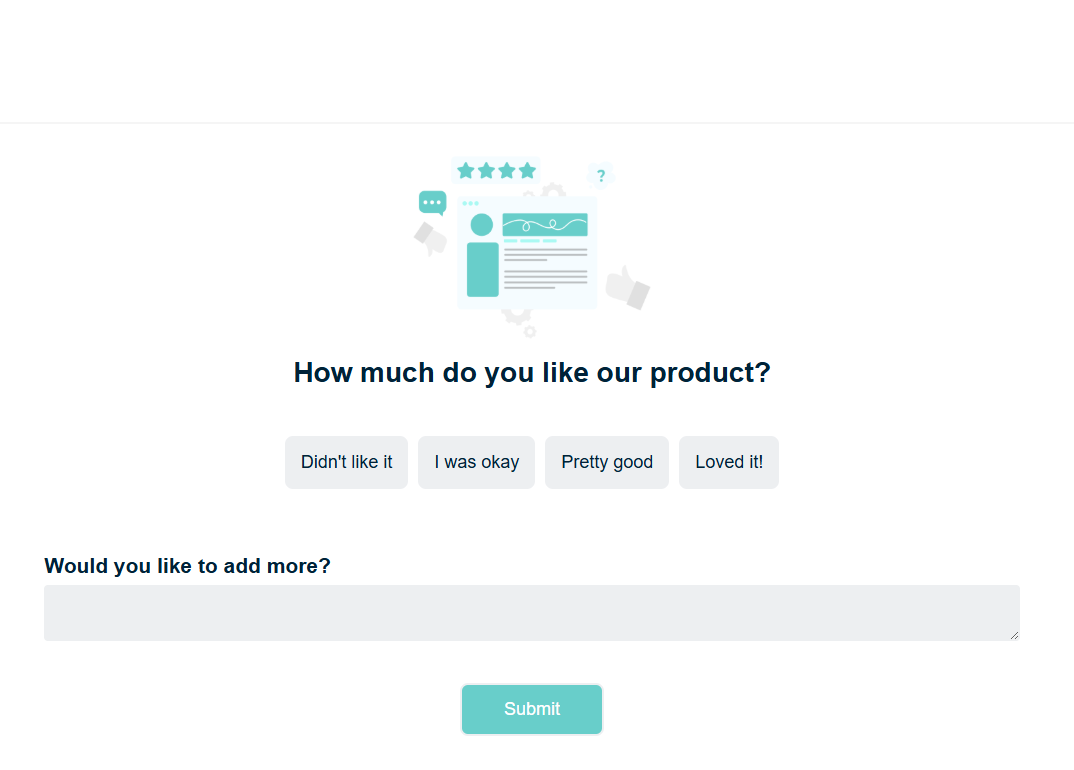
After reviewing the content, the user selects an answer and approves it by clicking the “Submit” button. If the answer has been submitted correctly, a message is displayed: ‘The survey has been completed successfully.’
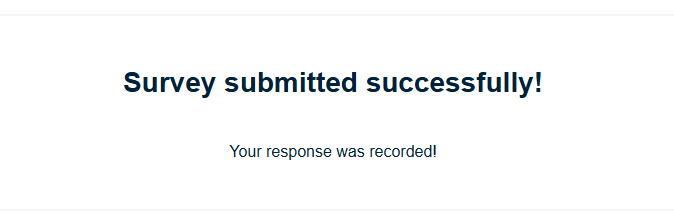
If the survey has already been saved before, any subsequent attempt to complete it and resubmit the form results in the message: ‘The survey cannot be saved because the answer has already been provided.’
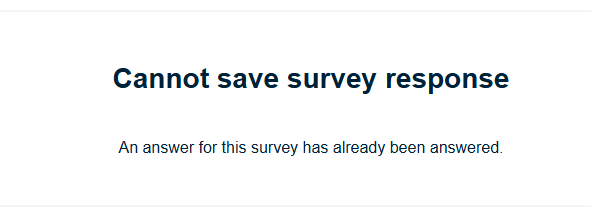
LOGS
MESSAGES
In this section, you can see the whole activity from your email boxes. This means that the messages downloaded from there will be displayed in this part of the system.
Like it was mentioned before (in Email > Accounts) those messages can
be force downloaded by using the located in that part of the
system. By default, messages are downloaded once every minute.
The one thing you can do with those messages while being in a ‘Messages’
section is that you can use the  button located in the
‘Action’ column of each message.
button located in the
‘Action’ column of each message.

Using this button will force the system to once again try to process the message and create a Ticket from it.
Basically, the ‘Reparse’ is used in case there are any problems with downloaded messages. One of those problems can be when a system downloaded the message and put it in the ‘Messages’ sections, but a new Ticket has not been created.
Those errors, as well as other activities like when a message was sent to a ticket, can be seen in this part of the system.
LOG MANAGER
This is a very important section that is used by the administrator of the MINT Service Desk. It’s very useful because it gives you all of the information and activity details required to track any issue. All of the activities are saved in log files. In order to track issues or check the activity, you can look for them in this section.
Once you go to the “Logs” you will see that the default view is divided into many different sections representing different entities from the system. Thanks to that information are not mixed, and it will be easier for you to analyze them.
The logs are divided into 25 different sections:
‘Application environment’,
‘Assets’,
‘Authorization’,
‘Automation’,
‘Dictionaries’,
‘Drafts’,
‘E-mail communication’,
‘Entity extensions’,
‘External Integrations’,
‘Knowledge Base’,
‘Notifications’,
‘PDF Generator’,
‘Queues’,
‘Reports’,
‘Repository’,
‘Services’,
‘SLA Escalation’,
‘Surveys’,
‘System Management’,
‘System Tools’,
‘Tickets’,
‘Time Tracker’,
‘Translations’,
‘Users’.
Each of them, of course, includes the logs from that section or group from Mint Service Desk. For example, if you want to look for any errors within your tickets you have to check ‘Tickets’ or if you want to check if everything is ok with your assets activity use ‘Asset’” and so on.
On the right bottom corner of each, you can easily check if everything
is okay or if there are any problems. You will see either the  or
or  icon. The first one means that everything is in order,
while the second one tells you that there is a particular number of
problems here.
icon. The first one means that everything is in order,
while the second one tells you that there is a particular number of
problems here.

Now, if you click on the icon the section will expand, and you
will see the list of those errors.
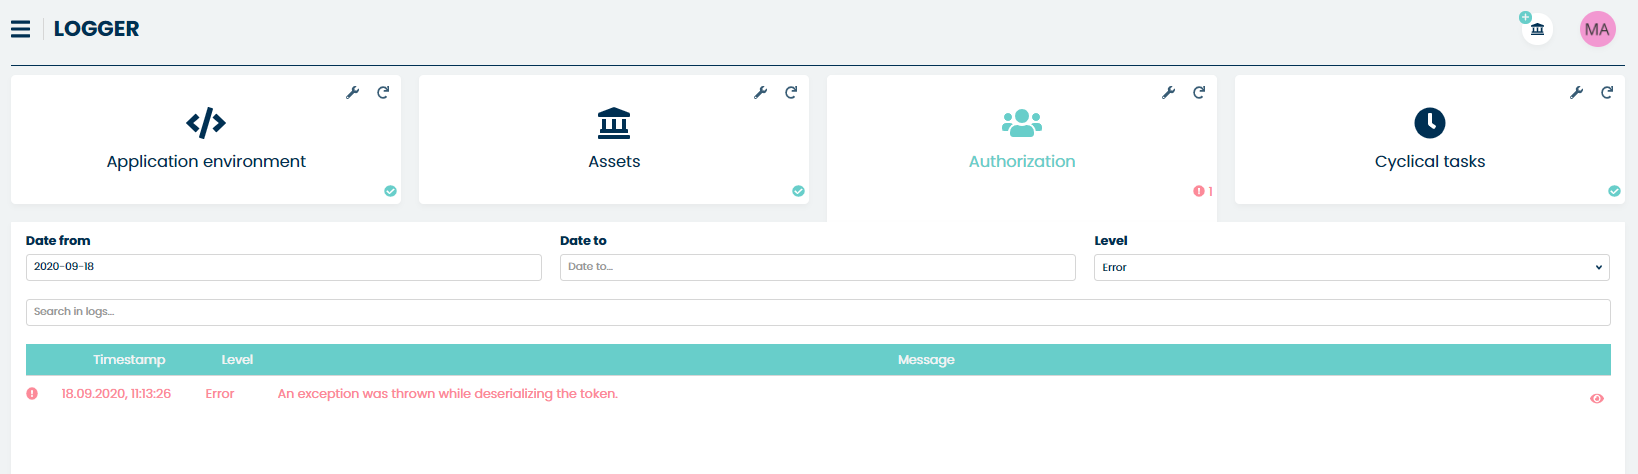
In order to see the details of an error/exception, you need to click on
the  icon located on the right side of each position on the
list.
icon located on the right side of each position on the
list.
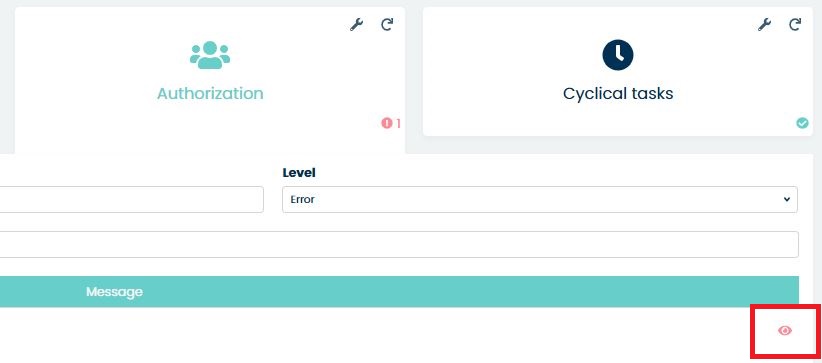
If you click on the icon the section will expand, and you will
see default options allowing you to browse through logs.
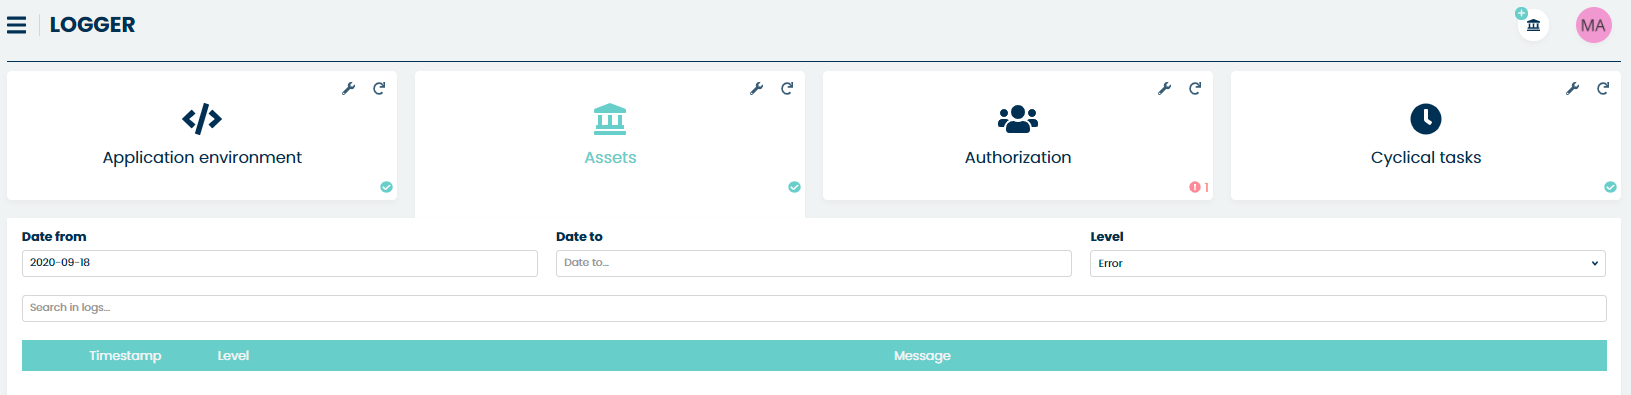
BROWSING THE LOGS
Click on the section you want to check. From the available searching fields select the time period you want to look for by setting “Date from” and “Date to”.

Now choose the ‘Level’ of logs you are looking for. You can choose between “Verbose”, “Debug”, “Information”, “Warning”, “Error” and “Fatal”.
If you are looking for something in specific you can type in a single word or text in the ‘Search for log…’ field.

The results will be displayed down below.
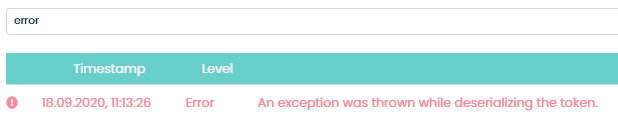
If you want, you can save the results. At the bottom part of the result list, you will find the ‘Download’ button. Mint Service Desk will always save them in a .ZIP file format.

Click on ‘Download’ and you will see a list of logs divided into single days. For example, ‘log20200918’ means that those are logs from 18.09.2020.
Click on the one you want to download, choose the desired place to save the file in your system file explorer, and click ‘Save’. Once a file is saved you just need to extract the .zip file and you will have the logs in a form of a text document.
MONITORING
This section of the system is used to monitor services.
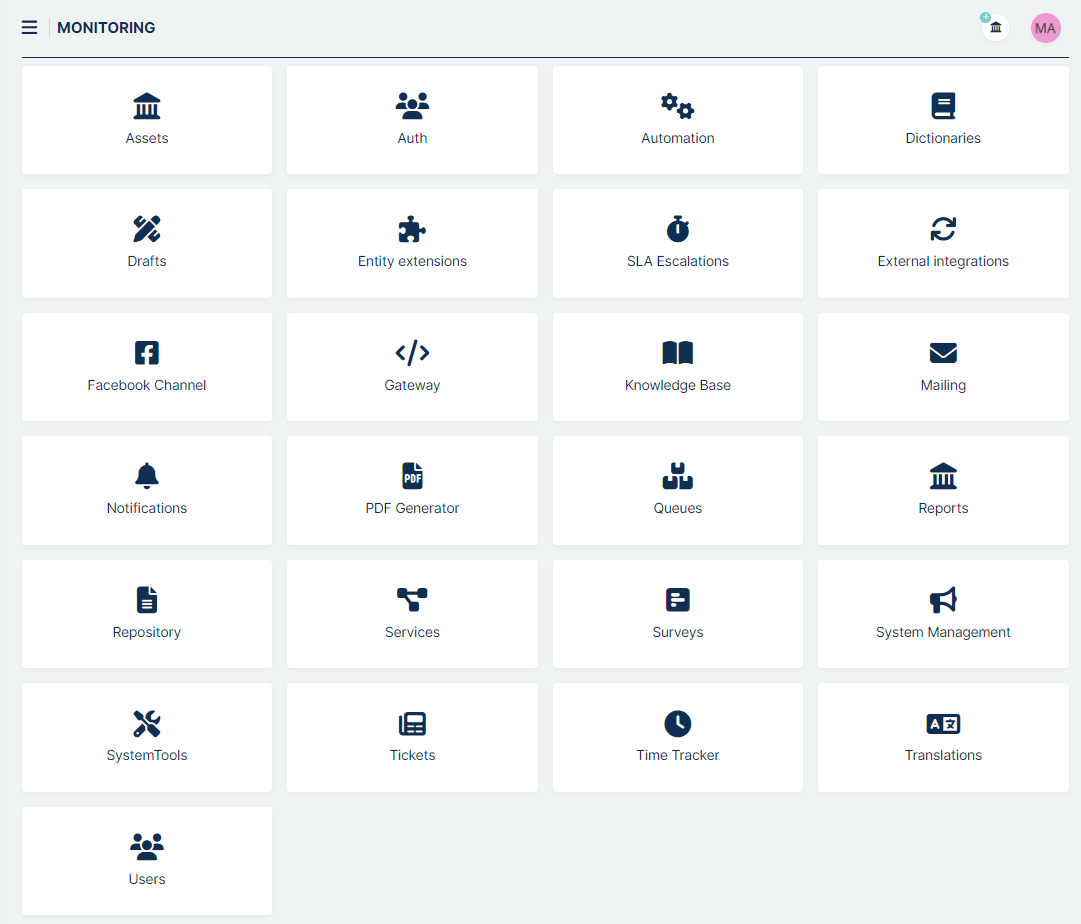
The available monitoring services are:
‘Assets’,
‘Auth’,
‘Automation’,
‘Dictionaries’,
‘Drafts’,
‘Entity extensions’,
‘SLA Escalation’,
‘External Integrations’,
‘Gateway’,
‘Knowledge Base’,
‘Mailing’,
‘Notifications’,
‘PDF Generator’,
‘Queues’,
‘Reports’,
‘Repository’,
‘Services’,
‘Surveys’,
‘System Management’,
‘System Tools’,
‘Tickets’,
‘Time Tracker’,
‘Translations’,
‘Users’.
When you press one of the services in the first place, it appears:
Type
Name
Description
Below these fields is a search engine so that you can search for information. Next to this is a field for selecting a scope. Depending on the service there are different scopes but all possible options are:
Common
Database
Logger
Plugin
RabbitMQ
Below the range is a table of searches.
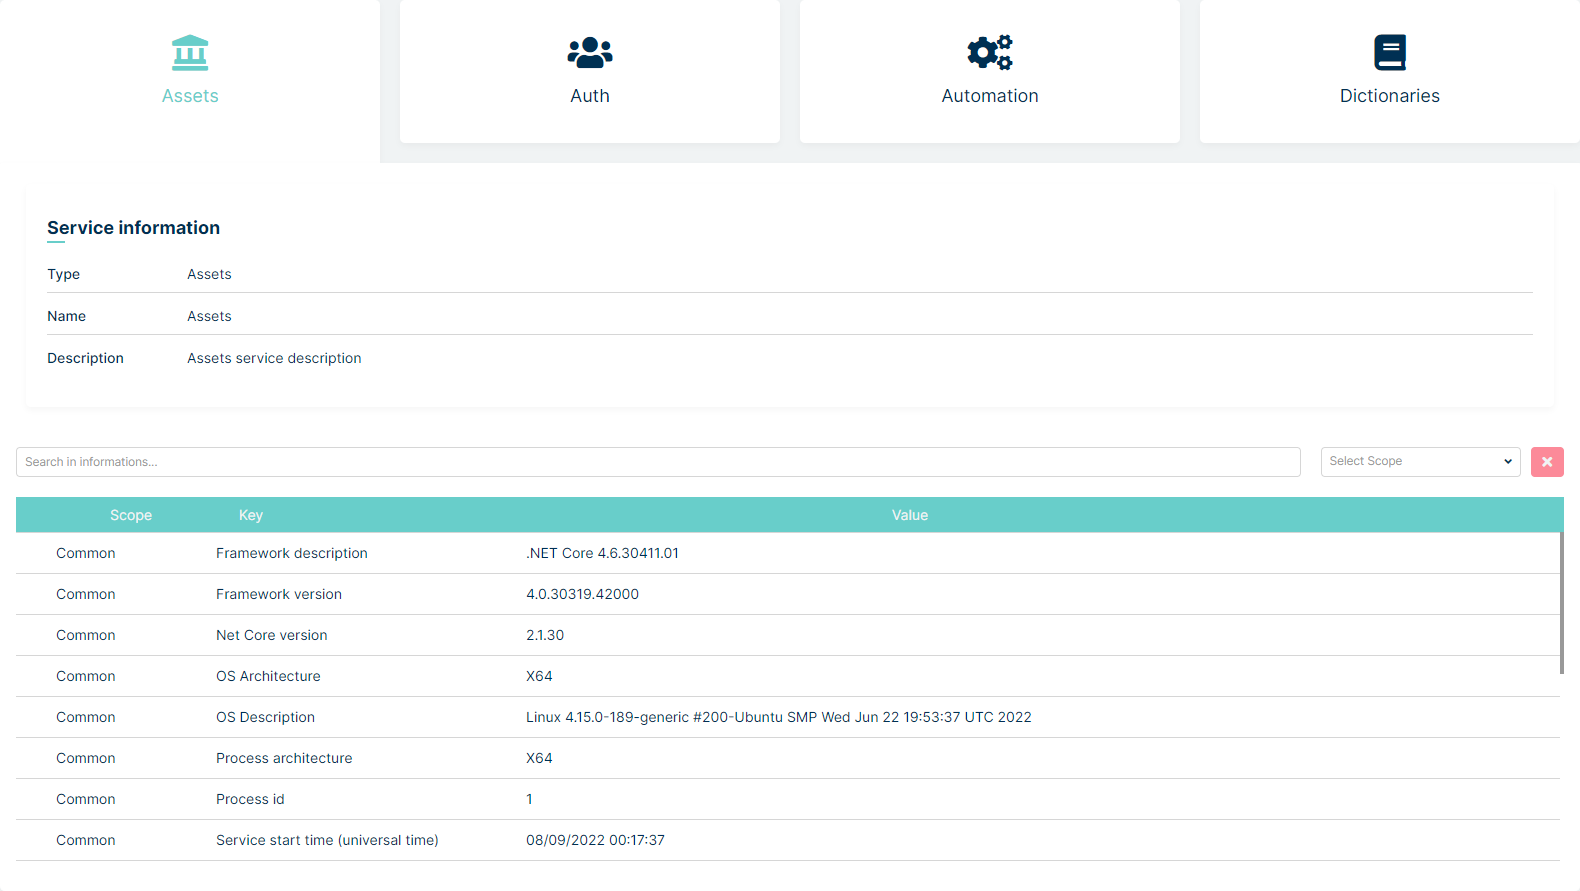
AUTHENTICATION BACKENDS
In this section you can configure your OpenID Providers and LDAP.
AZURE AD
First go to https://portal.azure.com Sign in and go to Microsoft Entra ID services.
Go to “App” and ‘App registration’
The following form will appear.
Now fill up the form:
in ‘Name’ field type your preferred name
‘Supported Account Types’: leave it as it is
‘Redirect URL’: fill it with https://{your.mintsd.domain}/external/signin-{your-scheme}
Replace {your.mintsd.domain} with your domain name
Replace {your.scheme} with schema name which will be needed later on
After the registration go to the Authentication tab
In ‘Implicit Grant’ section check ID tokens
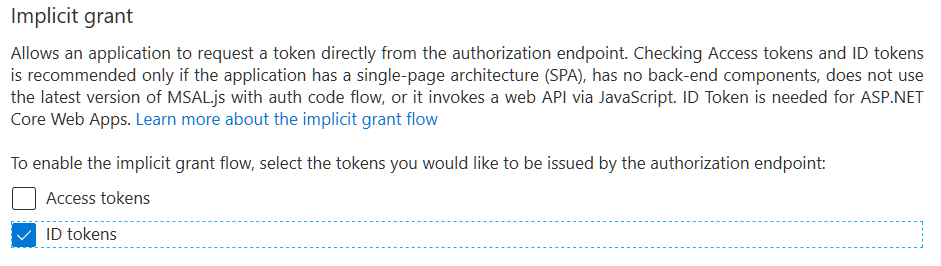
Go to Token Configuration tab.
Click on Add optional claim.
Check ID token type and email, given_name, family_name claims.
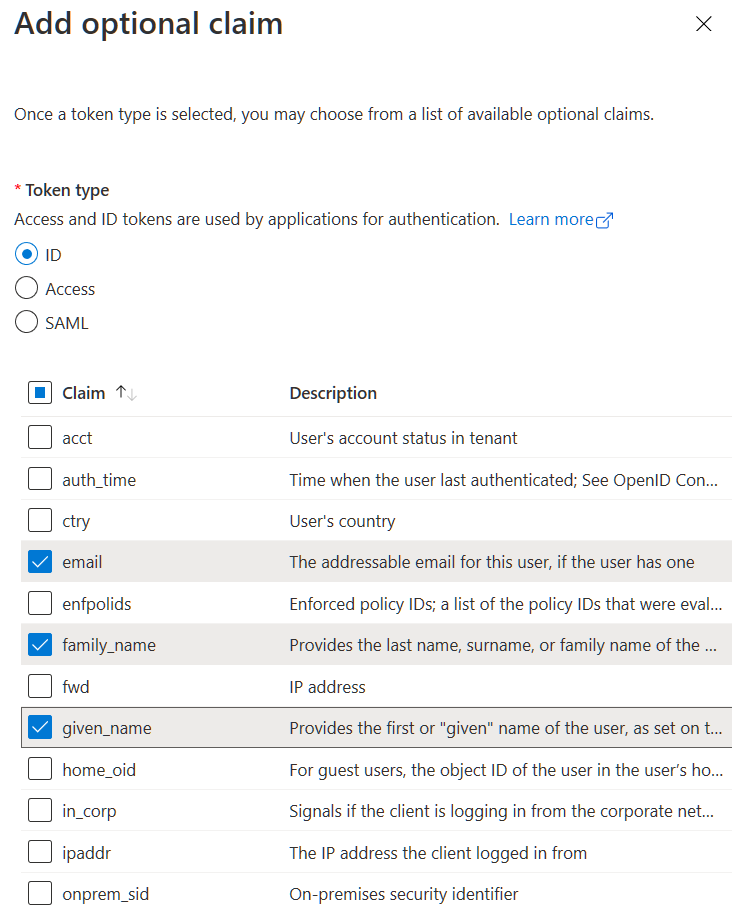
In case of a need to configure group mapping, click on Add groups claim. Now select all check-boxes and click on Add.

Go into API permissions section.
click on Add a permission
select Microsoft Graph
select Delegated permission and check email and profile
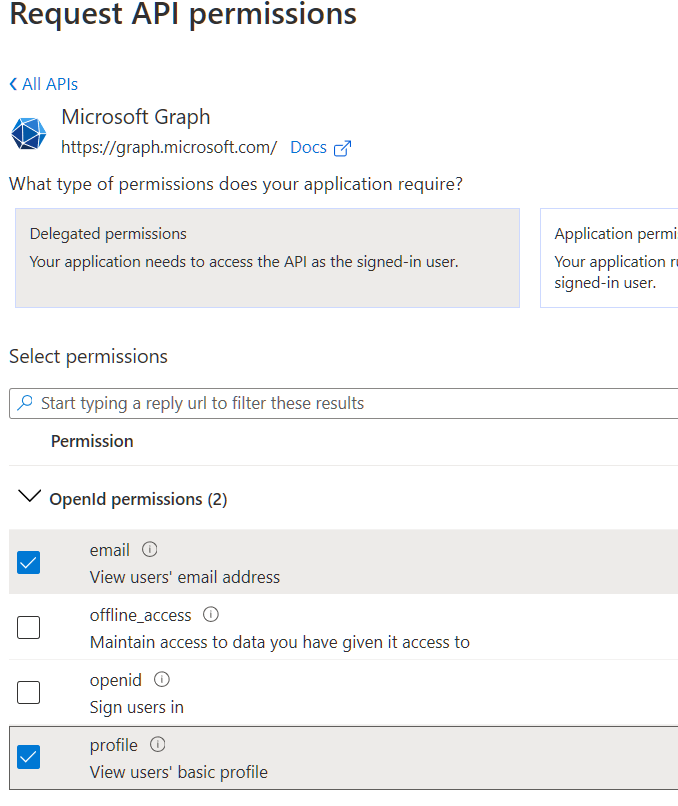
Go to Certificates & secrets tab.
Add new client secret by clicking on New Client secret.
Remember to copy client secret afterwards by clicking on copy button.
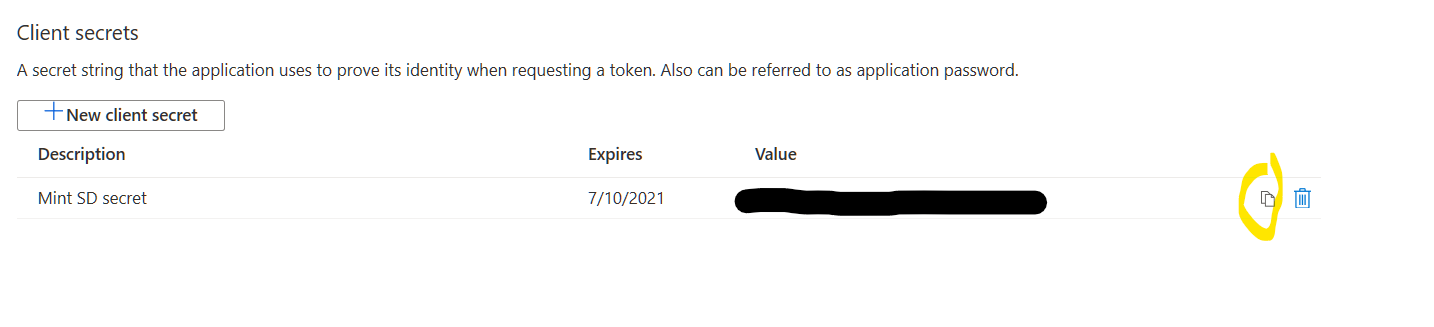
In the Authentication Backends section go to OpenID Providers click on button, the following form will appear.
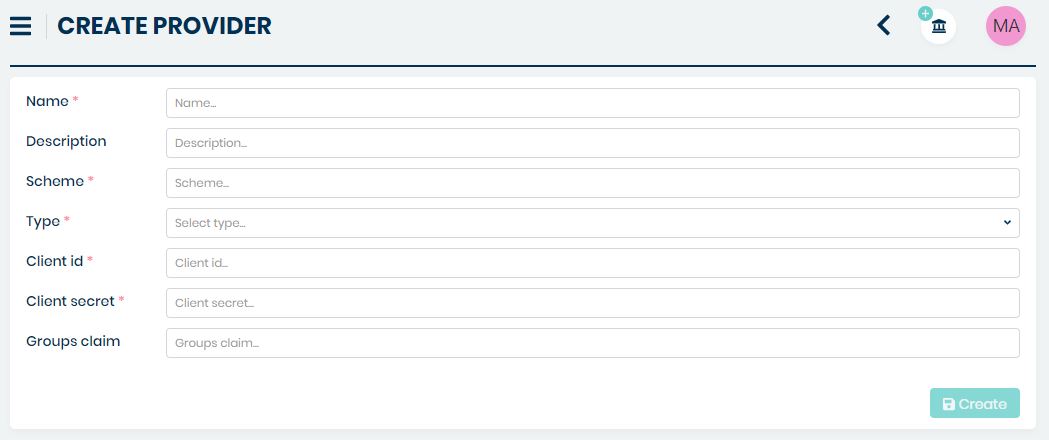
Now fill up the form:
value from Name will appear on Login screen
in Scheme field type value from one of the previous steps ({your.scheme})
in Type field select AzureAd
in Client secret field paste the value from previous step (‘Cerificates & secrets’ tab)
in Client id field paste the value from registered app overview

in Tenant Id field paste the value from registered app overview
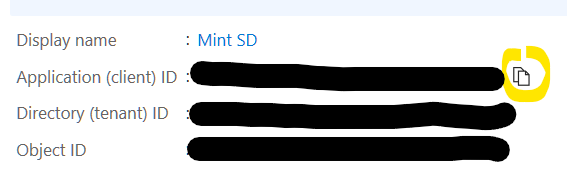
in Groups claim field, enter the name: ‘groups’. The new fields will appear below in Group mapping section. Paste ID of Azure group to Groups and select Agent role from Role to connect Azure group with Agent role. You can combine more groups under one claim by pressing Add button.
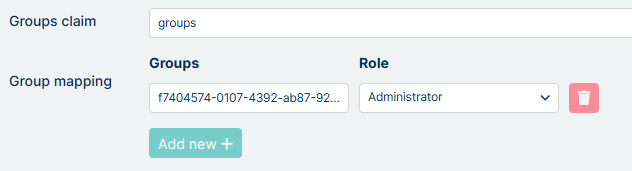
You will find the group ID in Azure AD under the path: Home > Microsoft Entra ID > Manage (sidebar) > Groups (sidebar) > All groups (sidebar)
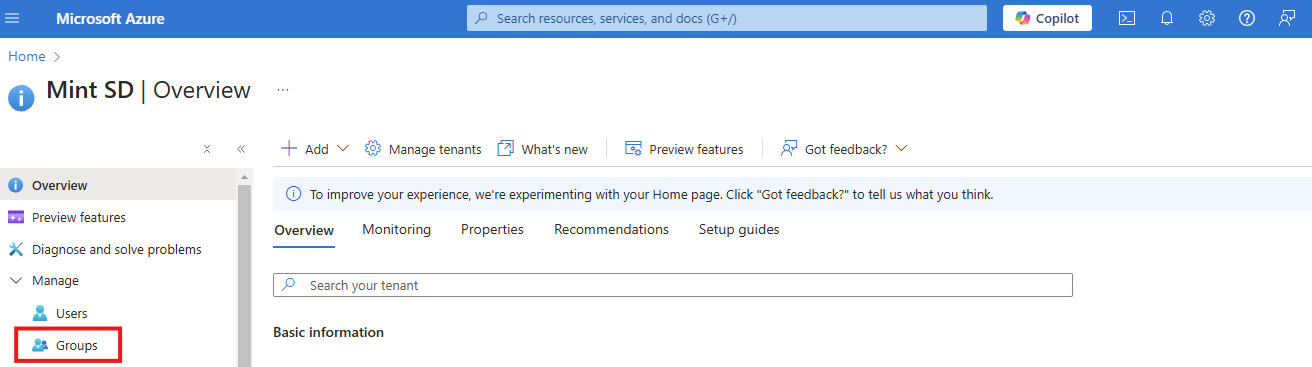

LDAP
LDAP integration allows automatic login using domain accounts and synchronization of user data (e.g., first name, last name, email address, groups).
The main screen displays a table showing the configurations currently saved. You can add new configuration, or Edit/Delete existing. You can also use Search field and Add column the same way like for example on tickets dashboad.
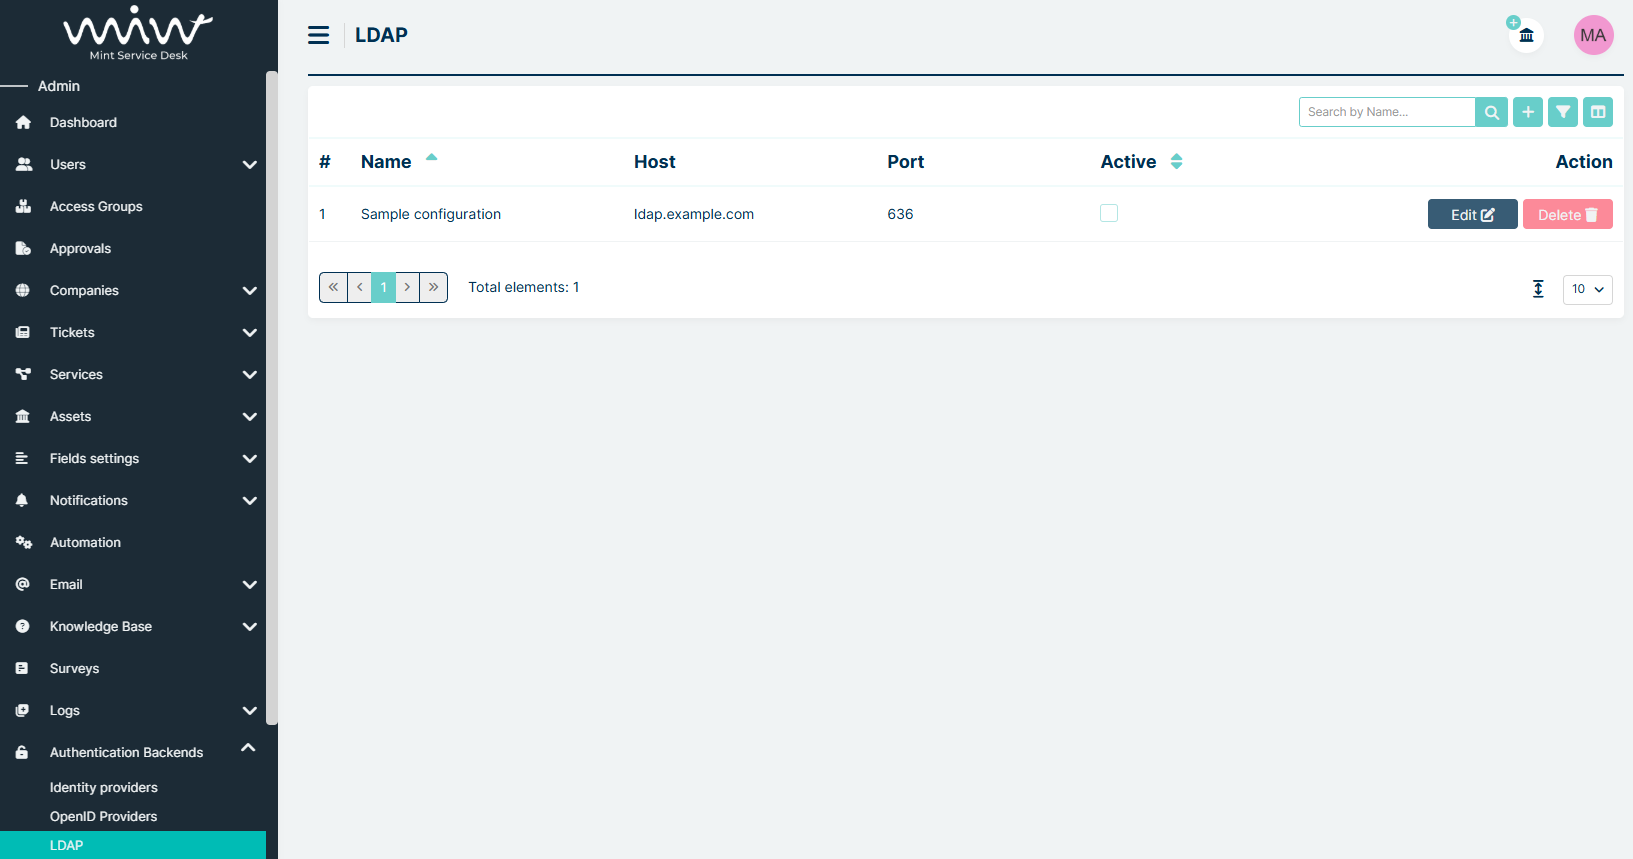
To add a new configuration, click the button. A page containing configuration fields will open.
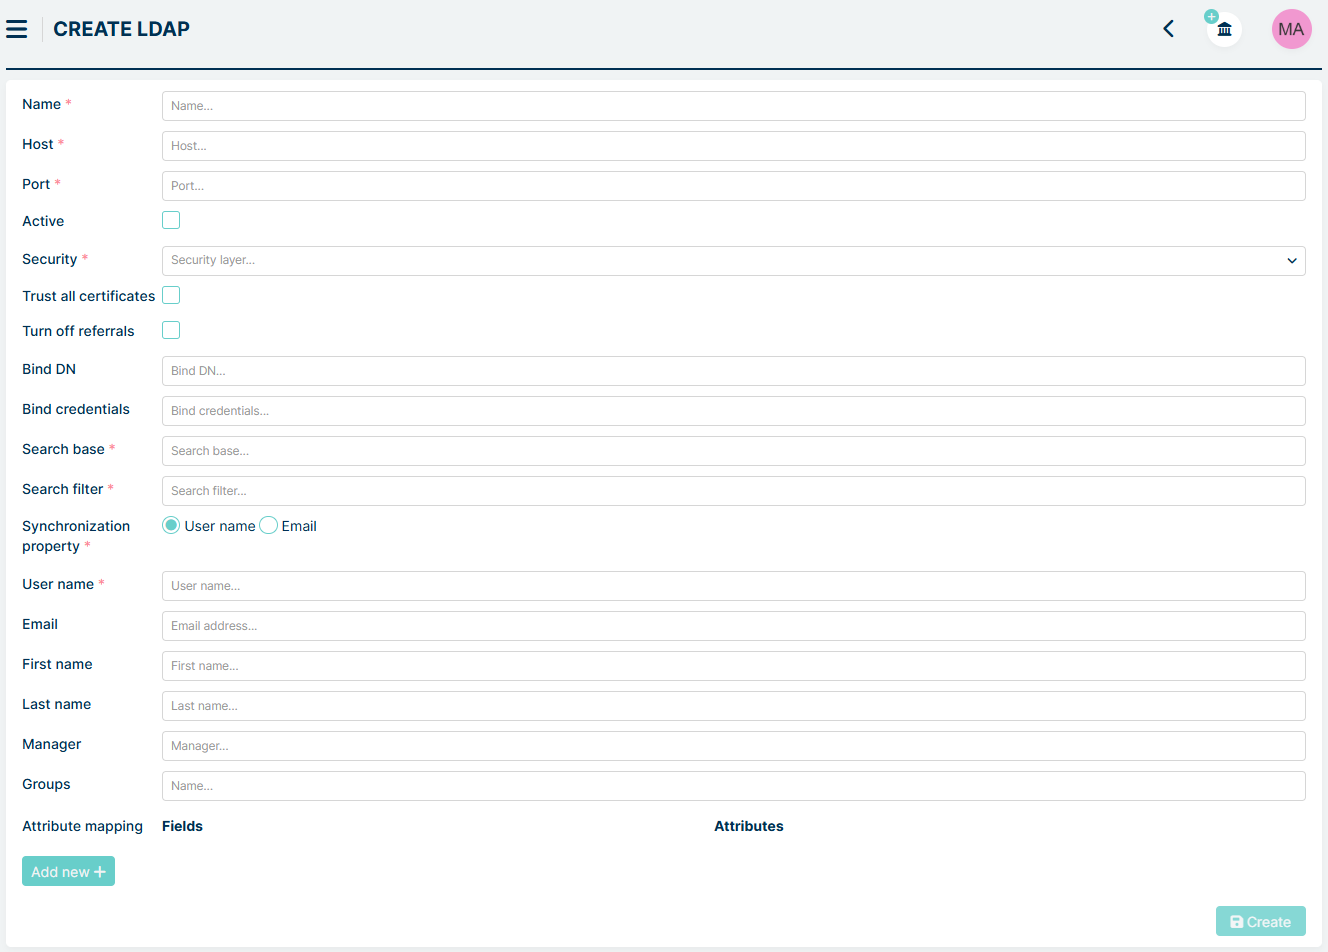
We will describe these fields below.
Configuration Fields
The first section describes the connection and authentication settings required for the Mint Service Desk system to communicate with the LDAP directory. It defines where the LDAP server is (host, port, security), how the system connects to it (Bind DN, credentials, certificates), and what user data should be retrieved (search base, search filter, synchronization property). The basic information required to establish a connection is the host name (Host), the relevant port (Port) and the security method (Security). There are two ways to configure configuration fields below. One option is to connect to the domain directly using a user account, which only requires the Search base and Search filter. The other option is to use a domain account to search the directory, which also requires a Bind DN and Bind credentials.
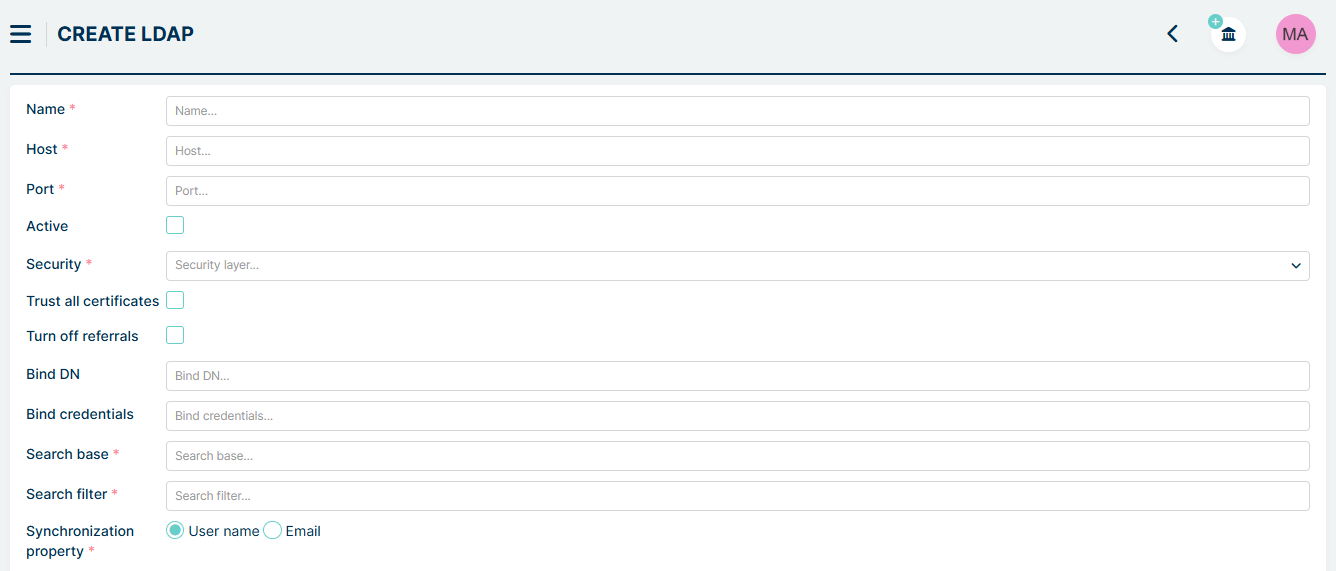
Field |
Description |
Example (Active Directory) |
|---|---|---|
Host |
LDAP server address. |
|
Port |
LDAP port ( |
|
Active |
Enables/disables LDAP integration |
|
Security |
Connection type: None, StartTLS, SSL/TLS |
|
Trust all certificates |
Accept all SSL certificates (including untrusted) |
|
Turn off referrals |
Disable LDAP referrals between servers |
|
Bind DN |
Technical account used to read data from LDAP |
|
Bind credentials |
Password for the Bind DN account |
|
Search base |
Starting point in the directory tree for user lookups |
|
Search filter |
LDAP filter defining which objects are retrieved |
|
Synchronization property |
Unique attribute to identify and sync users (User name or Email) |
|
User Data Mapping
The User Data Mapping section defines how user information from LDAP attributes (e.g., sAMAccountName, mail, givenName) is mapped to the corresponding fields in the Service Desk system (e.g., username, email, first name, last name, groups). There is also possibility to map group parameters to specific User Roles and additional attributes from LDAP to specific custom fields in User Profile
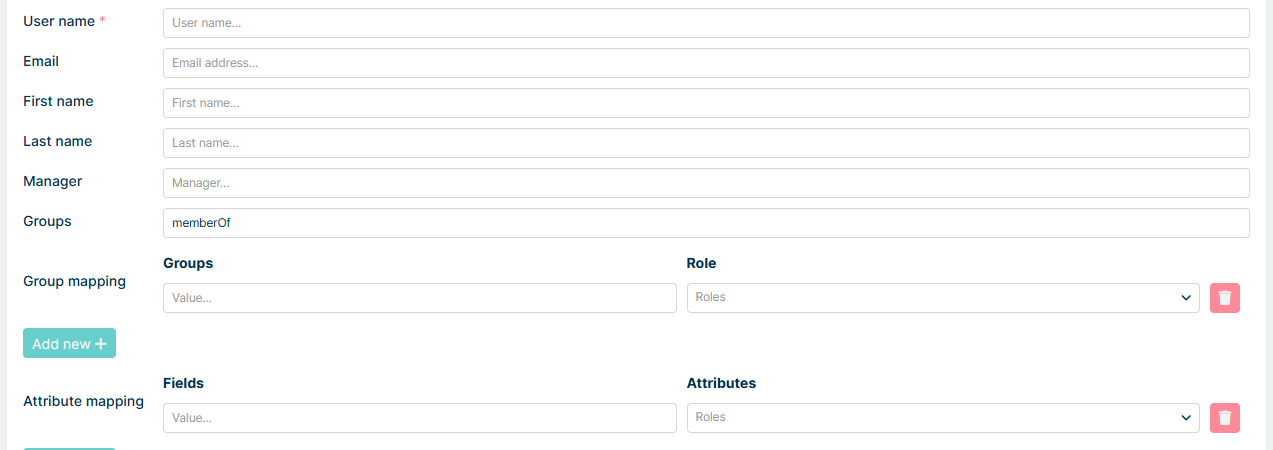
Service Desk Field |
LDAP Attribute |
Description |
|---|---|---|
User name |
|
User login (used for domain authentication) |
|
User’s email address |
|
First name |
|
First name |
Last name |
|
Last name |
Manager |
|
LDAP attribute name where manager value is held |
Groups |
|
Attribute name where user groups are held |
Group mapping (visible if the Groups field is filled in) |
|
Selected parameter from the Groups field to map with Mint Service Desk user roles |
Attribute mapping (visible if the Groups field is filled in) |
|
Additional attribute from LDAP to map with custom user fields |
Remember that when the role mapping option is configured, the appropriate roles are set for each user when they log in and their groups are retrieved. This means that any changes made to roles in the administration panel will not take effect, as the roles retrieved from LDAP take priority.
NOTICES
Here you can set the admin notifications that will be visible at the top of the page.
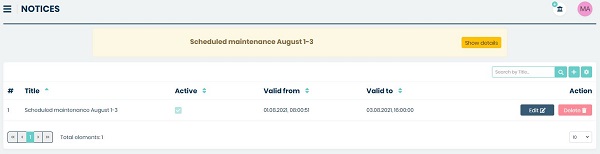
If you want to create a new notice, you need to click on
button, located on the right side of the search box.

Once you do that you will be moved to the ‘Create Notice’ form, where you need to put in some information of your notice.
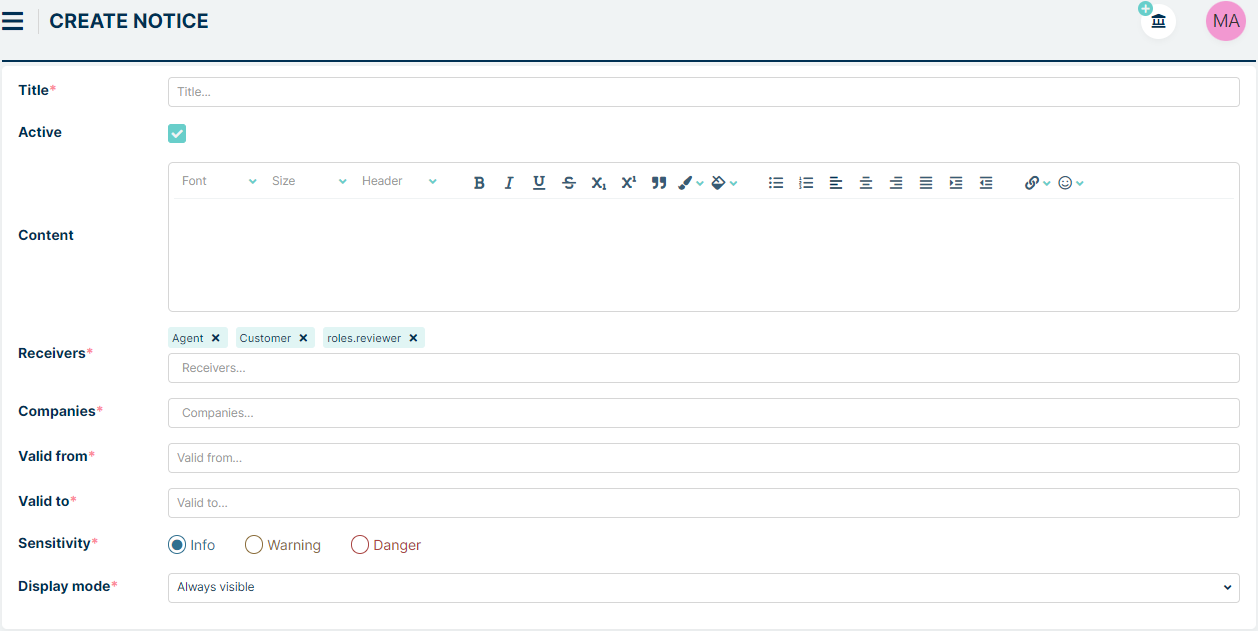
Fill the information on this page:
Title: Enter the title of the notification to be displayed at the top of the page.
Active: Decide if the notification should be active or not.
Content: The message that will be displayed when the notification is expanded.
Recivers: Choose who you want this notification to go to. Currently, you can choose from three options: Customer, Agent and Admin.
Companies: Select for which companies the notification should be displayed.
Valid from: The date and time from when the notification will be effective.
Valid to: The date and time until which the notification will be effective.
Sensitivity Choose from three possible options: Info = Blue, Warning = Yellow and Danger = Red.
Display mode Select how the notification should be displayed.
Example of admin notification setup.
Effect

CONSENTS
The Consents functionality allows the administrator to create, edit, and manage consent content displayed to system users. Consents can be shown in different areas of the application (e.g., during registration, after login, or in the user profile) and assigned to selected user groups.
Below is a description of the functionality from the administrator’s perspective.
CONSENTS TAB
On the administrator side, there is a separate Consents tab available in the sidebar menu. After entering the tab, a list of previously created consents is displayed in a table view.
The table consists of the following columns:
Name – consent name
Active – checkbox indicating whether the consent is active
Valid from – the date from which the consent is valid
Valid to – the date until which the consent is valid
Action – action buttons:
Answers – preview user responses
Edit – edit the selected consent
Delete – delete the selected consent
Above the table, the following tools are available:
Search by – search field for consents
“+” button – add a new consent
Filter button – allows selecting the column used for filtering
Column visibility button – allows showing or hiding selected table columns
ADDING A NEW CONSENT
To add a new consent, click the “+” button. A form divided into several sections will appear.
Let’s describe each section
BASIC INFORMATION

The first section contains the following fields:
Name – text field for entering the consent name
Order – numeric field defining the display order (hierarchy) of the consent in the list
DISPLAY AND ACTIVITY SETTINGS

This section includes the following fields:
Location – defines where the consent will be displayed. Three checkboxes are available:
Show in user profile – display in the user profile. Example:
Show on register page – display on the registration page. Choosing this option makes two-step registration - step 1 for essential user data and step 2 fo Example:
Show after login – display after user login. Example:
Activate – checkbox that determines whether the consent is active. Only active consents are visible to users.
Reevaluate after update – requires all users to provide consent again if the content has been modified by the administrator.
Require an answer – selecting this option means that at least one answer must be selected and saved in order to proceed. For consents with this checkbox enabled and with After logging in option, closing the consent window without saving will log the user off the system.
RECEIVERS AND VALIDITY PERIOD

This section defines the target audience and validity period of the consent.
Receivers – multichoice list where you can select:
Admin
Agent
Customer
Companies – field visible only when Customer is selected in Receivers.
It allows specifying which companies the consent will be displayed to. If left empty, the consent will be visible to all companies.
Valid from – start date of the consent validity
Valid to – end date of the consent validity
The Valid to field can be left empty – in this case, the consent remains valid indefinitely.
LANGUAGE VERSIONS
The last section is used to define consent content in different languages. The consent language displayed to the user is automatically aligned with the language selected in the user’s profile settings. This section includes:
Language – dropdown list for selecting a language
After selecting a language and clicking the “+” button next to the field, the selected language is added to the list below in the form of a table row:

Here we have the following columns:
Name – language name
Action – action buttons:
Edit – edit the consent content in the selected language
Delete – remove the language version (available after saving)
After clicking Edit, additional configuration fields appear below the selected language:

Name – consent name in the selected language (text field)
Content – consent content displayed to the user
Add answer – button with a “+” icon to add possible answers
Clicking the ‘Add answer’ button makes new row to appear

This section contains:
Sequential number (e.g., 1., 2., 3. – each click adds another entry)
Text field for entering the answer content
Required checkbox – determines whether the specific answer is mandatory to save the consent
Trash icon – removes the given answer
EDITING AND DELETING CONSENTS
An existing consent can be:
Edited – by clicking the Edit button in the Action column
Deleted – by clicking the Delete button (confirmation may be required)
Reviewed – by clicking the Answers button to see user responses
Deleting a consent removes it permanently from the system.
CONSENT EXAMPLES
As mentioned earlier, there are three types of consents that can be configured in the system. Below are examples of each of them:
Consent in the user profile
The window for this consent is located at the bottom of the user profile
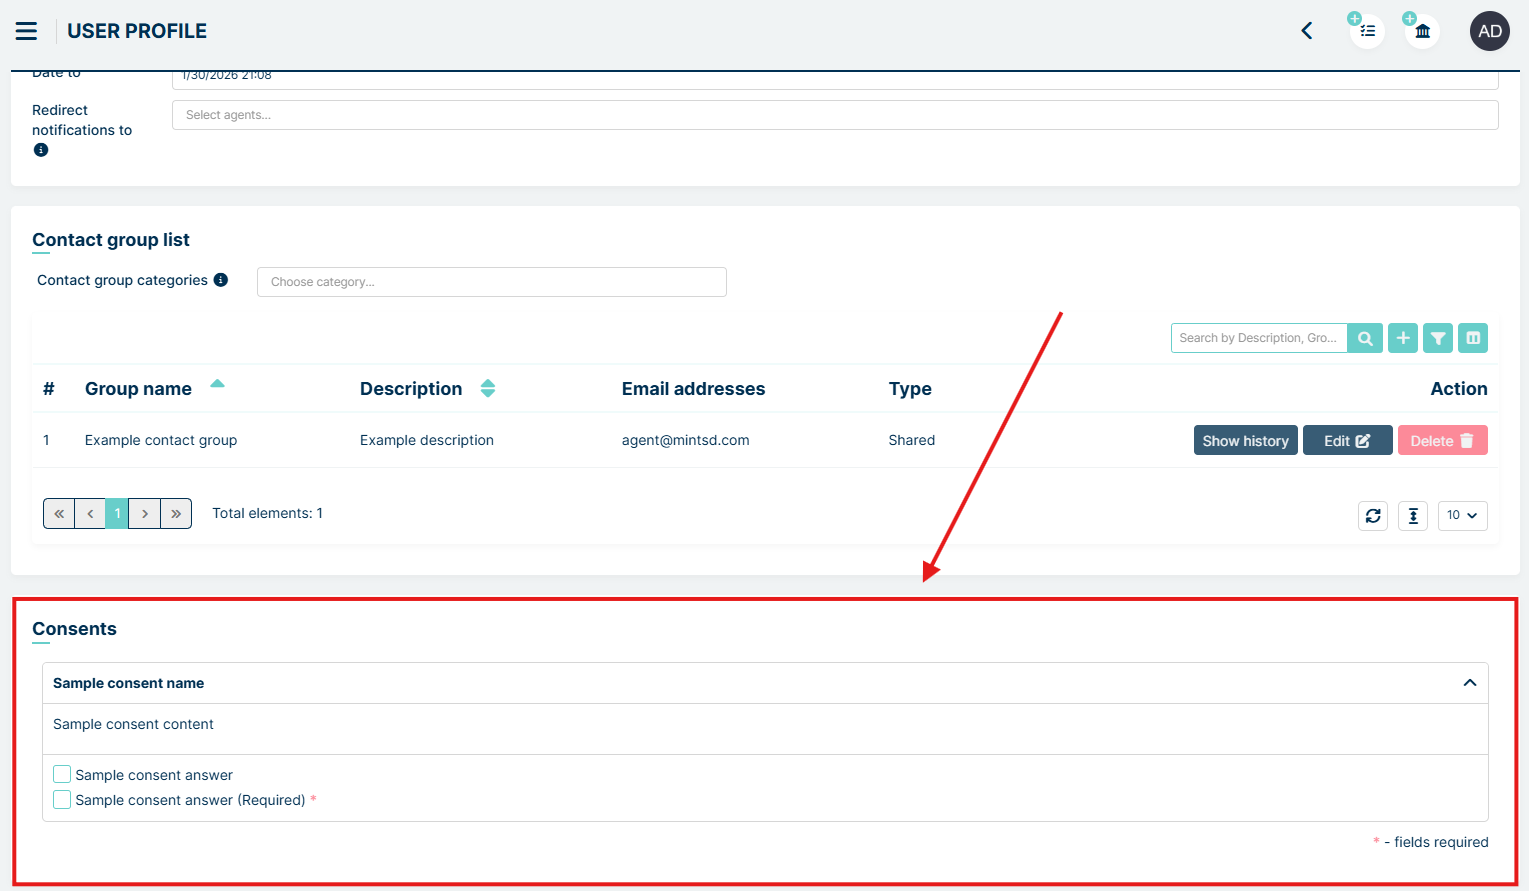
Consent on the registration page
When the Show on registered page option is selected, registration is a two-step process. The second step is the selected consent screen
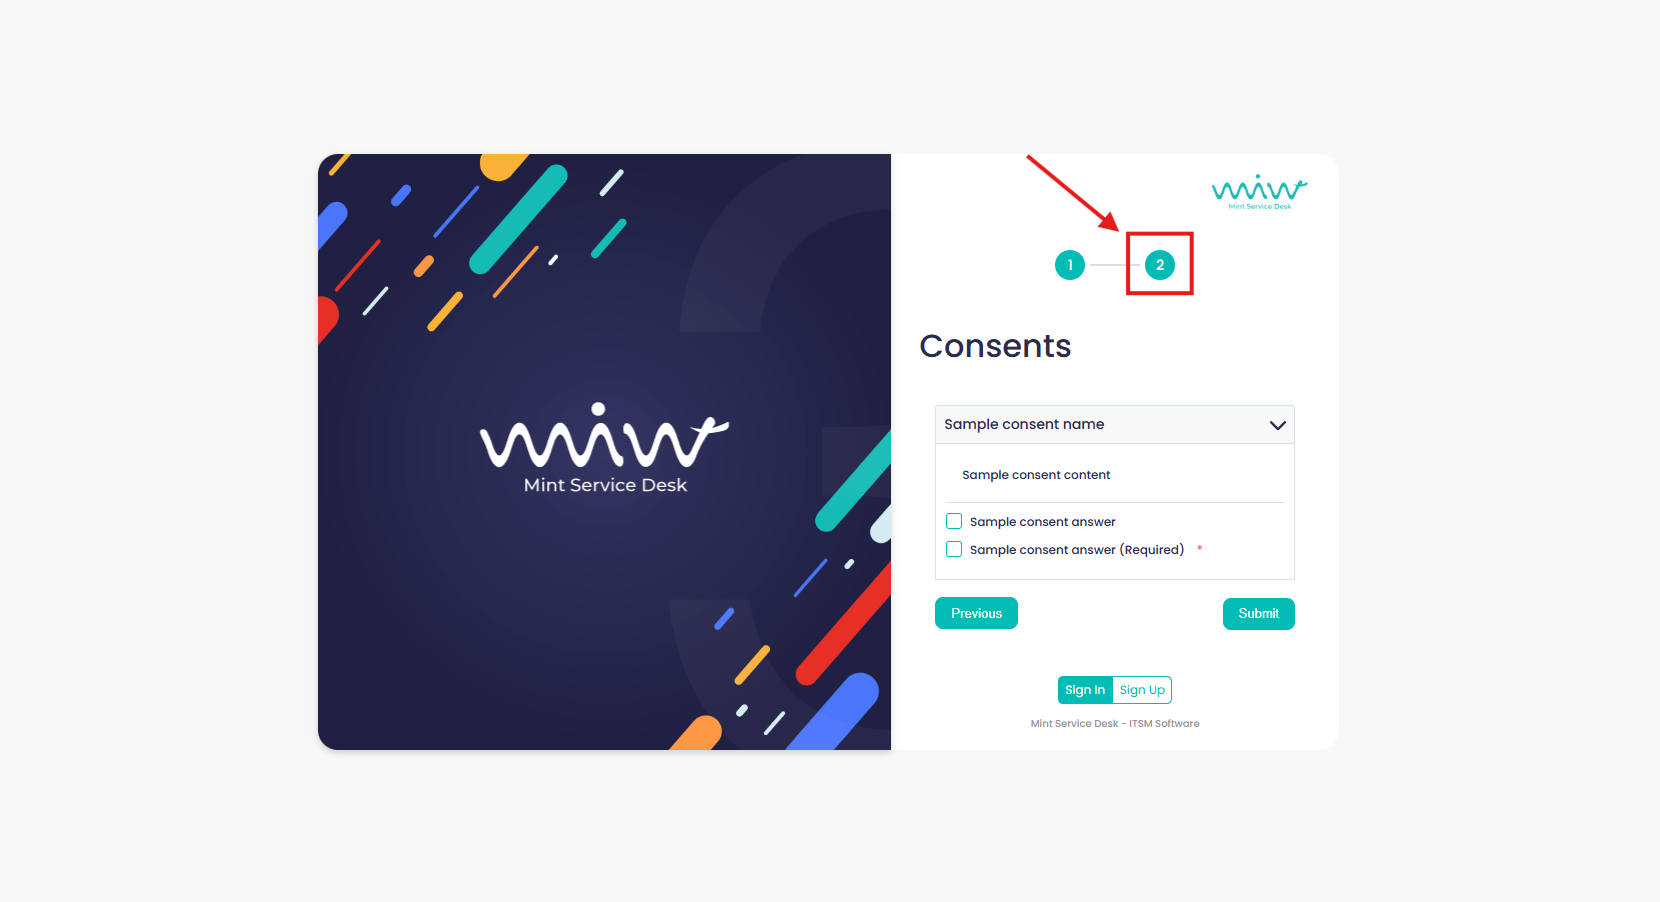
Consent after logging in
With this configuration, the consent window appears immediately after the user logs in

FILE REPOSITORY
File Repository is a place for the orderly storage of “MINT” application documents. Each user level has different options for dealing with files from the repository. The administrator can create “Buckets” - containers that store files, upload, download, delete files and configure servers where files will be stored. Agent can pin files from “Buckets” to selected tickets and download files. The customer can only download files if they are assigned to a given ticket. Here we will deal with the description of the administrator profile.
SERVER CONFIGURATION
First step to start using file repository is server configuration. To do this, we need to go to the “File repository” tab in sidebar and click on “Server configuration” after expanding it.
Next we see page where all servers for the file repository are configured. The page also has a search engine, a filter, and icon that
allows us to add a new server to the file repository.
When we click button, the Server Configuration page appear
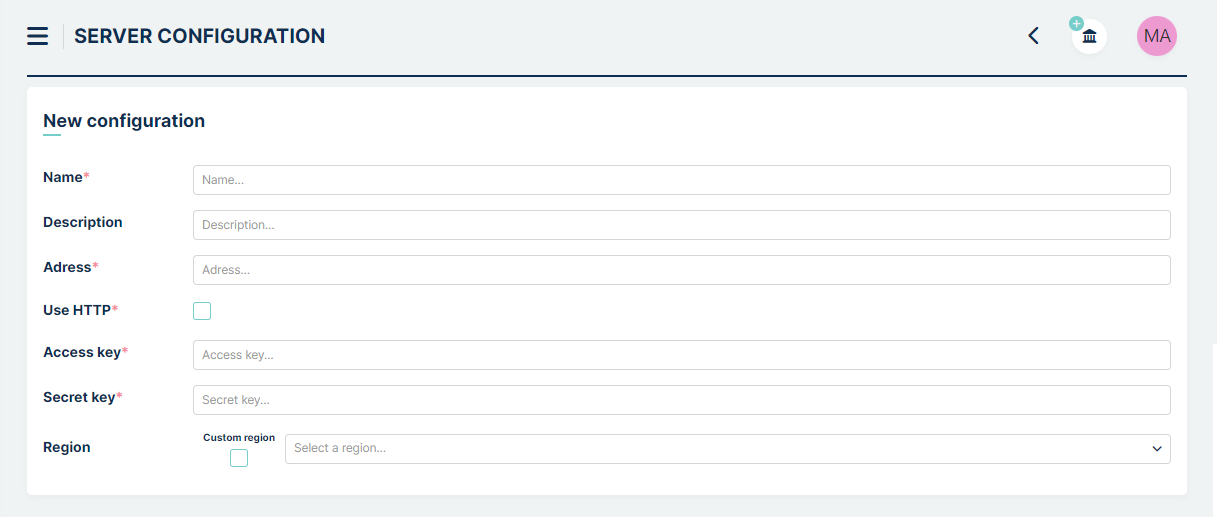
Let’s describe fields on page:
Name – we can set our server name here
Description – for description of our server
Adress – server adress field
Use HTTP – checkbox to use http protocol to connect
Access key – required to set up connection
Secret key – secret to our server
Region – to set the region
Most of these fields are required, as it was marked on screen above.
After adding the server, two buttons appear: - to make changes to the existing server and - to remove an unnecessary server.
BUCKETS
Bucket management is placed in „Buckets” section in File Repository
Here we can see our previously created buckets
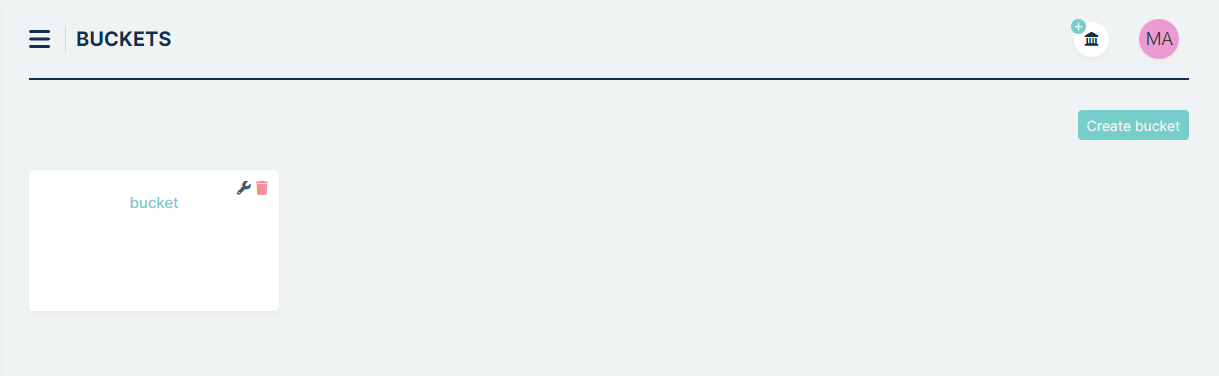
To create a new bucket, we need to click on the button. Then, a modal will appear on the screen with three fields to fill in:
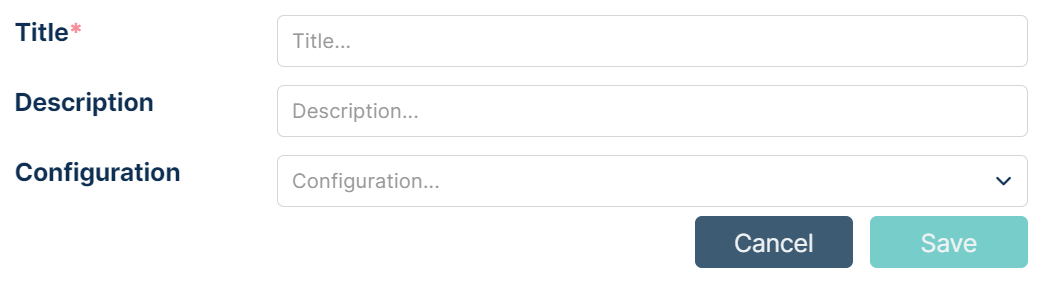
Let’s describe fields on page:
Title – to name our bucket
Description - here you can enter information about our bucket
Configuration - to choose the previously configured server
After filling all fields and clicking button, a bucket appears. We can always edit bucket (by clicking on the  ) or
delete (by clicking on the ). To enter the bucket, you just need to click on it.
) or
delete (by clicking on the ). To enter the bucket, you just need to click on it.
ADDING FOLDERS AND FILES TO BUCKET
After entering our created bucket we can see  and
and  buttons, used to expand or collapse the folder tree. Additionally, we have buttons like
“Add Folder”
buttons, used to expand or collapse the folder tree. Additionally, we have buttons like
“Add Folder”  and “Add File”
  .
.
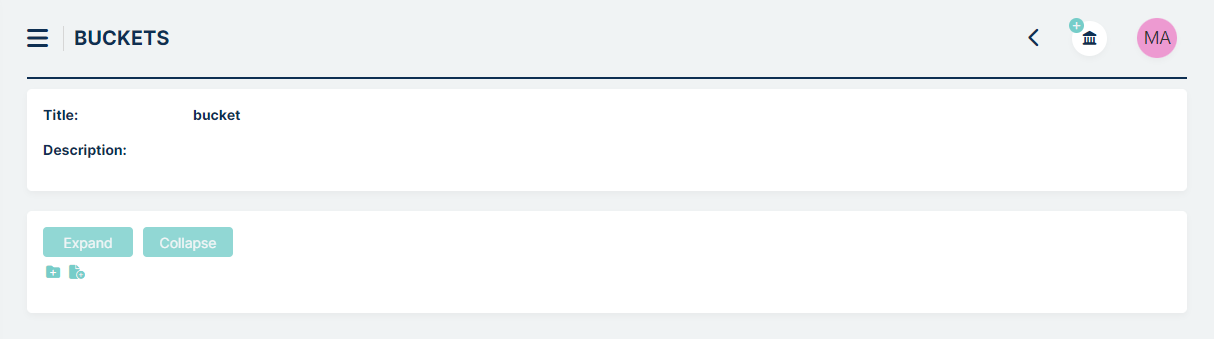
When we click on , a modal will appear with a text field where we can enter the name.
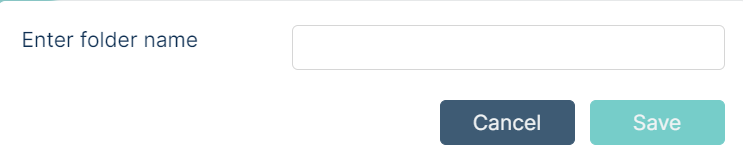
The added folder it will appear slightly below the button. In this folder we have the same buttons as above (Add folder and file) and an additional red “Delete folder”.
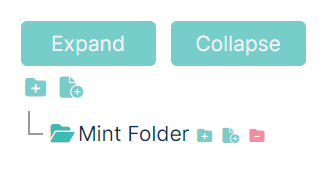
When you click on the “Add file” icon, a modal appear with upload button that allows you to upload selected files from the target device.
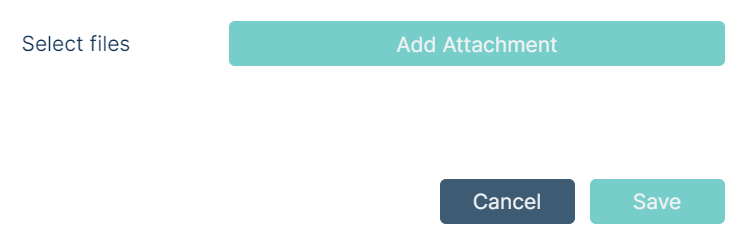
We can save several files at once. After uploading the files and clicking the modal disappear by itself and the file appear in the folder.
There is information that file uploaded succesfully
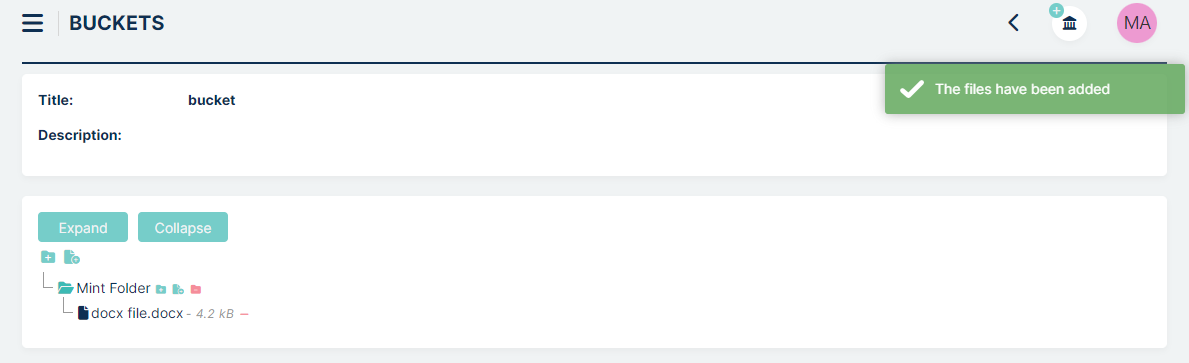
After adding a file to bucket, we will see the given format (for example .jpg), size (for example 338.6 kB) and a red minus to remove the file.
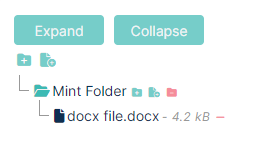
REMOVING FILES, FOLDERS AND BUCKETS
To remove file from bucket, we simply click on red minus on the right from file name. There is a toast to confirm operation
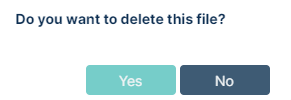
Accepting this operation will remove file permamently
To remove folder from Bucket, we simply click on  button placed on the right from folder name. The modal with confirmation will appear
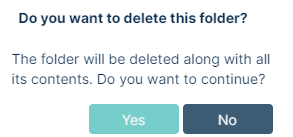
Accepting this operation will remove folder and all contained files permamently
To remove Bucket from server, we click on  button in right upper corner of Bucket. The modal with confirmation will appear
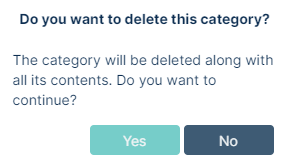
Accepting this operation will remove Bucket, with all contained folders and files permamently
DOWNLOADING FILES
Any file uploaded to the file repository can be downloaded by the administrator. To download file we just need to click on pinned file. Whole downloading process is similar as in Agent’s profile and is described there.
CUSTOMER PORTAL
The Customer Portal module is designed to facilitate customer interaction by allowing them to quickly create requests using predefined templates set up by administrators. These templates can also be used by Agent as a tab in create ticket window in specific settings described further. Enabling and disabling visibility of this module for Customer is described in SETTINGS chapter of Admin Portal documentation.
The administration module of the Customer Portal feature can be accessed via the sidebar and consists of two main sections:
Containers
In the Containers section, administrators can assign and group customer requests or cases. This feature enables better organization and categorization of cases effectively.
Cases
In the Cases section, administrators have the ability to create templates for future customer tickets or requests. These templates include predefined information, forms, and fields that streamline the request submission process for customers. By creating these templates, administrators ensure consistency and accuracy in the requests they receive, enhancing overall customer support.
CONTAINERS
Clicking on this section will show us view like below
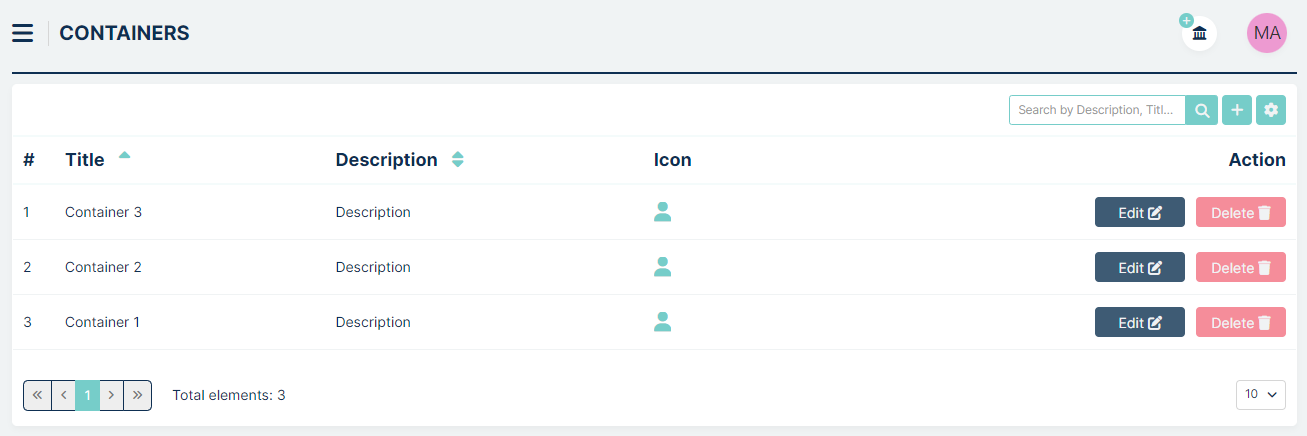
In the top right of the screen we have:
– “Search” Field
– “Add Container” button - after click we are going to the Create Container window
– “Set Column Properties” - we can set here column visibility and search field parameteres
In the center part of the screen we have the list of Containers that we created
previously. We can edit them with button and delete with button
Let’s describe Create Container window
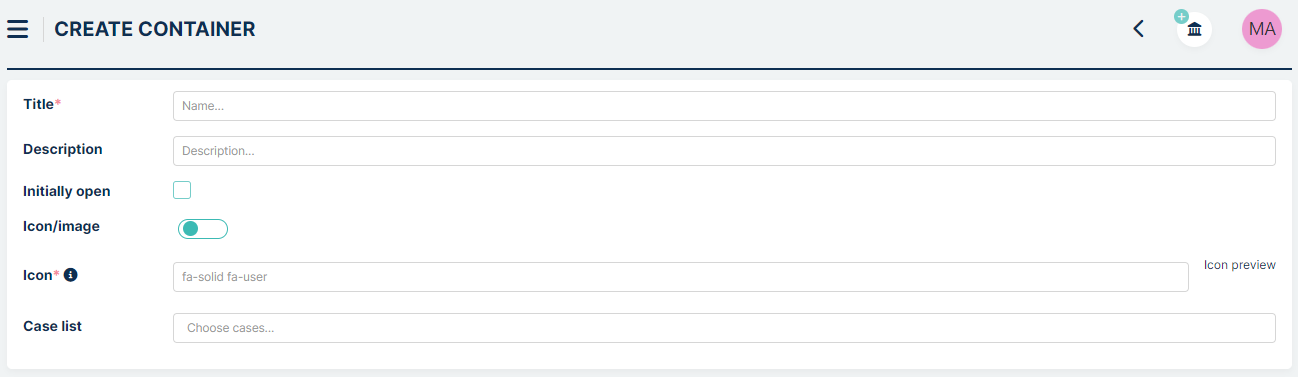
At the top of the window, you’ll find a “Title” field and an optional “Description” field. Below that, there is a “Initially open” checkbox, which you can select if you want the container to open automatically in the Customer view.
Next, we have the checkbox “Show container even if it does not contain any cases.” By selecting this option, our container will be visible in the Customer view, even if it does not have any assigned cases.
To set an icon or image for the container, click on the “Icon/Image” button. If you opt for “Icon,” an additional field will appear:
We can use icons available from https://www.fontawesome.com/icons by selecting “Free” in the filters. To correctly specify the format in the Container field, use the following format: “fa-solid fa-user”. After entering this information, our chosen icon should appear in the “Icon Preview” section on the right side of the window.

If you choose to use a picture for the container, an additional field will appear:
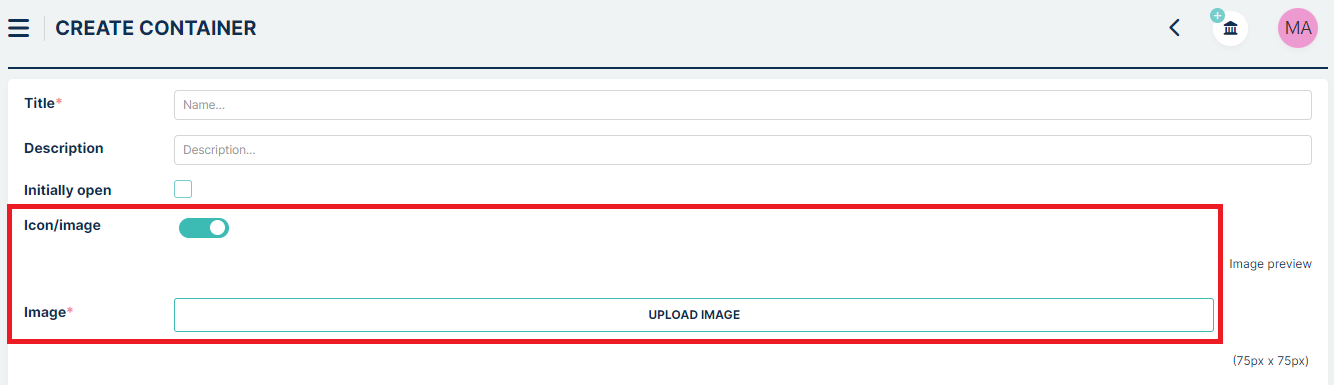
Clicking the “Upload image” button will open a “Choose file” window. We recommend using the 75px x 75px size format. The uploaded picture will be displayed in the “Image preview” section on the right side of the Container window.
The last field is “Case list.” Here, you can either assign cases now or do so later by editing the container.

CASES
In this section, we create templates for cases. Upon entering this section, you’ll encounter a view that resembles the one found in the Containers section, with similar buttons and a “Search field” located in the upper right corner.
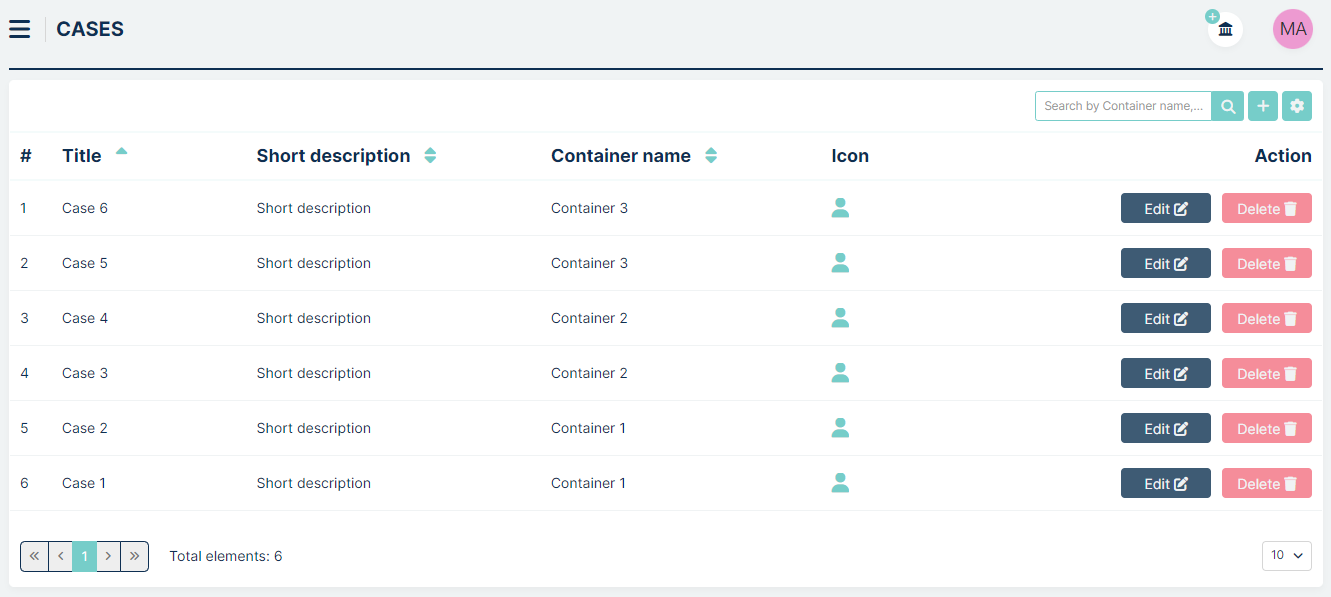
We can edit and delete each case by and buttons
Let’s click on button to open Create Case window
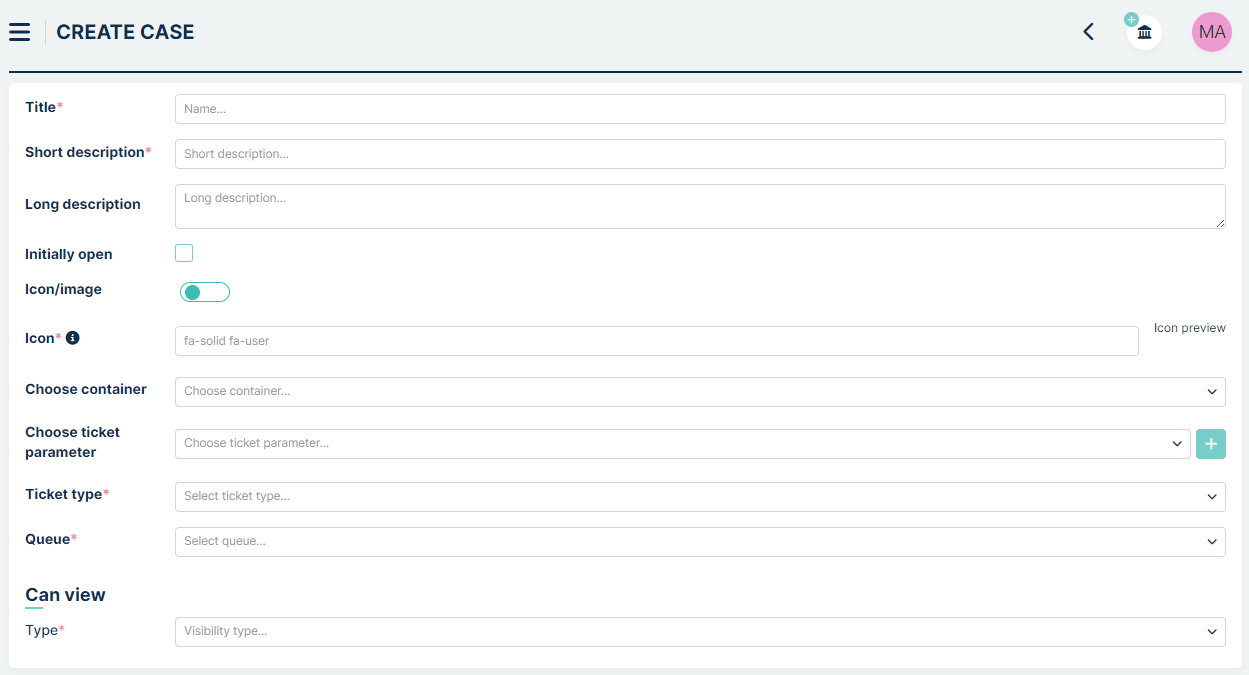
First section is Case data.

You’ll find here required fields like “Title” and “Short description”. There is also optional “Long description” field. Below that, there is an “Initially open” checkbox, which you can select if you want the case to open by default in the Customer view.
To set an icon or image for the case, click on the “Icon/Image” button. If you choose “Icon,” an additional field will appear:

If you choose to use a picture for the case, an additional field will appear:

As described in the Container section, you can add icons and pictures.
The next field is “Choose container,” where you can associate your case with a specific container.

Next we have “Show as tab” checkbox. When this setting is enabled, our case will appear as a tab for the Agent when he creates the ticket.
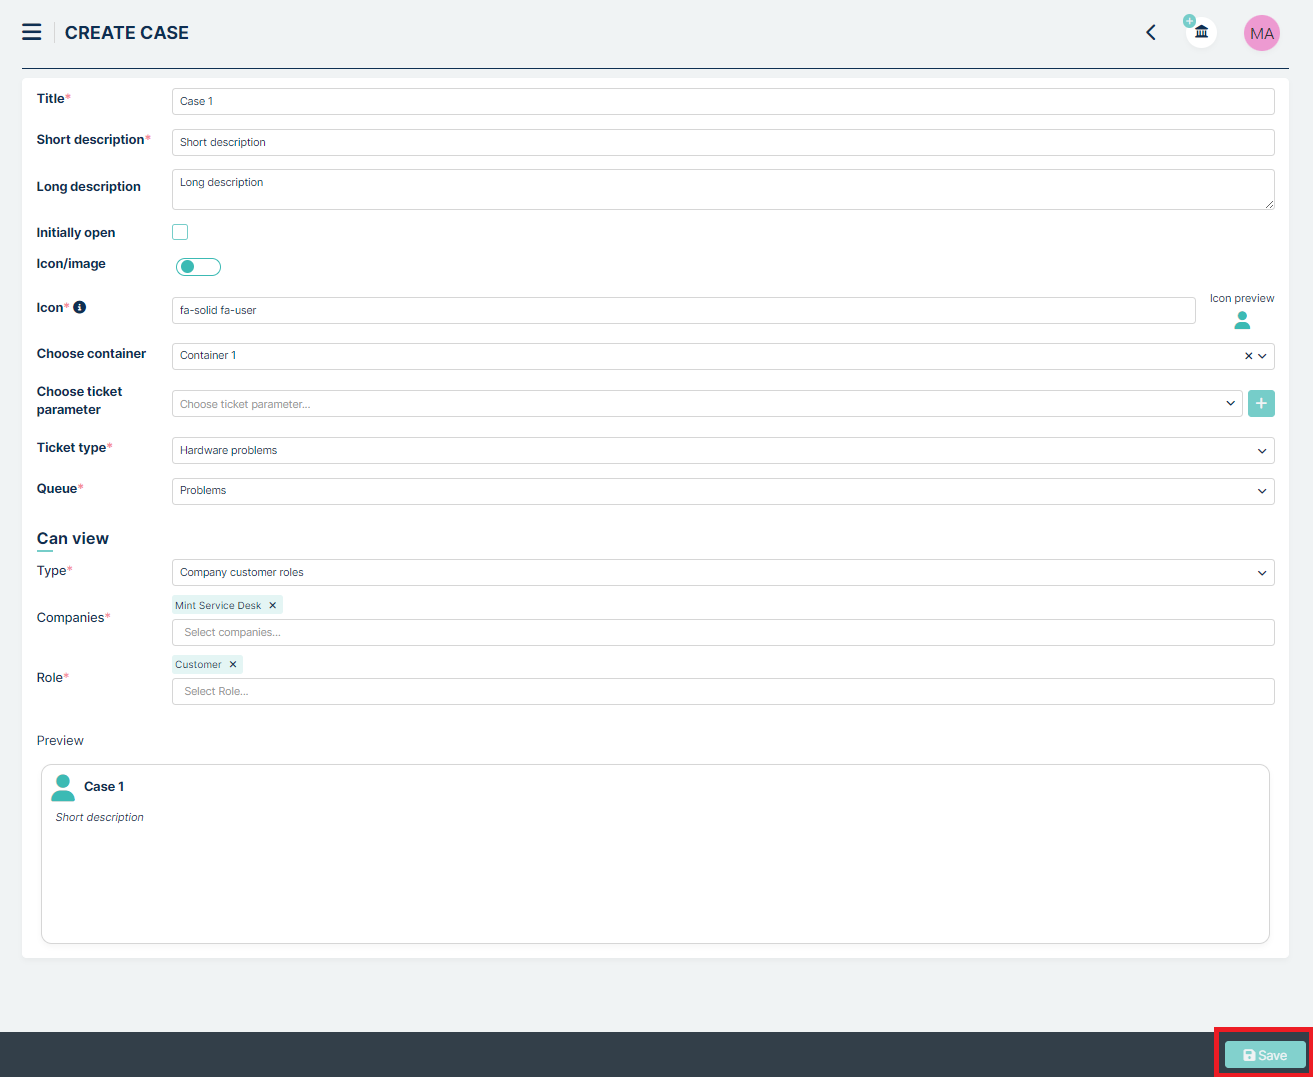
The next section is Form data.
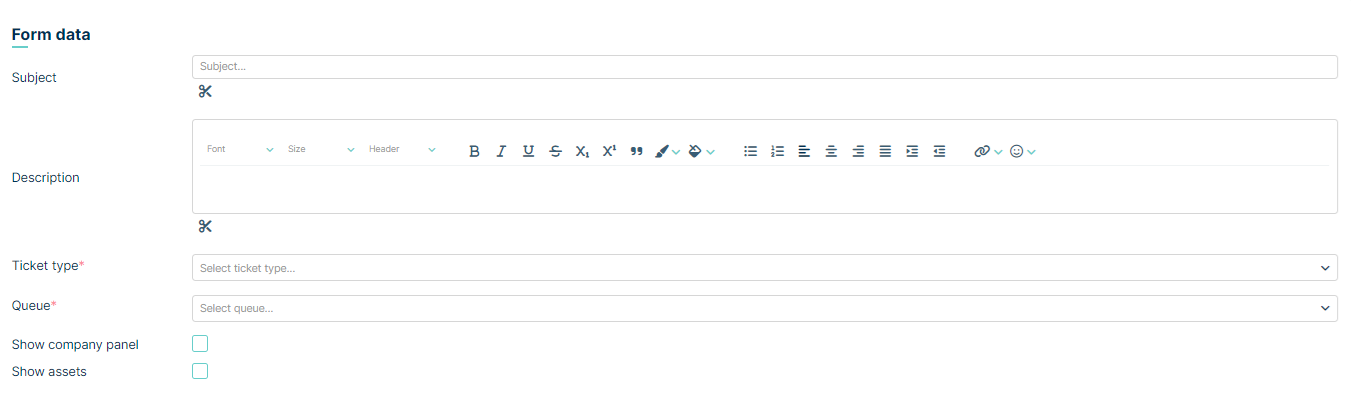
Here, we can prepare a template for our case by setting the ticket Title, Description, Ticket Type, and Queue. We can also manage the visibility of the Companies and Assets panels in the case through checkboxes located at the bottom of this section. In the Title and Description fields, we can use snippets (scissors icon), which are placeholders for values that will be filled in after the ticket is created.
Example: We want our ticket to have the title “Ticket created on:” followed by the creation date. To do this, fill in the title with “Ticket created on:” and then click on the scissors icon located below this field. Next, from the “Ticket” section, select the “Creation date” option. When creating a ticket, our title will take the form: “Ticket created on: {{TicketCreationDate}}”. However, after its creation, the snippet {{TicketCreationDate}} will be replaced with the actual ticket creation date.
You can use multiple types of snippets, including those related to custom fields.
When you fill Ticket type, you will see field “Choose ticket parameter.” Here you can select additional parameters for the case template, such as Service and Priority. To add each parameter, follow these steps:
Choose the parameter from the dropdown labeled “Choose filter parameters.”
Afterward, click on the
button located on the right
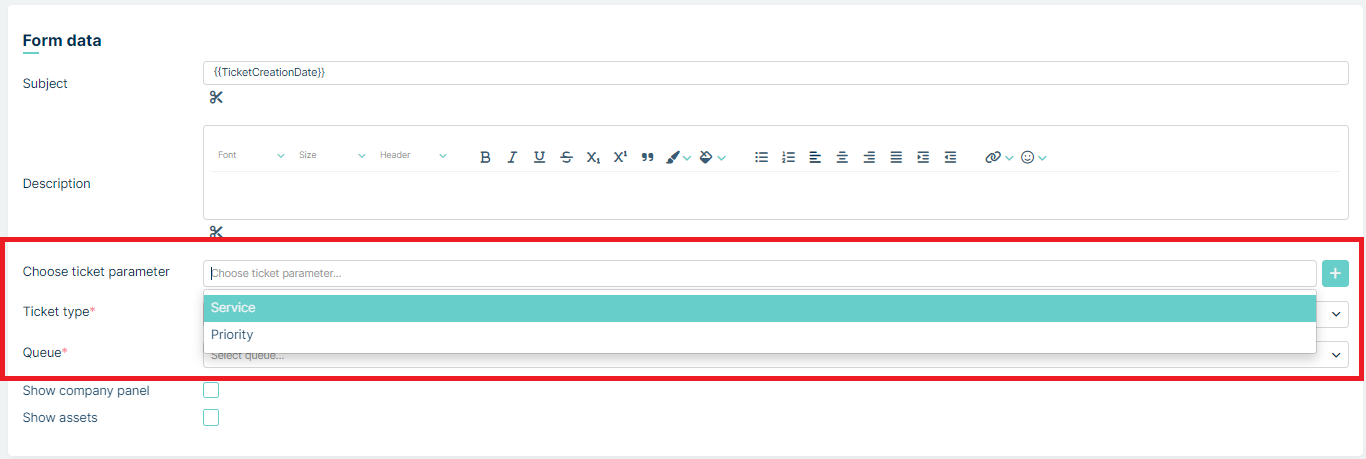
Another section is labeled Can view.

In this section, you can configure visibility settings for either all customers or specific Company customer roles and Agent roles.

The last section is Ticket attributes, and it appears when we select a Ticket type in the “Form data” section.
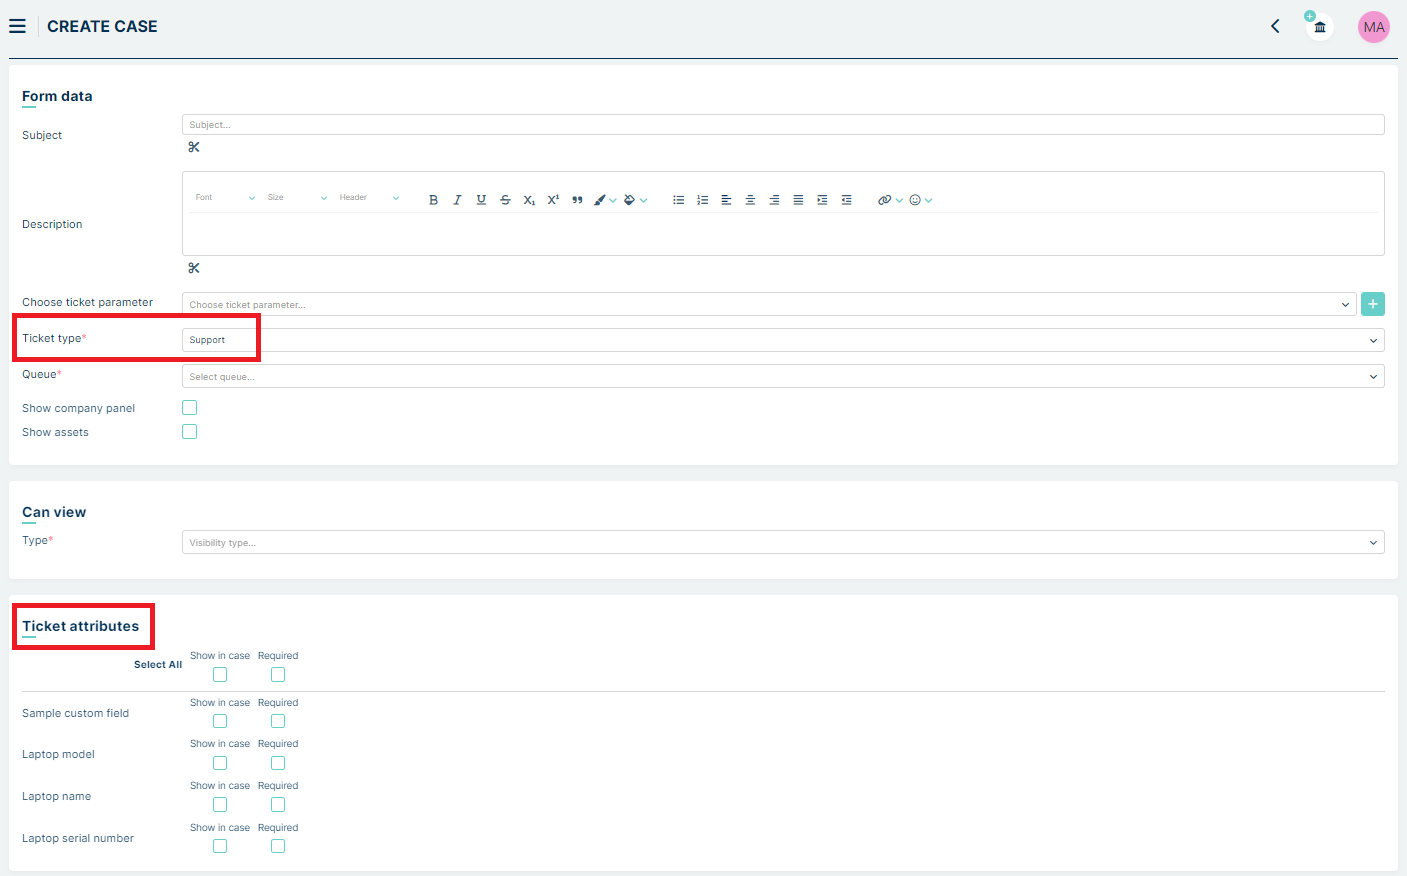
In this section, custom fields associated with the selected Ticket type are visible. Here, we can set which of these fields should be visible in our ticket and which are required. These custom fields are visible to all users specified in the “Can view” section, regardless of the permissions granted to them in the Tickets -> Custom fields section.
At the bottom of the page, you’ll find a “Preview” window. Here, you can preview how your case will be displayed in the Customer Portal for Customer role.

The final step is clicking on the button located in the bottom right part of the window.
Upon clicking, the case will be saved, and you will be directed to the Case list.
The rest part of the Customer Portal functionality has beed described in Customer section in this documentation.
SETTINGS
GENERAL
In this place of the system, you will find some subsections with configuration parameters you can adjust. There are five sections: ‘Files’ (default place after you go to Settings > General), ‘Templates’, ‘Logo’, ‘Global settings’, ‘Tickets’, ‘Time Tracker’, ‘Users’, ‘Assets’, ‘Customer portal’, ‘Mailing’, ‘Public settings’ and ‘Reports’ .
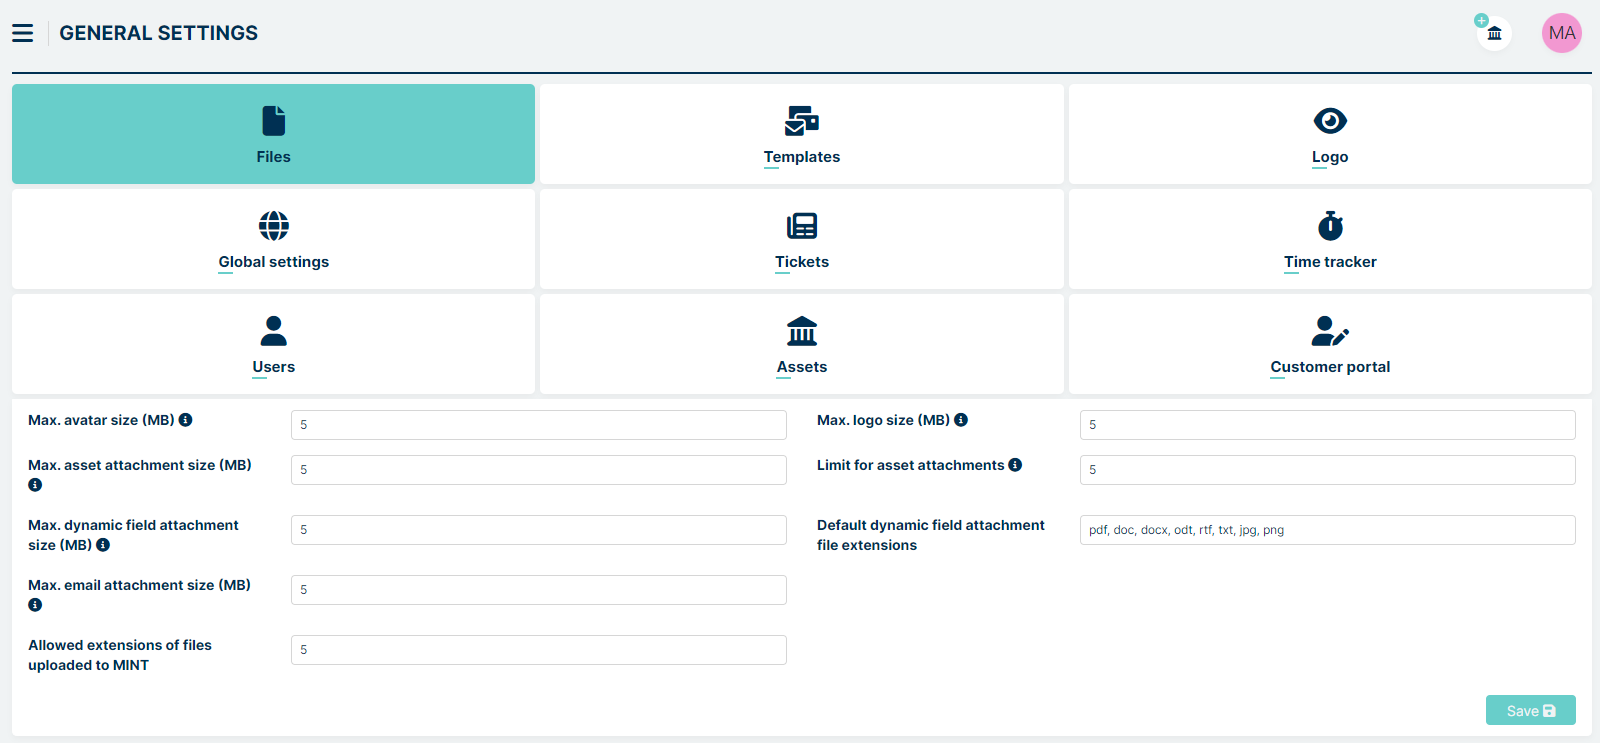
FILES
This is the default view once you go to the ‘General’ part of the ‘Settings’ section. Here you can change the sizes and limits for Avatar, Logo and Attachments. Limits are specified in megabytes (MB), except limit for asset attachent specified in numbers.
Max. avatar size (MB): the maximum size of an Avatar user can upload to profile information in the ‘User profile’ part of the account. Can be set from 1 to 5 MB.
Max. logo size (MB): the maximum size of a logo (both: sidebar and login page) you can upload in the ‘Logo’ section of the ‘General’ part of the ‘Settings’ section. Can be set from 1 to 5 MB.
Max. asset attachment size (MB): the maximum size of each attachment that can be added to an asset. Can be set from 1 to 30 MB.
Limit for asset attachments: you can define the number of possible attachments that can be added to each asset in your Mint Service Desk system. You can set it up from 1 to 5.
Max. dynamic field attachment size (MB): the maximum size of each attachment that can be added to dynamic field. Can be set from 1 to 30 MB.
Default dynamic field attachment file extensions: A list of all extensions that can be used in the attachments. For example: pdf, doc, docx, odt, rtf, txt, etc.
Max. email attachment size (MB): the maximum size of each e-mail attachment that can be downloaded to MINT from external e-mail message in ticket details. Can be set from 1 to 50 MB.
Allowed extensions of files uploaded to MINT: List of all allowed file extensions uploaded to MINT.
TEMPLATES
In this place, you can select templates for email messages that are sent by the system. Those are: ‘Email confirmation’ and‘ Reset password’.
At the very beginning of this guide, in the ‘Basics’ part, you already selected a template for the email confirmation.
Always remember that before selecting a new template here, first you need to create some components, then create a template (with those components). It was already described in Channels > Components and Templates parts of this guide.
Once you save a new template it will be available to choose from the dropdown lists.
You can set 3 types of email message templates.
Email confirmation: right here you can select a template which will be used for the email sent to a user, right after he signed up to the Mint Service Desk, to confirm a new account.
Reset password: this template will be used for the email which will be sent to a user once he chose the option ‘Forgot my password’ on the login screen.
Two-Factor authentication: in this setting you can choose the temlate that is used in verification code email message in Two-Factor autorization method
LOGO
If you want to change the logo on the sidebar or on the login page for your company logo, it is possible to do it in this place.
It is easy to change the branding of your business in MINT Service Desk by uploading the files. Click on the image located on the right side of the “Sidebar logo”.

It will open your Operational System file explorer where you need to find and select the picture you want to upload and set as a new sidebar logo. Once selected click ‘Open’ and the picture will be uploaded.
Then you can add: Text in background, Text color in background, Text size in background (1-100) and Text font in background to be displayed on the login page.
Next, you can add is Background logo and Login page background. Click on the image located on the right side of the “Background logo” or “Login page background”.
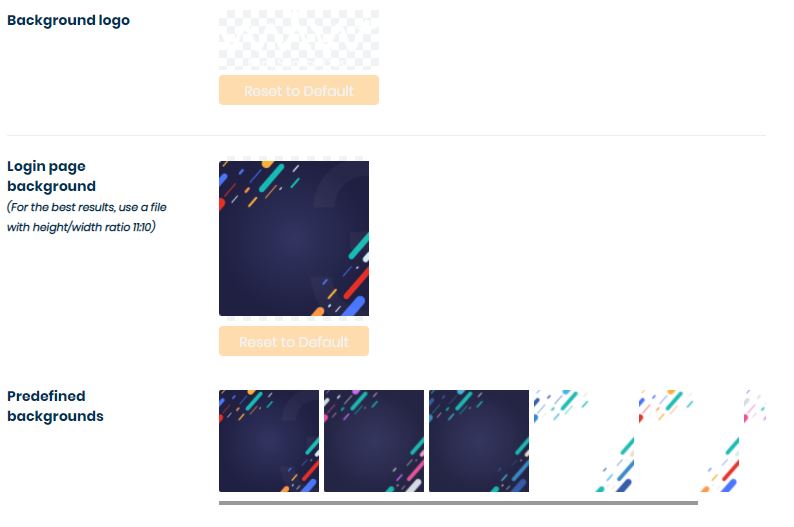
For images, it is better to upload a transparent background image and for “Login page background” it is better to use a file with a height/width ratio of 11:10.
If you prefer the default MINT Service Desk images you can always
reset both images to default values by clicking on the button 
If you select the wrong type of file (e.g. .pdf by mistake) you will receive the ‘Invalid file’ error message.

If you select an image with the size exceeding the limit set in the ‘Files’ section, you will also receive the same error message. In that case, you need either choose a smaller image or go to the ‘Files’ tab and raise up the size limit.
GLOBAL SETTINGS
In this place you can change some global settings such as: time zone, default language, tickets and articles preview options.
Time Zone: the default time zone for the system.
Default language: the default language for system users.
Browser Tab Title: allows you to specify what will be displayed in the Tab Title
Browser Tab Title: here you can set the default theme that will be set for new users of the system
Domain adresses regex Here you can set a regular expression that will filter e-mail addresses when sending reports by e-mail (sending to e-mails matching the regex will be blocked - additional settings related to this can be found under Settings => Reports tab)
Upgrade
This section contains information about the modules that are locked in the free version. When you see  means that you have access to this module.
Currently available modules are:
Access to Automation module
Access to reports
Access to grouped reports
Access to Time Tracking module
Api Access
Access to ticket conditional attributes
Access to Customer Portal
Acces to File Repository
Acces to search engine
Access to identity providers
Access to surveys
Access to content manager
Access to SQL reports
Access to Approvals module
When the module has been purchased and there is still a blank field instead of checkmark, press  button to refresh the feature flags.
When you want to upgrade your version to Enterprise, press  button.
TICKETS
In this place you can choose some additional settings for Tickets, for example set up the maximum size for Ticket attachment.
On the left side we have:
Max. article attachment size (MB): it allows you to set the maximum size of an attachment in megabytes.
Queues sorting: This option allows you to choose whether you want to sort the queues or By ordering in admin panel.
Priority sorting: This option allows you to choose whether you want to sort priorities alphabetically or By ordering in admin panel.
Assets relation: This option allows you to establish relationships to assets. You can choose from one-to-many or many-to-many.
Default answer: In this option there is a choice of two options “None” and “Reply all”. Selecting “Reply all” means that when you enter a ticket, the system will behave as if you pressed the “Reply all” button on the last article.
Selection default ticket creation type for users: This option has two choices “None” and “Enable for agents”. Selecting the first option will cause the agent to rely on the default settings and selecting the second option will appear in a new field in the agent’s profile:

Notify parent tickets about changes in child tickets: This setting allows you to define whether the parent ticket should be informed about status changes in a child ticket. Available options:
None – no notification is sent.
Private articles – a private article is added to the parent ticket.
System article – a system article is added to the parent ticket.
You also can configure the relevant notification event, related to this functionality in the Notifications section of the admin profile.
Subscription management strategy: This option allows you to select the behaviour of the Subscribe button ( ) in the ticket details. You can choose:
Allow assigning only yourself - clicking on the button allows you to subscribe yourself to the ticket
Allow agents to assign other agents - clicking on the button allows you to subscribe yourself and - if you are an Agent - also other agents to the ticket
Everyone can assign everyone - Please be careful when selecting this option, as it allows the Customer to see a list of all Agents in the system!- clicking on the button allows you to subscribe yourself and also other users to the ticket, even if You are a Customer
On the right side we have:
Extend ticket type color to ticket number: it allows you to extend the color to the ticket number. The effect of this setting can be seen on the dashboard. It is worth remembering that the ticket number will take the color that we set in Tickets / Custom fields / Tickets structure.
Auto reassigne on reply: This option allows you to determine whether a new agent should be assigned to a ticket after a response. For example: Agent 1 is assigned to the ticket, Agent 2 responds to the ticket. If the option is checked, the system assigns Agent 2 to the ticket after their response
Extend filter client by email adress This option is connected with Company user filter on agent and customer dashboard. Enabling this option allows you to search Company user by Name, Surname and/or email adress. Disabling it causes, that you can search only by Name and Surname
Show default ticket creation properties panel for agent This option can enable or hide default ticket creation properties panel in Agent profile, where each Agent can set personal default properties when creating new ticket
Show default ticket creation properties panel for customer This option can enable or hide default ticket creation properties panel in Customer profile, where each Customer can set personal default properties when creating new ticket
Enable search engine This option allows you to enable improved searching in filters on dashboard (available in Mint Enterprise version)
Enable merge tickets This option allows you to enable Merge Tickets in Ticket Details in Agent role
Show preview: it allows you to choose if users, by default, should have the preview of tickets and articles enabled (checked box) or not (empty box).
Show article resend button: it allows you to resend email article with sending error in Articles section in ticket details
In the Ticket form configuration section you can configure what things will be displayed when creating a ticket.
User type is about specifying who this configuration should go to: To a Customer or an Agent. You can choose which values should be visible on ticket creation and which should be visible on ticket details. Some of these settings have only one option to set.
Below are the values possible to configure (can be different for agent and for customer):
Assets
Assignee
Tickets relation
Customer portal (channel in ticket details)
Queue
Priority
Company
Company user
Ticket type
Service
Contract
E-mail tickets
Checking the E-mail tickets option will add an additional tab when creating a ticket:
Pressing this option will change the Assign company user tab to E-mail recipients with two fields, TO and CC, in which you need to enter the e-mail addresses to which you want to send the ticket.
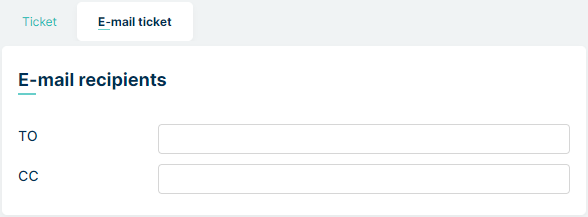
Default ticket creation type
The selection under Default ticket creation type indicates which channel should be the default when creating a ticket.
You can choose some of the values are required or not (for example Assets, Priority)
If you uncheck Queue and Ticket type on ticket creation, you will have available ‘Default value’ column to choose default value for them.
In the Ticket search default settings section, you can configure default settings to search for tickets.
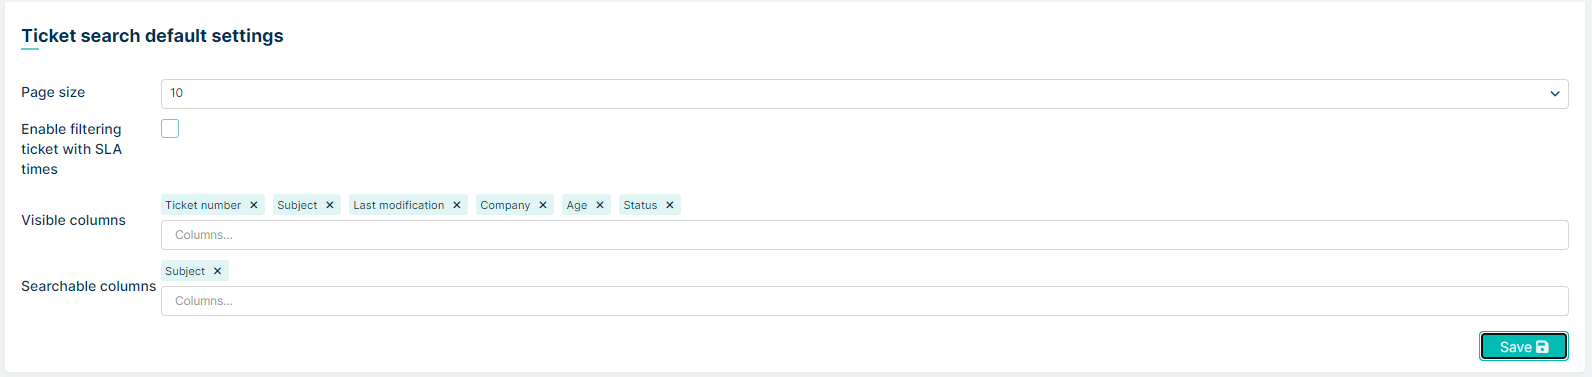
Four values are possible to configure:
Page size: Allows you to determine how many submissions should be on the site.
Enable filtering ticket with SLA times: Enables filtering of tickets with SLA time checkbox on Agent dashboard.
Visible columns: This setting allows you to determine which columns should be visible on the dashboard.
Searchable columns: This setting allows you to determine which columns should be searchable by default on the dashboard.
Section My Tickets you can enable or disable “My Tickets” feature in Agent and Customer

In the Signature section, you can configure signature settings.

Two values are possible to configure:
Signatures Policy
Only System signatures - This option only allows system signatures, which are selected in the “System Signatures” option.
Only Queue signatures - This option allows you to select the signatures that have been assigned to given queues.
System na Queue - This option is a combination of Only System signatures and Only Queue signatures.
All types of signatures - This option allows you to select all signatures in the system.
System Signatures - Here you assign what signatures will be referred to as system signatures.
In the Ticket autoresponse section, you can configure autoresponse for a ticket.

Channel type - You choose which channel you want the autoresponse to go through.
Internal
Email
Autoresponder policy - You select the policy for the autoresponser, that is, whether the autoresponser should be selected by queue or by admin selection.
Selected by queue
Set on admin settings
Autoresponder MailBox
TIME TRACKER
I this place you can edit some options for the time tracker like:
choosing ‘spent time type’,
‘disable estimation’
‘disable spend time’
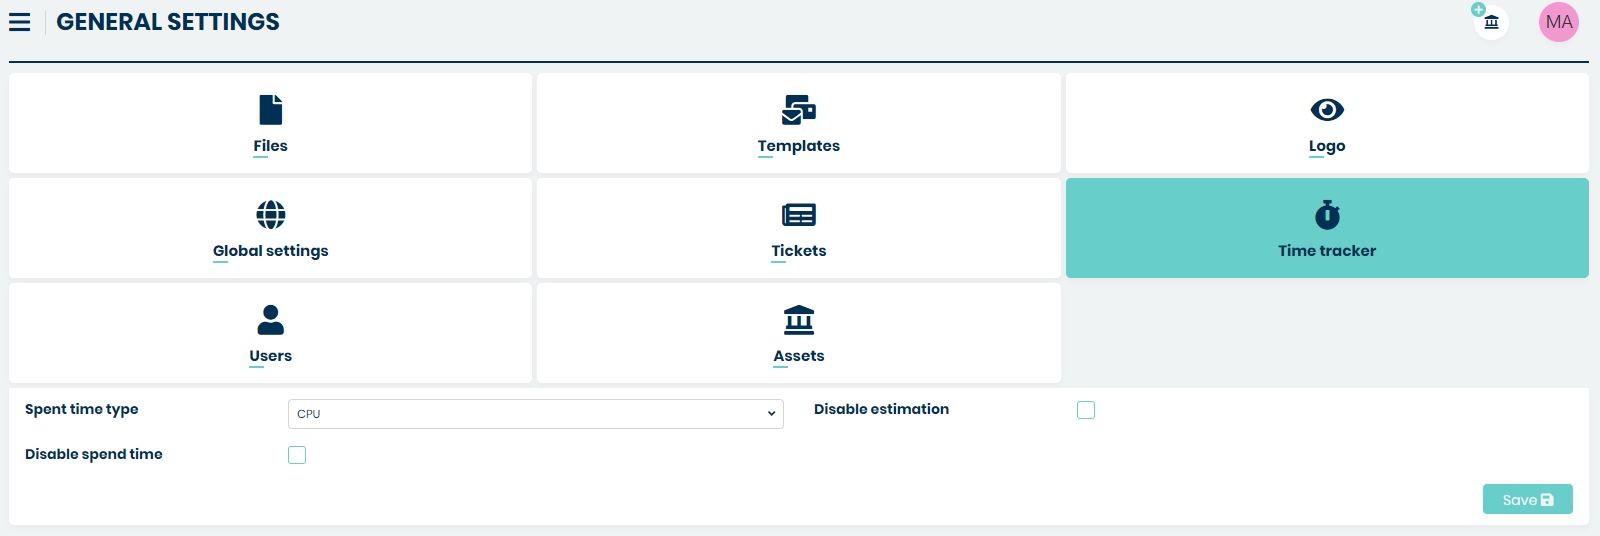
Spend time type: it allows you to change the type of time spent. You can add such types in Fields settings -> Dictionaries
Disable estimation: it allows you to disable or enable the estimation visible in the ticket preview
Disable spend time: it allows you to disable or enable the spent time visible in the ticket preview
USERS
In this place you can edit option about Users.
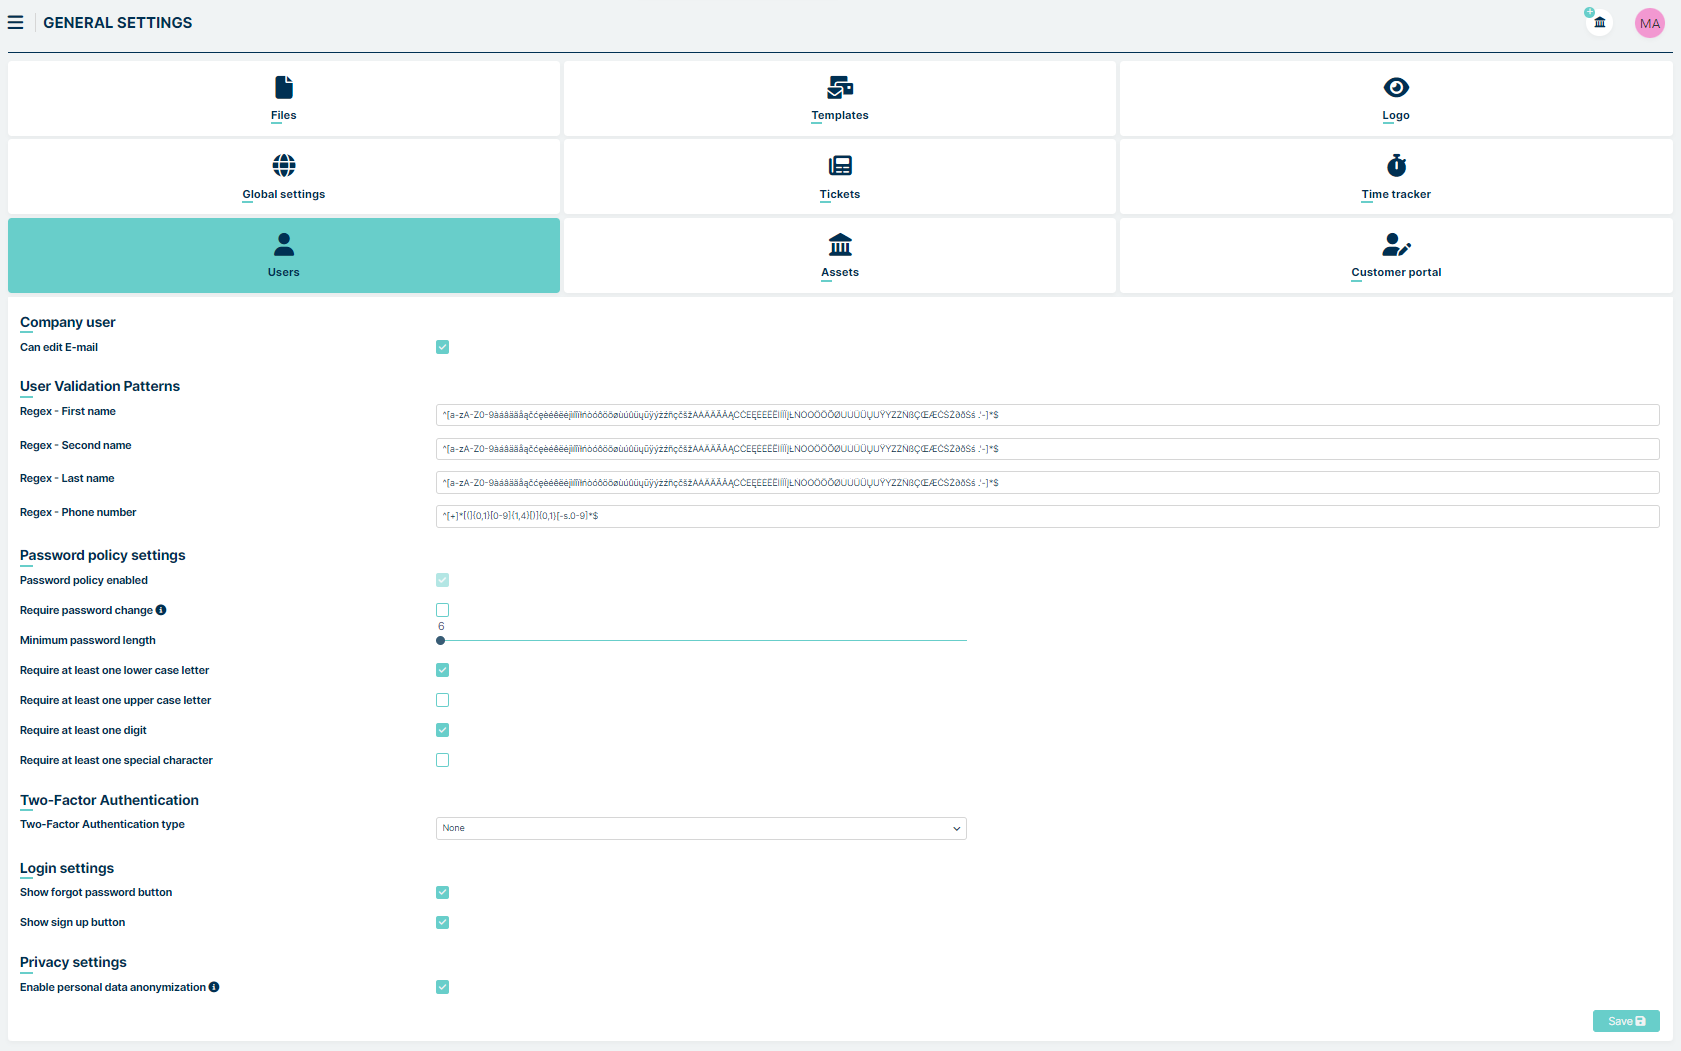
Company user section:
Can edit E-mail - Enabling this option will allow the user to edit their E-Mail address.
Default customer role - Here you can select which company and role should be automatically assigned to the new user registering via the website. Blank fields mean that the new user will be marked as Unassigned
User Validation Patterns section:
Regex - First name - Here you select the regex for the first name field
Regex - Second name - Here you select the regex for the second name field
Regex - Last name - Here you select the regex for the last name field
Regex - Phone number - Here you select the regex for the phone number field
Password policy settings - Here you can set requirements for passwords created and changed by all users, including Admin.
Password policy enabled - This option is always enabled and cannot be modified
Require password change - Here you can set to force password change for users whose passwords do not meet the new policy requirements
Minimum password lenght - Here you can set password lenght from 6 to 30 characters
Require at least one lower case letter - Here you can set requirement to use at least one lower letter in password
Require at least one upper case letter - Here you can set requirement to use at least one upper letter in password
Require at least one digit - Here you can set requirement to use at least one digit in password
Require at least one special character - Here you can set requirement to use at least one special character in password
Two-Factor Authentication section:
Two-Factor Authentication type - Here whether to have two-step authorization or not. At this time, only the email option is available.
Login settings section:
Show forgot password button - Unchecking this checkbox will remove the “Forgot my password” option from the login screen.
Show sign up button - Unchecking this checkbox will remove the “Sign up” option from the login screen.
This is what the login screen looks like after unchecking both checkboxes:
Privacy settings - Here you can enable or disable functionality to anonymize user data in user profile
ASSETS
In this place you can edit option about Assets.
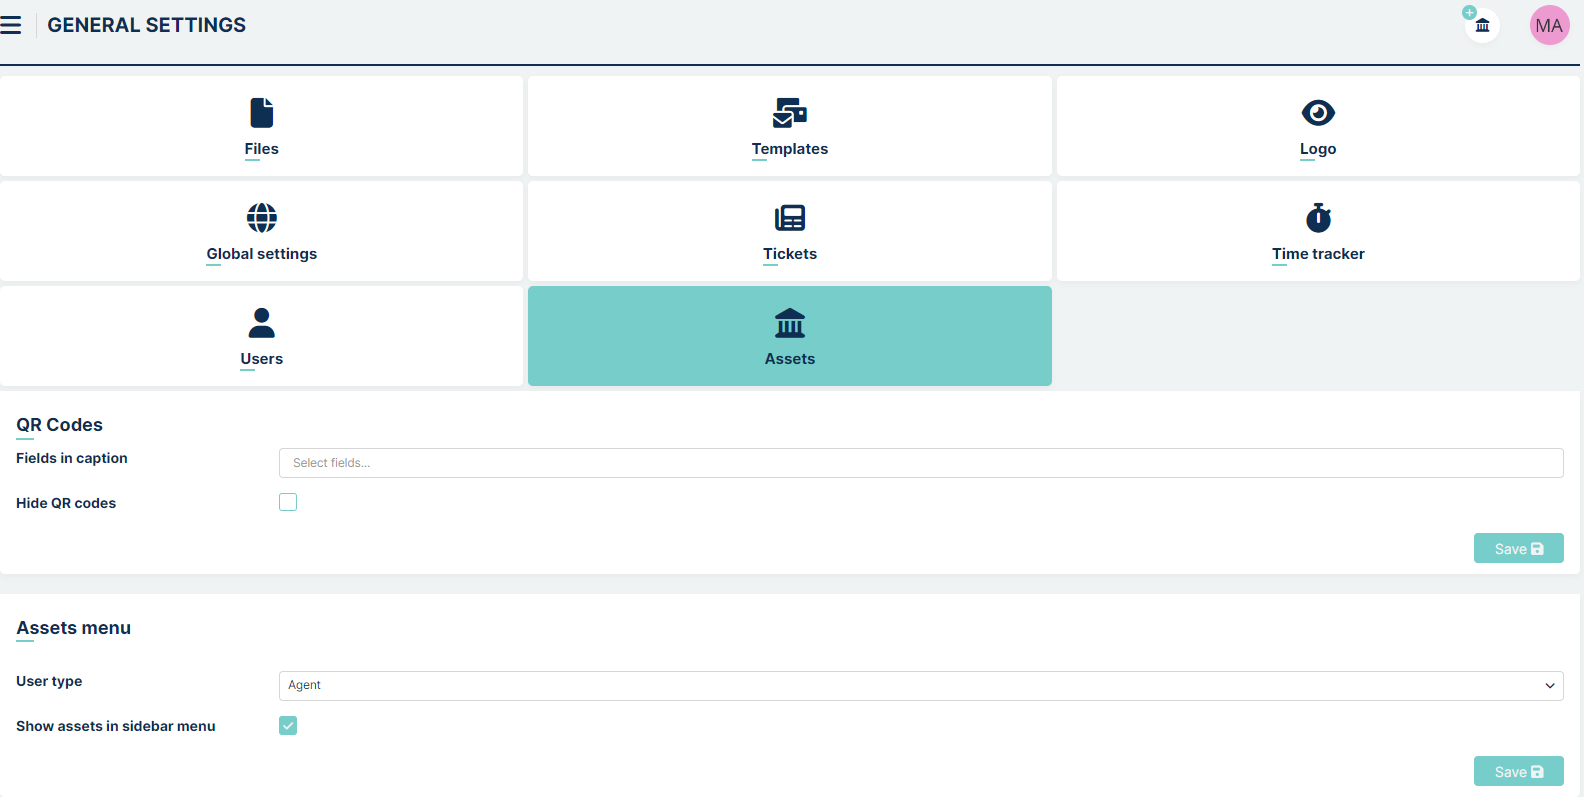
In the QR Codes section you can edit what information should be included in the QR Code printout.
If you don’t need the QR code in assets then you can disable it by disabling Hide QR codes checkbox
Assets menu section:
User type: Here you choose who you want the setting to refer to. You can choose between agent and customer.
Show assets in sidebar menu: Here you choose whether the asset should be visible on the sidebar.
Enable My Assets: Here you choose whether the ‘My assets’ should be visible on the sidebar. The ‘My Assets’ tab is visible in the Agent and Customer profiles. It displays the assets that are assigned to the logged-in user.
CUSTOMER PORTAL
Here you can set whether the Customer Portal (tab in the Customer profile) is to be visible or not. In addition, you can select whether the Dashboard or the Customer Portal should be visible by default when the Customer is logged in
MAILING
In this part of the system, there is a setting for tickets created from the e-mail channel. In case that ticket is sent on behalf of another person (functionality for example in Outlook), we decide whether the ticket is to be set up on the person who sends the email or the person on whose behalf the email is sent. The person we set up is assigned as Customer in the ticket.
PUBLIC SETTINGS
The settings of this tab are related to the Whistleblower system (different product of OPGK Software) and a description can be found in the documentation for this system. These settings are not used in Mint Service Desk.
REPORTS
In this place you can edit option about Reports.
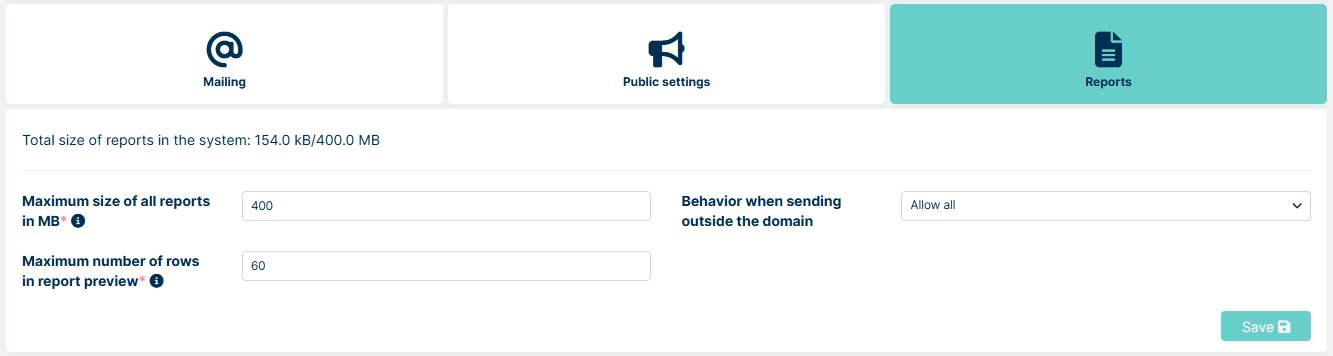
Reports section:
Maximum size of all reports: Here you can set the maximum permissible size of all reports, beyond which the system will prevent further reports from being generated. The current report size is displayed in the line above this setting
Maximum number of rows in report preview Here you can set the maximum number of rows presented when the Agent clicks on the report preview
Behavior when sending outside the domain: Here you can set whether reports are to be:
sent to all email recipients
sent taking into account the regex filter from the Settings => Global settings tab from the Domain adresses regex field
not sent (blocked)
API
In this section, you can view, create, edit, or delete all the API Clients for Mint Service Desk.
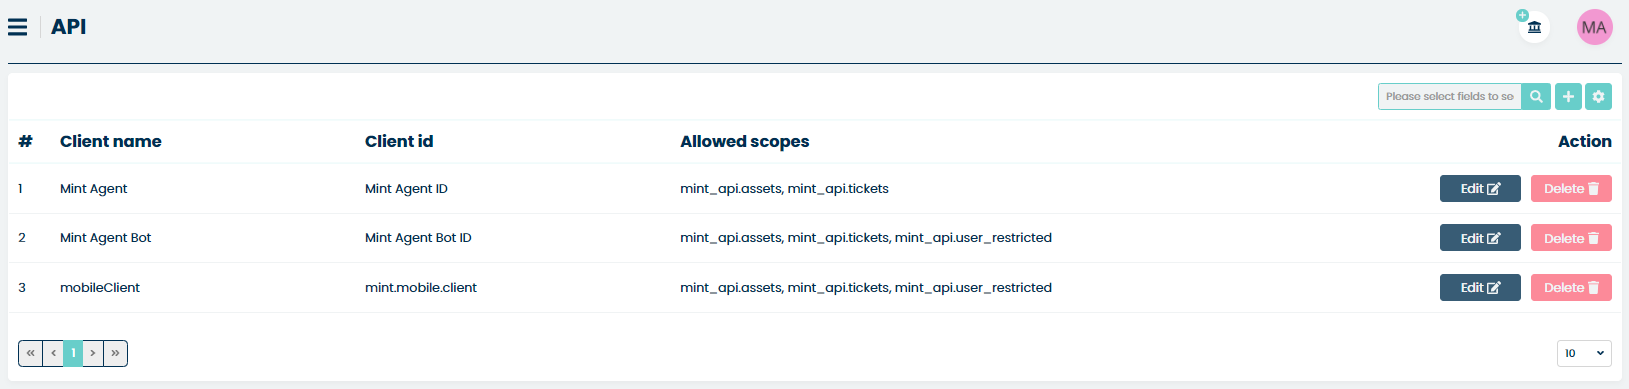
To create a new API client, click on the button located on the
right side, next to the search field. You will be moved to the ‘API’
view where you need to fill some necessary data.

Enter the following required information:
‘Client id’ – API Client identifier,
‘Client name’ – API Client name.
You also need to choose the desired scopes (‘Allowed scopes’). Those scopes specify the set of endpoints to which the API Client will also have access to.
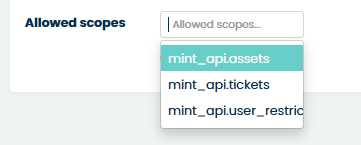
In the Mint Service Desk, you have three available scopes to choose from:
‘mint_api.assets’ – gives access to edition and viewing the MINT Service Desk assets
‘mint_api.tickets’ – gives a possibility to view information about tickets, add comments and make other changes
‘mint_api.user_restricted (Require user)’ – adds additional possibilities to the scopes mentioned above. It unblocks, among others, creating tickets and adding new articles
If you select ‘mint api.assets’ and/or ‘mint api tickets’ you will be
able to save the new API Client. To do so just click the
button.
CREATING A REQUEST
To create a query you first need to prepare a client. To do this, press button.
The client allows you to log in in a machine to machine fashion. That is, using client_id and client_secret we are able to log into MINT and execute any query.
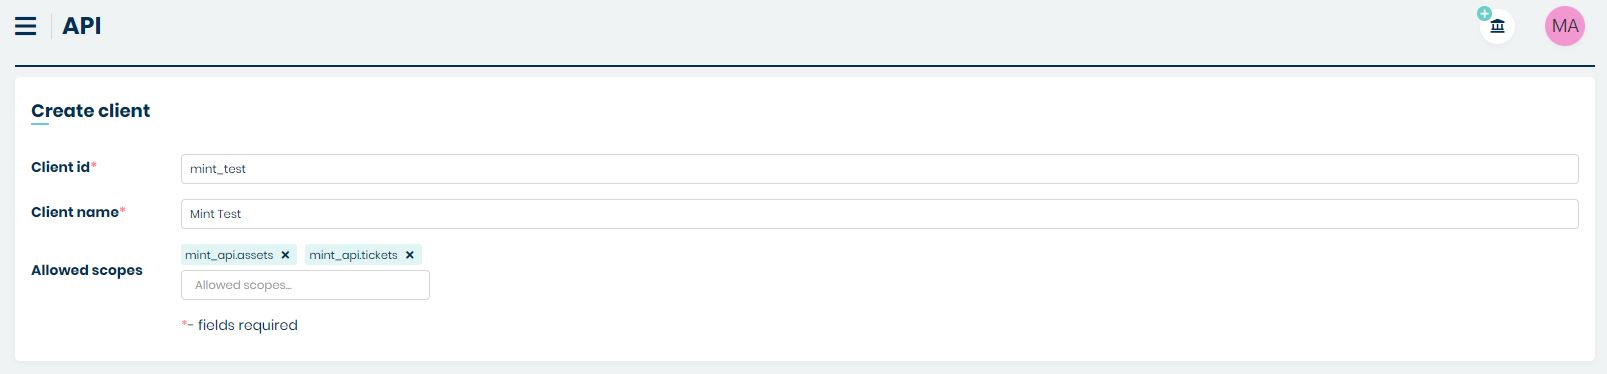
Client id (Remember not to use spaces between words but use e.g.‘_’)
Client name
Allowed scopes (We will focus on two scopes: mint.api_assets and mint_api.tickets)
Scope is the space to which integrators have access via a token that will be generated.
After adding the scopes and pressing button, a Client secret is generated which needs to be copied and saved.
Remember that when the secret is generated again, the secret will no longer be valid.
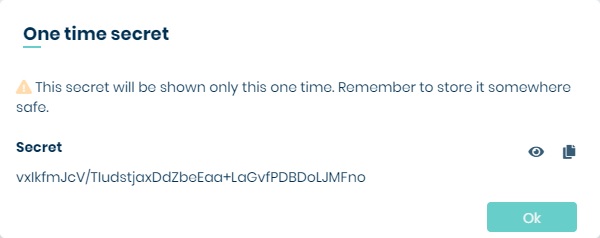
I will use Postman to get the token. To get started, turn on the program and add a new connection. From the available options, select the POST method. And in place of address, type the address to your mint and add ‘/connect/token’ (in my case it will be ‘https://rcmintsd.opgksoftware.com/connect/token’)
Now you need to configure four fields:
grant_type - here add your client_credentials
client_id - here, use the client_id you provided during API configuration.
client_secret - here use the client_id that I got after configuring the API.
scope - here, use the scopes you specified when configuring the API.
Remember to do this in ‘x-www-form-urlencoded’.

Now press the ‘Send’ button to receive the token.

Copy the token received and you can test it on your_address_to_mint/swagger/index.html
To start testing first press  button. In the field that appears, type ‘Bearer your_token’
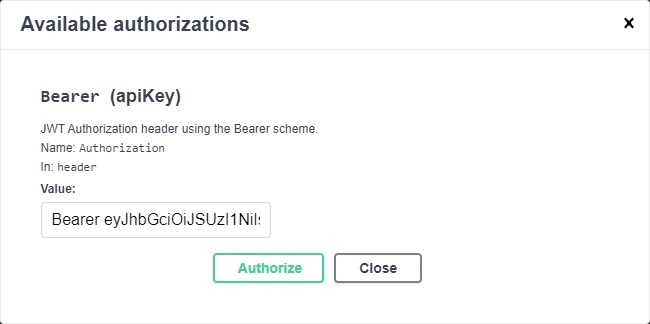
Then press button again.
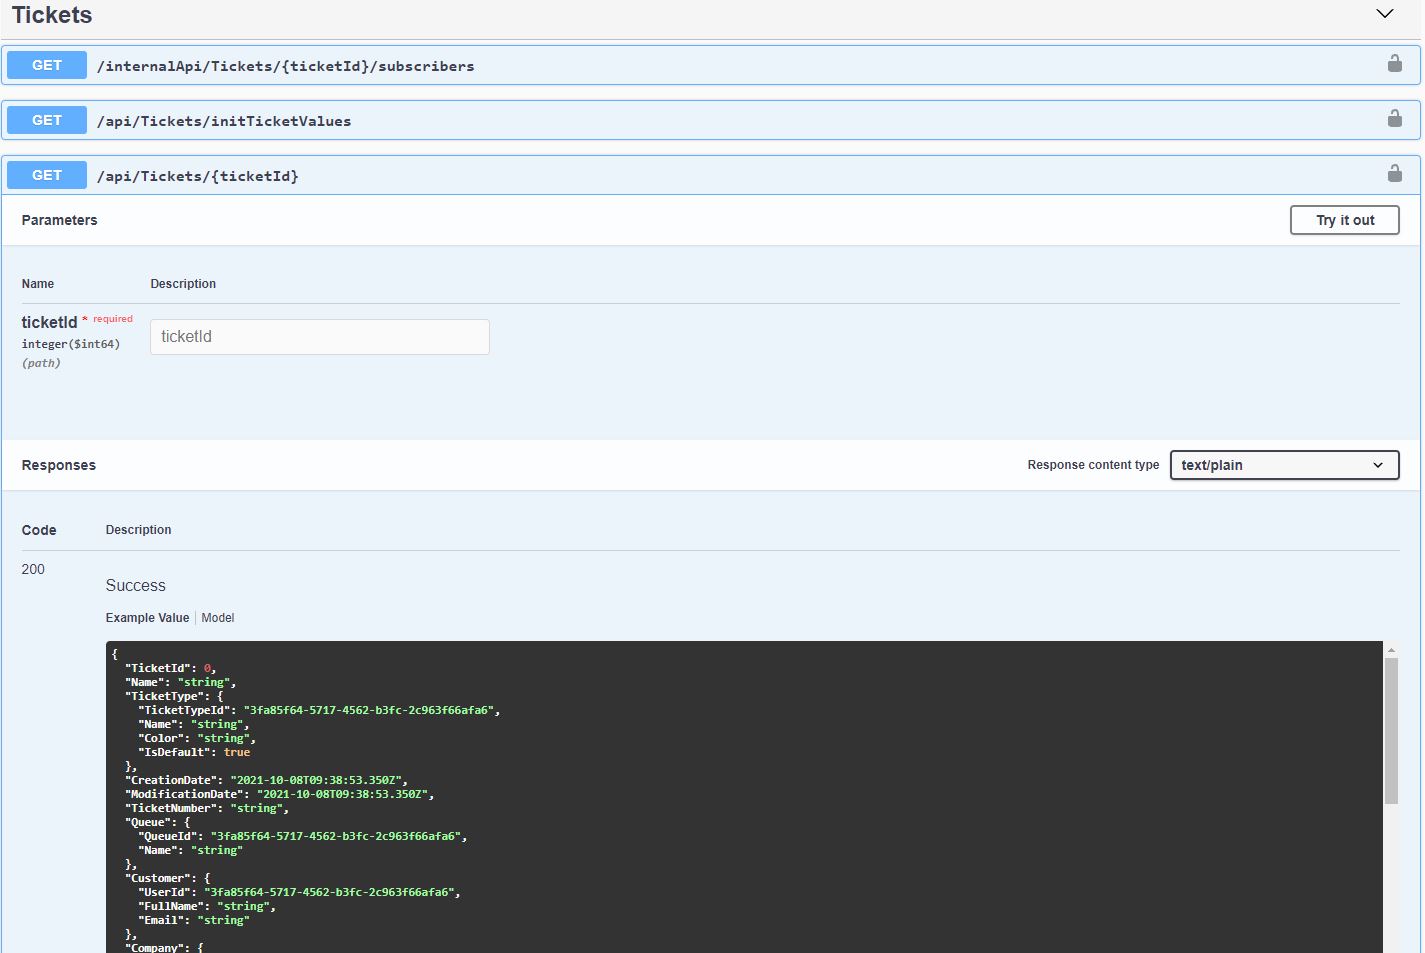
Now you can test if the token works. Go below to the ‘Tickets’ section and select ‘/api/Tickets/{ticketId}’.
You will see the example that will be returned after testing. Press  button. Fill in the ‘ticketid’
field by typing the id of the ticket you want to preview. Then press
button. Fill in the ‘ticketid’
field by typing the id of the ticket you want to preview. Then press  button.
You don’t have to test it on swagger. You can do the same in Postman by selecting the GET method and typing ‘page_address/api/Tickets/{ticketId}’ Example: https://rcmintsd.opgksoftware.com/api/Tickets/{ticketId}.
CREATING A BOT USER
While creating an API Client you can select the third ‘Allowed scope’: ‘mint_api.user_restricted (Require user)’ from the list of available scopes.

If you do that you will have to create a Bot user. Bot account is a type of account on behalf of which requests that require a user are sent.
The moment you select the abovementioned scope a new part of API view ‘Create bot user’ will be loaded.
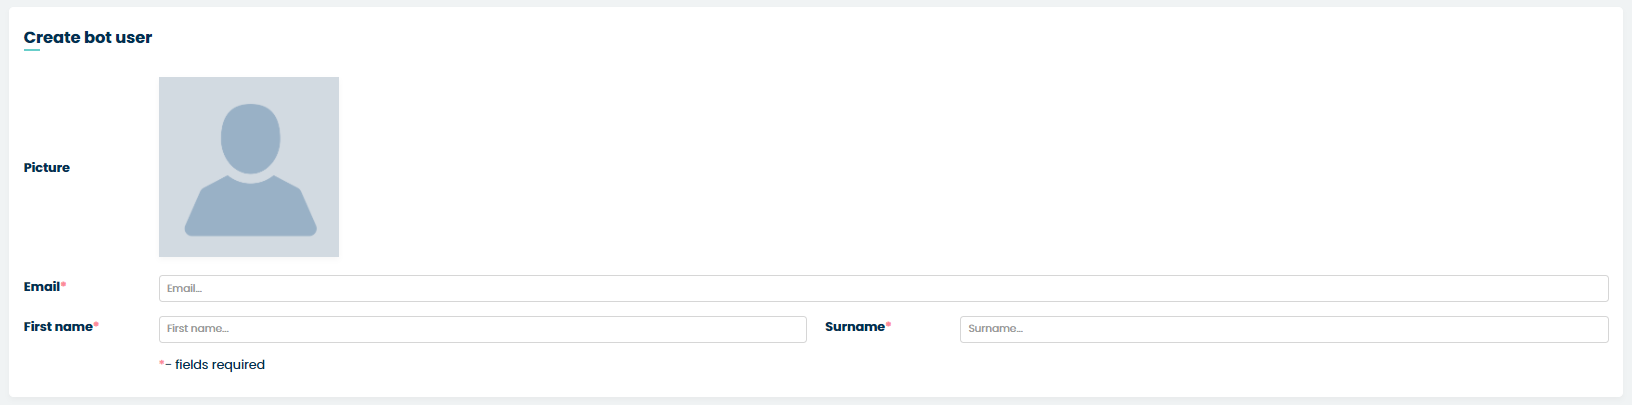
Now, you need to type ‘Email’ (the correct email address), ‘First name’
and ‘Surname’. Once you finish, click on the button. You will
see an additional window ‘One-time secret’.
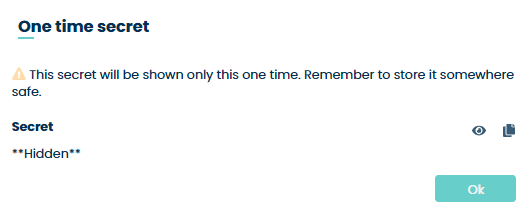
By default, the ‘Secret’ is hidden. To see its content, you
need to click on the  icon. Now write down, remember, or copy
the ‘Secret’. You also can click the
icon. Now write down, remember, or copy
the ‘Secret’. You also can click the  icon to copy the secret
to your clipboard and paste it e.g., to some text editor.
icon to copy the secret
to your clipboard and paste it e.g., to some text editor.

A secret is basically a key registered for the calling web service.
Once you saved this secret just click  button and API Client
(with Bot user) will be created.
button and API Client
(with Bot user) will be created.
After creating a new API Client, you can always either change anything
inside it ( button) or even delete it from the system
( button).
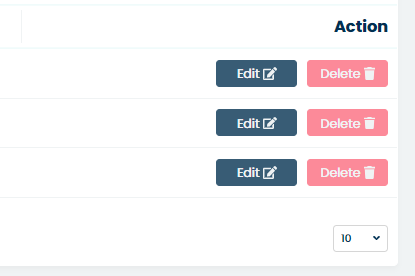
When you decide to edit the content of API Client you will see that on the right side there is a new section called ‘Secrets’. Right here you will see the list of ‘Secrets’.
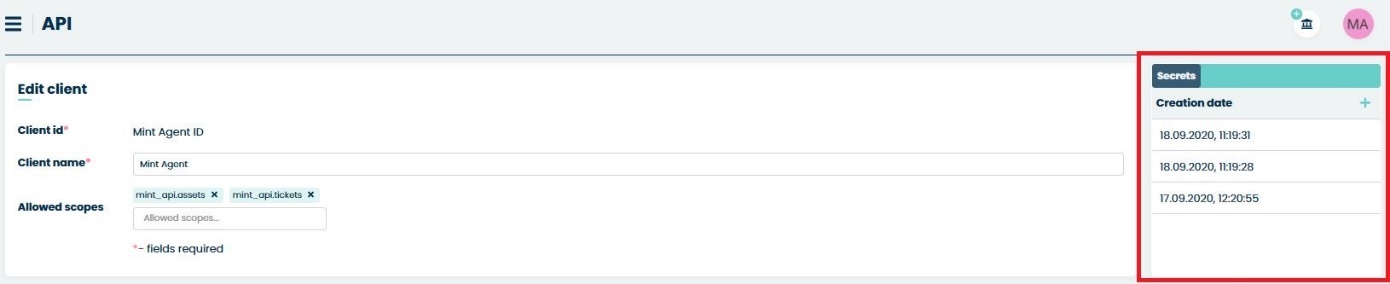
Here, you can generate a new secret. Simply click the  button
and copy/write down/memorize the secret just like you did when you were
creating a Bot user.
button
and copy/write down/memorize the secret just like you did when you were
creating a Bot user.

You can also delete any of them by moving the mouse cursor over one
desired position. A new  button will appear. Just click on it
and the secret will be deleted.
button will appear. Just click on it
and the secret will be deleted.